File Explorer is a helpful utility to locate and access files and directories on your computer. However, in some cases, files may not appear in File Explorer due to system errors or misconfigurations. This MiniTool post provides seven solutions to fix the File Explorer not showing files problem on Windows.
File Explorer not showing files on Windows 10/11 is not an unusual problem. An example from SuperUser illustrates this problem:
“File Explorer not loading files and previews. I’m surfing files with the explorer, and at some point, the explorer literally starts not showing files in every folder. When this happens, if I close the explorer window and I open it again, I can’t see anything.”superuser.com
Problem: File Explorer Not Showing Files on Windows
File Explorer is a built-in file management application on Windows that can help you locate and access your files and folders.
Sometimes, your files and folders may be missing in the File Explorer. If your File Explorer doesn’t show all files, you need to distinguish between Files Not Showing and Files Not Existing.
Scenario 1. Files Not Showing:
This refers to an issue with File Explorer that might fail to display files and folders, due to incorrect settings.
However, the files and folders are present and can be accessed through the command line.
Scenario 2. Files Not Existing:
It indicates that the files and folders are actually lost. In this case, you need to rescue your data immediately.
If you aren’t sure which situation you are in, learn the causes of this issue first.
After understanding the potential reasons, try the outlined solutions to fix the File Explorer not showing files issue.

Reasons for File Explorer Not Showing Files
There are some common reasons why File Explorer doesn’t show files:
- Hidden Files: Files and folders may be hidden due to folder settings, user actions, malware infections, and more.
- File Search Index Issues: Problems with the file search index can also lead to difficulties in finding files, as a properly indexed archive allows for efficient searching based on keywords or dates.
- Accidental Deletion: You may unintentionally delete your files or folders.
- Malware: Sometimes, a virus or malware infection can lead to data loss or hide files.
- Etc.
After learning the causes, continue to the next part to resolve the problem.
How to Fix File Explorer Not Showing Files on Windows
If you notice that the File Explorer is not showing files on Windows, try some basic solutions:
- Refresh File Explorer: Right-click the space within the File Explorer and select Refresh.
- Reboot the PC: Restart your computer to see whether your files are now visible in File Explorer.
If they don’t work, refer to the following solutions to solve the File Explorer not showing files issue.
Method 1. Show Hidden Files
As mentioned above, files and folders may be hidden due to multiple reasons. In this case, you need to enable the option to show hidden files to make them visible.
Here’s how to do it:
Step 1. Press Win + E to open the File Explorer.
Step 2. Go to the View tab and check the box for Hidden items.
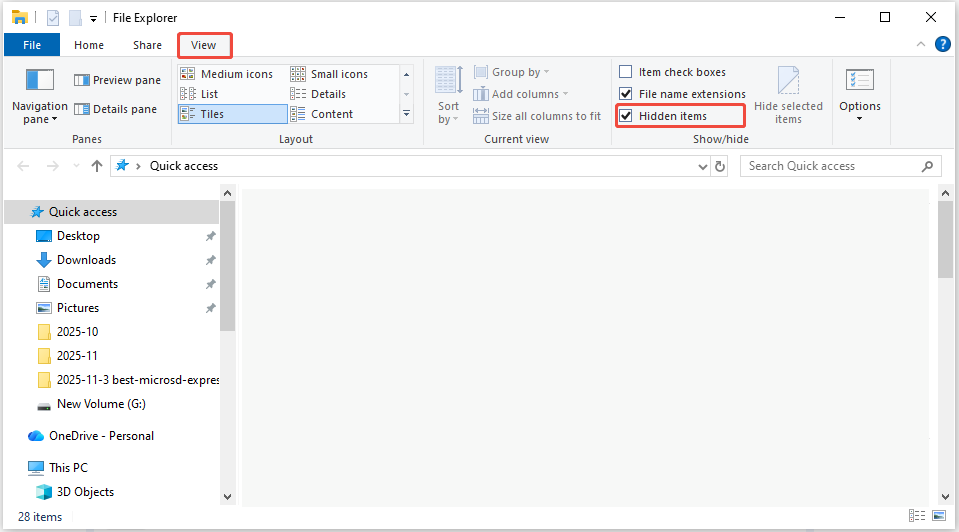
If there are no files shown, restart the File Explorer to fix the File Explorer not loading files issue.
![[SOLVED] Show Hidden Files Button Not Working on Windows 10 - Fix](https://images.minitool.com/minitool.com/images/uploads/2018/11/win10-show-hidden-files-not-working-thumbnail.jpg)
Method 2. Restart File Explorer
When Windows Explorer encounters issues, it can disrupt its functionalities, causing problems like incorrect file display or unresponsiveness.
These issues may arise from corrupted system files, software conflicts, or memory overload, negatively impacting file management efficiency.
To resolve the problem, consider restarting File Explorer through Task Manager. Follow these instructions to do it:
Step 1. Press Ctrl + Shift + Esc to open Task Manager.
Step 2. In the pop-up window, right-click on Windows Explorer and select End task.
Step 3. Click on File in the upper left corner, then choose Run new task.
Step 4. Type explorer.exe into the box and then press Enter.
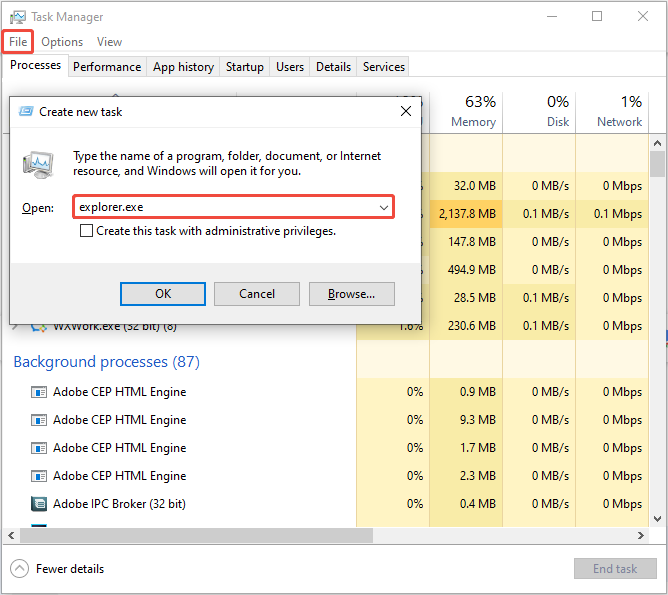
This method will quickly restart File Explorer. After that, you can verify whether the problem with Windows Explorer not showing files has been fixed.
If this solution doesn’t work, clearing the icon cache may help you fix the issue.
Method 3. Clear the Icon Cache in Disk Cleanup
Windows will save a cache for file thumbnails and images, which are helpful for you to identify the file types quickly.
However, if this thumbnail cache becomes corrupted or is missing, the file or folder loading process may take longer, or File Explorer might not display all files.
Therefore, clearing the thumbnail caches is essential. Here is the breakdown to clear the icon cache in Disk Cleanup:
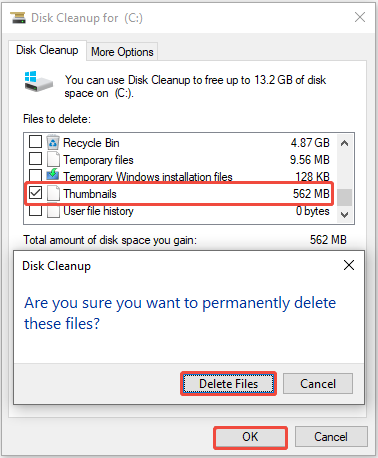
Step 1. Click on the Search icon in the taskbar, type Disk Cleanup in the search box, right-click on it, and select Run as administrator.
Step 2. In the Drive Selection pop-up, select the C: drive and click OK to proceed.
Step 3. In the Disk Cleanup window, check the Thumbnails box under the Files to delete section, and then click the OK button.
Step 4. When the confirmation window appears, click on the Delete Files button to remove the thumbnails.
If the Windows Explorer is still not showing files, force rebuild the search index to fix it.
Method 4. Rebuild the Search Index
Windows 10 keeps an index of all your searches to provide quick access to search results. If the database entries become corrupted, it can lead to slow search processes or missing or incorrect results.
In such situations, you may need to delete and recreate your search index. The steps are as follows:
Step 1. Press Win + R to open the Run dialog, type control /name Microsoft.IndexingOptions in the box, and press Enter.
Step 2. On the Indexing Options page, click the Advanced button located at the bottom.
Step 3. In the Advanced Options page, under Troubleshooting, click the Rebuild button.
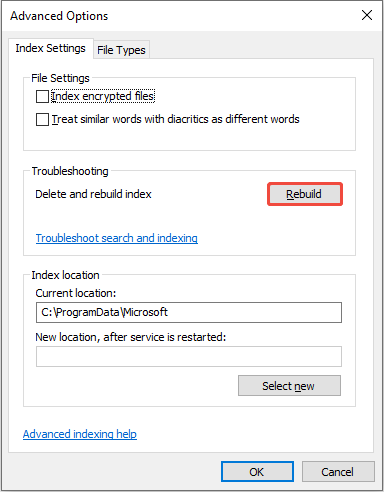
Step 4. When the Rebuild Index window appears, click the OK button.
The rebuilding process might take a while to finish. Once completed, close the window and open File Explorer to see if your files are visible.
If not, run the System File Checker to scan and repair corrupted system files.
Method 5. Run System File Checker
If your computer has damaged system files, File Explorer might fail to find certain files. You can utilize the System File Checker (SFC) to scan and fix Windows system files.
Here’s how you can do it.
Step 1. Press Win + S to open the Search box, type CMD, right-click on Command Prompt, and select Run as administrator.
Step 2. When the UAC prompt appears, click the Yes button to proceed.
Step 3. Type sfc /scannow in the pop-up window and press Enter.
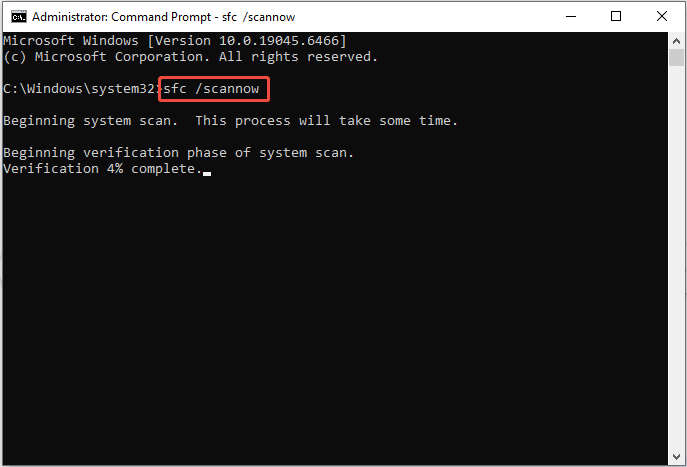
After the process is finished, reboot your computer and launch File Explorer to see if the files are visible.
Method 6. Update Windows
An outdated Windows OS may cause some system glitches, such as File Explorer not showing files. To avoid potential problems, regularly update your computer by following these instructions:
Step 1. Press Win + I to open Windows Settings. Then, select the Update & Security option.
Step 2. Navigate to the Windows Update section and click on the Check for updates button.
Step 3. It will automatically seek the latest updates. If an update is available, click on the Download & install button to initiate the download.
Once completed, open your File Explorer to see if the files are visible.
Method 7. Scan for Malware
Sometimes, malware may disrupt system functions, causing files to be hidden or preventing File Explorer from displaying them correctly.
To check for malware on Windows, use the built-in Windows security application, Windows Defender, which offers strong protection.
Here’s how to do it:
Step 1. Click the Windows search icon in the bottom-left corner.
Step 2. Type Windows Security into the search bar and press Enter.
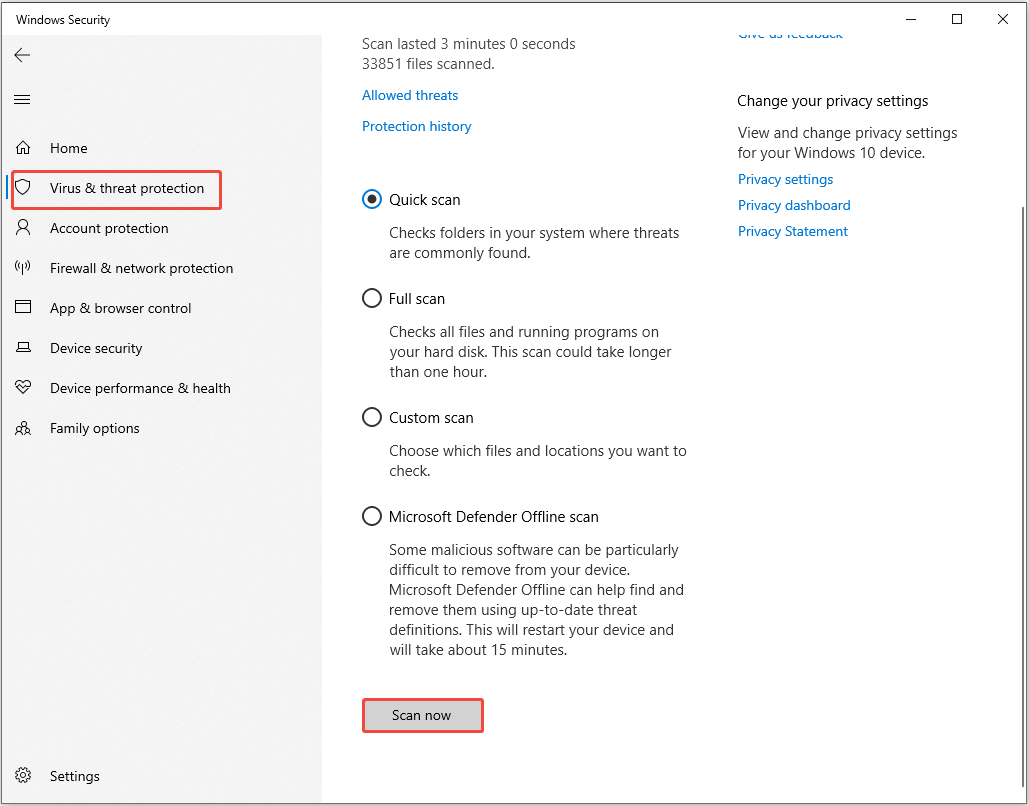
Step 3. In the Windows Security app, click on the Virus & threat protection option.
Step 4. For most situations, the Quick scan button on the main page is sufficient, as it checks critical system areas where threats are commonly found.
For other options, click on Scan options to choose from:
- Full scan: Checks every file and program on your computer. This can take a long time, but is more thorough if you suspect a deep infection.
- Custom scan: Allows you to select specific drives or folders you want to check.
- Microsoft Defender Offline scan: Restarts your PC and runs a scan before Windows fully loads. This is useful for removing stubborn or malicious software that tries to hide or interfere with the scanning process while Windows is running.
Select your desired scan option and click Scan now.

How to Recover Missing Files Using MiniTool Power Data Recovery
If the above-mentioned solutions don’t work, you may be in such a situation that your files are lost from your Windows PC.
If you do not have reliable and free data recovery software, try MiniTool Power Data Recovery.
This robust data recovery tool can recover deleted files from various scenarios, including accidental deletion, disk failure, system crashes, etc.
Additionally, it is compatible with Windows 11/10/8/8.1 and works with various storage devices, such as HDDs, SSDs, USB flash drives, SD cards, and more.
MiniTool Power Data Recovery can recover deleted images, videos, documents, or other files that haven’t been overwritten by new data.
Download and install the free edition of this MiniTool recovery tool and use it to recover up to 1 GB of files for free.
MiniTool Power Data Recovery FreeClick to Download100%Clean & Safe
Follow the steps below to recover deleted or lost files with MiniTool Power Data Recovery.
Step 1. Scan the Partition, Location, or Disk
On the software’s home page, select the partition where the deleted files might be under the Logical Drives tab and click Scan.
If you are unsure where the lost files are stored, scan the entire disk in the Devices tab.
Additionally, this software allows you to scan specific locations, such as the Desktop or any specified folder.
Here, we choose the C drive to scan.

The scanning process will take some time. You need to be patient and wait for it to complete.
Step 2. Locate and Preview Files
Once the scan is complete, find the files you want to recover. Browse through the file paths under Path or switch to the Type tab to filter by file type and format.
Moreover, use the Filter function to narrow results by file type, date modified, file size, and file category.
If you remember the name of the desired file, use the Search bar by typing the file name or keywords and pressing Enter.
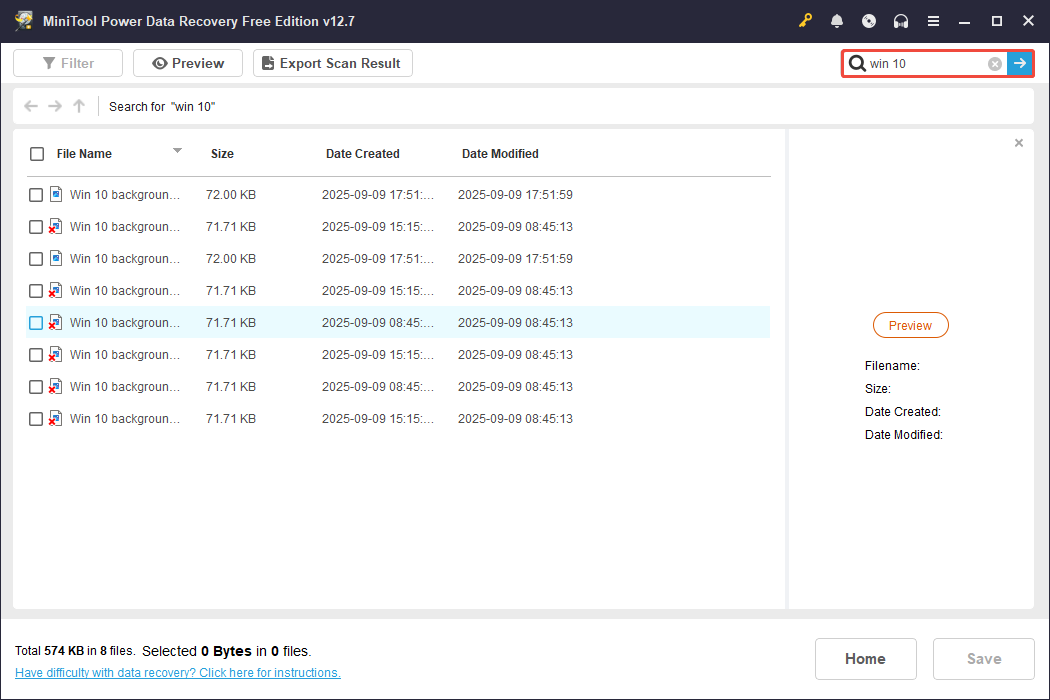
To verify if the file is wanted, double-click to preview it.
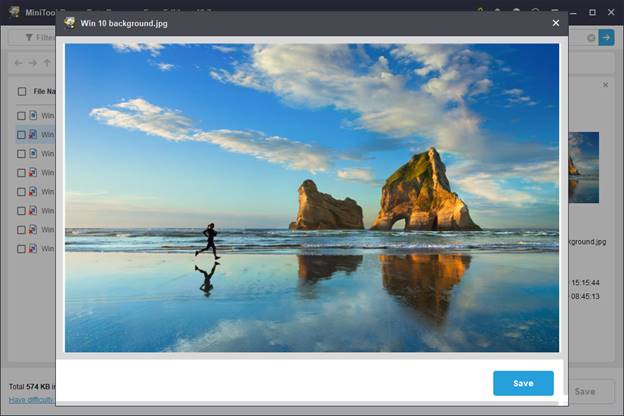
Step 3. Save the Wanted Files
Select the files you wish to recover, click Save, and choose a different location to store them to avoid overwriting the deleted files.
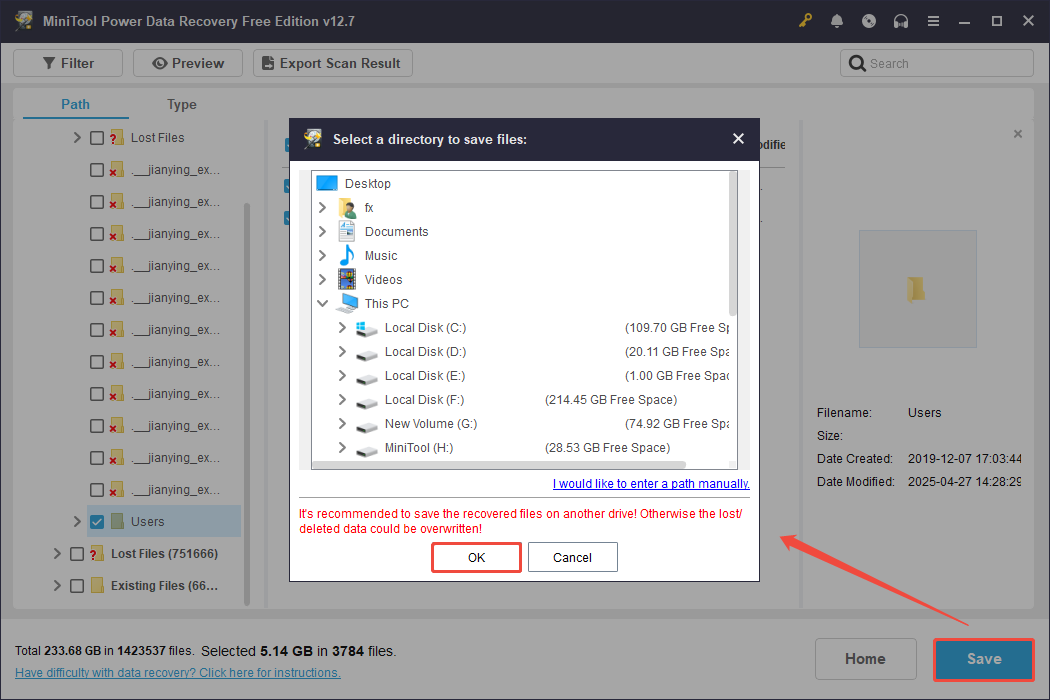
When the Recovery Completed window pops up, it means your deleted or lost files have been successfully recovered to the target location.
If the 1 GB free capacity is used up, consider upgrading to a full edition to enjoy unlimited file recovery.
Bottom Line
To summarize, this post provides seven solutions for you to resolve the File Explorer not showing files issue on Windows.
After trying some simple methods, like showing hidden files and restarting Windows Explorer, proceed to more effective workarounds.
Even if no one works, data recovery software can assist in retrieving the deleted or lost files.
If you encounter any issues or have any questions while using MiniTool Power Data Recovery, contact the support team at [email protected].
About The Author

Position: Columnist
Sandy became an English editor after graduation. She is devoted to finding effective solutions for diverse IT problems and provides articles on data recovery, data backup, and computer partitions and drives. In her spare time, she likes listening to music and playing games.
User Comments :