Issue: Hard Drive Is Full but No Files on It
In the process of using a computer, you may encounter this confusing situation: the hard drive is full but no files on it.
There are two possibilities: either the files exist but are not visible, or the files are missing but the disk space is full.
This article analyzes the reasons behind the “hard drive full but no files” error in both of the above scenarios. It also provides practical solutions to help you recover hard drive space and lost files.
Why Is My Hard Drive Full but I Have No Files
There are two situations when a hard drive is full but there are no files. The reasons for each are as follows. Understanding these factors can help you identify the appropriate solution.
Case 1. Files Exist but Are Not Visible
In the first scenario, the files do fill up the hard drive, but they are not visible. Here are some common causes.
- Hidden files or system files. The operating system generates logs, caches, and temporary files. They are not displayed by default but still take up space.
- Permissions or access restrictions. Some folders or files cannot be displayed or accessed due to permission settings, but still occupy space.
- Malware or abnormal processes. Viruses or malicious programs may modify file attributes to make them invisible.
- Indexing or display issues. A file manager or system index malfunction is causing files to not be listed, even though they are actually on the drive.
Case 2. Files Are Missing but Disk Space Is Full
The following are some reasons why files are missing but disk space is full.
- Recycle Bin files or system restore points: Deleted files may still be in the Recycle Bin, or the system may have system restore points enabled. It consumes an amount of space but is not displayed in normal directories.
- File system corruption or directory loss: When a hard drive’s file system is corrupted, the files may become inaccessible, but the space they occupied remains allocated.
- Misassigned drive letters to hidden recovery partitions: Hidden system or recovery partitions may be incorrectly assigned drive letters, causing them to appear in File Explorer.
After understanding the reasons for these two situations, follow the instructions below to recover missing files or free up disk space.
Step 1. Recover Files if They Are Missing
When the hard drive is full but no files on it, change folder options to make your hidden files visible. Additionally, if important files are still missing, use data recovery software to recover them.
Option 1: Show Hidden Files
Many system files, configuration files, or temporary data generated by applications are typically not visible in the normal view.
Showing hidden files will make these contents visible in the File Explorer. This allows you to easily inspect, clean up, or modify them, gaining a better understanding of disk space.
Here is how to do it:
Step 1: Press Win + E to open File Explorer.
Step 2: In This PC, select the target drive.
Step 3: Switch to the View tab in the top toolbar.
Step 4: Check the Hidden items option.
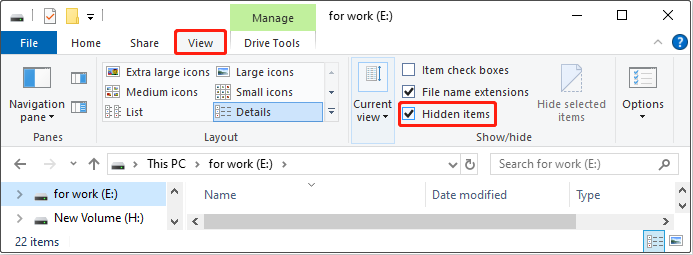
All hidden files will be displayed. If the files don’t appear, it’s very likely lost. In this case, use data recovery software to recover missing files.
Option 2: Recover Using MiniTool Power Data Recovery
MiniTool Power Data Recovery is a good choice, and here are its advantages:
- Support for data loss scenarios: This software can recover data lost due to accidental deletion, disk formatting, partition loss, system crashes, hard drive damage, and more.
- Wide device compatibility: It supports not only computer hard drive recovery but also USB drive recovery, SD card recovery, and recovery for other storage devices.
- Rich file type support: This tool can recover common file types such as document, image, video, and audio, meeting diverse needs.
- High security: It uses read-only scanning mode, preventing secondary damage to original data.
- User-friendly: The interface and operation are simple and easy to understand. This makes the recovery process very efficient.
This free file recovery software gives you a 1 GB free recovery quota. Download and install it to recover your missing files.
MiniTool Power Data Recovery FreeClick to Download100%Clean & Safe
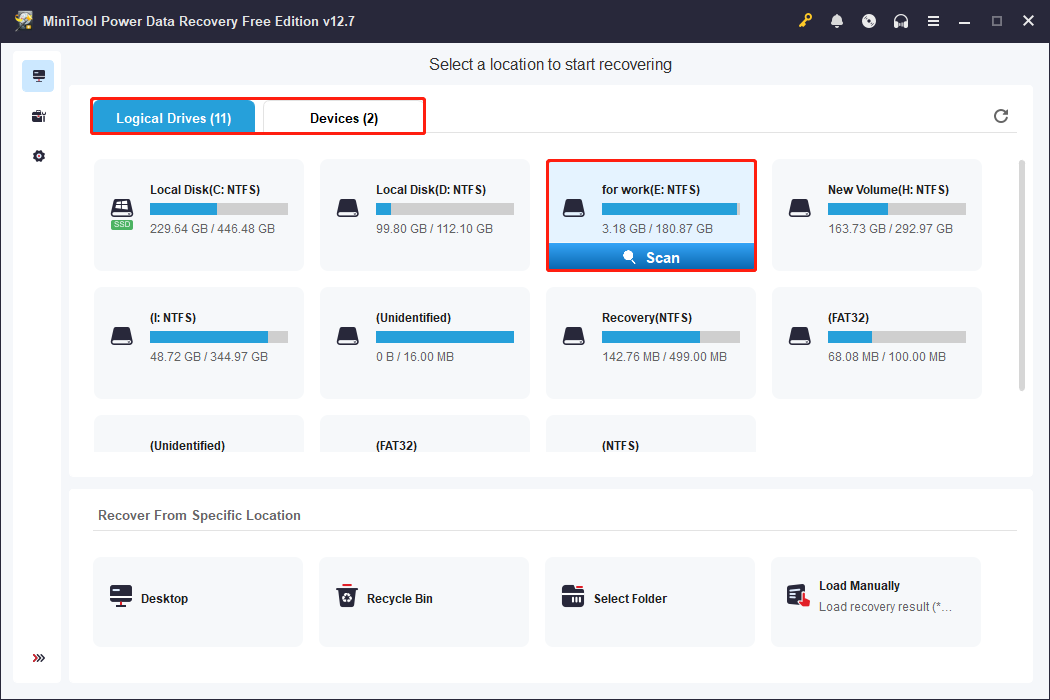
Step 1: Launch the software and scan your hard drive
Open MiniTool Power Data Recovery and access the main interface. Under Logical Drives, you can see all the partitions, including existing partitions, deleted partitions, and unallocated space.
Switch to the Devices tab, and all the disks connected to your computer are listed here.
Find the partition or the disk and click Scan.
Step 2: Find the files using Path, Type, Filter, and Search
The scan process will take some time. When it ends, start finding the target files.
- Path: Displays files according to the directory path where they were originally located. It’s suitable when you remember the file’s original location.
- Type: Categorizes files by file type (e.g., document, picture, video, audio, etc.), making it easy to find files of a specific type.
- Filter: Provides conditional filtering criteria: file type, modification date, file size, and file category, to further narrow down the search.
- Search: Allows you to enter the filename or part of the filename to quickly locate the target file.

Step 3: Check the file content using the Preview feature
After finding the required files, check their contents. MiniTool’s Preview feature allows you to preview files before recovery. Double-click the target file to open the preview window.

Step 4: Save the needed files to a safe destination
Select all the files you want and click Save. In the directory window, choose a safe path and click OK to start the recovery.

When the missing files are restored, it’s time to repair the problem of hard drive full but no files.
Step 2. Fix the Hard Drive if It Is Full but No Files on It
This section provides effective troubleshooting and repair methods, freeing up hard drive space and restoring normal operation.
Solution 1: Empty the Recycle Bin
When your hard drive shows as full, deleted files in the Recycle Bin still take up space. Emptying it can truly free up this hidden space, restoring usable space to your hard drive.
Step 1: Locate the Recycle Bin on your PC.
Step 2: Right-click the icon and select Empty Recycle Bin.
Step 3: In the pop-up window, click Yes to confirm the change.
If it doesn’t work, try the following methods.
Solution 2: Remove Viruses and Malware
Viruses or malware may generate hidden files or continuously write junk data in the background, consuming a large amount of space. They may also modify file attributes or directory structure, making normal files invisible.
Removing viruses and malware can eliminate this malicious activity, restore disk space, and ensure system security.
Step 1: Press Win + I to open Settings.
Step 2: Click Update & Security and switch to Windows Security.
Step 3: Under Protection areas, click Virus & threat protection.
Step 4: Click Scan options, choose a scan type, and click Scan now.
If this method proves ineffective, proceed to the next one.
Solution 3: Delete System Restore Points
System restore points may be consuming a lot of space in the background, causing your hard drive to run out of space.
Deleting them can release these hidden spaces, thereby restoring available hard drive capacity.
Step 1: Type Create a restore point in the Windows search bar and press Enter.
Step 2: Under the System Protection tab, select the drive and click Configure.
Step 3: Click the Delete button next to Delete all restore points for this drive.
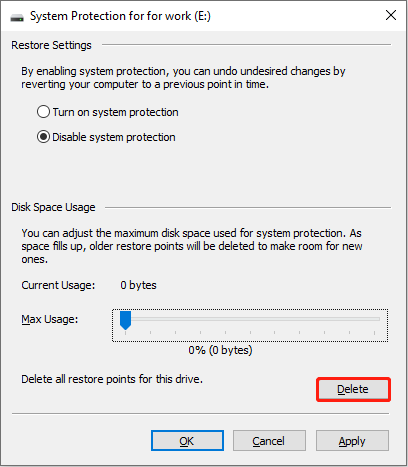
Step 4: Click Continue to confirm the action.
Should this approach fail, move on to the subsequent option.
Solution 4: Use Disk Cleanup to Clean up System Files
System files and caches often consume a lot of space in the background. Disk Cleanup can scan and clean these hidden system files, including temporary files, update remnants, and error logs.
This effectively frees up disk space, allowing the hard drive to return to normal use.
Step 1: Input Disk Cleanup in the Windows search box and press Enter.
Step 2: Select the drive you want to clean up files for and click OK.
Step 3: Check the boxes for the unnecessary files and click OK.
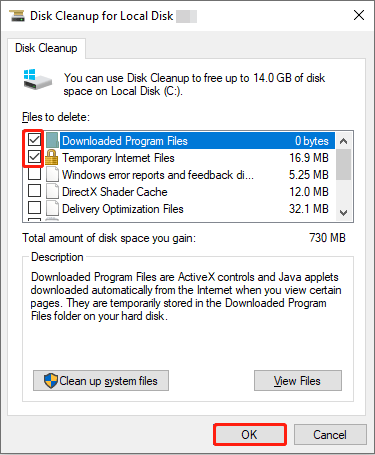
Step 4: In the Disk Clean-up window, click Delete Files to permanently delete them.
If this method does not work, advance to the next step.
Solution 5: Check out Tree Size to Delete Unnecessary Files
When your hard drive is full but no files on it, TreeSize can visually display the actual space occupied by each folder and file.
Using TreeSize to find and delete unnecessary files helps quickly free up disk space.
Step 1: Download TreeSize from the JAM Software website and install it on your computer.
Step 2: Type TreeSize in the Windows search bar, right-click it, and select Run as administrator.
Step 3: Choose the specific drive you want to analyze from the Select Directory drop-down menu.
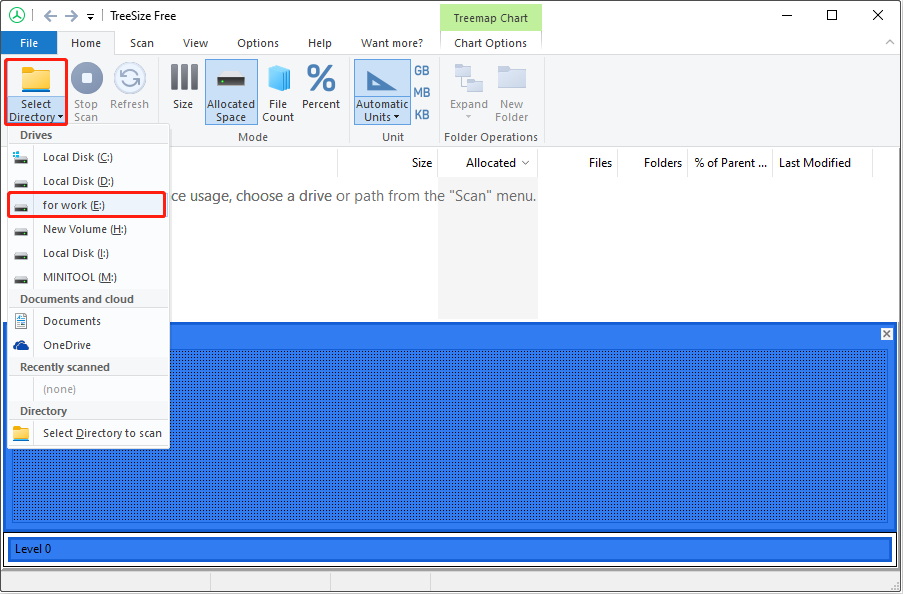
Step 4: Right-click on the identified unwanted file or folder and select Delete to permanently remove it.
In the event that this approach is unsuccessful, continue with the following alternative.
Solution 6: Run DiskPart to Remove the Drive Letter
Some hidden system partitions may appear in File Explorer due to incorrectly assigned drive letters.
Manually removing the drive letter can eliminate low disk space warnings and hide these partitions, preventing them from appearing in File Explorer.
Step 1: Type Command Prompt in the Windows search bar, then right-click it and select Run as administrator.
Step 2: Input diskpart and press Enter to launch it.
Step 3: Type list volume and press Enter. All the drives will be displayed.
Step 4: Type select volume <volume number> and press Enter. Replace volume number with the target drive’s number.
Step 5: Enter remove letter=<drive letter> and press Enter. Replace drive letter with the one of your hard drive.
For example, type select volume 1 and press Enter, then type remove letter=E and press Enter.
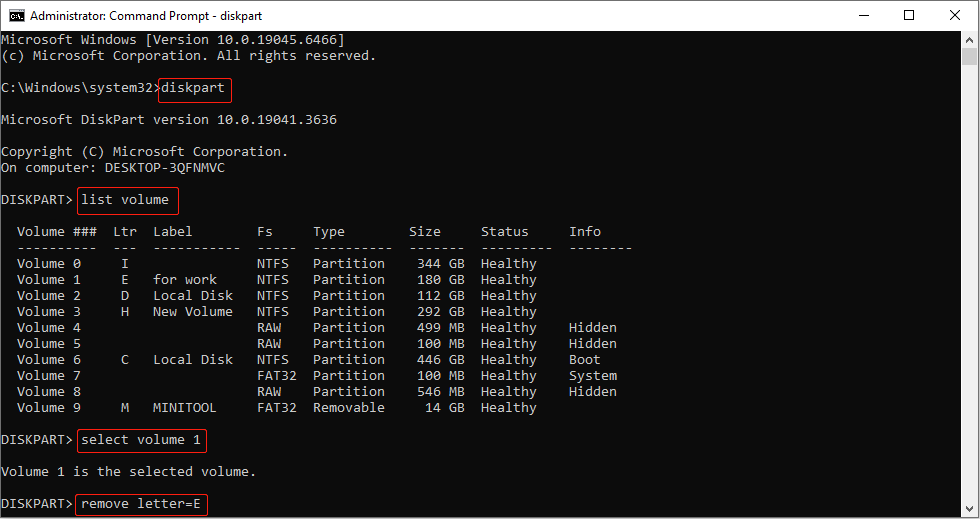
If this method is not productive, check the last resort.
Solution 7: Format Your Drive to Normal
File system corruption or partition errors can cause space to be incorrectly occupied. Formatting your drive can rebuild the file system structure and clear hidden or corrupted data. This can restore the hard drive to its normal state.
Step 1: Press Win + X and choose Disk Management.
Step 2: Right-click the problematic disk and select Format.
Step 3: Type a volume label, choose a file system, and click OK.
When the drive is formatted successfully, check its space usage.
Bottom Line
Now you know how to fix hard drive not showing files. First, show hidden files to make them visible, or use MiniTool Power Data Recovery to recover missing files.
When the files are secure, refer to the methods to repair your hard drive. It involves emptying the Recycle Bin, removing viruses, deleting system restore points, using Disk Cleanup, removing the drive letter, or formatting the disk.
If you have any questions about the MiniTool product, contact us at [email protected].
About The Author

Position: Columnist
Chelsea graduated from university with a major in English. She has a strong interest in English writing. It is this passion for writing that led her to become an English editor. Her articles mainly focus on data recovery and other computer industry news. As an energetic and outgoing girl, Chelsea enjoys listening to music, singing, riding bikes, and eating in her spare time.
User Comments :