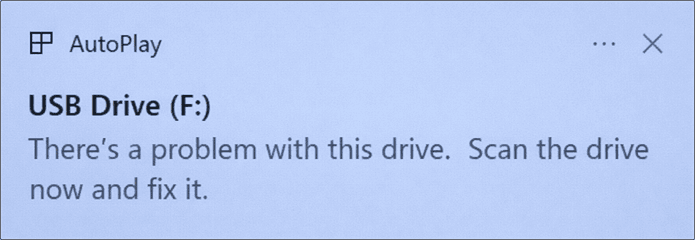
Issue: There’s a Problem with This Drive USB Drive
When plugging a USB drive into your computer, you may receive the error message “there’s a problem with this drive. Scan the drive now and fix it.” It means there’s an error in the drive’s file system or storage structure.
The common causes are as follows:
- File system corruption
- Bad sectors or physical damage
- driver problem
- Viruses or malware
- Compatibility issues
The system will usually suggest that you scan and repair the drive to fix logical errors or recover readable data. While repair can sometimes resolve the issue, sometimes you may encounter the following errors:
- There was a problem repairing this drive.
- Windows was unable to repair the drive.
- Windows can’t repair the drive while it’s in use.
In this case, continuing to use the device may result in data loss or file corruption. It’s best to back up or restore important files before attempting USB repairs.
Ensure USB Data Security in Advance
To ensure USB data security, several methods are available depending on the situation.
Case 1: Back up Your Files if the Drive Is Accessible
Backing up your files is a crucial step to ensure data security when the USB drive is still accessible.
Make sure the USB drive is plugged into your computer, then open File Explorer. Locate the corresponding drive and copy important files to your local hard drive or cloud storage (such as OneDrive or Google Drive).
Afterward, it’s best to check that the backup file can be opened normally. Even if the USB fails later, you can quickly restore your data from the backup.
If your USB drive is inaccessible, refer to the next method.
Case 2: Recover Data if the USB Drive is Not Accessible
When the USB drive cannot be accessed, data recovery is necessary. The fact that a device cannot be opened does not necessarily mean the data is completely lost. In many cases, the files still exist, but the indexes are corrupted.
Professional data recovery software can be used to scan the disk structure and attempt to extract readable files.
How to recover data from an inaccessible USB drive?
MiniTool Power Data Recovery is recommended for recovering inaccessible USB data. Here are several key reasons:
- Highly targeted: It can identify and scan the inaccessible USB drives (RAW-formatted drives, corrupted partitions).
- Multiple recovery scenarios: This tool supports various file loss scenarios, including accidental deletion, formatting, partition loss, and file system corruption.
- Strong compatibility: It supports the recovery of almost all file types, such as documents, images, videos, and audio.
- Data security: The recovery process is read-only and does not write to the original USB drive. This prevents further data and disk corruption.
- User-friendly: The interface is simple, and the operation is clear, allowing even those without experience to quickly recover files.
This free file recovery software allows you to recover 1 GB of files for free. Download and install it to recover data from the inaccessible USB drive.
MiniTool Power Data Recovery FreeClick to Download100%Clean & Safe
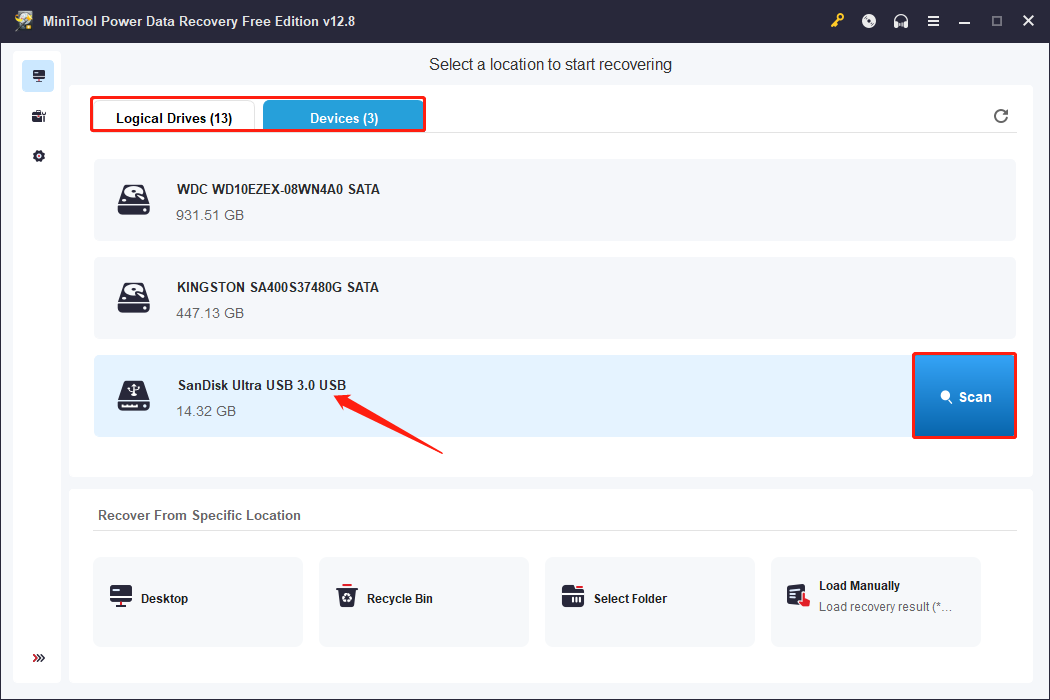
Step 1: Launch the software and scan your USB drive
Launch MiniTool Power Data Recovery. You will see two data recovery modules on the main interface: Logical Drives and Devices.
- Logical Drives displays all partitions, including existing partitions, lost partitions, and unallocated space.
- Devices shows all disks connected to your computer, allowing you to scan the entire USB device.
Select the target USB drive and click the Scan icon. The software will start searching for all files.
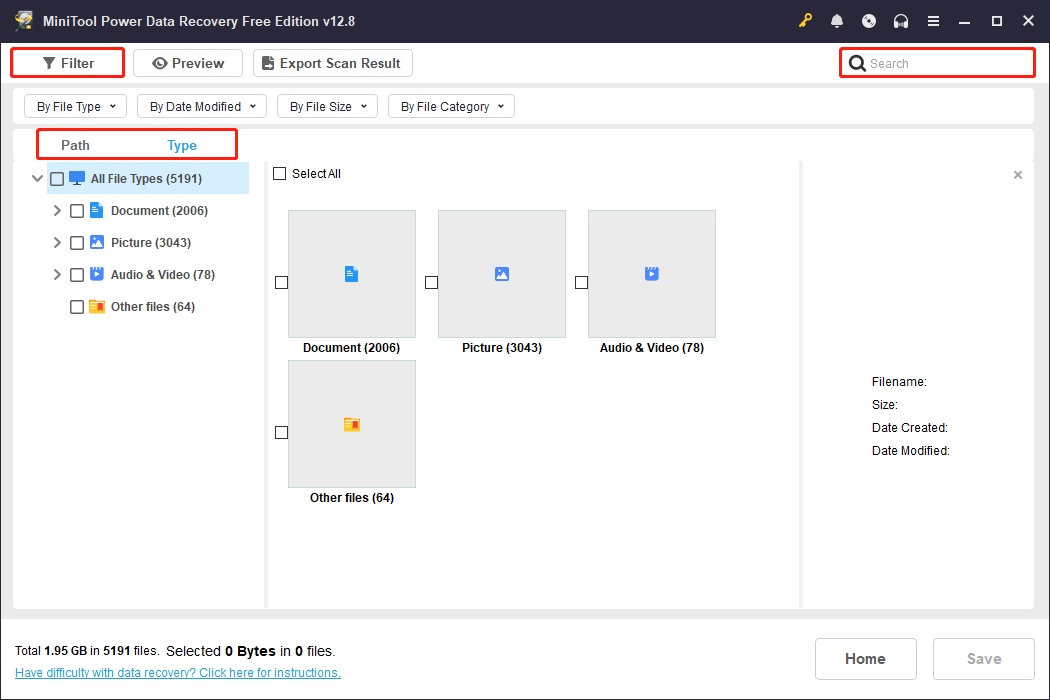
Step 2: Wait for the scan to end and find the target files
The scan duration depends on the USB drive’s capacity and the amount of data. For a complete recovery result, wait patiently for it to finish automatically.
When it ends, locate the files you want using Path, Type, Filter, and Search. Below is a description of their respective features.
- The Path feature displays scan results according to the original folder structure, including Deleted Files, Lost Files, and Existing Files.
- The Type feature categorizes found files based on file type, such as documents, pictures, videos, and audios.
- The Filter feature provides multi-dimensional filtering criteria, such as file type, modification date, file size, and file category.
- The Search feature allows you to enter a full or partial filename to search for the specific file.
The Preview feature allows you to view the contents of the files, such as pictures, videos, and audios, before recovery.
Just double-click the file you want to check, and the preview window will pop up.
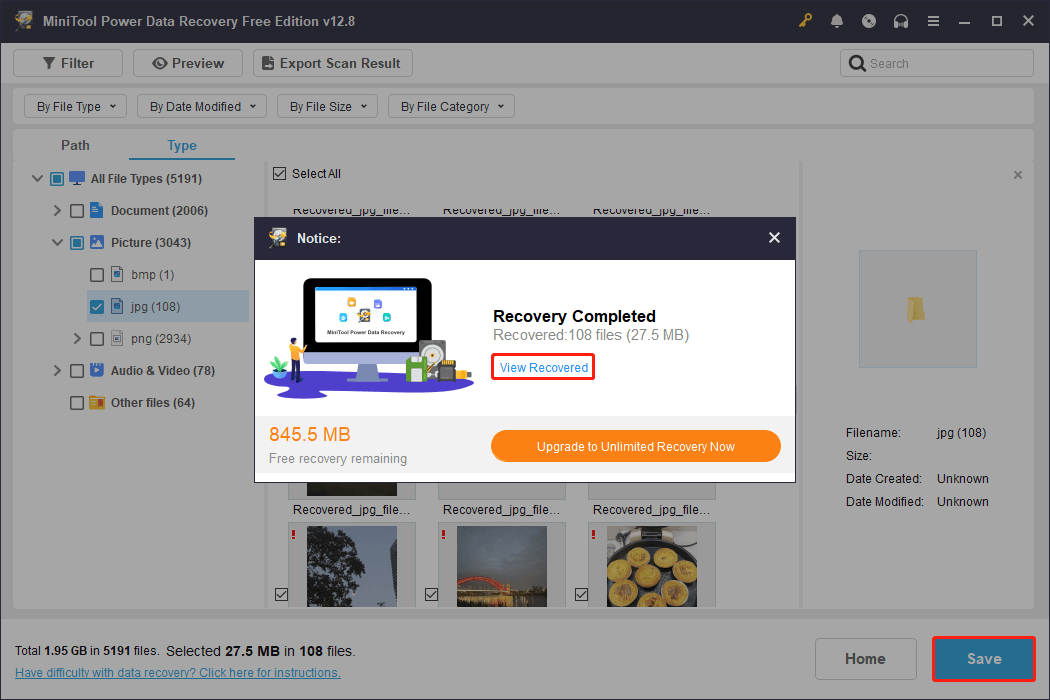
Step 3: Save the required files to a safe location
When files are confirmed, check them and click the Save button. There will be a window prompting you to choose a path for the recovered files. Choose a safe one and click OK to start recovery.
When the Recovery Completed window shows, click the View Recovered button to check the files.
Once you’ve ensured data security, you can confidently address USB device issues.
Fix “There’s a Problem with This Drive” on Windows
This section explains how to resolve the error message. To fix file system corruption, use the Error Checking tool or the CHKDSK command. For other issues, try reinstalling the disk driver or formatting the USB drive.
Solution 1: Check the Connection
A loose connection, a faulty port, or an insufficient power supply can all prevent the system from reliably recognizing the USB drive, triggering the error.
Therefore, the first step is to check the connections:
- Unplug and re-plug the USB cable, ensuring it’s firmly inserted.
- Try different ports, ideally plugging it directly into the back of the computer.
- Avoid using low-quality extension cables or USB hubs.
- Confirm that the power supply is normal for the removable drive.
These simple checks can quickly rule out physical connection problems and prevent misdiagnosis as drive failure.
If the connection is good, try the advanced solutions one by one until the problem is fixed.
Solution 2: Launch the Error Checking Tool
Logical errors on the disk can also cause the error message. In this case, you can use Windows’ built-in Error Checking tool to repair it.
This tool scans the drive’s file system, finds and repairs corrupted indexes or incorrect partition information, thereby restoring normal access.
Step 1: Press Win + E to open File Explorer.
Step 2: Right-click the USB drive under This PC, and choose Properties.
Step 3: Switch to the Tools tab and click the Check button.

Step 4: In the pop-up window, click Scan drive to scan the drive for file system errors.
If an error is found, you will be asked whether to repair it. Click Repair Drive to fix it.
The process may take a few minutes, and the results will be displayed once completed. If the repair is successful, the drive can resume normal use.
Solution 3: Run CHKDSK to Repair Errors
CHKDSK is a built-in Windows command-line tool that scans the drive’s file system structure, detects errors, and attempts to repair them. It is more flexible than the graphical Error Checking tool.
Step 1: Type cmd in the Windows search bar, right-click Command Prompt, and choose Run as administrator.
Step 2: Type chkdsk /f /r /x G: and press Enter to start scanning and fixing disk errors.
- /f automatically fixes found errors.
- /r checks for bad sectors and recovers readable information.
- /x forces the volume to be unmounted.
- G: represents the drive letter. Replace it with the actual letter of your USB drive.
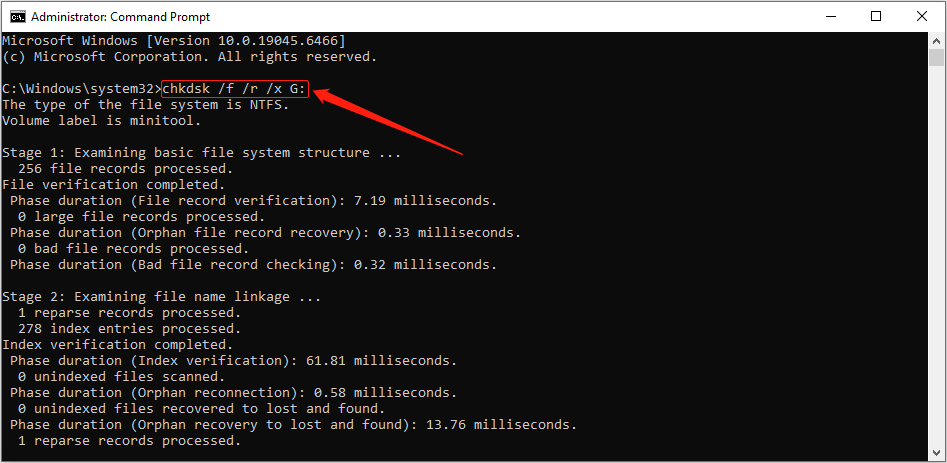
When completed, the Command Prompt displays the inspection report, including the number of errors found and their fixes.
Solution 4: Run Hardware and Devices Troubleshooter
When you see this error message, running the Hardware and Devices Troubleshooter is also an effective method.
It automatically detects and fixes common errors that make the drive unstable or unreadable.
Step 1: Type Command Prompt in the Windows search box, right-click the best match, and choose Run as administrator.
Step 2: Input msdt.exe -id DeviceDiagnostic and press Enter.
Step 3: In the new window, click Next to start repair.
The system will automatically scan your computer to detect problems related to USB hardware. Then, follow the prompts to complete the repair.
After the repair is complete, restart the computer to ensure that the changes take effect.
Solution 5: Update or Reinstall the USB Driver
Outdated, corrupted, or conflicting USB drivers can also trigger the error message. Updating the USB driver can fix communication failures between the computer and the USB device, resolving recognition abnormalities.
Step 1: Right-click the Start button and choose Device Manager.
Step 2: Expand Disk drives, right-click the USB device, and choose Update driver.
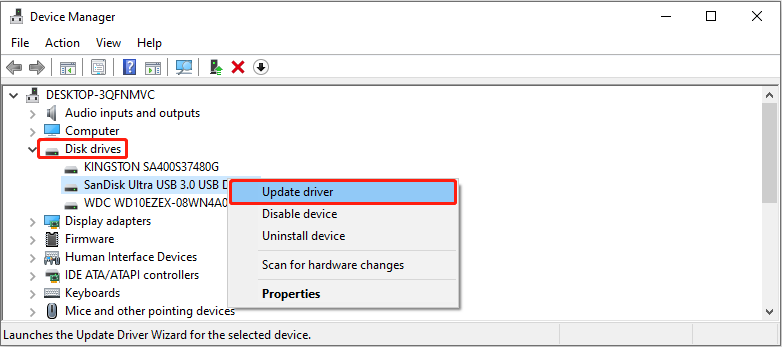
Step 3: In the new window, select Search automatically for drivers.
The system will find and install the appropriate driver online.
If the update fails to fix the problem, you can choose to reinstall the device. Right-click the USB drive and select Uninstall device.
After the uninstallation is complete, restart the computer, unplug the USB device, and plug it back in.
Solution 6: Format the USB Drive to Normal
If all the above methods fail, formatting the USB drive is the final solution.
Formatting can repair severe file system corruption, bad sectors, or partition errors, thereby resetting the drive to a usable file system state.
Here are two options to format your USB drive.
Option 1: Use Disk Management
Disk Management is a drive management tool that comes with Windows. It can perform several disk management functions, including formatting. This avoids compatibility or security risks caused by third-party software.
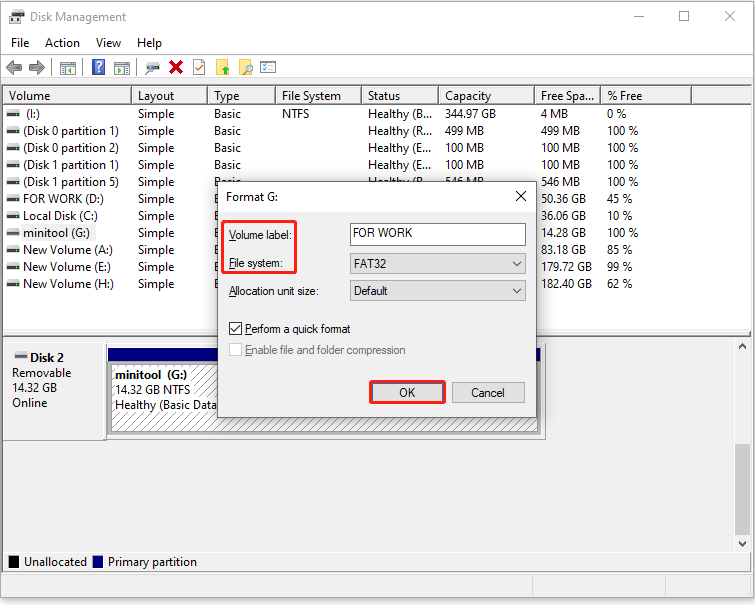
Step 1: Right-click the Start button and choose Disk Management.
Step 2: Right-click the target disk and choose Format.
Step 3: Type a volume label, choose a file system, and click OK twice to perform the change.
Option 2: Use MiniTool Partition Wizard
MiniTool Partition Wizard is more flexible and powerful than the formatting tool that comes with Windows.
It not only supports the common FAT32, exFAT, NTFS, but also supports the Ext series and other file systems.
In addition to formatting, it can also perform partition moving, merging, resizing, and cloning operations on a USB drive. Therefore, it is more suitable for complex disk management.
Step 1: Download and install MiniTool Partition Wizard by clicking the green button below.
MiniTool Partition Wizard FreeClick to Download100%Clean & Safe
Step 2: Open the software, select the target USB drive, and choose Format Partition under Partition Management.
Step 3: Type a partition label, set a file system, and click OK.
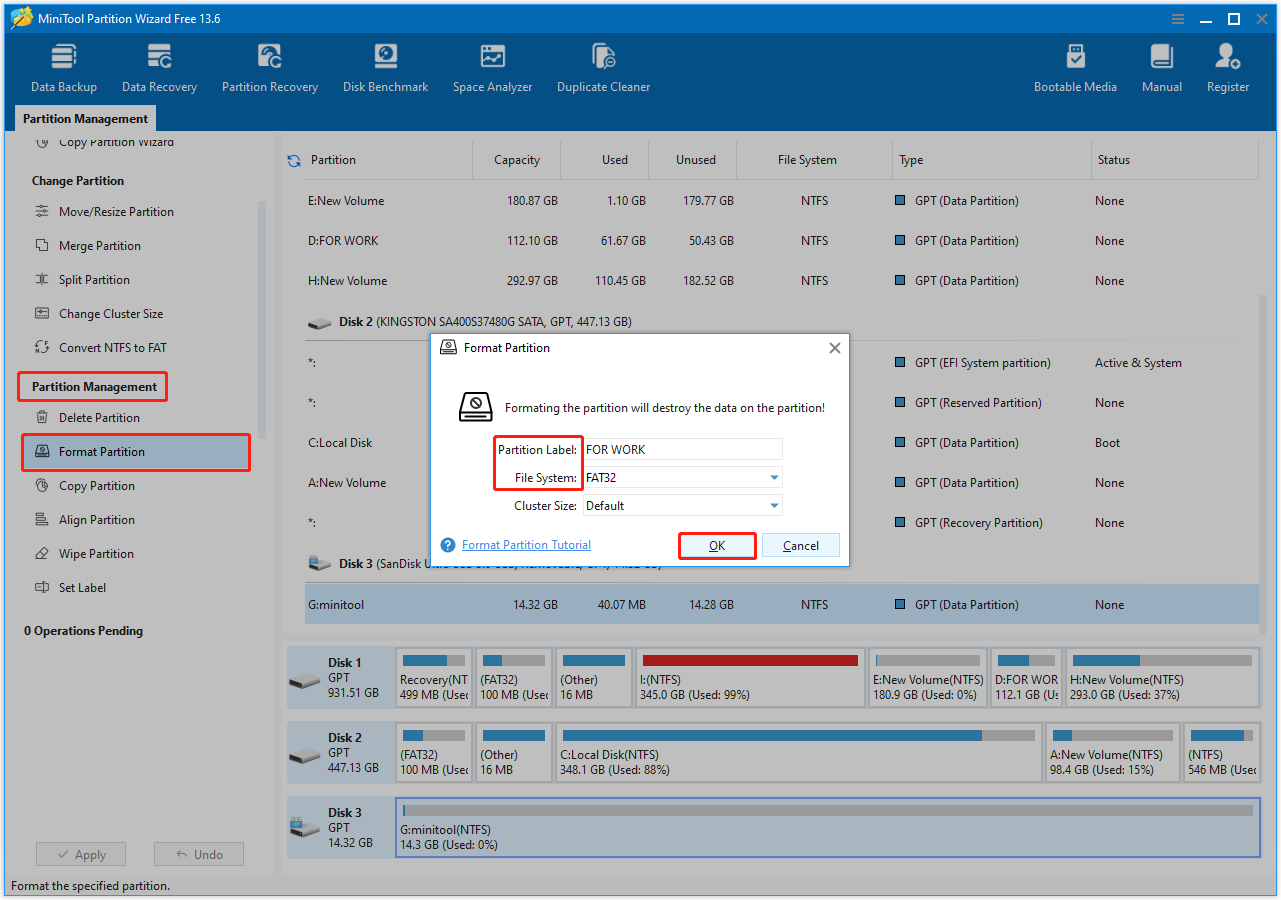
Step 4: In the lower left corner of the main interface, click Apply to make the change take effect.
After the USB drive is back to normal operation, check how to prevent this type of problem from happening again.
How to Protect Your USB Drive in the Future
To protect your USB devices, it’s key to developing some long-term good habits:
- Always safely remove: Use “Safely Remove Hardware” before unplugging to avoid disconnecting before data is fully written.
- Enable quick removal: Enabling quick removal allows the system to complete the operation immediately when writing data. It reduces the risk of file corruption when the device is unplugged.
- Back up data regularly: Regularly copy important files to your computer or the cloud to prevent permanent file loss.
- Avoid physical damage: Do not bend, drop, or expose to extreme temperatures.
- Use trusted devices: Avoid plugging into public or unsafe computers to reduce the risk of virus infection.
Final Words
When you need to fix “there’s a problem with this drive”, use MiniTool Power Data Recovery to recover data first.
Then, try running the Error Checking tool, CHKDSK, and the Hardware and Devices troubleshooter to fix this error.
If that doesn’t work, update or reinstall the USB driver, or format the drive as a last resort.
If you have any questions about MiniTool product, feel free to contact us at [email protected] for assistance.
About The Author

Position: Columnist
Chelsea graduated from university with a major in English. She has a strong interest in English writing. It is this passion for writing that led her to become an English editor. Her articles mainly focus on data recovery and other computer industry news. As an energetic and outgoing girl, Chelsea enjoys listening to music, singing, riding bikes, and eating in her spare time.
User Comments :