The unknown USB device (device descriptor request failed) error prevents you from using your keyboard, webcam, or drive. This MiniTool guide shows you several solutions, including discharging static power, running the hardware troubleshooter, reinstalling the driver, and more. Also, it introduces how to recover files from an unknown USB drive.
Unknown USB Device: Device Descriptor Request Failed Error Code 43
“Unknown USB Device (Device Descriptor Request Failed). Trying to fix this issue with one of my USBs, but alas, none of the fixes I have tried have remedied the problem. Pretty much at my wits’ end with what else to do besides throw the computer out the window, to be honest.”reddit.com
You plug your USB device, such as a keyboard, webcam, or flash drive, into your computer, expecting it to work normally.
But instead, you see this error message in Device Manager:
Unknown USB Device (Device Descriptor Request Failed)
And, it is usually accompanied by the error code 43.
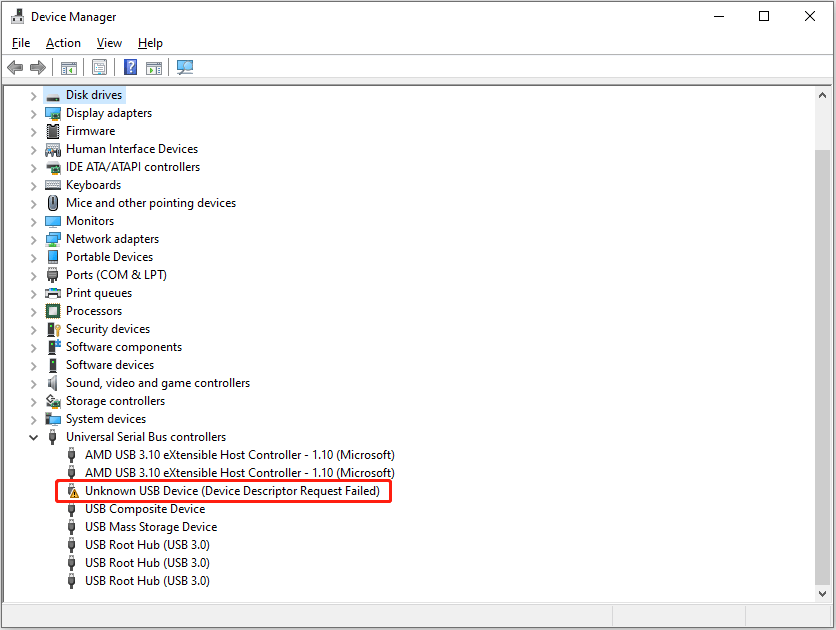
When this error pops up, you cannot use the USB device or access the USB drive.
So, what causes this error?
What Causes the Device Descriptor Request Failed Error
The device descriptor request failed error code 43 usually means your computer cannot read the basic information from the USB device.
Here are the most common reasons for this error:
Bad physical connection.
Loose or damaged USB connectors can block the communication between your device and computer.
The USB cable may be loose, the connector may not be fully inserted, or the USB port could be damaged or have poor contact.
Power drain issues.
Sometimes, residual power remains even after shutting down the computer. This may prevent the system from reading the USB device descriptor.
Faulty or outdated USB drivers.
If your USB device’s driver is outdated, missing, or corrupted, Windows won’t know what to do with the device. So, the device descriptor request failed error occurs.
Power management settings.
If you have enabled fast startup or USB selective suspend to save power, sometimes Windows cannot talk to your USB device properly.
Malware/virus infection.
A virus or malicious malware may block your system from reading USB device descriptors.
BIOS issues.
If your BIOS is out of date or misconfigured, it may cause USB devices to stop working or malfunction.
Now that you know why the device descriptor request failed error appears, the next step is to use the solutions below to resolve it.
How to Fix Device Descriptor Request Failed on Windows 10/11
To fix your USB device issue, you need to troubleshoot it based on the causes of the problem.
Here are proven solutions gathered from real users on forums, and they actually work.
You can start by checking your USB connection.
If that does not help, perform a power drain reset, disable and re-enable the USB device, or update/reinstall the USB driver.
You can also run the Hardware and Devices troubleshooter to diagnose the issue. Or, you can disable the USB selective suspend setting or fast startup to prevent power saving from interfering.
Here is a video guide:
Fix 1. Check Physical Connection Issues
To rule out physical connection issues, try unplugging your device and plugging it again into a different USB port.
Next, check the USB cable carefully for any damage or cracks. A faulty cable often causes device recognition issues.
Finally, connect your device to another computer to verify if the issue persists. This helps you determine whether the problem is with your computer or the device itself.
Fix 2. Perform a Power Drain Reset
A power drain reset removes residual electrical charge from a computer. Many users reported that doing this fixed the unknown USB device error.
How to do a flea power drain? Follow the steps below.
Step 1. Disconnect the power source and unplug all other devices from your computer, except the keyboard, mouse, and monitor.
If you are using a laptop with a removable battery, take the battery out as well.
Step 2. Shut down your computer.
Step 3. Press and hold the Power button for 10 seconds. This will help drain any residual power stored in your computer’s components.
Step 4. Reconnect the computer to the power source and start it up.
Fix 3. Disable and Enable the Device
Disabling and enabling the problematic device also helps. It refreshes the connection and often resolves temporary glitches.
To do this, you need to access the Device Manager, locate the device, and choose Enable or Disable.
Step 1. Right-click the Start button and choose Device Manager.
Step 2. Expand the target category and locate your USB device. Then right-click it and choose Disable device.

Step 3. Right-click the device again and choose Enable device to re-enable it. Some changes may require a system restart to take effect.
Fix 4. Run Hardware and Devices Troubleshooter
This troubleshooter can help identify and fix common device-related issues.
To run the Hardware and Devices troubleshooter, you need to use the msdt.exe -id DeviceDiagnostic command.
Step 1. Press the Windows + R key combination to open Run.
Step 2. Type msdt.exe -id DeviceDiagnostic in the text box and press Enter.
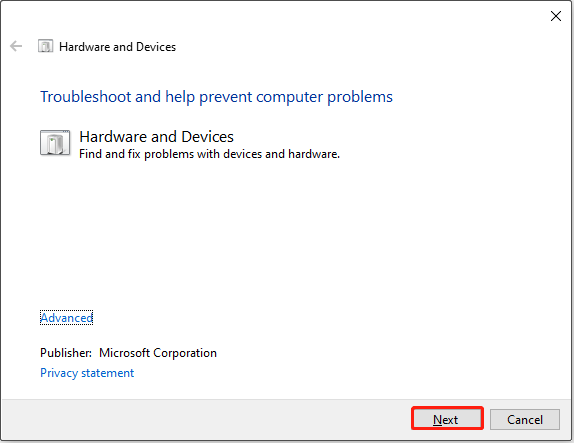
Step 3. When the Hardware and Devices window shows up, click Next.
Then follow the on-screen instructions to select the device to troubleshoot and complete the process.
Fix 5. Update or Reinstall USB Device Driver
When your USB device is not recognized properly, updating the driver can often resolve the issue.
Update the USB device driver from Device Manager:
Step 1. Right-click Start and select Device Manager.
Step 2. Expand the corresponding category and locate your USB device.
Step 3. Right-click the device and choose Update driver.
Step 4. Choose Search automatically for drivers, and Windows will attempt to find and install the latest driver.
If unknown USB device descriptor request failed keeps popping up after updating the driver, try uninstalling the current driver and restarting your computer to reinstall it.
Reinstall the USB device driver from Device Manager:
If, after updating the driver, the USB error persists, the next step is to reinstall the driver.
Step 1. Right-click your USB device and choose Uninstall device.
Step 2. Click Uninstall to confirm.
Step 3. Restart your computer, and Windows will reinstall the driver automatically during startup.
Fix 6. Disable USB Selective Suspend Setting
The USB selective suspend feature allows your system to turn off USB devices to save energy. This may be the cause of the unknown USB device error.
To fix the problem, try disabling this feature from the Control Panel.
Step 1. Open Power Options.
- Search for Control Panel in the Windows search box and open it.
- Then, select System and Security > Power Options.
Step 2. Change advanced power settings.
- Click Change plan settings next to the current power plan.
- In the new window, click Change advanced power settings.
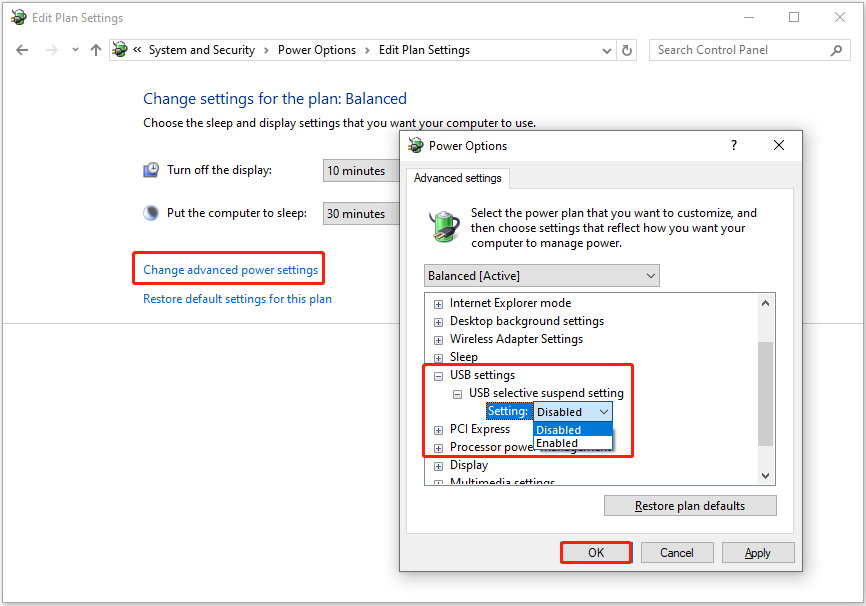
Step 3. Disable USB selective suspend.
- Expand USB settings > USB selective suspend setting.
- Next, expand the drop-down menu and select the Disabled option.
- Click OK to save this change and close the window.
Fix 7. Run a Virus/Malware Scan
Malware or a virus can cause USB devices to malfunction. To rule out this cause, try running a full virus scan to detect and remove malicious software.
To perform a virus scan on Windows, you can use the built-in Windows Defender. Open Windows Defender, navigate to Virus & threat protection, and then choose to perform a quick or full scan.
Here is how to run a virus/malware scan through Windows Defender in detail:
Step 1. Open Windows Defender and navigate to Virus & threat protection.
- Press Windows + I to open Settings.
- Choose Update & Security > Windows Security.
- On the right side, click Virus & threat protection.
Step 2. Choose a scan type.
Under Virus & threat protection, click Scan options.
Next, choose a scan option from these choices:
- Quick scan: Scans the most common folders where malware is usually found. This scan is faster but less thorough.
- Full scan: Scans all files and running programs on your computer. This scan takes longer but is more comprehensive.
- Custom scan: Allows you to select specific files or locations to scan.
- Microsoft Defender Offline scan: Restarts your PC and scans for malware while Windows is not running. Windows Defender will remove them using up-to-date threat definitions.
Step 3. Start the scan.
After selecting a preferred scan option, click the Scan now button to start the process.

Windows Defender will begin scanning your system for threats based on the selected scan type.
Once the scan is complete, the results will be displayed. If any threats are found, follow the on-screen instructions to remove, quarantine, or allow them.
Fix 8. Disable Fast Startup
Fast startup is a feature that helps your computer boot faster after a shutdown. But it can sometimes cause hardware detection issues. Turning off this feature can help fix the problem.
How to disable fast startup on Windows? Here are the steps.
Step 1. Access Power Options.
- Use the Windows search box to search for the Control Panel, and then open it.
- Go to System and Security > Power Options.
Step 2. Change power settings.
- Click Choose what the power button does on the left panel.
- Next, hit Change settings that are currently unavailable.
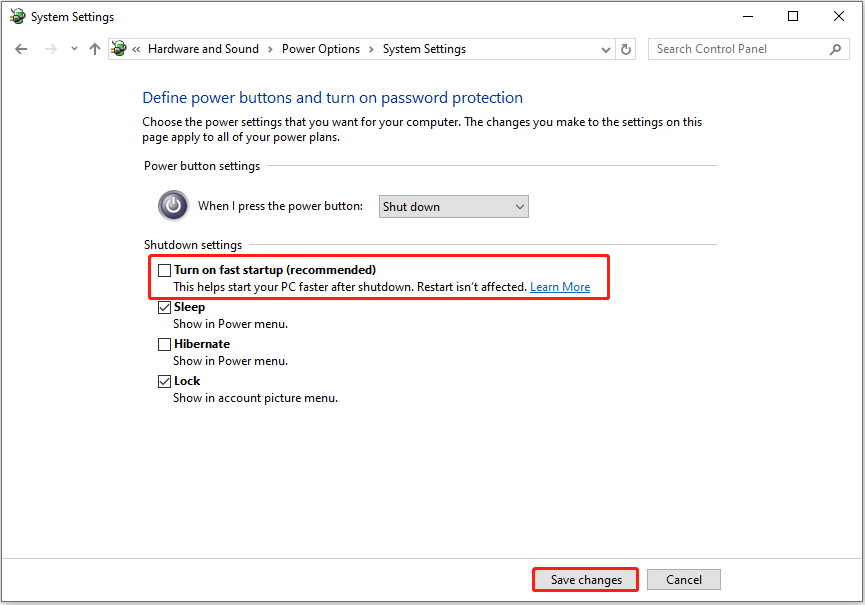
Step 3. Disable fast startup.
- Under Shutdown settings, untick Turn on fast startup (recommended).
- Finally, click Save changes to apply the new settings.
Fix 9. Update BIOS
When there are hardware compatibility issues, the unknown USB device error may occur. Updating the BIOS can sometimes resolve these compatibility issues and improve system stability.
However, a failed BIOS update may cause serious system issues, such as a blue screen, black screen, and so on.
So, be sure to follow these two critical precautions before performing a BIOS update:
- Back up important files and the system.
- Ensure your computer has a stable power supply during the BIOS update process.
Preparation: Back Up Files and System
MiniTool ShadowMaker can help back up your files and the Windows system. This Windows backup tool is free to use within 30 days.
MiniTool ShadowMaker TrialClick to Download100%Clean & Safe
- Launch the trial edition of this backup tool and click Keep Trial to continue.
- Go to the Backup tab from the left sidebar.
- All the system-related partitions are selected by default in SOURCE. If you want to back up files, click SOURCE and choose Folders and Files to select them.
- Click DESTINATION to select the location to store the backup files.
- Click Back Up Now to start the backup process.
Update BIOS
To update BIOS, first, identify your motherboard model and visit the manufacturer’s website to download the latest BIOS update file.
Next, transfer the update file to a formatted USB drive. Then access the BIOS settings to start the update process.
Step 1. Identify your motherboard model.
- Press Windows + R to open Run.
- Type msinfo32 and press Enter. The motherboard information is listed next to BaseBoard Manufacturer, BaseBoard Product, and BaseBoard Version.
Step 2. Download the BIOS update file.
- Visit your motherboard manufacturer’s website.
- Navigate to the Support or Downloads section and download the BIOS update file that matches your motherboard model.
Step 3. Transfer the file to a USB drive.
Extract the downloaded file, and then transfer it to a blank USB flash drive.
Step 4. Boot into BIOS and start the BIOS update.
- Restart your computer. During startup, press the BIOS key like Esc, F2, F12, etc., to enter BIOS.
- Locate the BIOS update section.
- Select the BIOS update file from the USB drive, and then follow the instructions on your screen to complete the update.

Fix 10. Reset BIOS
Sometimes, the device descriptor request failed error is caused by incorrect BIOS settings. So, you can try restoring the default settings of the BIOS.
To reset BIOS, you can access the BIOS interface to load default settings.
Step 1. Restart your computer. During startup, press F2, F12, Esc, or F10 to enter BIOS.
Step 2. Find the option named “Load Optimized Defaults” or “Load Setup Defaults” (or similar) in your BIOS menu. Then select that option.
Step 3. Press the button (usually F10) to save the change and exit BIOS. The computer will restart and boot to Windows.
Additional Information: How to Recover Files From an Unknown USB Drive
In most cases, the device descriptor request failed error can be fixed by using the methods above. However, there are still situations where the USB device remains unknown.
If you want to recover important files stored on the unknown USB drive, there is still a chance.
You can use professional data recovery software to check if the USB drive can be recognized. If yes, try scanning the drive and recovering the found items.
One of the best tools for this task is MiniTool Power Data Recovery.
A Brief Introduction to MiniTool Power Data Recovery
Here are some key features of this free data recovery software:
>> Recover files from problematic drives.
Even if your USB drive shows unknown, RAW, or unallocated, this tool can scan it for files, as long as it can recognize the drive.
>> Supports various file types.
This comprehensive data restore tool supports recovering documents, pictures, videos, audio, emails, compressed files, and more.
>> Compatible with diverse file storage media.
In addition to USB flash drives, this tool also supports HDDs, SSDs, SD cards, and even CDs/DVDs.
>> Supports file preview.
You can preview photos, documents, videos, audio, and other types of files for free before deciding what to restore.
>> Offers 1 GB of free data recovery capacity.
You can recover 1 GB of files in total without paying a penny.
MiniTool Power Data Recovery FreeClick to Download100%Clean & Safe
To recover files with MiniTool Power Data Recovery, simply select the target drive and start scanning. Once the scan is complete, locate your files using Path, Type, Filter, or Search. Then preview and save them to a safe location.
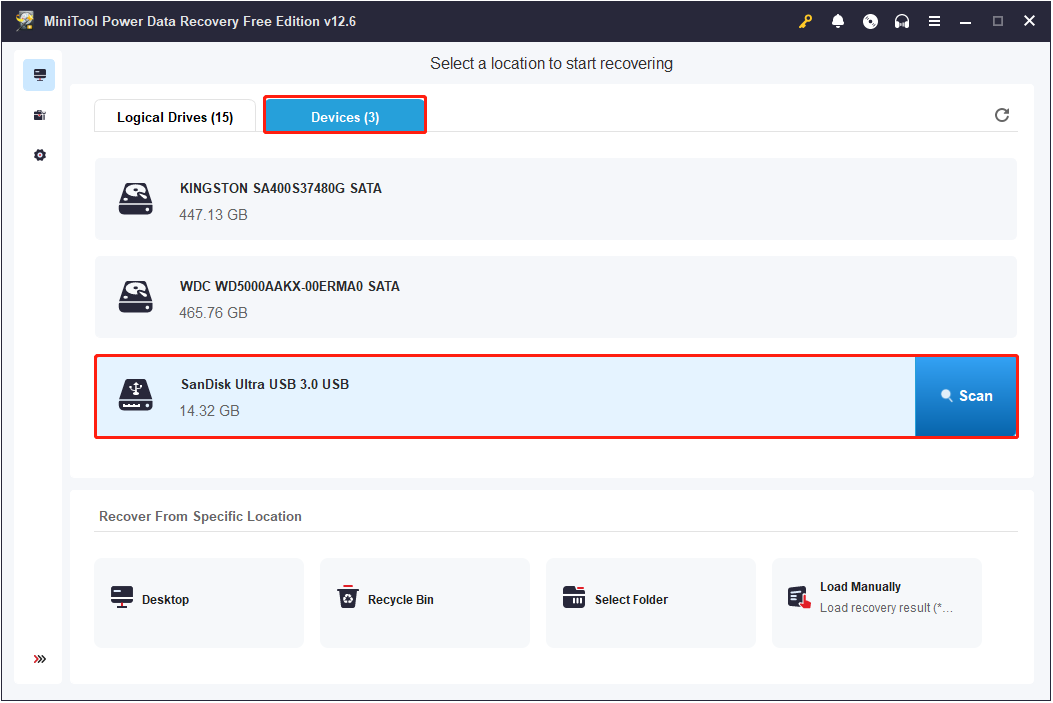
Step 1. Select the USB Drive to Scan
Make sure the problematic USB drive is properly connected to your computer.
Under the Logical Drives section in this MiniTool data recovery software, select the USB drive and click Scan.
If there are multiple partitions, go to Devices and select the entire drive to scan.
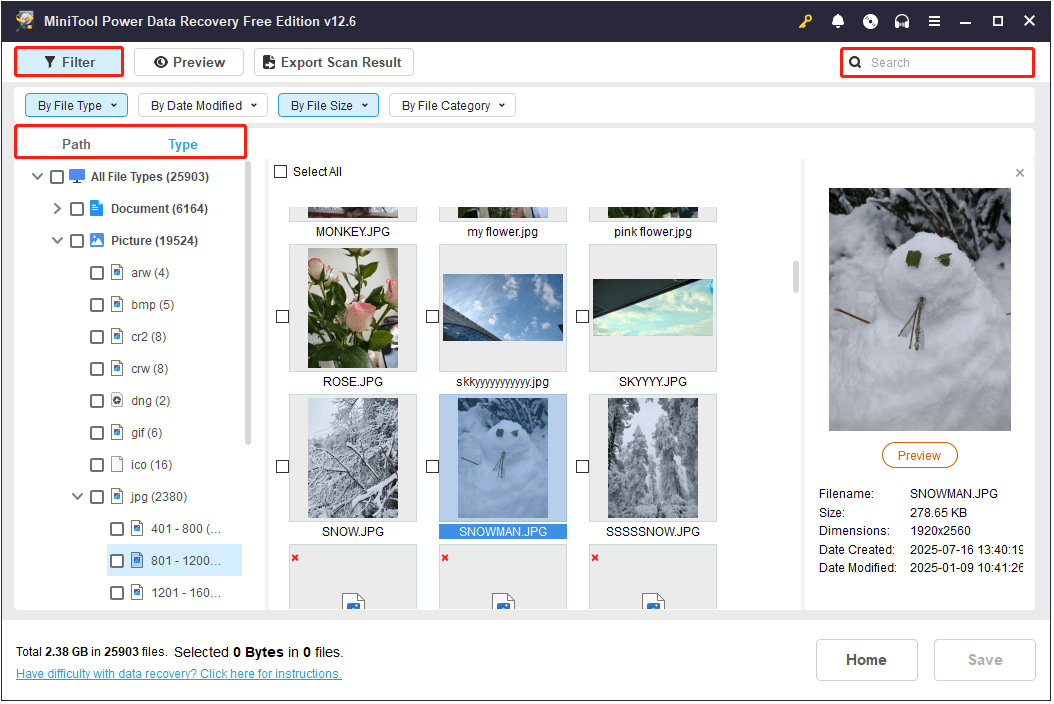
Step 2. Locate Desired Files With Path, Type, Filter, and Search
Once the full scan is completed, you can start locating the files you want to recover.
By default, you can expand the folders and subfolders under Path to find and tick the files/folders you want to recover.
Alternatively, you can move to the Type tab to view and locate desired files by file type and file format.
Moreover, the Filter feature can further narrow down the file list. Click Filter and set up the filtering rules from By File Type, By Date Modified, By File Size, and By File Category.
Want to search for a specific file? Simply type the partial or complete file name in the search box and press Enter.
Step 3. Preview and Save Wanted Files
Double-click on each file to preview its content.
Once you have ticked all the files you want to recover, click the Save button.
In the new window, choose a new location with enough free space to store the recovered items.

When the recovery process is done, you can open the selected location to view and use the recovered files.
Closing Words
If your USB device shows the message “device descriptor request failed”, do not worry. The methods listed above are collected from real users and have helped many resolve the issue.
I believe one of them can help fix the problem and restore your device to normal functionality.
If the error persists and your USB drive remains inaccessible, you can download MiniTool Power Data Recovery Free to check whether it can detect the drive and recover files.
Should you have any questions or encounter issues while using MiniTool products, feel free to contact our support team at [email protected].
Device Descriptor Request Failed FAQ
1. Go to Device Manager to update/reinstall the USB drive’s driver.
2. Open Run and type msdt.exe -id DeviceDiagnostic to run the Hardware and Devices troubleshooter.
3. Go to Disk Management to assign a drive letter.
4. If the drive shows unallocated in Disk Management, create a new partition on the drive.
Open Device Manager, right-click the unknown USB device, and choose Properties.
Go to the Details tab, and select Hardware Ids from the Property drop-down menu.
The top line should list something like PCI\VEN_1002&DEV_15DD&SUBSYS_D0001458&REV_C6.
The number after VEN is the Vendor ID, and the number after DEV is the Device ID.
You can go to a hardware ID lookup site to search for the corresponding vendor and device.
Run Command Prompt as an administrator. In the command window, type chkdsk drive letter: /f /r /x and press Enter (replace the drive letter with the actual one of the USB drive).
Then CHKDSK will start to scan the drive and attempt to repair any file system issues.
If this does not work, you may try to update the driver, run CHKDSK, use the error-checking tool in disk properties, or format the USB drive to build a new file system.
About The Author

Position: Columnist
Shirley holds a bachelor’s degree in English and has been an editor at the MiniTool Team for many years. She specializes in IT-related content, with a focus on data recovery, file backup, disk management, and other technical topics. She is committed to delivering clear, accurate, and practical solutions to help users resolve common computer issues.
User Comments :