How to recover deleted or unsaved Excel files on Windows? Try pressing Ctrl + Z to undo recent deletions, check the Recycle Bin or previous versions, or use free data recovery software from MiniTool. To recover unsaved Excel files, use the AutoRecover feature.
Many users rely on Excel to store important data, such as financial records, work reports, and study materials. However, it’s not uncommon to accidentally delete an Excel file or lose it after a system restart. For example, a user on the Microsoft forum once wrote:
“I am unable to find an Excel file on my computer. It must have been deleted when I restarted recently. I know that I have edited and saved this folder several times over the last months, but I cannot find the file. Does anyone have any suggestions about how I can recover it?”learn.microsoft.com
So, to help more users find a feasible solution, I have conducted in-depth research on several reliable Excel file recovery methods and backup recommendations.
In the following contents, I will share these practical solutions and suggestions step by step.
How to Recover Deleted Excel Files on Windows
Want a quick guide? Watch this short video:
First, let’s look at how to recover Excel files that have been deleted. The methods include undoing recent deletions, checking the Recycle Bin, restoring from previous versions, and using free data recovery software.
Method 1. Use Ctrl + Z
Ctrl + Z is a frequently used keyboard shortcut. It is used to undo the last action performed. For example, if you accidentally delete text or a file, pressing Ctrl + Z will restore it.
So, when you notice that your Excel files have been deleted, instantly press Ctrl + Z to undo the deletion.
What if Ctrl + Z fails to restore your Excel files? Check the Recycle Bin.
Method 2. Restore From the Recycle Bin
By default, files deleted from your internal hard drives will be sent to the Recycle Bin. Before emptying the Recycle Bin, the deleted files will remain there.
So, when your Excel files are deleted, you can restore them from the Recycle Bin. Here is how to do that.
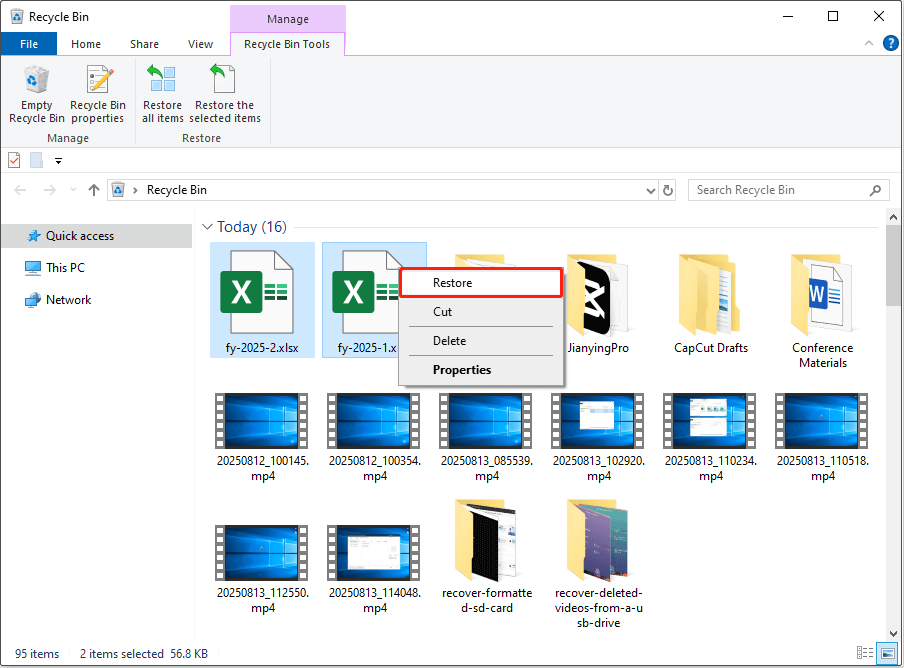
Step 1. Open the Recycle Bin.
Double-click the Recycle Bin icon on the desktop to open it.
Step 2. Find and Restore Excel Files.
Find the required Excel files, select and right-click them, and click Restore. This restores them to their original locations.
If you prefer to restore them to another location, simply drag and drop them to the target directory.
However, files deleted in the following situations will not be in the Recycle Bin:
- Files are deleted by pressing Shift + Delete.
- Files are deleted from removable drives, such as USB drives, SD cards, and other removable media.
- The Recycle Bin is configured not to store deleted files.
- Any file larger than the Recycle Bin’s file size limit will bypass the Recycle Bin.
How to retrieve deleted Excel files that are not in the Recycle Bin? Use the following solutions.

Method 3. Restore From a Previous Version
If your Excel files were backed up using File History before being deleted, you can now restore them from a previous version. Follow the steps below to do that.
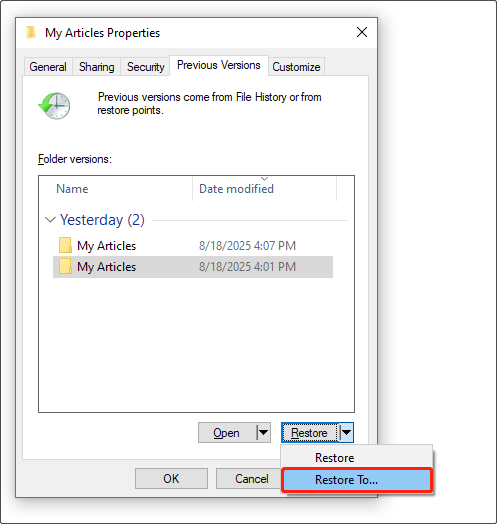
Step 1. Access Folder/Drive Properties.
Navigate to the folder or drive where the Excel files were stored.
Right-click that folder or drive and choose Restore previous versions.
Step 2. Preview Files.
In the folder/drive properties window, all the available previous versions of the folder or drive are listed. Select a previous version, expand Open, and select Open in File History to preview the content.
Step 3. Restore a Desired Version.
To restore the selected version, click Restore. To avoid overwriting the current version, I recommend you expand the Restore menu and choose Restore To to save the files in a different location.
As you can see, restoring deleted Excel files from a previous version is easy. However, if File History is not enabled, you may see this message: “There are no previous versions available”.
In this case, how can you recover permanently deleted Excel files? You will need to use data recovery software.
Method 4. Use MiniTool Power Data Recovery
** Why Choose MiniTool Power Data Recovery?
What is the best file restore software to recover Excel files? MiniTool Power Data Recovery is a great choice. Why? It has powerful data recovery features, simple operation steps, and an intuitive interface.
Recover From Various Deletion Scenarios
- Supports accidental deletion, Shift + Delete deletion, lost files during cut and paste, and files emptied from the Recycle Bin.
- Works well for both user errors and disk issues that cause Excel files to be deleted.
Supports Multiple Storage Devices
In addition to internal hard drives, it also supports external hard drives, SSDs, USB flash drives, SD cards, and other file storage media.
File Preview Function
It allows you to preview Excel files (and diverse other files) before recovery. This ensures that you recover the correct files.
1 GB Free Recovery Capacity
You can recover up to 1 GB of data for free using this Windows data recovery software.
Clear Interface and Simple Steps
This recovery tool features a clean and intuitive interface, so it is easy for beginners to navigate. With just 3 steps, you can get your Excel files back easily.
** How to Restore Deleted Excel Files Using This Data Restore Tool?
Now, download MiniTool Power Data Recovery Free and use it to recover Excel files.
MiniTool Power Data Recovery FreeClick to Download100%Clean & Safe
Step 1. Scan the Drive, Location, or Disk.
Run the software to enter the main interface. Here, you have three options:
- Under Logical Drives, select the target disk drive where deleted Excel files should exist and click Scan.
- Under Recover From Specific Location, choose to scan the Desktop, Recycle Bin, or a specific folder individually to save time.
- Under Devices, select to scan the entire disk for lost files.
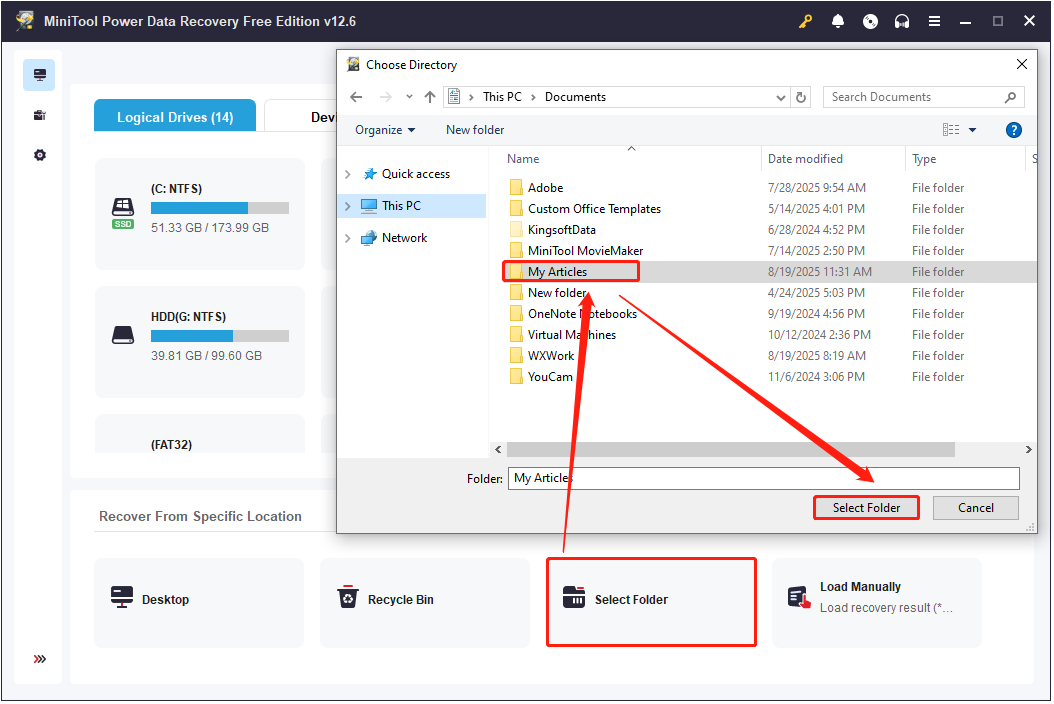
Since my Excel files were stored in the My Articles folder, I will choose that folder to scan:
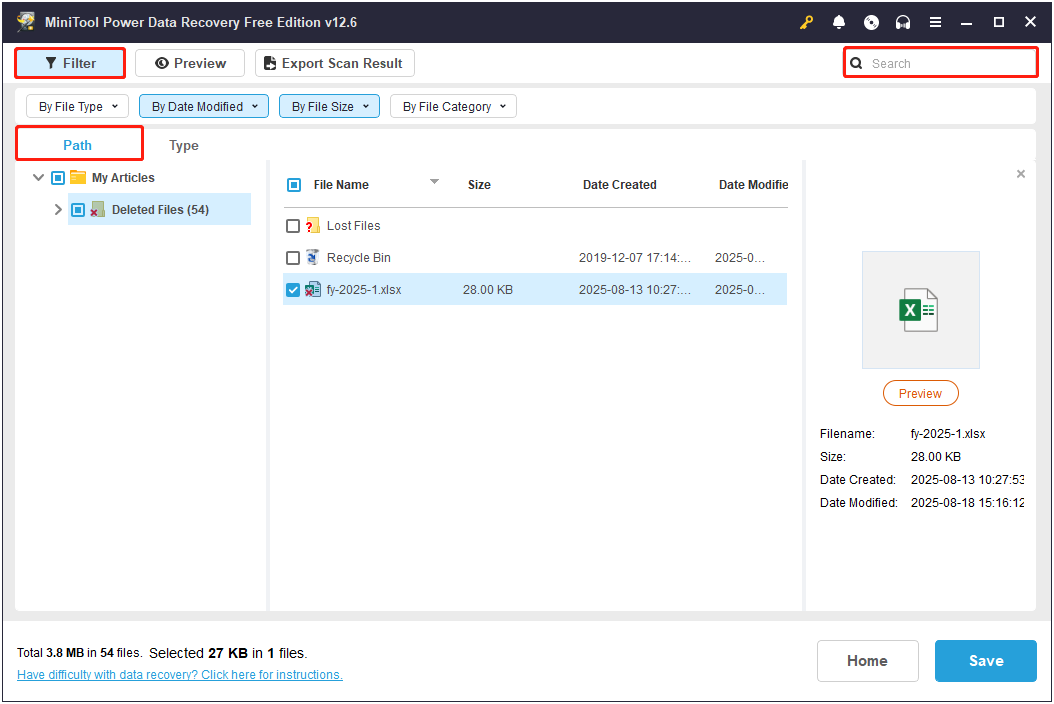
Step 2. Locate Required Excel Files.
Once the scan is finished, it is time to locate the Excel files you want to recover.
Expand the folders under Path to view files by their original folder structure. Then tick the Excel files you tend to save.
There are two additional features to help you locate your files faster:
- Filter: This allows you to narrow down the results by file type, size, date modified, and file category. So, you can quickly find the specific Excel files you need.
- Search: You can directly enter the file name or part of it in the search box and press Enter to locate your Excel files without manually browsing through all folders.
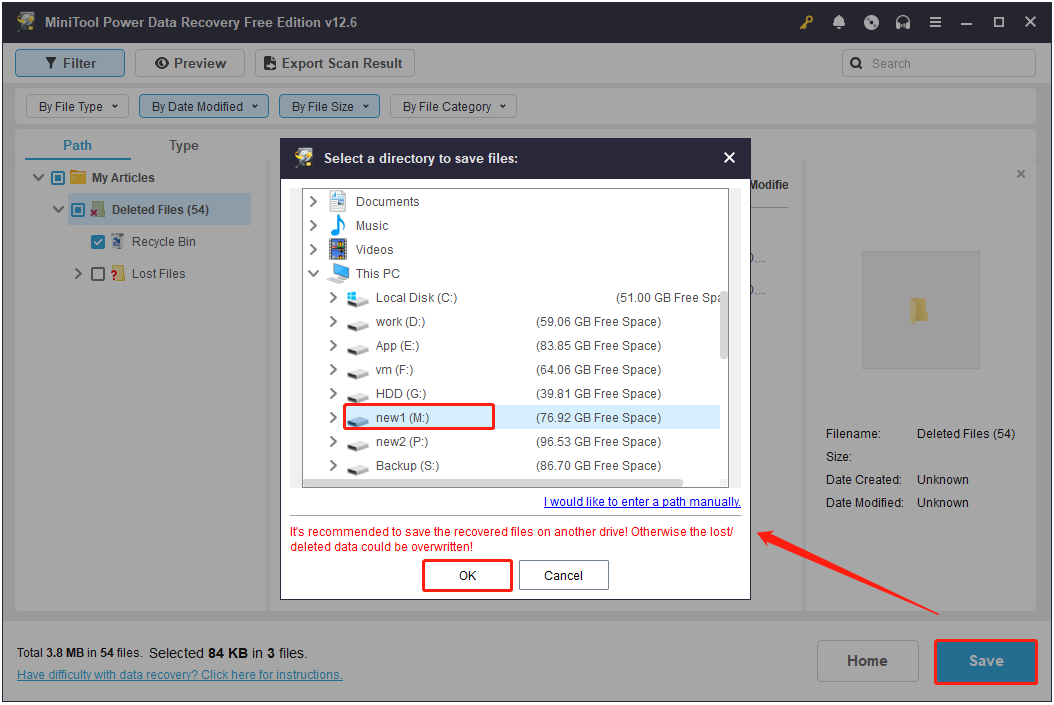
Step 3. Preview and Save Target Excel Files.
Before recovery, double-click on each Excel file to preview its content.
Once you’ve confirmed the files you want to recover, click Save. In the new window, choose a location separate from the original location in case of data overwriting, and then click OK to start recovery.
Free recovery is limited to 1 GB in total. To recover files beyond that, you will need to upgrade the software. See MiniTool Power Data Recovery License Comparison.
This is all about how to recover deleted Excel files on Windows.

How to Recover Unsaved Excel Files on Windows
Excel files may remain unsaved due to a system crash, power outage, or program failure. Recycle Bin and most data recovery software on the market cannot restore unsaved content.
Fortunately, Excel’s built-in AutoRecover feature can help you restore unsaved Excel files.
AutoRecover is enabled by default and automatically saves your work at a specified interval. If Excel crashes or closes unexpectedly, you can use this feature to restore your file.
How to recover an unsaved Excel file? Follow the instructions below.
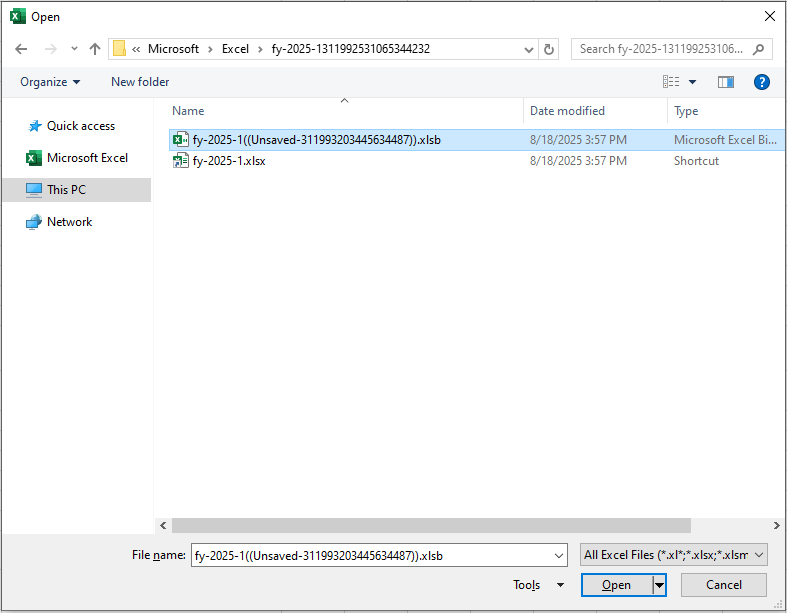
Step 1. Open the unsaved Excel file.
Step 2. Hit File > Open. Then click the Recover Unsaved Workbooks option at the bottom.
Step 3. A folder containing temporary files of unsaved work will open. Locate your file according to the modification date, open it, and then save it to your desired location.
Alternatively, you can open File Explorer and directly navigate to the default Excel recovery file location to find your unsaved files:
C:\Users\username\AppData\Roaming\Microsoft\Excel
So far, we have discussed how to recover deleted and unsaved Excel files. However, recovery is never 100% successful, especially if you do not have a backup.
To avoid data loss in the first place, it is always a good idea to keep reliable backups. Here are three practical ways to back up your Excel files.
3 Excel File Backup Recommendations
Suggestion 1. Keep the AutoRecover Feature Enabled
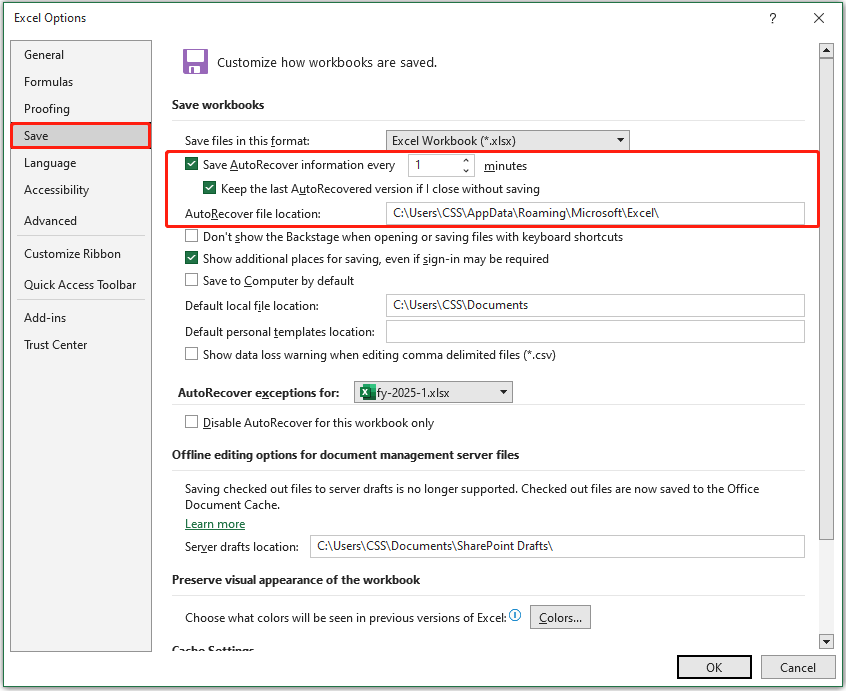
As said before, AutoRecover is built into Excel and is turned on by default. It automatically saves temporary versions of your work according to the configured backup interval. If Excel closes unexpectedly, you can restore the most recent version of your file.
So, for data safety, make sure to keep this feature turned on. You can also navigate to File > Options > Save to adjust the backup interval and change the AutoRecover file location.
Suggestion 2. Enable File History
As mentioned above, File History is a Windows backup tool that can automatically save copies of your files to another drive. With File History turned on, you can restore previous versions of an Excel file.
If you have not enabled File History, follow the steps below to enable it on Windows 10:
Step 1. Type Control Panel in the Windows search box and press Enter to open it.
Step 2. Navigate to System & Security > File History.
Step 3. Click Select drive to choose the destination drive to save the backup files. Then you can click Run now to start the backup.
File History automatically backs up all your libraries, including Documents, Pictures, Videos, and Music. If the Excel files are not included, follow the steps below to add them:
Step 1. Press Windows + I to open Settings.
Step 2. Navigate to Update & Security > Files backup. Then click More options under Back up using File History.
Step 3. Click Add a folder under Back up these folders to add the folders you want to back up.
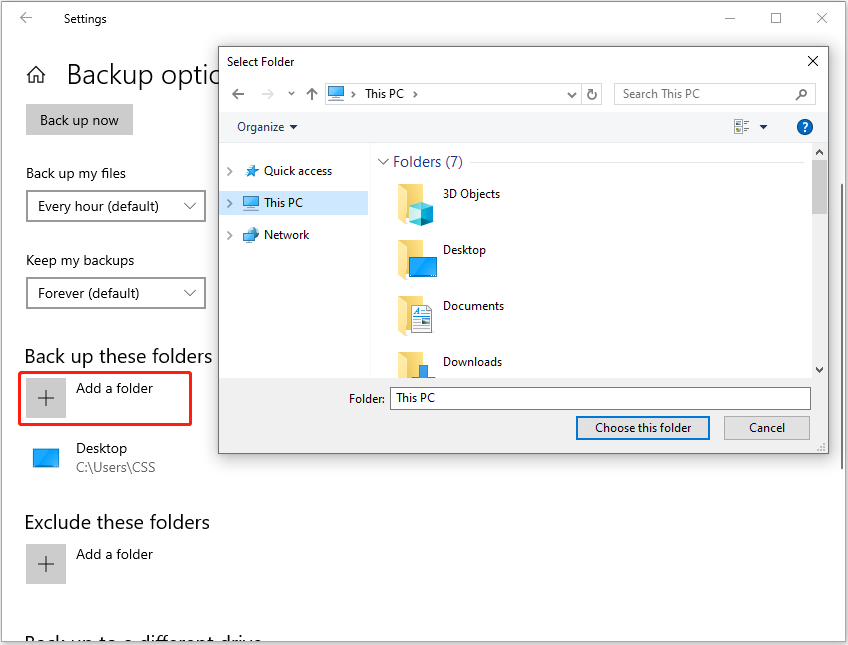
Also, you can click Add a folder under Exclude these folders to choose which folders you do not want to back up.

Suggestion 3. Use MiniTool ShadowMaker
MiniTool ShadowMaker, a professional Windows backup tool, can also help back up Excel files. It allows you to create full, incremental, or differential backups daily, weekly, monthly, or when you log on or log off.
You can try MiniTool ShadowMaker for free for 30 days. Get and use it.
MiniTool ShadowMaker TrialClick to Download100%Clean & Safe
Step 1. Run the software and click Keep Trial to continue.
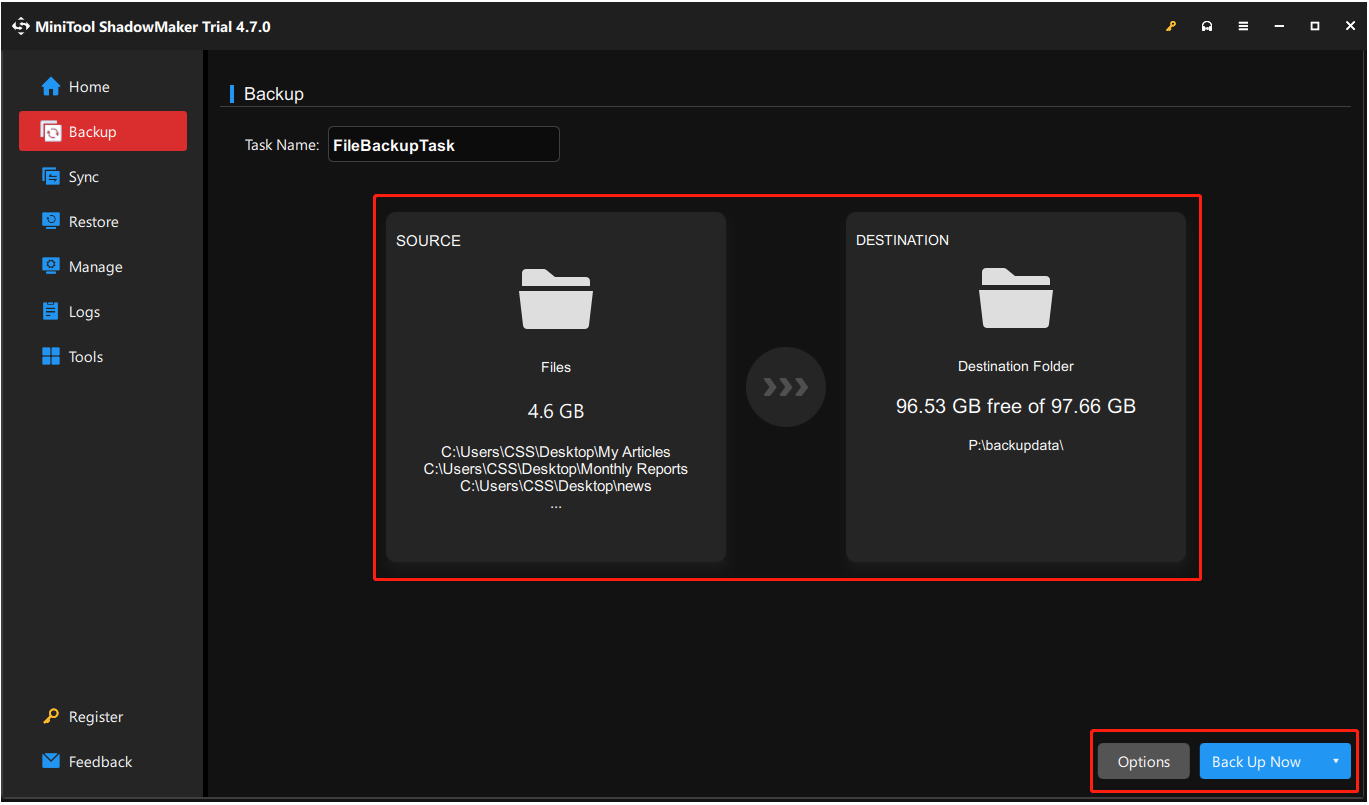
Step 2. Go to the Backup tab from the left menu.
Step 3. Click SOURCE to select the Excel files you want to back up. Then, click DESTINATION to choose the drive you want to store the backup files.
Step 4. Hit Options in the lower right corner. Then you can enable and configure Backup Scheme and Schedule Settings.
Step 5. Once set up, click Back Up Now to begin the process.
If your Excel files are damaged or deleted, you can then restore them from the backup:
Launch MiniTool ShadowMaker and go to the Restore tab. Next, click the Restore button next to the backup file. Then, choose a location to store the recovered files and complete the process.
Bottom Line
To sum up, this article walks you through the steps to recover deleted and unsaved Excel files on Windows. I believe you can get your files back by following the instructions above.
To avoid the risk of unsuccessful or incomplete recovery, it is necessary to back up your Excel files automatically or regularly.
If you encounter any problems when using MiniTool’s products, please reach out to the support team at [email protected].
About The Author

Position: Columnist
Shirley holds a bachelor’s degree in English and has been an editor at the MiniTool Team for many years. She specializes in IT-related content, with a focus on data recovery, file backup, disk management, and other technical topics. She is committed to delivering clear, accurate, and practical solutions to help users resolve common computer issues.
User Comments :