I believe you must have heard of data overwrite, but how much do you know about it? Don’t worry. This essay from MiniTool tells you the basic information about it and teaches you to prevent deleted files from being overwritten on Windows.
An Introduction to Data Overwrite
Data overwrite refers to the process of replacing the original data in the storage medium such as hard disks, USB flash drives, SSDs, etc., with new data. It is a common operation in computer and information technology, which involves both data security and privacy protection. The following is a full explanation:
1. The basic principle of data overwrite and file deletion
Whether it is a mechanical hard disk (HDD), solid-state drive (SSD), or USB flash drive, the basic unit of data storage is a binary bit (0 and 1). When new data is written, the 0/1 state of the original location will be directly replaced by the new data.
After knowing the principle of data overwrite, you need to understand the underlying principle for file deletion. File deletion is one of the most basic operations in computer systems, yet its underlying process is more complex than it seems. Let me explain to you the underlying reasons for file deletion. When you delete a file, the operating system does not immediately erase the data but instead performs two key operations:
- Mark the disk space occupied by the file as “available”
- Delete the index record in the file system (e.g., FAT or NTFS)
This design enables the system to respond quickly to deletion operations, but it also means that the original data still exists in the storage device until it is overwritten by new data.
2. Overwrite type: logical overwrite vs physical overwrite
- Logical overwrite: Modify only the index of the file system (such as marking it as “available” after deleting a file). The original data remains on the storage device until it is overwritten by new data, making recovery possible.
- Physical overwrite: Write new data directly to the physical storage location of the original data, the original data is replaced, and recovery is extremely difficult.
3. Application scenarios of data overwrite
- Daily file operations. Save files: When software and documents are updated or modified, the new versions usually overwrite the older versions of the files; Format storage devices: A quick format overwrites only logically, while a full format may overwrite physically.
- Data clearing. Before storage devices such as hard disks and SSDs are shipped or resold, manufacturers or users will perform an overwrite operation to write random data or 0s to all areas of the storage device to ensure that the storage area does not contain any old data.
- Space reuse. In the storage system, unused storage space is reclaimed and reused through overwrite technology to ensure efficient use of system resources.
- Data security and destruction: Completely delete sensitive data to prevent data leakage.
Read Also: Disk Wipe: CCleaner Wipe Free Space and the Alternative Ways
Common Causes of Data Overwrite
Data overwrite is the core reason for the permanent loss of deleted data. Its triggering mechanism involves the coordinated operation of the operating system, application programs, and hardware storage. The following are the triggering conditions for data overwrite.
- Continuous use of storage devices. If you continue using the storage device where the file was lost, the written data is likely to overwrite the lost data.
- Automatic generation of system temporary files. Sometimes the system generates temporary files due to various operations, and the storage location may be the location of the lost file, causing overwrite.
- Application cache update. The use of applications is necessary and frequent, so the cache of these programs will also be updated and stored at all times, causing overwriting risks.
- Disk defragmentation process. During disk defragmentation, data fragments are rearranged. There is a possibility that data will be stored in the location of the lost file.
- TRIM command on SSD. Most SSDs have a feature called TRIM. When a file is deleted, TRIM notifies the SSD which data blocks are no longer in use, allowing these blocks to be restored to a writable state promptly, so that new data can be written, causing data overwriting.

How to Prevent Deleted Files From Being Overwritten
After understanding data overwrite, let’s continue learning how to prevent data from being overwritten Windows 10/11.
Way 1: Stop Writing New Data Immediately
After deleting files, to prevent deleted files from being overwritten, what you should do first is stop writing any new data to the storage device. New data may occupy the storage space of the previously deleted file, causing file overwrite.
To be on the safe side, you can switch the storage device to read-only mode. Some hard disks or other storage devices have this mode, which protects the stored contents and avoids unnecessary write operations.
Way 2: Disable the SSD TRIM (Only for SSD)
Generally, turning off the TRIM function of an SSD is not a common recommendation because it may cause performance degradation. However, in certain situations, you may need to turn it off.
For example, when a file is deleted, TRIM will immediately mark its storage area as available and clear the data, which means that new data can be written, causing file overwrite. Therefore, disabling TRIM helps retain deleted files to prevent deleted files from being overwritten.
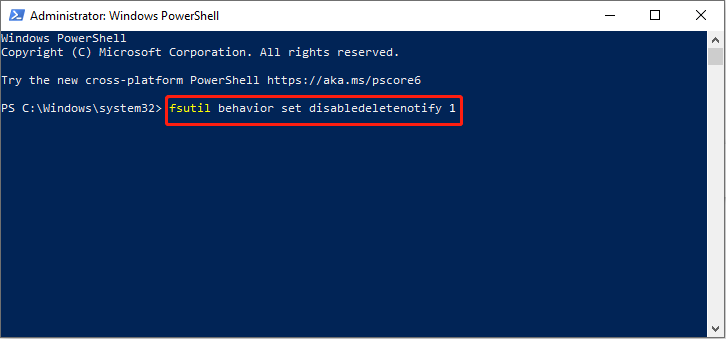
Step 1: Right-click on the Windows button and choose Windows PowerShell (Admin).
Step 2: Click on Yes in the UAC window to continue.
Step 3: Input fsutil behavior set disabledeletenotify 1 in the window and press Enter.
Way 3: Do Not Empty the Recycle Bin Unless Target File Has Been Recovered
When you delete files from your computer, they are not immediately and permanently removed but moved to the Recycle Bin. This utility allows you to recover deleted files from it. However, if you choose to empty the Recycle Bin, the storage areas where the deleted files are located will be marked as free space, and new data may be written to these areas. If new files are deleted and put into the Recycle Bin later, these files will occupy the space where the files deleted by emptying the Recycle Bin were located, and the previously deleted files may be overwritten.
If you need to empty the Recycle Bin, check for any files that may need to be recovered first to avoid data loss due to file overwriting. If there are any, recover them before proceeding with the emptying. How to recover files from the Recycle Bin? Work with the following steps.
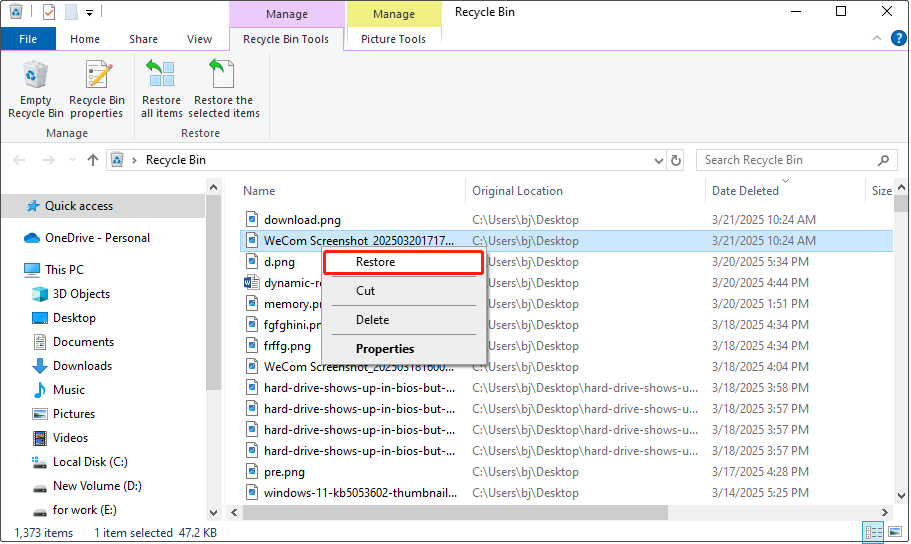
Step 1: Find Recycle Bin and double-click on it to launch it.
Step 2: Find the target files from the list or search for files by typing the partial or full file name.
Step 3: Select and right-click on the file and choose Restore to save the file to the original place.
Way 4: Recover Files Using Data Recovery Tool
Using data recovery software can save deleted data before data overwrite occurs because it can scan the data blocks marked as “available” on the storage device and try to recover the deleted files.
Here I would like to recommend a professional and robust recovery tool, MiniTool Power Data Recovery Free for you.
- Read-only mode and efficient recovery: MiniTool Power Data Recovery operates in read-only mode during the recovery process and does not perform any write operations on the storage device; it is simple to operate and efficient, which can help you complete data recovery as soon as possible and prevent data from being overwritten.
- Deep scan: It can scan data blocks marked as “unallocated” or “available” on the storage device, and try to recover files from the bottom layer. Even if the file directory information has been lost, it is possible to retrieve data.
- Support for different devices: The software supports data recovery from a variety of storage devices, such as hard drive recovery, USB flash drive recovery, and SD card recovery, which is particularly important when the risk of data overwriting is high.
In addition to the above information, there are some other things you need to know. As a highly compatible tool, it is suitable for Windows 11/10/8/8.1. And the free recovery capacity of 1 GB of files is what a novice should have. Download and install it to have a try.
MiniTool Power Data Recovery FreeClick to Download100%Clean & Safe
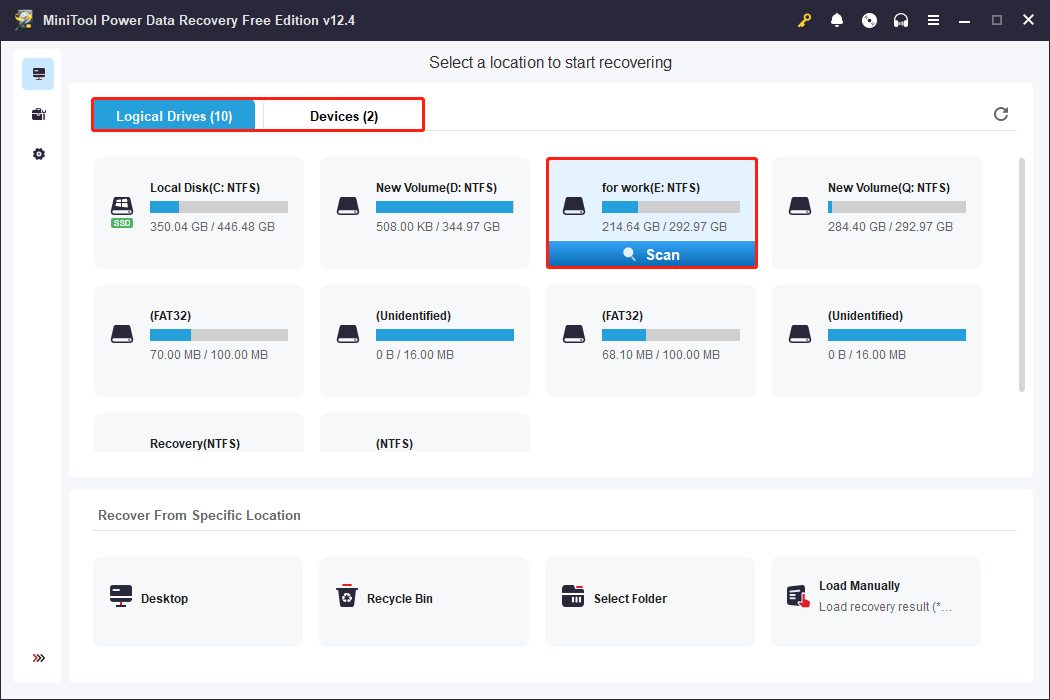
Step 1: After the installation ends, double-click on the icon to launch the MiniTool Power Data Recovery software. When you enter the main interface, you will see all the partitions under the Logical Drives tab where you should find the target partition and click on Scan to scan for data.
Of course, if your files are too scattered to be confined to one partition, you can choose to scan the entire disk at once. Switch to the Devices tab, choose the disk you want to scan, and click on Scan to get started.
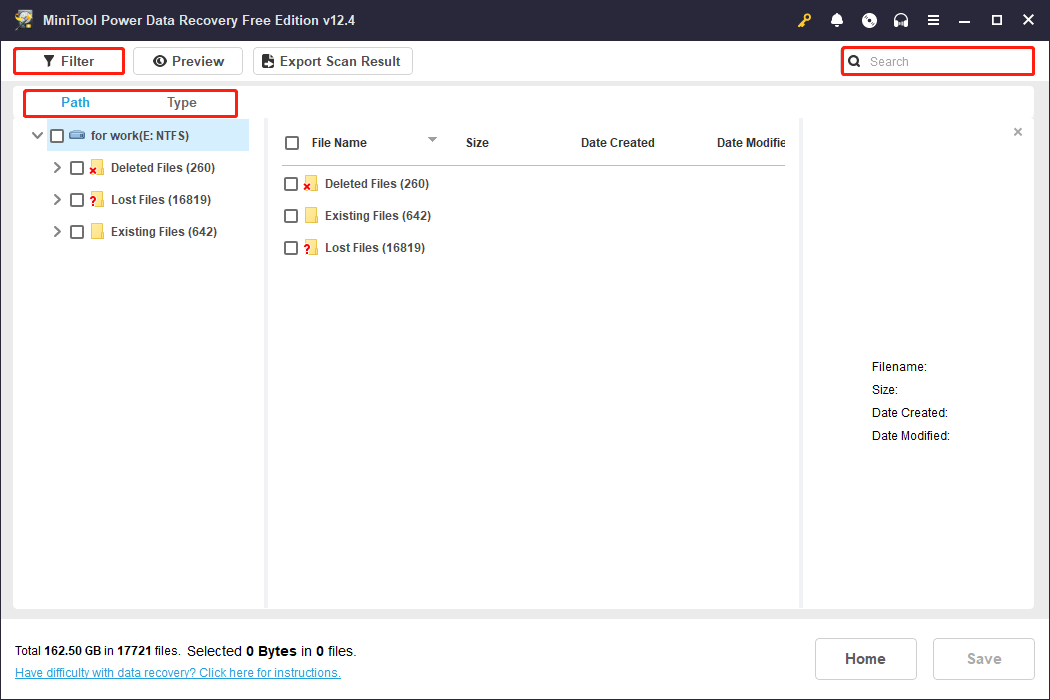
Step 2: Wait for the scan process to complete. On the scan results page, files can be arranged in various views to help you find the target file. Let me introduce these features one by one.
- Path: All the files will be listed under this tab by default. It allows you to find files and folders in their original file structure.
- Type: It classifies files into various types such as documents, pictures, audio, videos, and more. Switch to the Type tab, and expand the list to find target files.
- Filter: This feature can not only meet the needs of classification by file type, but also filter files by modified date, file size, and file category. Click on the Filter button and then choose your criteria.
- Search: It can find the corresponding file by searching for the partial or full file name. Type the name in the box and press Enter to filter out unnecessary files.
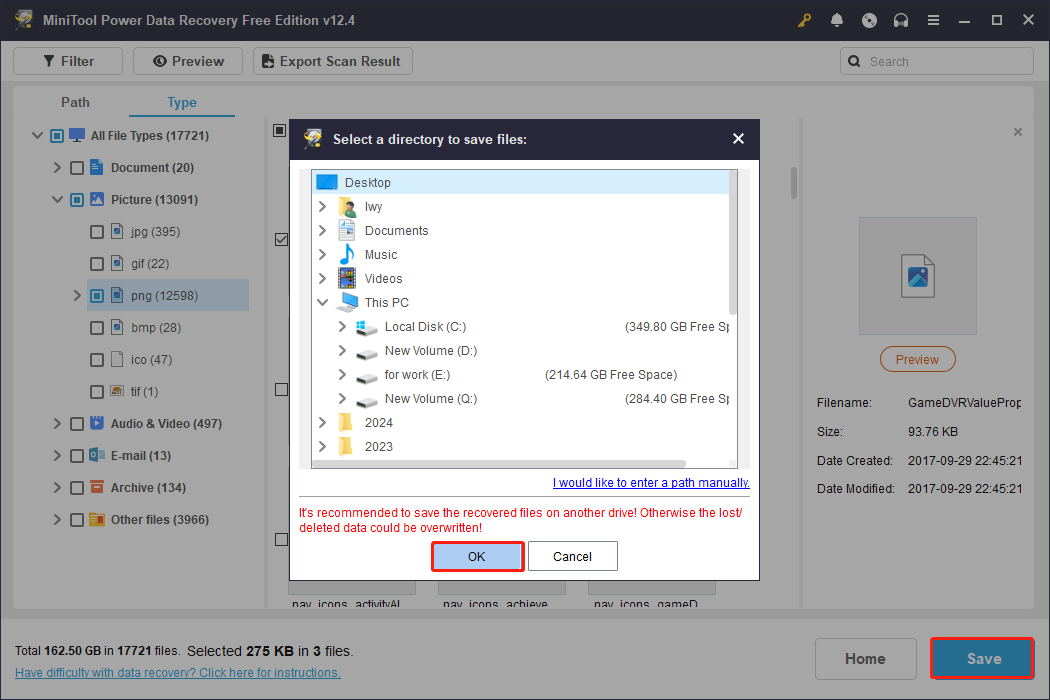
Step 3: When the target files are found, you should check the file content to confirm they are correct. The Preview feature can do you a favor to improve the accuracy, avoiding wasting the free recovery capacity. Select the file, and double-click on it or click on the Preview button.
Step 4: You can do the last step now. Tick all the boxes for required files and click on Save. Choose a new location in the pop-up window and click on OK to start saving files. When the Recovery Complete window shows up, it means the recovered files have been saved in the new place.

How to Back Up Files Regularly
While backups cannot directly prevent deleted files from being overwritten, this action ensures that you always have a copy of your important files. Regular backups provide a safety net that allows you to recover files even in the worst case.
MiniTool ShadowMaker is a professional backup and data protection software. You can set daily, weekly or monthly scheduled backup tasks to automatically protect your data. It provides trial and multiple paid editions. You can use the trial edition for free for 30 days.
MiniTool ShadowMaker TrialClick to Download100%Clean & Safe
Step 1: Launch the MiniTool ShadowMaker software and go to the Backup section.
Step 2: Select the SOURCE section and choose the disk, partition, folder, or file to back up based on your needs.
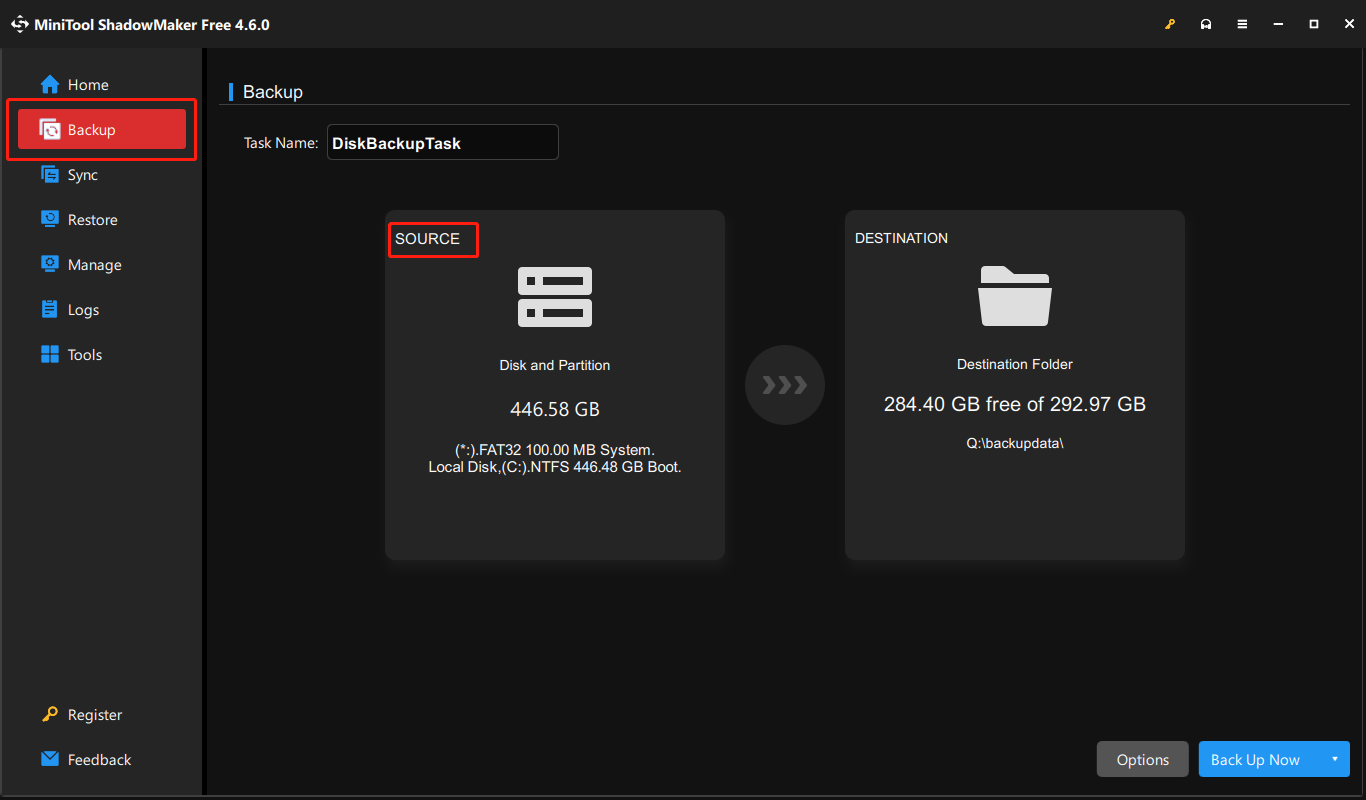
Step 3: In the main interface, select the DESTINATION section to choose a storage location.
Step 4: Click on Options to enable and set up schedule settings: Daily, Weekly, Monthly, On Event.
Step 5: Click on Back Up Now > OK to start the backup process.

Final Thoughts
By combining the above solutions, you can prevent deleted files from being overwritten very likely. When you try recovering lost data, don’t forget to use MiniTool Power Data Recovery mentioned in this article. However, remember that data recovery is the last line of defense, and preventing data loss is the most fundamental. Additionally, regular data backups, as discussed above, can save you time and effort in case of data loss.
Any questions about MiniTool products are welcome. Feel free to contact us via [email protected].
About The Author

Position: Columnist
Chelsea graduated from university with a major in English. She has a strong interest in English writing. It is this passion for writing that led her to become an English editor. Her articles mainly focus on data recovery and other computer industry news. As an energetic and outgoing girl, Chelsea enjoys listening to music, singing, riding bikes, and eating in her spare time.
User Comments :