Did you accidentally delete files or lose data on your Surface Pro? Fear not! This comprehensive guide from MiniTool Software will walk you through various methods to recover data from Surface Pro, including utilizing the Recycle Bin, using a data restore tool like MiniTool Power Data Recovery, or restoring from previous backups.
In our digital age, data loss can be a nightmare, especially when it involves important files or documents stored on your Surface Pro. Whether due to accidental deletion, system crashes, or hardware failures, losing data can disrupt productivity and cause undue stress. Fortunately, effective methods are available to recover data from Surface Pro and prevent future data loss on the device.
Restore Deleted Files on a Surface Pro from the Recycle Bin
What Is the Recycle Bin in Windows?
The Recycle Bin in Windows is a feature that functions as a temporary storage area for deleted files and folders. When you delete a file or folder in Windows, it is not immediately removed from your system. Instead, it is moved to the Recycle Bin, allowing you to restore it if you realize you still need it.

This feature provides a safety net for users who accidentally delete files or folders, because it allows them to easily recover them without the need for third-party data recovery tools.
You can use these steps to restore deleted files from the Recycle Bin on Surface Pro:
Step 1. Double-click the Recycle Bin icon on the desktop to open it.
Step 2. Check the files in the Recycle Bin and find the needed ones. You can also enter the filename into the search box to directly locate it if you still remember the name of the file you want to recover.
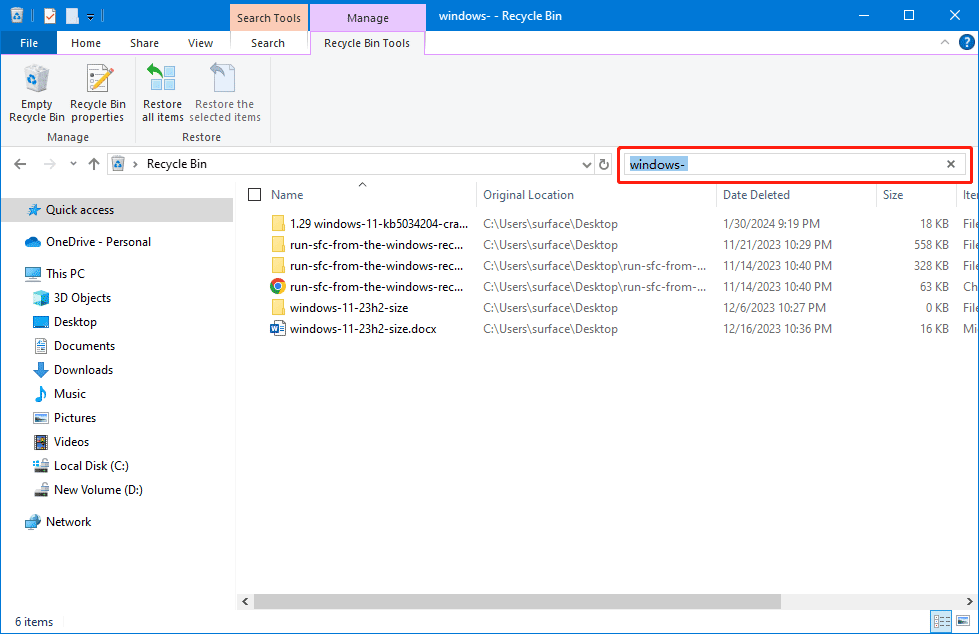
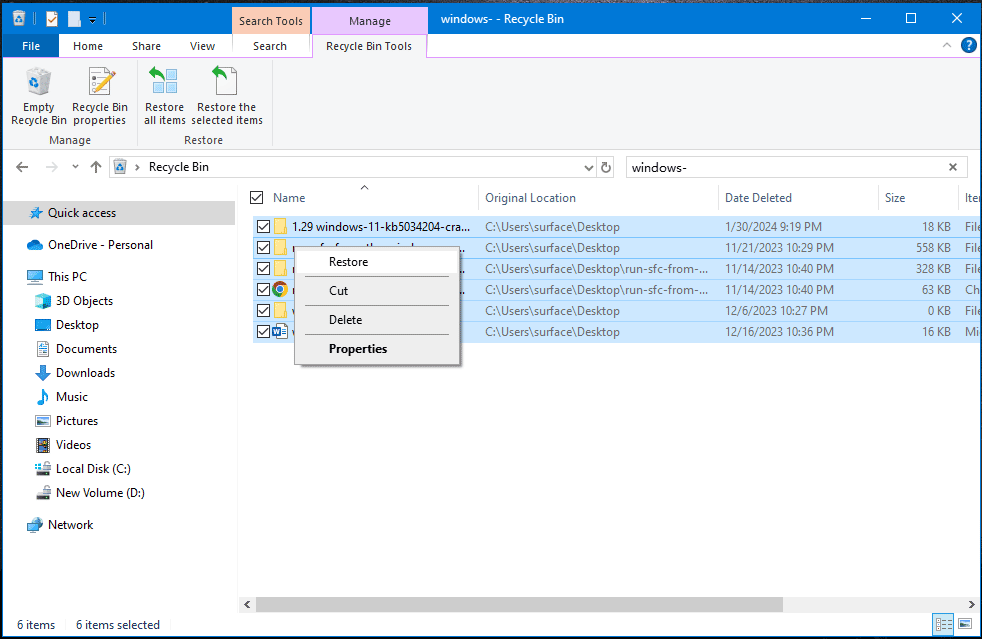
Step 3. Select the desired files, then right-click them and select Restore from the context menu. After that, the selected files will be restored to their original location(s). See where restored files go from the Recycle Bin.
Recover Data from Surface Pro Using MiniTool Power Data Recovery
If your files aren’t in the Recycle Bin or if you’ve emptied it, don’t panic. There are third-party data recovery tools available to recover deleted files from Surface Pro. You can try MiniTool Power Data Recovery, which is specifically designed to recover lost or deleted files from various storage devices and Windows PCs, including Surface Pro.
About MiniTool Power Data Recovery
MiniTool Power Data Recovery stands out as premier free data recovery software, adept at retrieving various file types such as images, photos, documents, videos, audio, and music files from diverse data storage devices. Compatible with all Windows versions, including Windows 11, Windows 10, Windows 8/8.1, and Windows 7, it offers universal accessibility.
Regardless of your computer or laptop brand, MiniTool Power Data Recovery offers a streamlined solution for scanning drives and retrieving essential files. Unsure if it suits your needs? Test its efficacy with MiniTool Power Data Recovery Free, which allows disk scanning and recovery of up to 1GB of files at no cost.
Surface Pro Data Recovery via MiniTool Power Data Recovery
No matter if you are using Surface Pro 9, Surface Pro 8, Surface Pro 7, Surface Pro 6, or Surface Pro 5, you can always run this software to find and recover the files you want.
Use these steps to recover data from Surface SSD or hard drive:
Step 1. Download and install MiniTool Power Data Recovery on your PC.
MiniTool Power Data Recovery FreeClick to Download100%Clean & Safe
Step 2. Launch the software to enter its main interface. This software will display all detected drives and partitions under Logical Drives by default. When you switch to the Devices tab, you will see the disk as a whole. In the Recover From Specific Location section, you can select a specific location to scan.
As per your situation, you can select one of the following scanning methods:
- Under Logical Drives, find the drive you want to recover data from and move the mouse cursor to it. After that, you need to click the Scan button to start scanning it. If you know which partition the deleted files were saved, you can use this method.
- Under Devices, you can select the whole disk to scan. You can use this scanning mode if you forget which partition is the original location of the missing files.
- Under Recover From Specific Location, you can select a specific location like the desktop, Recycle Bin, or a specific folder to scan. This method is a good choice if you still know the exact location of the deleted files on Surface Pro.
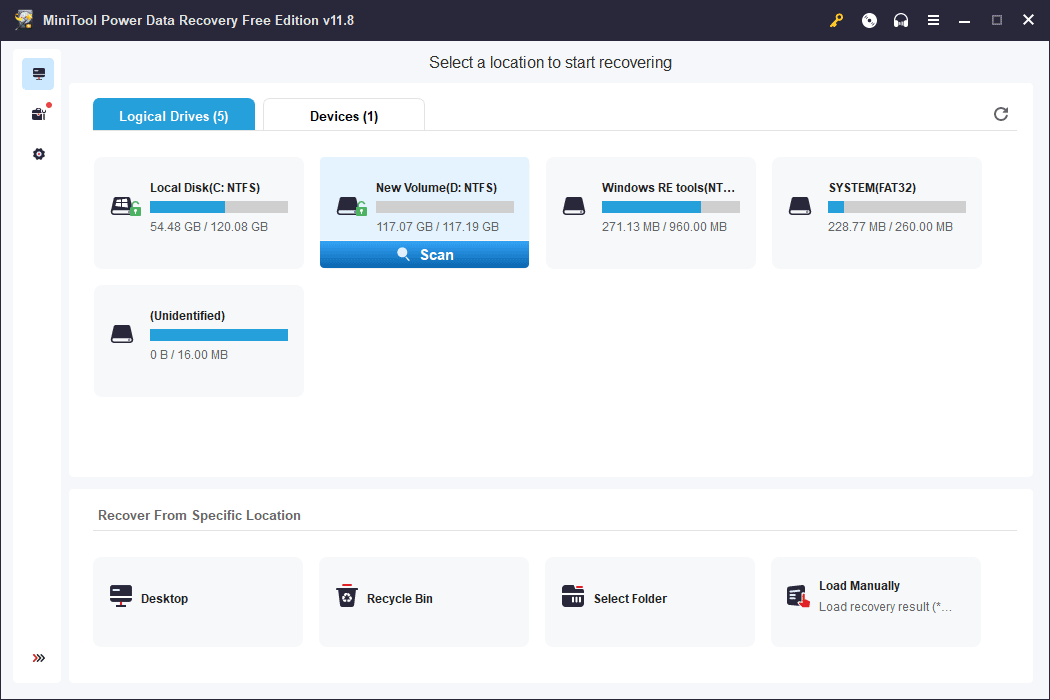
In this article, we take scanning the drive D as an example.
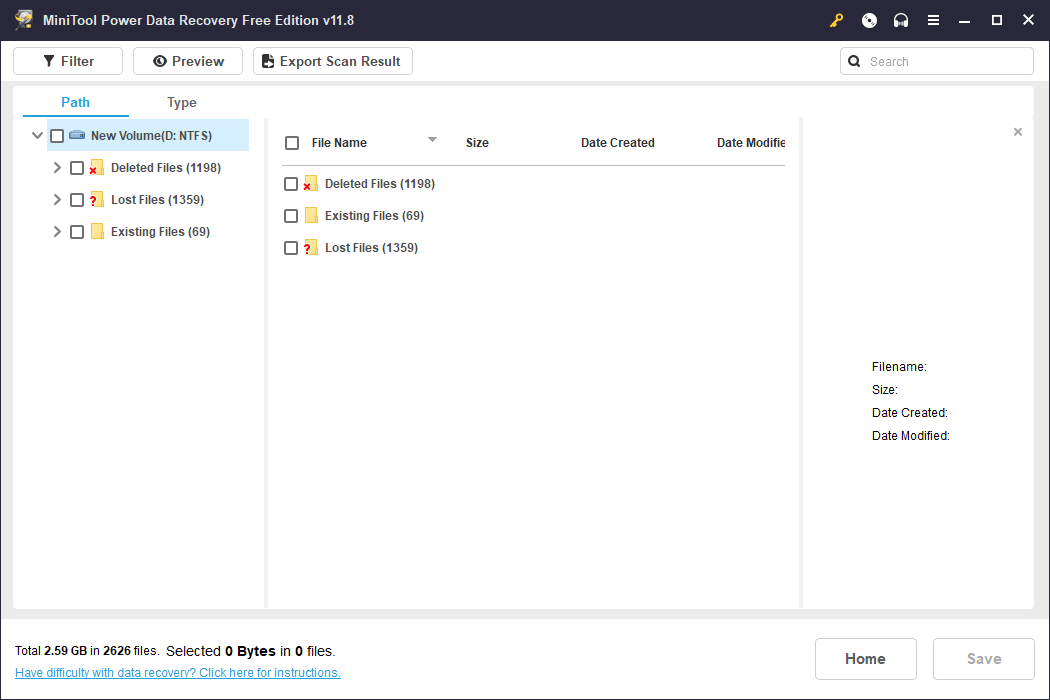
Step 3. When the scanning process ends, this software will show the scan results by path by default. If you want to recover deleted files on Surface Pro, you can expand the Deleted Files folder to find them. If you want to recover lost files on Surface Pro, you can expand the Lost Files folder to find the items. You can also switch to the Type tab to make this software display scanned files by file type, and then you can locate the files you need based on the file type.
Step 4. You can select one file and preview it to confirm if it is the file you want to restore. In detail, this data restore tool supports previewing Word documents, Excels, PPTs, texts, videos, audio files, and more. Additionally, the size of the file that can be previewed should not exceed 2GB.
Step 5. Choose the needed files and click on the Save button. Then, you can select a suitable location from the pop-up interface to store the selected files. To prevent the deleted files from being overwritten, you should not save files to their original location.
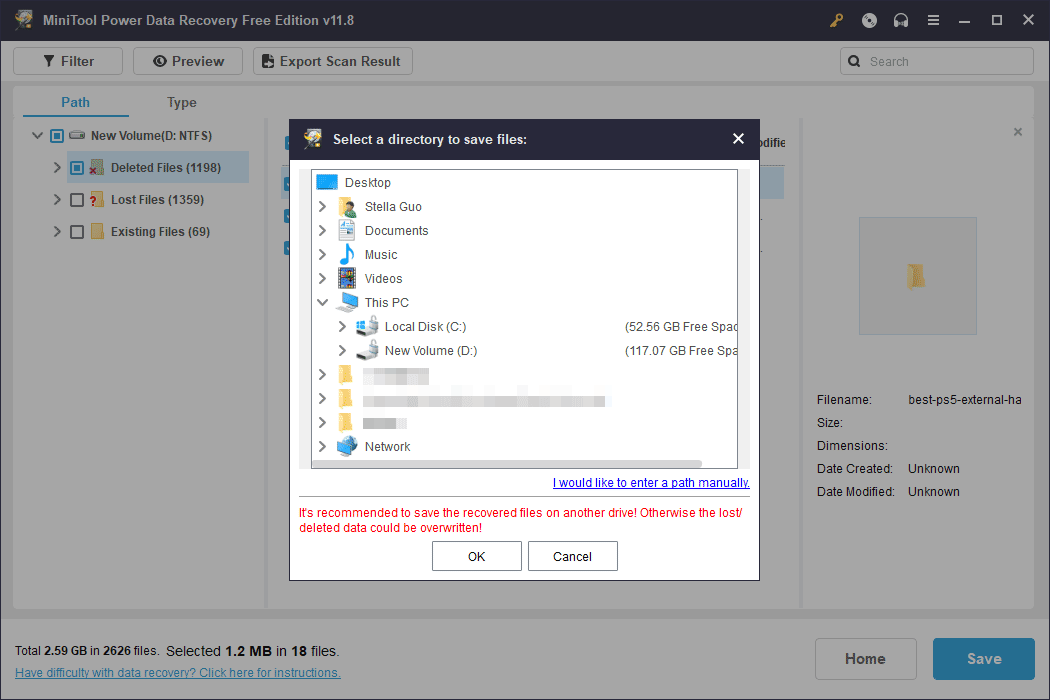
If you want to recover more than 1GB of files using this file recovery tool, you can upgrade this freeware to a full edition.
Recover Data from Dead Surface Pro Using MiniTool Power Data Recovery Boot Disk
If unfortunately, your Surface Pro won’t boot due to some reason, you’d better first use MiniTool Power Data Recovery Boot Disk to rescue files from the PC. After that, you can take action to fix the dead Surface Pro.
To do this job, you need to use MiniTool Bootable Media Builder to create a bootable USB drive and then boot your PC from the bootable USB drive. After that, you can scan your drive and rescue files to an external hard drive or SSD.
![[Solved] Surface Pro Won’t Turn on or Wake up from Sleep](https://images.minitool.com/minitool.com/images/uploads/2020/01/surface-pro-wont-turn-on-thumbnail.jpg)
Restore Deleted Files from the Previous Backup
Another effective way to recover lost data on your Surface Pro is to restore from previous backups.
If you’ve been diligent about backing up your Surface Pro regularly, you can easily restore your system to a previous state where the lost data still existed. Windows offers built-in backup and restore features, or you can use third-party backup solutions for added flexibility and control.
The backup restoring steps depend on the backup tool you use. However, here are some useful instructions you may be interested in:
- How to restore files with File History in Windows 10.
- How to restore deleted files from Dropbox.
- How to recover deleted files from OneDrive.
How to Back up Surface Pro?
Prevention is always better than cure, and the best way to safeguard your data on a Surface Pro is to implement a reliable backup strategy.
Windows Built-in Backup Tools
Windows operating systems come equipped with several built-in backup utilities designed to protect your data and system configurations. Here are some options you can utilize on your Surface Pro.
File History
File History is a built-in backup tool in Windows that automatically backs up your files to an external drive or network location. So, you can enable it on your PC to safeguard your files.
To enable File History:
Step 1. Connect an external drive to your Surface Pro.
Step 2. Go to Settings > Update & Security > Files backup > Add a drive under Back up using File History, and then select your external drive.
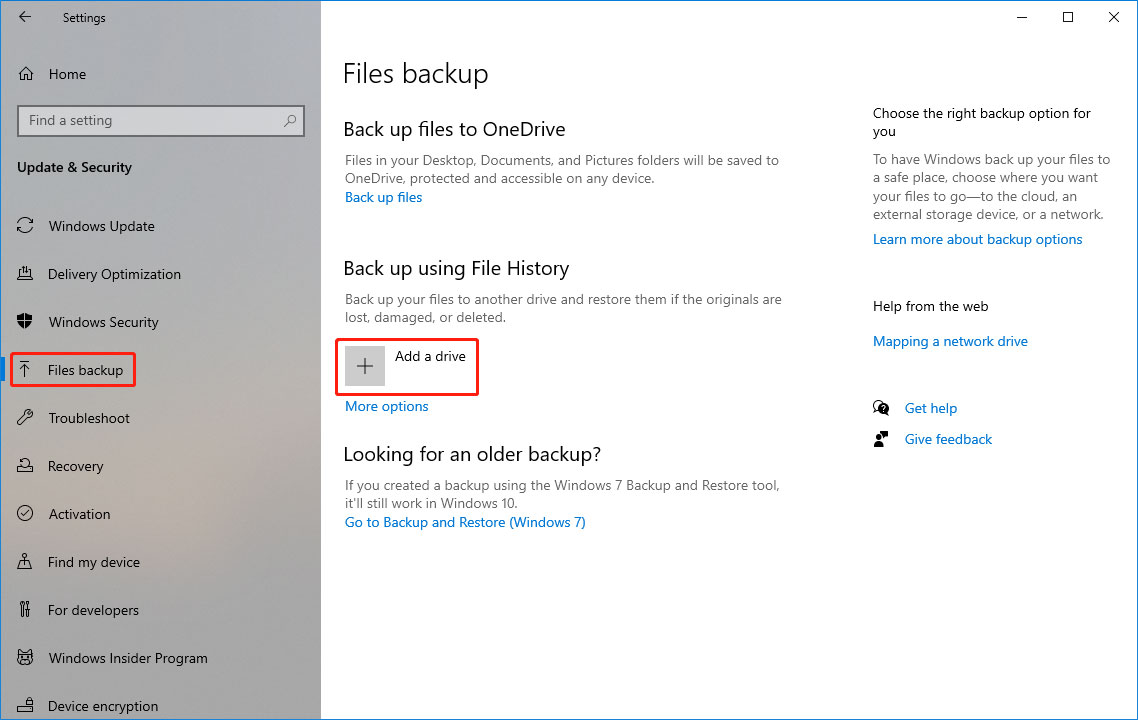
Step 3. Toggle on Automatically back up my files.
System Restore
System Restore allows you to revert your Surface Pro’s system files and settings to a previous state without affecting your files. Likewise, it is a good choice to back up your Surface Pro.
To create a system restore point:
Step 1. Type Create a restore point in the Windows search bar and select the corresponding result.
Step 2. Click on Create and follow the prompts to create a restore point.
Cloud Backup Options
Cloud backup solutions offer off-site storage for your data, providing an extra layer of protection against local disasters and theft. Some popular cloud backup services compatible with Surface Pro include:
OneDrive
OneDrive, Microsoft’s cloud storage service, seamlessly integrates with Windows and offers automatic backup for your files and folders.
To set up OneDrive on your Surface Pro:
Step 1. Go to https://onedrive.live.com/login/ and then sign in with your Microsoft account.
Step 2. Drag and drop files into the OneDrive folder, or enable automatic syncing for specific folders.
Google Drive
Google Drive provides cross-platform cloud storage and backup solutions. To make things easier, you can download and install the Google Drive app on your Surface Pro. Consequently, you can sync your important files and documents effortlessly.
Third-Party Windows Backup Utility
MiniTool ShadowMaker is a third-party backup software offering comprehensive data protection for Surface Pro users. It can run on Windows 11, Windows 10, Windows 8/8.1, and Windows 7.
This Windows backup software supports schedule and event trigger backup, as well as full, differential, and incremental backup schemes. You can also set this backup software to automatically back up your Surface Pro.

You can first try MiniTool ShadowMaker Trial because it allows you to experience its backup and restore features for free within 30 days.
Here is how to back up a Surface Pro using MiniTool ShadowMaker:
Step 1. Download and install MiniTool ShadowMaker Trial on your Windows computer.
MiniTool ShadowMaker TrialClick to Download100%Clean & Safe
Step 2. Double-click the shortcut of the software, and then click the Keep Trial icon on the pop-up interface to enter the software’s main interface.
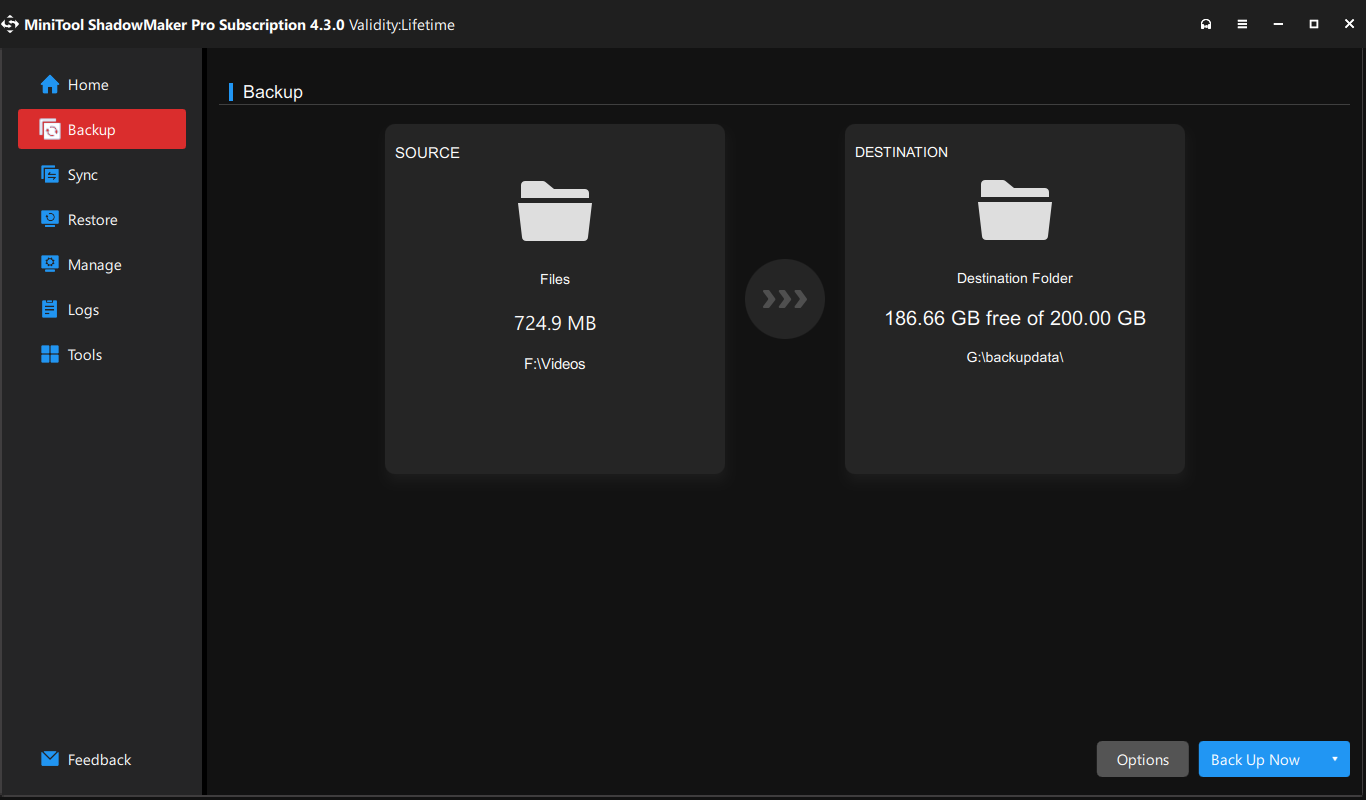
Step 3. Click Backup from the left panel and then you can see the Backup interface.
Step 4. Go to SOURCE > Disk and Partitions or Files and Folders > select the disk or partition or folder or files you want to back up.
Step 5. Go to DESTINATION to select a location to save the backup.
Step 6. Click the Back Up Now button to start the backup process. Wait until the backup process ends. This will back up your selected source as an image.
Bottom Line
Losing data on your Surface Pro can be a stressful experience. However, there are easy methods to help you recover data from Surface Pro.
By utilizing methods such as Surface Pro data recovery from the Recycle Bin, third-party data recovery software like MiniTool Power Data Recovery, restoring from backups, and implementing backup strategies, you can ensure that your important files and documents remain safe and secure on your Surface Pro. Remember to regularly back up your data to avoid future mishaps and enjoy peace of mind knowing that your digital assets are protected.
Besides, please feel free to contact us by sending emails to [email protected] when you encounter any issues when using MiniTool software.
About The Author

Position: Columnist
Stella has been working in MiniTool Software as an English Editor for more than 8 years. Her articles mainly cover the fields of data recovery including storage media data recovery, phone data recovery, and photo recovery, videos download, partition management, and video & audio format conversions.
User Comments :