Use Recovery Options in Windows 11 to Solve Issues
No matter which operating system you are using, it might run into problems unexpectedly. Windows 11 is not an exception. For example, your Windows 11 might not work properly after a new update is installed. Or you can’t boot it successfully due to some reason. If you don’t like this new Windows version, you may want to go back to Windows 10.
All in all, you might encounter different kinds of issues when you are using Windows 11. Well then, how to deal with these problems? You can consider using the recovery options in Windows 11.
There are many available Windows 11 recovery options like Reset your PC, uninstall updates, Startup Repair, system restore, go back to your previous version of Windows, and more. They are designed for different purposes. This article can help you decide which recovery option you can use to solve your problem.
Problem | Select this recovery option |
Files are lost, deleted, or inaccessible | MiniTool Power Data Recovery |
Back up files and systems | MiniTool ShadowMaker |
Your Windows 11 won’t work properly after installing a new update | Uninstall updates |
Your Windows 11 won’t work properly after installing a new app or changing system settings | Reset this PC |
Your Windows 11 won’t boot or keeps loading forever | Startup Repair |
l Your Windows 11 won’t start, but you haven’t created a recovery drive and resetting your PC didn’t work l Your PC is infected by viruses or malware | Reinstall Windows 11 using an installation medium |
Your Windows 11 won’t start, but you haven’t created a recovery drive | Restore Windows 11 using an installation medium |
Your PC won’t start and you’ve created a recovery drive | Use a recovery drive to restore or recover your PC |
You want to reinstall your previous operating system You want to go back to Windows 10 | Go back to your previous version of Windows |
Your PC isn’t working well and you recently installed an app | Restore from a system restore point |
Option 1: Data Recovery Software
First, let’s introduce a data recovery software: MiniTool Power Data Recovery. This free file recovery tool is not to repair your damaged Windows 11 system, but it can recover your precious files from different types of data storage drives. It could be one of the must-have software on your Windows 11 machine.
This software has a trial edition. It can scan the drive you want to recover data from, then you can check if it finds your needed files. To recover your files to a suitable location, you need to use a full edition.
MiniTool Power Data Recovery TrialClick to Download100%Clean & Safe
Here, we will show you how to use this software to restore your lost and deleted files on Windows 11.
Step 1: Download and install MiniTool Power Data Recovery Trial on your computer.
Step 2: Open the software to enter its main interface.
Step 3: This software will display all the drives it can detect on the interface. You can select the target drive and click the Scan button to start scanning the drive. However, if you are not sure which drive is the target drive, you can switch to the Devices section and select the whole drive to scan.
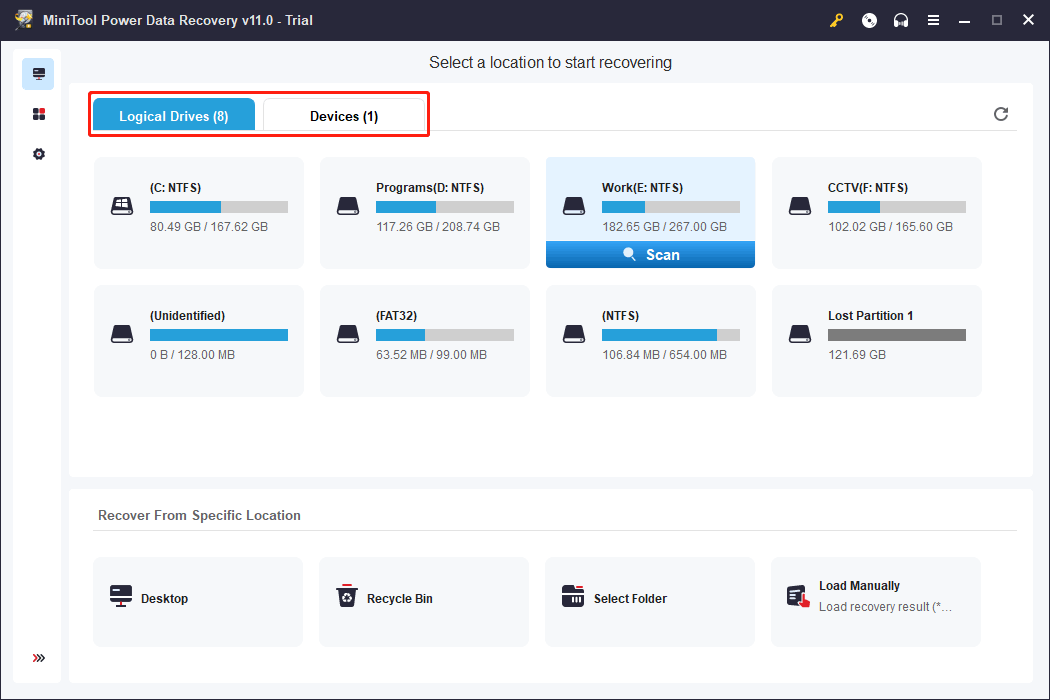
Step 4: When the scanning ends, you will see the scan results. You can open each folder to find your needed files. You can also use the Type feature to find your files by type.
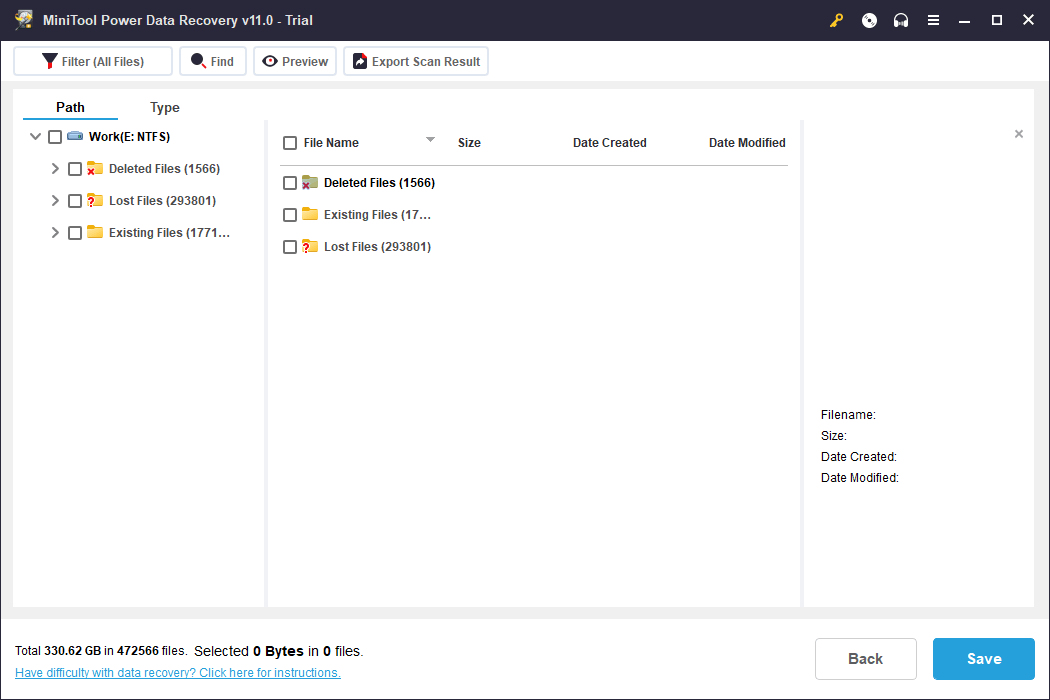
Step 5: If you want to recover your files using this software, you need to use a license key to register this software, then select the files you want to recover and click the Save button to save your files to your specific folder. Here, you need to know that the destination location should not be the original location of the selected files. Otherwise, the lost or deleted files could be overwritten by new data and become unrecoverable.
Option 2: Data and System Backup and Restore
A good option to protect your data and system is to back up them using professional Windows backup software. You can use MiniTool ShadowMaker to do such a job. This MiniTool software can back up and restore your files, folders, partitions, disks, and systems in Windows. It supports schedule and event trigger backup & differential and incremental backup. It also has a trial edition, which allows you to free use it within 30 days.
MiniTool ShadowMaker TrialClick to Download100%Clean & Safe
Option 3: Uninstall Updates
Microsoft keeps releasing updates for Windows 11 to bring new features, improvements, and bug fixes. However, not every update is suitable for you. Your system might not work properly after you install a new update. If this situation happens, you can uninstall the update to make your computer go back to normal.
Windows 11 has an uninstall update feature that can help you remove the recently installed update.
How to Uninstall Updates on Windows 11?
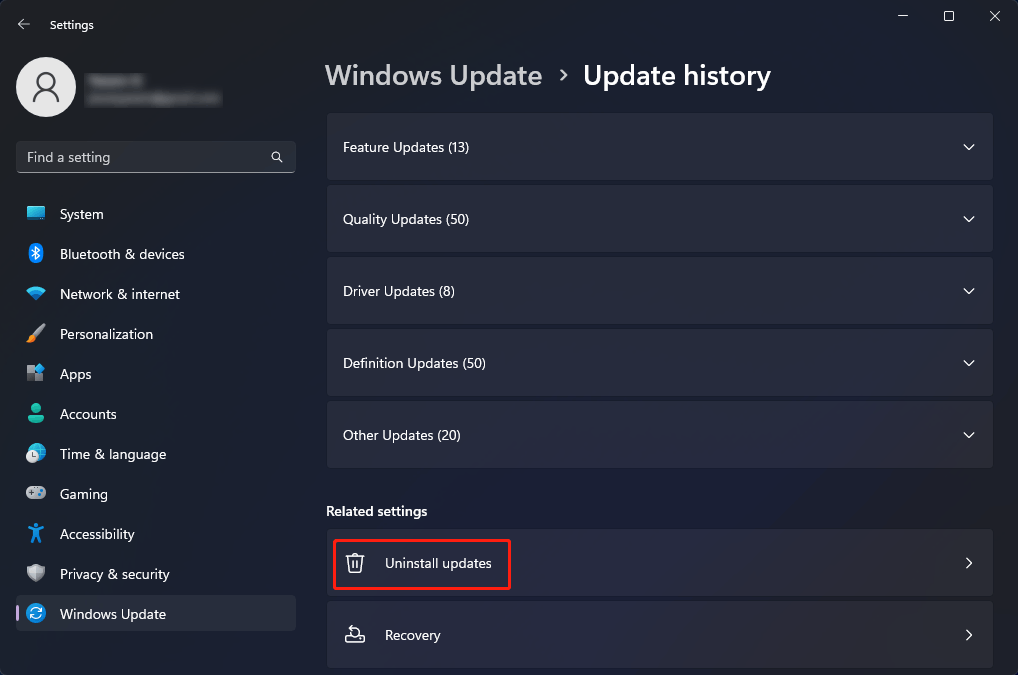
Step 1: Go to Start > Settings > Windows Update > Update history.
Step 2: Scroll down to the Related settings section and click Uninstall updates.
Step 3: On the next page, find the update you have recently installed and click the Uninstall button next to it to remove the update from your device.
Option 4: Reset This PC
After you install a new app or change some system settings on your Windows 11 device, you might find that the system won’t work well anymore. Reset this PC option can help you reset your system to make everything go back to normal again.
Using this method, you can choose whether to keep your files or remove them from your device and then reinstall Windows 11. You can reset your PC from the Settings app or the sign-in screen. Here is how to reset Windows 11 using these two methods.
How to reset your PC from Settings?
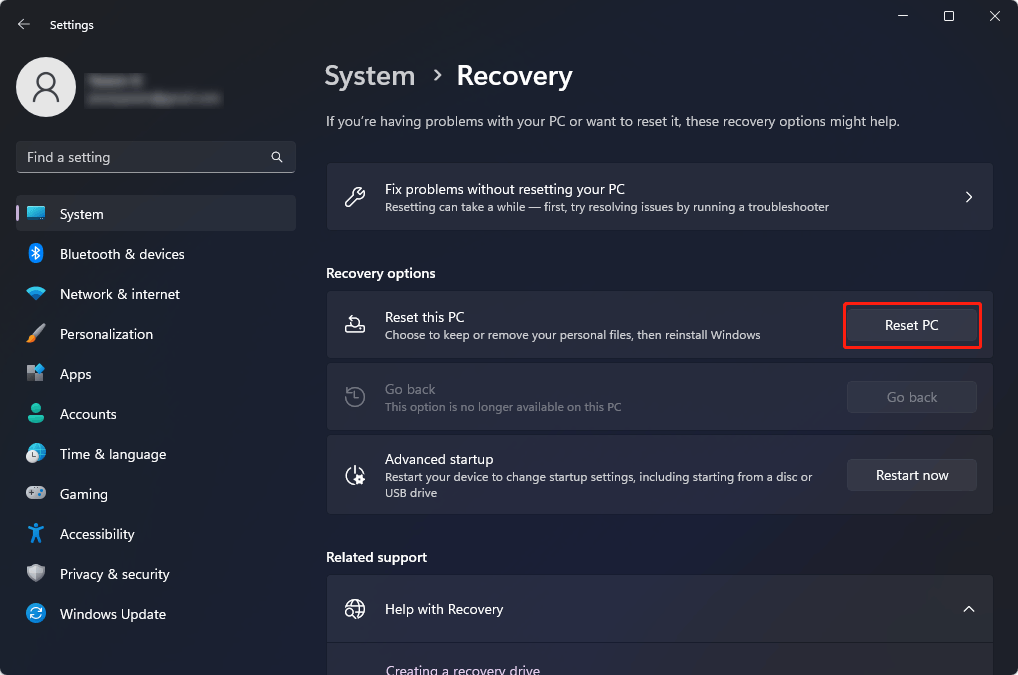
Step 1: Go to Start > Settings > System > Recovery.
Step 2: Click the Reset PC button next to Reset this PC.
Step 3: Follow the on-screen guides to reset your PC.
How to reset your PC from the sign-in screen?
If the Settings app won’t open, you can reset your PC from the sign-in screen.
Step 1: Press Windows + L to access the sign-in screen.
Step 2: Restart your computer by pressing the Shift key while selecting Power > Restart.
Step 3: Your computer will boot into the Windows Recovery Environment (WinRE) environment. Then, go to Troubleshoot > Reset this PC and select an option to reset your PC.

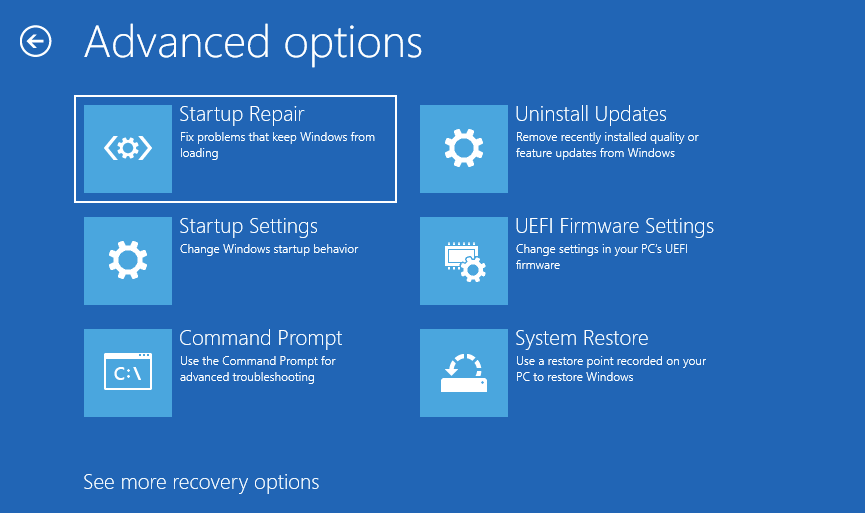
Option 5: Startup Repair
Startup Repair can help you fix some common problems that prevent your Windows 11 from starting up.
Step 1: Press and hold the power button for about 10 seconds to force turn off your device. Then, press the power button again to turn on your device. When you see the logo screen, force turn off your device again. Repeat this operation three times. Then, your computer will enter the Automatic Repair screen.
Step 2: Click Advanced options on the screen.
Step 3: Go to Troubleshoot > Advanced options > Startup Repair > Restart.
Option 6: Windows 11 Installation Media
Windows 11 installation medium can help you reinstall Windows 11 or restore Windows 11.
- If your Windows 11 won’t restart but you haven’t created a recovery drive and reset this PC won’t work, you can reinstall Windows 11 via a Windows 11 installation medium.
- If you suspect that your computer is infected by viruses or malware, you can reinstall Windows 11 using a Windows 11 installation medium.
- If your Windows 11 won’t restart but you haven’t created a recovery drive, you can restore your computer using a Windows 11 installation medium.
>> See how to create a Windows 11 installation medium.
>> Reinstall Windows 11 while it is still running:
Step 1: Connect the installation medium to your computer.
Step 2: Go to File Explorer and open the installation drive.
Step 3: From the root directory of the drive, you need to double-click the setup.exe file. Click Yes if you see User Account Control.
Step 4: Click Change what to keep.
Step 5: Select Keep personal files and apps, or Keep personal files only, or Keep nothing according to your requirements.
Step 6: Click Next.
Step 7: Click Install to start reinstalling Windows 11 on your device.
During the reinstallation, your computer will restart several times.
>> Reinstall Windows 11 by starting your PC using installation medium:
Step 1: Connect the installation medium to your computer.
Step 2: Boot your computer from the installation drive.
Step 3: When you see the Windows setup interface, you need to click Next, then Install, and follow the on-screen guides to reinstall Windows 11 on your device.
>> Restore your Windows 11 PC using the installation medium:
Step 1: Connect the installation medium to your computer.
Step 2: Boot your computer from the installation drive.
Step 3: When you see the Windows setup interface, you need to click Repair your computer to continue.
Step 4: When you see the Choose an option screen, click Troubleshoot to continue. To restore from a system restore point, you need to go to Advanced options > System Restore. Then, you can uninstall the recently installed apps, drives, or updates that might cause your computer issues. This will not affect your personal files.
Option 7: Windows 11 Recovery Drive
If you have created a Windows 11 recovery drive, you can restore your computer from a system restore point or recover your PC.
Step 1: Connect the recovery drive to your Windows 11 PC and turn on your device.
Step 2: Press Windows + L to access the sign-in screen.
Step 3: Restart your computer by pressing the Shift key while selecting Power > Restart. Your PC will boot into the WinRE environment. You will see the Choose an option screen.
Step 4: Go to Troubleshoot.
- If you want to restore from a system restore point, you need to go to Advanced Options > System Restore. This will not remove your files. But it will remove your recently installed apps, drivers, and updates.
- If you want to reinstall Windows 11, you need to go to Advanced Options > Recover from a drive. This will delete all your files, apps, and drivers you have installed. Your system settings will also be changed.
Option 8: Go Back to Your Previous Version of Windows
If you don’t like Windows 11 or the new Windows 11 version has issues, you can choose to go back to your previous version of Windows you have installed. You can find this Windows 11 recovery option in Start > Settings > System > Recovery.
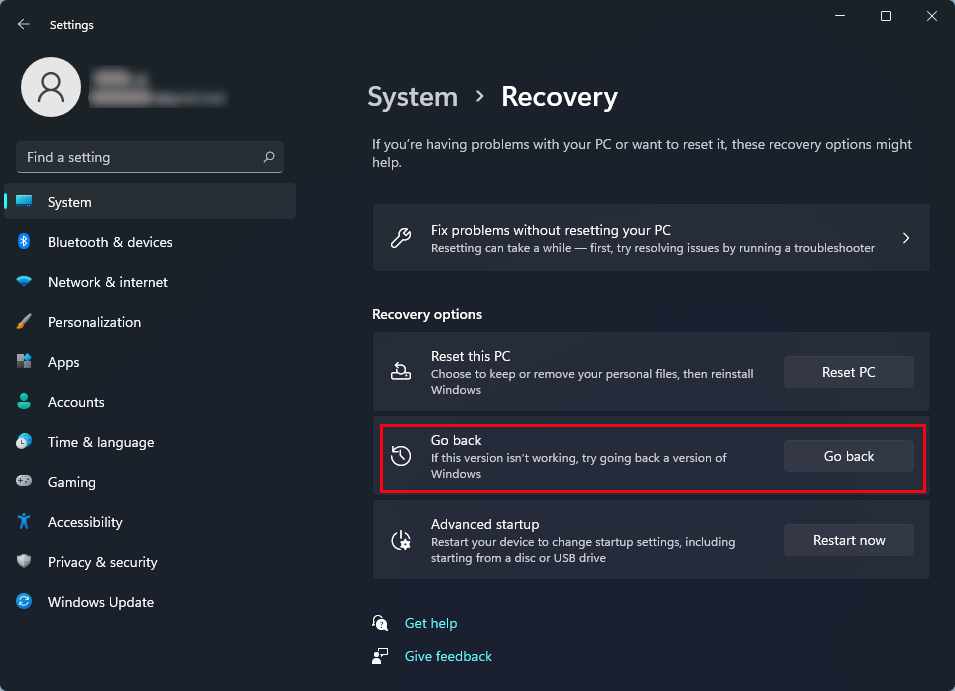
However, this option is only available within 10 days after you update/upgrade your system to a new version.
>> See how to go back to Windows 10 using this recovery option in Windows 11.
Option 9: System Restore Point
This recovery option enables you to make your PC go back to a Windows 11 restore point you have created. It will not remove your files. But it will remove your apps, drivers, and updates you installed after the restore point was made.
Step 1: Click the search icon in the taskbar and search for control panel. Then select Control Panel from the search result to open Control Panel.
Step 2: Click Recovery from Control Panel and go to Open System Restore.
Step 3: On the pop-up Restore system files and settings window, click Next to continue.
Step 4: Select your needed Windows 11 restore point from the list, then select Scan for affected programs.
Step 5: A list of items that will be deleted will be showing up. If you are satisfied with the deletions, you can click Close > Next > Finish to perform a Windows 11 system restore.
Bottom Line
Want to use the recovery options in Windows 11 to repair your Windows 11 issues but don’t know which one is suitable for you? This article is helpful for you. Here, you can find multiple Windows 11 recovery options and know when and how to use them to solve problems on your Windows 11 computer. We hope this article can help you choose a proper option.
Should you have other good suggestions or issues, you can let us know in the comments. You can also contact us via [email protected].
User Comments :