Symptoms of Black Screen of Death
The Black Screen of Death refers to a situation where the computer screen goes black, usually due to a critical, often fatal, hardware or software error on Windows PCs.
Later on, the black screen, or blank screen, is directly used to represent all critical errors that can cause the PC screen to go completely black and unresponsive.
The black screen may occur at any time. For example, during startup, when running a program or a game, or after installing a Windows update.
When the black screen occurs, you may notice the following symptoms.
- The PC turns on but no display. The indicator light may be on or off.
- The computer screen went black but still running. You can hear sound effects.
- Windows black screen with cursor.
- A black screen with a blinking underscore.
Further Reading:
A black screen is different from a blue screen. A blue screen is blue background displaying a warning message with white text. It forces the system to stop running when a Windows system encounters a serious error, in order to protect the system and data.
In addition, blue screens provide error codes to help resolve issues. However, a black screen’s main characteristic is a non-functional display without any information to help solve the problem.
Generally speaking, black screen problems are more troublesome than blue screen problems because they are related to hardware in most cases.
Fix Black Screen Before Windows Login
What to do if my computer screen is black? You may wonder about this question. If you encounter this issue before Windows login, try the following quick methods to solve it.
#1. Adjust Your Screen Brightness
Sometimes, the computer may be working fine, but the screen brightness is too low. When placing such a computer in direct sunlight or a very bright environment, the screen is relatively dark. This may make you mistakenly think that the screen has gone black.
To solve this issue, move your computer to a dimly lit area and check if the screen is displaying normally. If so, increase the screen brightness through the following methods.
- For Desktops: Look for buttons on the bottom right edge or back of your monitor. Press the menu button to open the On-Screen Display (OSD). Then, navigate to Brightness or Display to adjust the level.
- For Laptops: Most laptops have a dedicated key to adjust screen brightness directly. The brightness key usually ranges from F1 to F12 (e.g., F5 or F6 for Dell PCs), marked with a sun icon. Hold down the Fn key while pressing the brightness key to adjust the brightness.
#2. Press Windows + Ctrl + Shift + B
Windows + Ctrl + Shift + B is a keyboard shortcut for resetting the display driver. It is usually used to fix screen display problems like a black screen, frozen screen, flickering screen, or a screen that won’t wake up.
After pressing this combination, you will hear a beep, and the screen will briefly go black and flicker. This is the normal process. Then, the Desktop Windows Manager (DWM) will redraw, resolving issues caused by the graphics card.
#3. Use Ctrl + Alt + Del
Click the CapsLock or NumLock keys to see if any indicator light turns on. If the indicator light doesn’t turn on, skip this method.
If any of the keys’ lights turn on, press Ctrl + Alt + Delete to prompt the administrator menu. Select your account and sign in as usual. If unable to sign in, click the Power icon and choose Restart to reboot the PC.
#4. Force Restart
In most cases, the force restart will take effect. You need to unplug all external devices, including the AC adapter, mouse and keyboard, external hard drives, VR headsets, Wi-Fi antennas, etc.
Then, press the power button and hold it for 5 to 10 seconds (or up to 30 seconds for some PC models), release the power button, count to 5, and press the button once. If it doesn’t turn on right away, try this step a few times until you see the power indicator light come on.
#5. Check the Display Connections
The loose display connections may also cause the black screen of death, especially when you notice that the screen goes black, but the GPU fan is running full.
Make sure your device is fully charged and/or plugged in. For desktops, make sure the GPU’s power cable and other cables are properly seated. If you are using an external monitor, make sure the monitor is connected, plugged in, and powered on.
#6. Cool Down the Monitor
Why does my monitor keep going black? One of the reasons is the monitor overheating. Power off the computer and wait for the monitor to cool down. After that, turn on the PC and check if the issue has been solved.
If the problem is resolved, you will need to take further steps to prevent the monitor from overheating. Here are some methods.
- Make sure there are no heat sources near your monitor, and the room is cool.
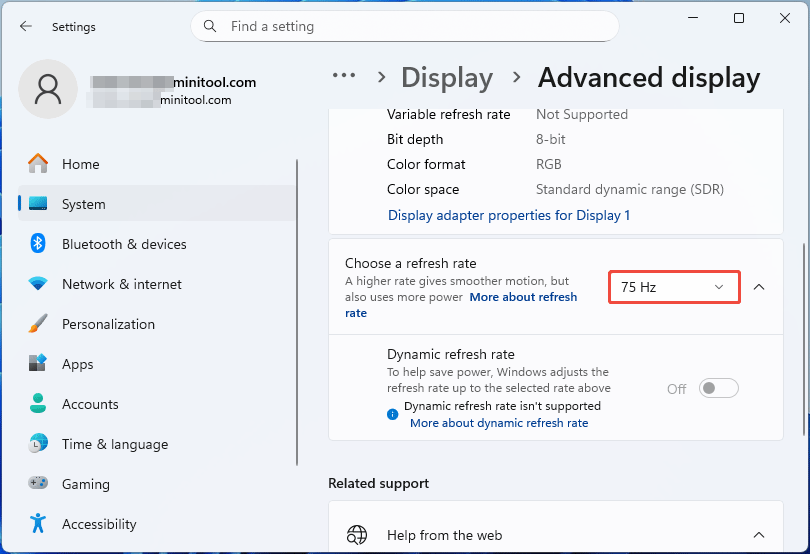
- Monitors with higher refresh rates will produce more heat. Make sure you haven’t overclocked your monitor. What’s more, you can press Windows + I to open Settings, go to System > Display > Advanced display, find “Choose a refresh rate”, and then select a lower monitor refresh rate.
Fix Black Screen After Windows Login
A black screen of death may occur when running a program or a game, after updating Windows or device drivers, etc. In addition to the above methods, you can also use the following approaches to troubleshoot the Windows black screen after login issue.
#1. Switch Display Mode
The Windows + P keyboard shortcut on Windows 10/11 instantly opens the Project menu, allowing you to quickly manage multiple displays. It can also be used to restore the PC from a black screen. Press Windows + P. Then, tap P again and press Enter to cycle through display modes (PC screen only, Duplicate, Extend, and Second screen only).
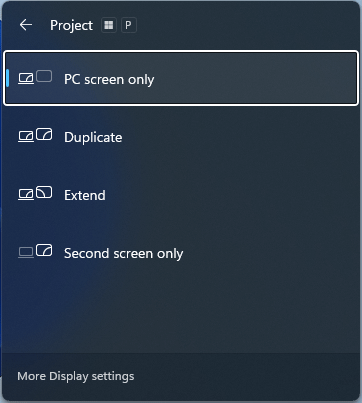
- PC screen only: Only the main display is used.
- Duplicate: Shows the same content on both screens.
- Extend: Expands the desktop across both screens, allowing windows to be dragged between them.
- Second screen only: Only the external monitor is used.
#2. Restart Windows File Explorer
Restarting Windows File Explorer can usually fix the Windows black screen with cursor after logging in. Here are the steps.
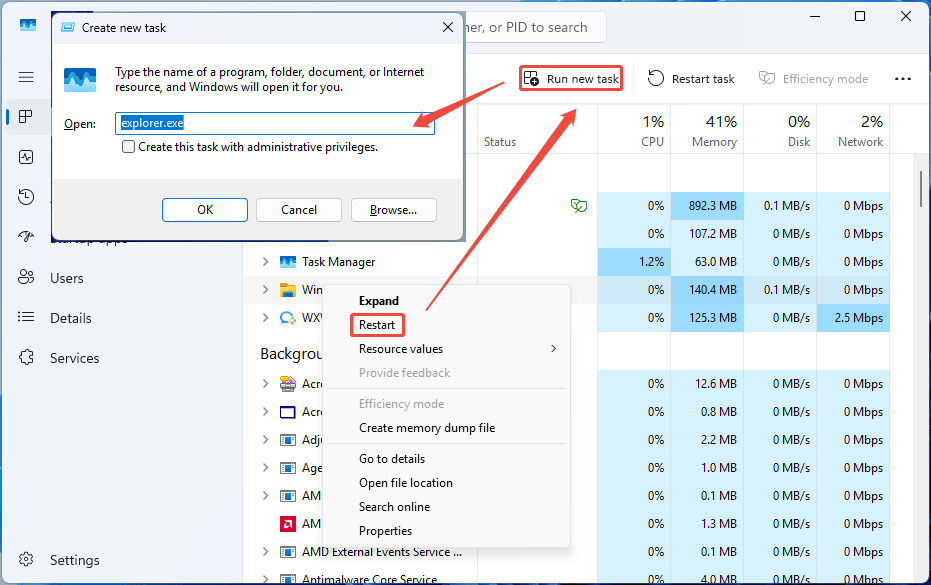
- Open Task Manager with Ctrl + Shift + Esc. If this combination doesn’t work, use Ctrl + Alt + Delete and then select Task Manager from the menu.
- On the Processes tab, right-click Windows Explorer, and then choose Restart. If it’s not listed, click Run new task, type “explorer.exe” and press Enter.
If the above steps don’t work, try them again in Safe Mode. To enter Safe Mode, first enter WinRE by interrupting the boot process for 3 times (power on the PC and then immediately power off it when the PC logo appears), then go to Troubleshoot > Advanced options > Startup Settings, click Restart, and finally press F5 to Enable Safe Mode with Networking.
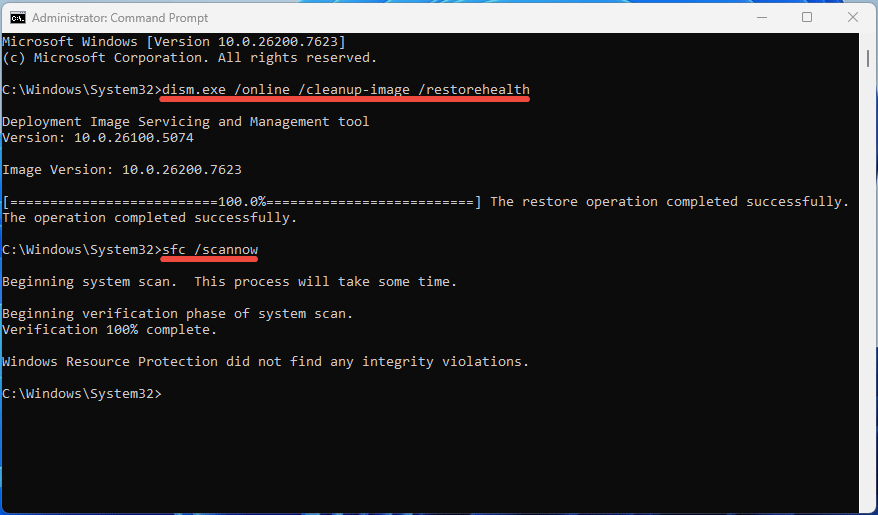
#3. Run SFC Scannow
If restarting Windows Explorer works, the desktop should be loaded. Then, it’s a matter of finding out why your system is not booting the desktop. The most common reason is some form of system file corruption, which can be fixed by running DISM and SFC commands.
Even if the restarting Windows Explorer method doesn’t work, running these commands can also serve as a standalone method to fix the black screen issue. Here is the guide:
- In the Windows Search bar, type “cmd”. From the result list, right-click Command Prompt and choose Run as administrator.
- In Command Prompt, type “dism.exe /online /cleanup-image /restorehealth” and press Enter.
- Once the command completes successfully, type “sfc /scannow” and press Enter.
- If the two commands completed successfully, it usually indicates that the system is fine. Otherwise, you need to take other measures to repair Windows.
#4. Update, Roll Back, or Reinstall the GPU Driver
Why is my laptop screen black? In many cases, the reason is the unstable or corrupt GPU drivers. Then, updating the GPU driver may solve it.
However, if you get a black screen after installing a GPU driver through Windows updates or encounter the Nvidia driver update black screen issue, rolling back the GPU driver or reinstalling a GPU driver of a known stable version can solve it.
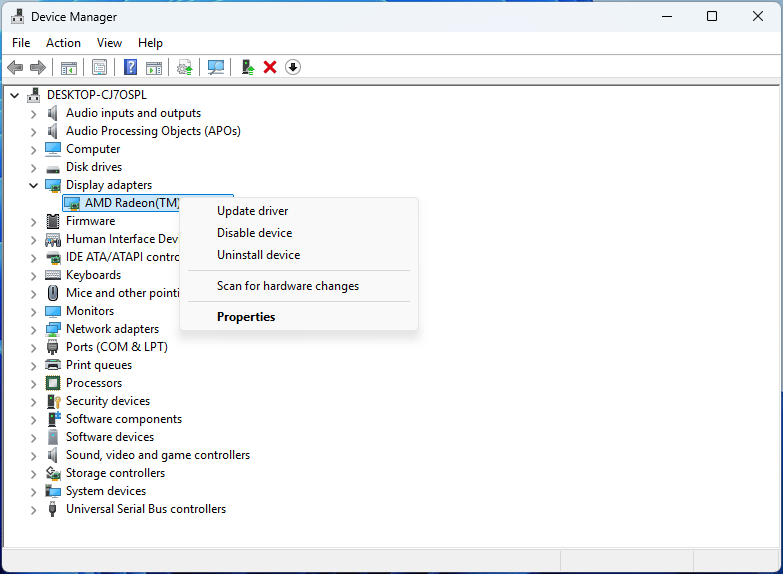
Here is how to update or roll back the GPU driver:
- Press Windows + X and select Device Manager.
- Expand Display adapters and right-click your graphics card.
- To Update: Select Update driver and then click “Search automatically for drivers.”
- To Roll Back: Select Properties, go to the Drivers tab, and then click Roll Back Driver.
Here is how to reinstall the GPU driver:
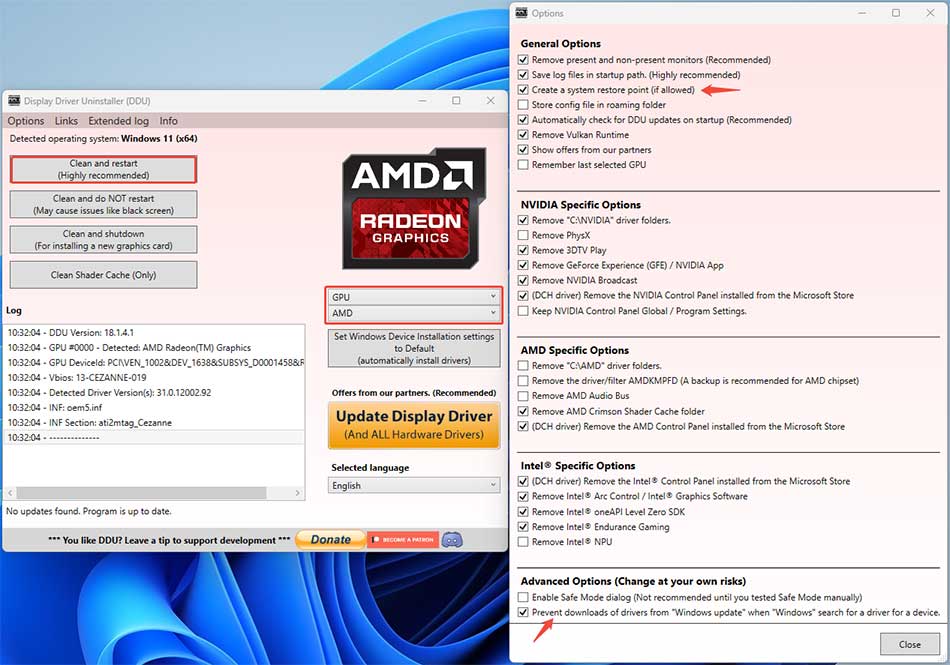
Step 1: Uninstall the GPU driver with DDU (Display Driver Uninstaller). This software can completely uninstall AMD/NVIDIA graphics card drivers, without leaving leftovers behind.
- Download and install DDU from the Wagnardsoft website.
- Boot into Safe Mode. It’s recommended but not necessary.
- Run this software. In the Options window, read these options and click Close. Pay attention to two options: Create a system restore point and Prevent downloads of drivers from “Windows update” when “Windows” search for a driver for a device. It’s recommended to choose the former option to avoid risk. As for the latter, depend on your needs.
- Expand the Select device type menu and select GPU. Then, select the Nvidia or AMD GPU device according to your GPU card brand.
- Click Clean and restart.
Step 2: Reinstall the GPU driver.
- Download a known stable GPU driver version from the GPU device manufacturer or the PC manufacturer.
- The GPU driver is an executable file. Double-click it to run. Then, follow the wizard to install the GPU driver. For more detailed steps, refer to this post: A Full Guide to Device Driver Update on Windows 11.
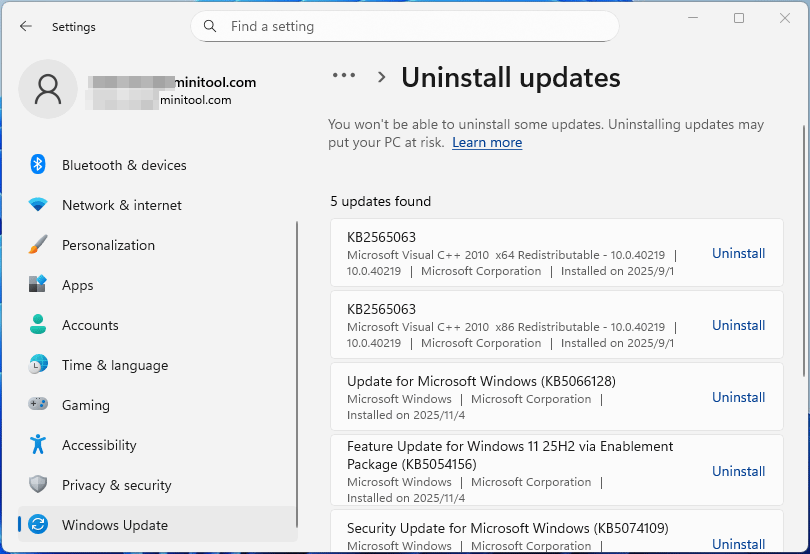
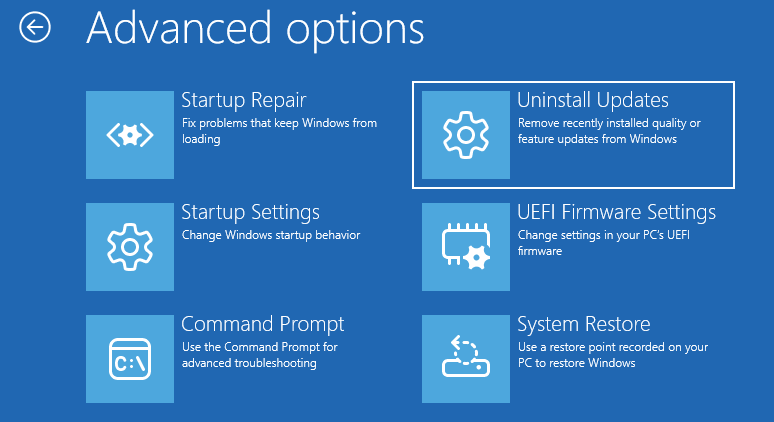
#5. Uninstall Recent Updates
If the computer screen goes black after installing Windows updates, then uninstalling them can restore the PC to normal. Here is the guide.
- Press Windows + I to open Settings.
- Go to Windows Update > Update history > Uninstall updates. In Windows 10, go to Update & Security > Windows Update > View update history > Uninstall updates.
- Identify the latest update and then click Uninstall next to it. In Windows 10, right-click the update and then click Uninstall.
If your computer can’t boot into Windows, follow the guide below to uninstall the quality update of Windows:
- Enter WinRE using the method described above.
- Go to Troubleshoot > Advanced options > Uninstall Updates.
- Select Uninstall latest quality update. A quality update is usually a cumulative update.
- Click the Uninstall quality update button to start the uninstallation.
#6. Limit the GPU Usage
Is your laptop screen black but still running? One of the reasons is that the graphics card is shut down because the computer thinks it is overheating.
Use software to monitor the GPU’s temperature. If the temperature is high, you need to clean the PC fans and apply thermal paste.
Or, you can lower clock speeds of the GPU to force limit the GPU usage, which can reduce the heat generated by the GPU. In addition, this method can also resolve the black issue caused by an insufficient power supply.
Here is how to limit the GPU usage.
For AMD GPUs:
- Open AMD Software: Adrenalin Edition and go to Performance > Tuning.
- Select Global Tuning (or a specific game profile).
- Under the GPU section, change the Tuning Control to Custom.
- Make sure the GPU Tuning is Enabled.
- Reduce the Max Frequency (%) to 90 or even lower.
- Click Apply Changes in the top right corner.
For Nvidia GPUs:
- Open NVIDIA Control Panel and click Manage 3D Settings.
- Under Global Settings, select Power management mode.
- Change the mode from “Prefer maximum performance” to “Normal”, “Adaptive”, or “Optimal power”.
#7. Update the GPU Card’s Firmware
Sometimes, the GPU manufacturers may screw up the GOP (Graphics Output Protocol) module in their firmware, breaking UEFI support (meaning no video during the UEFI phase of boot). Then, a firmware update can solve the black screen of death.
For Nvidia GPUs:
- Download the NVIDIA GPU Firmware Update Tool for your GPU from the NVIDIA website.
- Run this tool. It will detect available updates.
- Follow the on-screen instructions to update the firmware.
For Other GPUs:
- Go to the PC manufacturer’s website and search for your PC model.
- On the product page, go to the driver and firmware download page.
- Find and download the VBIOS update (e.g., RTX2080_VBIOS_v1.0.0.5.exe for a Dell PC).
- It should be an executable file. Run it directly to update the GPU firmware.
2. If your graphics card doesn't have an available VBIOS update, you can try flashing an updated VBIOS from another graphics card to resolve the black screen issue. Refer to this Reddit post (6900XT Black Screen Crash Fix) for detailed steps. Note that this method is very risky and may void the warranty on the card. Do this at your own risk and as a last resort.
Advanced Troubleshooting Methods
If the above methods don’t work, try the following ones to troubleshoot the black screen of death. Most of these approaches can work even if your computer won’t boot into Windows.
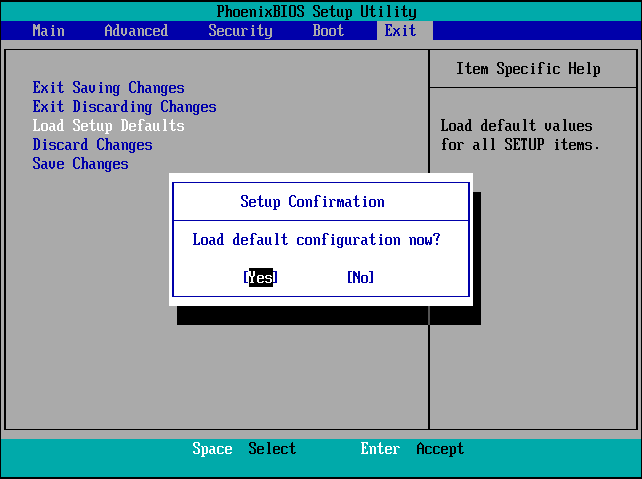
#1. Reset BIOS/UEFI
Have you ever modified some settings in BIOS/UEFI? If so, you may have messed up the BIOS/UEFI settings, causing the black screen. To solve the issue, reset the BIOS/UEFI through the following steps:
- Shut down your computer completely.
- Power on your computer and then press the BIOS key immediately when the PC logo appears. The BIOS key should be Del, Esc, F2, etc. You should search online for the specific key of your PC model.
- Once in the firmware, navigate to the Exit or Setup tab using the arrow key.
- Use the arrow key to highlight Load Setup Defaults, Optimal Defaults, Restore Defaults, or a similar option. Then, press the Enter key to select it.
- When it asks you whether to load the default configuration, select Yes by pressing Enter.
- Go to the Boot menu to make sure your internal hard drive is the first boot device.
- Press F10 and then Enter to save changes and exit.
#2. Perform System Restore
Windows system corruption can cause the black screen of death. In this case, system restore is one of the methods to repair Windows. It can revert Windows back to a previous state when Windows runs well. That state is called a system restore point.
2. This feature won’t affect your personal files, but it will remove apps, drivers, and updates installed after the restore point is created.
Here is how to perform a system restore.
Step 1: Enter WinRE and then go to Troubleshoot > Advanced options > System Restore. On the pop-up window, click Next. Then, select a system restore point according to the Date and Time, and click Next.
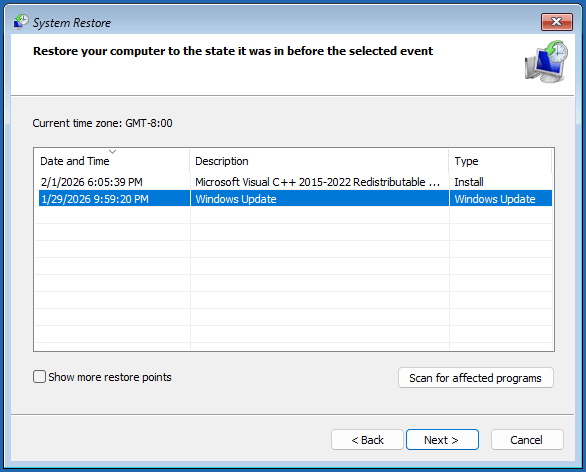
Step 2: Confirm your restore point and click Finish. Then, click Yes on the pop-up warning window to confirm the operation. It will start restoring the PC.
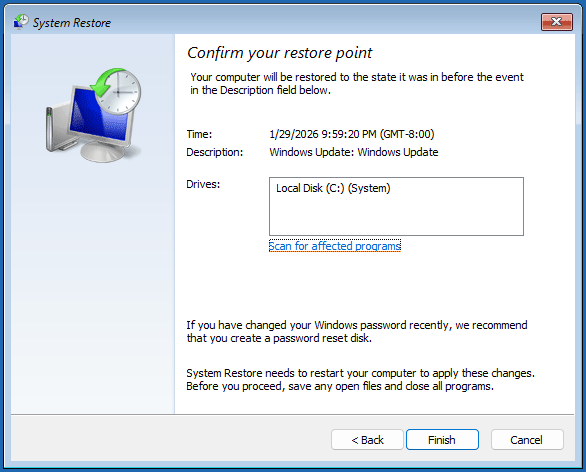
You can also perform a system restore from Windows. Open “create a restore point” from Windows Search. The System Properties window will pop up, with the System Protection tab opened. Click the System Restore button to perform it.
#3. Reset the PC
Some users report that resetting the PC can solve the black screen issue. It can also repair Windows while keeping your personal files. Here are the steps:
- Enter WinRE and then click Troubleshoot > Reset this PC.
- Choose Keep my files and then Local reinstall. It will reinstall Windows using the local recovery image stored in the WinRE while keeping your personal files.
- Click Reset to start the reset process.
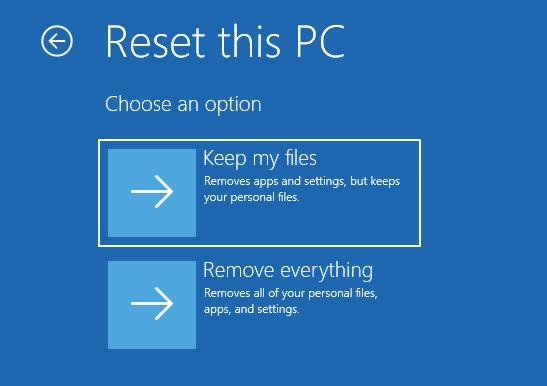
You can also reset the PC from Windows: open Settings and then go to System (for Windows 11) or Update & Security (for Windows 10) > Recovery. Find Reset this PC and click the Reset PC or Get started button.
#4. Reinstall Windows
Reinstalling Windows is a more thorough method to repair Windows. If the black screen is caused by system corruption, this is the most reliable and the last resort to solve the issue. However, this method will erase data. You need to transfer or recover data before reinstalling.
To recover data from an unbootable PC, you can use MiniTool Partition Wizard. This software can recover data from internal hard drives, external hard drives, USB drives, SD cards, the desktop, Recycle Bin, or a specific folder.
It is also a free partition manager with the ability to format drives, move/resize partitions, extend partitions, etc.
MiniTool Partition Wizard DemoClick to Download100%Clean & Safe
Here is how to recover data and then reinstall Windows.
Step 1: Make a bootable USB drive with MiniTool Partition Wizard.
- Open a well-running PC, connect a USB drive to this PC, and then run MiniTool Partition Wizard.
- In the software’s interface, click Bootable Media in the top right corner.
- In the pop-up window, click WinPE-based media with MiniTool plug-in.
- Select USB Flash Disk as the media destination.
- Read the Note message and click Yes to confirm and start the creation process.
- After the creation process is complete, click Finish.

Step 2: Boot the unbootable PC from the USB drive.
- Insert the bootable USB drive into the unbootable PC.
- Connect an external drive to the PC so that you can recover data to it.
- Power on the PC, and then press the boot menu key (F2, F8, F9, F11, F12, Esc, etc.) immediately when the PC logo appears.
- When the Boot Menu appears, select the USB drive to boot up.
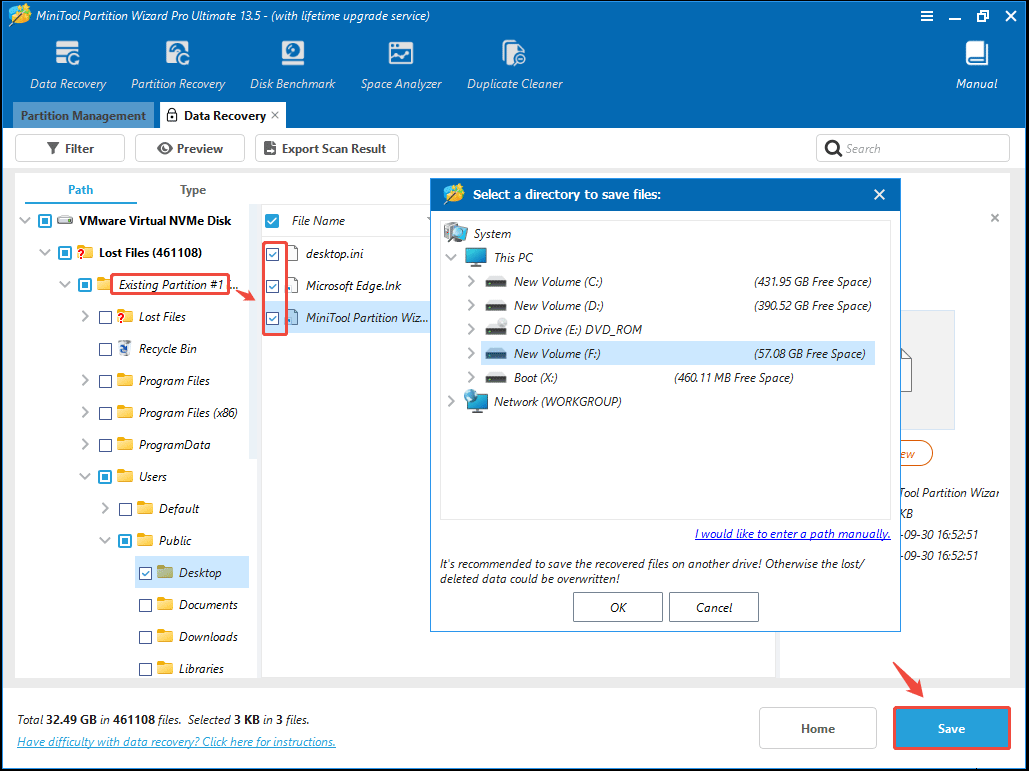
Step 3: Recover data to the external drive.
- Wait until MiniTool Partition Wizard opens.
- Click Data Recovery > Devices.
- Select the system disk to Scan.
- Wait for a few minutes and then stop the scanning process. The black screen doesn’t delete files. It just prevents you from accessing the existing data. Therefore, you don’t need to spend several hours waiting for the scanning process to complete.
- Expand Lost Files > Existing Partition and navigate to the files that you want to recover, just like in Windows.
- Check the boxes before the files to be recovered and then click Save.
- In the pop-up window, select the external drive to save recovered files.
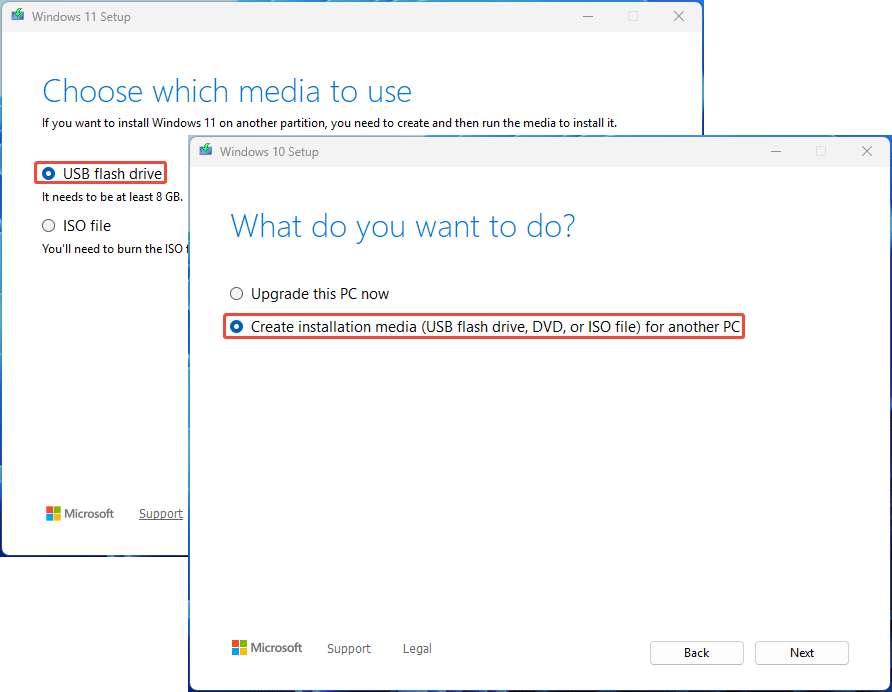
Step 4: Make a Windows installation USB drive.
- Insert the USB drive into the normal PC again.
- Download the Windows 11/10 Media Creation Tool from Microsoft’s website and then run it.
- Follow the on-screen instructions to create a Windows installation USB drive. It means that you need to select the USB flash drive option (for Windows 11) or the Create installation media (USB flash drive, DVD, or ISO file) for another PC option (for Windows 10).
Step 2: Reinstall Windows.
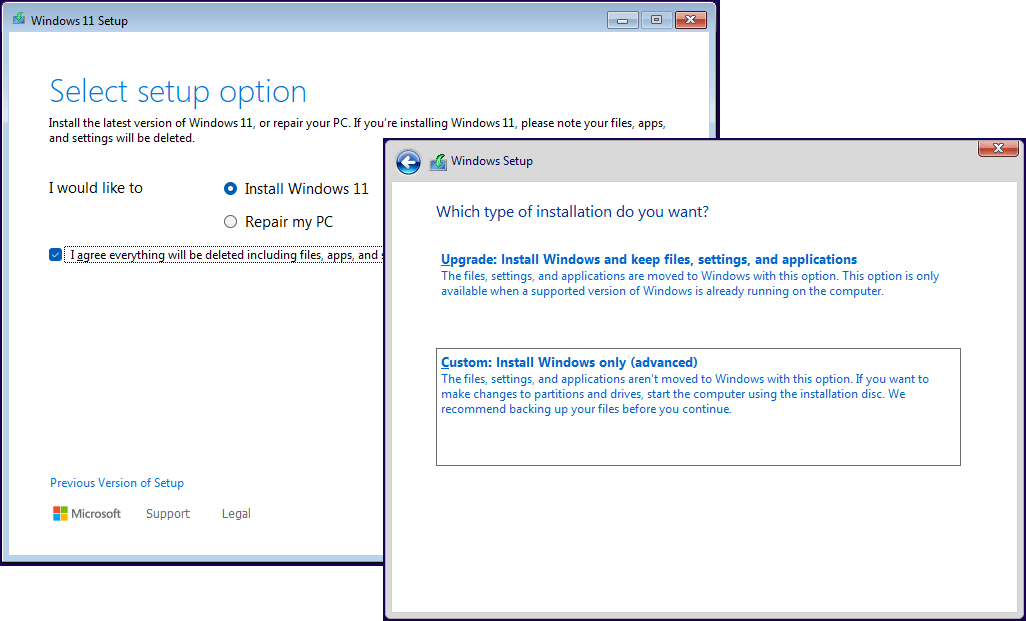
- Boot the unbootable PC from the Windows installation USB drive.
- Once the Windows Setup interface appears, follow the on-screen instructions to install Windows. It means selecting the Install Windows 11 option for Windows 11 and the Custom: Install Windows Only (advanced) option for Windows 10.
2. When you are asked to select the location to install Windows, it’s recommended that you use the Delete Partition feature to delete all partitions. Once the disk becomes unallocated, select it to install Windows.
#5. Test Hardware Components
If all the above methods don’t work, it’s time to consider the hardware failures. In general, the damaged CPU, memory, hard drive, PSU, display, laptop keyboard, or display/power cables may cause the black screen issue.
You can perform some simple tests to identify the culprit components. For example:
- Check if the HDMI, Display Port, VGA, and power cables are damaged or melted.
- Try a different monitor or cable to see if the issue can be solved.
- If you are using a laptop, check if the battery is damaged. Connect the PC to the charger and then power it on. See if the black screen can be solved.
- If you are using a laptop, connect an external monitor to the laptop. Then, turn on the external monitor and the laptop. Press Fn + the external monitor button (range from F2 to F10 depending on PC models) to switch the display to the external monitor, and then check if the black screen issue appears on the external monitor.
In addition to the above simple tests, you can also run the hardware diagnostics tool pre-installed in the PC firmware to test the hardware. Here are some examples.
To troubleshoot the HP laptop screen black issue, run HP PC Hardware Diagnostics UEFI to test the hardware components.
- Press and hold the power button to shut down the computer.
- Turn on the computer and immediately press Esc repeatedly until the startup menu opens.
- Press F2 to select System Diagnostics.
- When the HP PC Hardware Diagnostics UEFI interface appears, click Symptom Tests.
- Type “1” into the field at the bottom of the screen and then press Enter. It means that the tool will test hardware components to identify the root cause of boot issues (black screen with an error message or flashing cursor).
- Select Run once and follow the on-screen instructions to complete the test.
- Review the results on the Test Logs screen to see if it finds the problem.
- If not, return to the main menu and then click System Tests.
- Click Fast Test, and then click Run once. It will perform Disk Read Verify, Video Memory Fast, Wireless IRQ Test, Wireless ROM Test, Fast CPU Stress Test, and Battery Check.
For the Dell laptop black screen issue, you can run Dell SupportAssist’s Enhanced Pre-boot System Assessment (ePSA) tool to diagnose your computer.
- Turn on your computer.
- At the Dell logo screen, press the F12 key repeatedly until the One-Time Boot Menu appears.
- On the boot menu screen, select the Diagnostics option. It will start running the diagnostic quick test, which will detect common hardware failures in essential components like the CPU, memory, hard drive, and fan.
- Once the quick test completes, the results will be shown.
- If the quick test doesn’t detect problems, click ADVANCED TEST at the bottom. Then, you can test all hardware components in the PC.
The tool used to troubleshoot the ASUS laptop screen black issue at the hardware level is System Diagnostics. Here is how to use it.
- Press F2 or Esc at boot time. A window will appear asking you to select a boot device. Press the arrow keys on your keyboard to select Enter Setup, and press Enter. This will open MyASUS in the UEFI BIOS.
- Click System Diagnostics, and then you can test hardware components here.

For the Lenovo laptop screen black issue, you can run Lenovo UEFI Diagnostics to test the hardware. The steps are as follows:
- Power on your computer and then press F10 (for Think systems) or the novo button (for Idea, Yoga, Legion, or LOQ systems) to access the Lenovo UEFI Diagnostics.
- Click RUN ALL to test all hardware components, including the storage, memory, battery, CPU, display, fan, keyboard, motherboard, etc.
Black Screen of Death: Causes and Preventive Measures
Why is my laptop screen black? The reasons can be summarized as follows.
- Hardware Issues: Improperly connected or damaged cables between the monitor and PC, overheating monitors, and faulty hardware components (CPU, GPU, RAM, PSU, etc.)
- Software Issues: Outdated, corrupt, or incompatible graphics drivers, incompatible Windows updates, and corrupt system files. Malicious programs may also trigger a black screen. Run an antivirus scan regularly.
To prevent the black screen issues, the following measures are recommended.
- Ensure HDMI, DisplayPort, or USB-C cables are firmly connected.
- Keep your computer cool, and if necessary, clean out dust and replace thermal paste.
- Run hardware diagnostic tools regularly, such as once every six months. If a hardware failure is detected, replace it promptly.
- Be cautious about or avoid overclocking hardware.
- Avoid any actions that could potentially damage the hardware, such as sudden power outages, unstable voltage, etc.
- Set your monitor’s refresh rate to a stable and native rate.
- If your computer is running normally, do not update the GPU driver unnecessarily.
- Avoid installing software from unknown sources, leading to computer viruses.
In addition to the above methods, it’s also recommended to back up your system disk regularly, which can ensure data security in a black screen and also restore the system. To do that, MiniTool ShadowMaker is one of the best options.
This software has Schedule Settings that allow you to set up regular automatic backups. When the computer fails to boot up because of the black screen, it can also restore the computer from the backup. Here is how to use this software to back up the system disk.
MiniTool ShadowMaker TrialClick to Download100%Clean & Safe
- Connect an external hard drive to your computer. The computer backup will be stored in it.
- Launch MiniTool ShadowMaker and click the Backup tab.
- On the right panel, keep the default option (the system disk) of SOURCE, and then click DESTINATION.
- On the new page, select the external hard drive as the destination and then click OK.
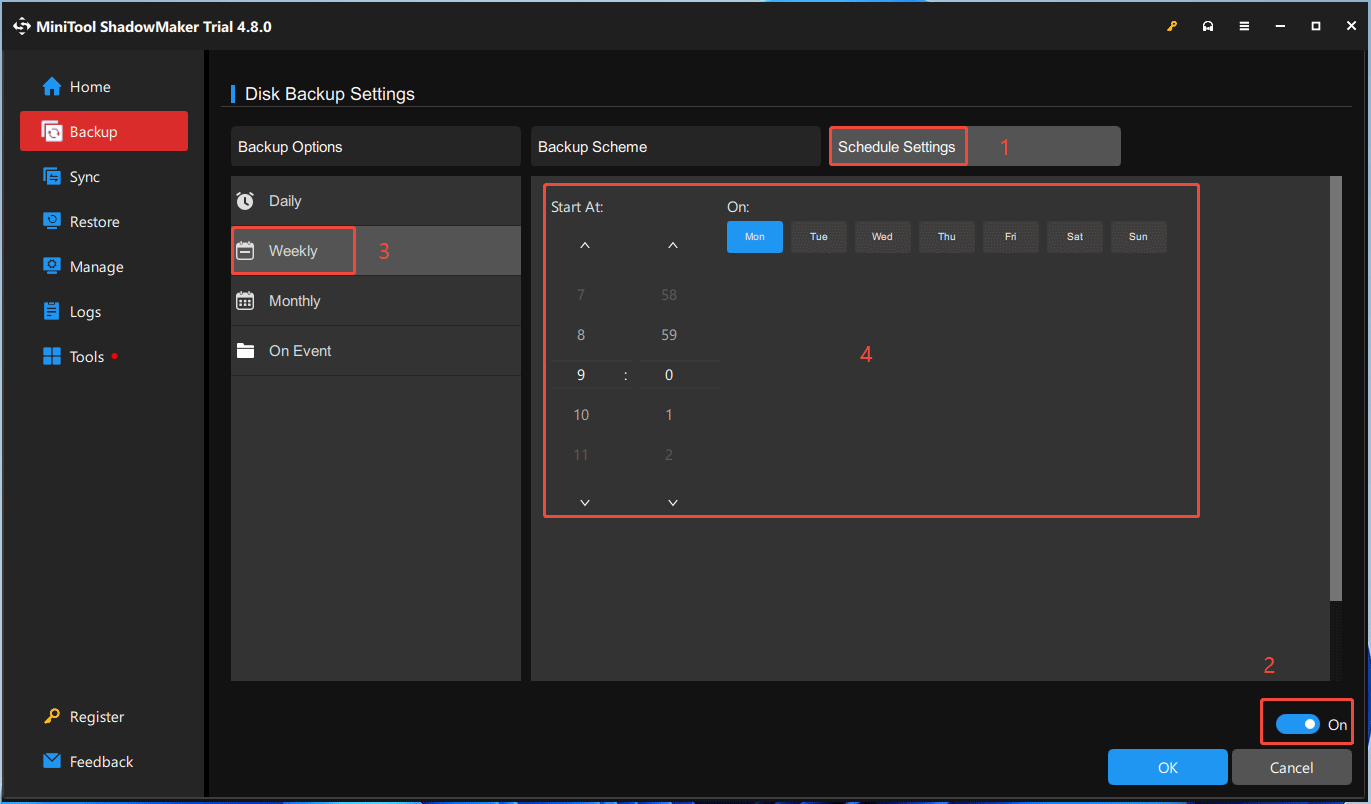
- Back to the Backup interface, click the Options button in the bottom right corner.
- On the Disk Backup Settings page, click Scheme Settings and turn it on.
- Select the backup frequency: Daily, Weekly (recommended), Monthly, or On Event.
- Choose what days of the week and what time to back up. It will enable the automatic backup feature.
- Click Backup Scheme and turn it on.
- Select Differential from the middle panel and then click OK. It backs up the entire computer for the first time and then backs up all files that have changed since the last full backup in subsequent backups. This method is recommended because its backup and restore speeds are moderate.
- Click the Back Up Now button and then click OK to confirm the operation.
If you want to restore the computer from the backup after a black screen, create a bootable USB drive with MiniTool ShadowMaker, boot the PC from it, and go to the Restore tab of this software to perform the system restore.
Bottom Line
This post offers various methods to troubleshoot the PC black screen issue, no matter whether it occurs on boot, after Windows login, after an update, or during a game. Hope this article can help you.
Of course, computer problems are complex. This post may have missed some effective methods. If you know other proven methods, send an email to [email protected] for sharing.
For issues with MiniTool Partition Wizard or MiniTool ShadowMaker, please contact the same email address for support.
About The Author

Position: Columnist
Linda has been an editor at MiniTool for seven years. She continuously learns about computers and puts her knowledge into practice. Moreover, she is particularly knowledgeable in disk management, data recovery, system installation, and PDF editing. Her articles typically reference multiple examples or are based on her own experience, providing users with the most suitable solutions.
User Comments :