With the support to offline (and online) games is increasing, PS4 and PS4 Pro appeal to more users. Yet, the capacity of PS4 becomes insufficient; people need more space to store games they are fond of. So, an external hard drive is required. But how can you add external hard drive to PS4 to get extra space? Please find answers here.
In the past, it’s impossible to add external drive to PS4 or PS4 Pro; but now, installing external hard drive becomes urgent for people who would like to enjoy more games on their PlayStation 4.
You’d better turn to the MiniTool Software when you need to do the following things:
- Solve a range of device problems.
- Improve the performance of a PC or removable device.
- Recover lost data from a hard drive or flash memory.
- Backup drives and files regularly.
Sony Now Allows You to Add External Drive to PS4
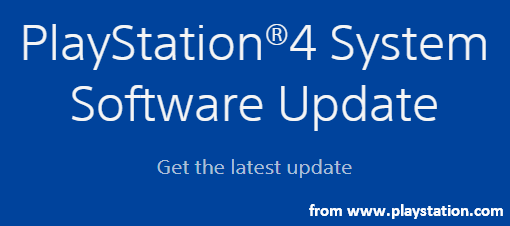
PlayStation 4 system software update:
Sony adds many new features to its PS4 consoles through the newest major system software update: version 4.50.
- Experience the slicker and faster user interface tools.
- Enjoy the 3D Blu-ray movies in stereoscopic 3D through PS VR headset.
- Set users’ screenshots in game as the custom wallpapers.
- Send users’ best gameplay moments to the PlayStation Activity Feed directly.
New Support for PS4 External Storage
What’s more exciting? Sony now allows you to use a PS4 external hard drive with USB 3.0 port. You can increase the storage of PS4 for games and apps by getting a Seagate Game Drive or the PS4 USB flash drive. It hands over the power to you for rearranging your schedule to make more free time for games.
After you have been playing for too long on PS4, you’ll easily find the speed of PS4 is slower than before. This is probably because it takes too much time to load the games and applications saved in the internal hard drive (system storage). That’s why an external hard drive (extended storage) is necessary.
Equipped with large capacity, the external hard drive also allows you to improve movie experience a lot. You can connect an external hard drive to PS4 to watch movies anytime you want.
It comes a long way to make this happen. Now, the days of storing games in and extracting it out of the meager 500 GB (Gigabyte) internal drive (or larger) in your PS4/PS4 Pro are finally over.
Add External Drive to A PS4 or PS4 Pro – Preparations
For users who have an earlier model PlayStation 4 system, they can save only about 12 to 15 games onto their PlayStation (which usually has a capacity of 500 GB to work with). Though users can upgrade the hard drive inside PS4 to improve capacity and speed, some of them still want more storage on external.
In this case, connecting an HDD to the PlayStation is a good choice. Please don’t worry; it’s not difficult, even easy, to install the external hard drive to your PS4 or PS4 Pro.
You need to know the following things before you start to install an external hard drive.
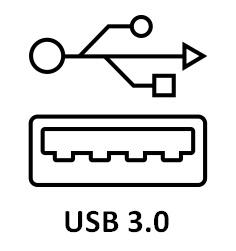
One: External HDD with USB 3.0 Port & Large Capacity
You need an external HDD that has a USB 3.0 connection and has a minimum capacity of 250 GB (PS4 external hard drive 2TB is the most popular choice). Actually, the PS4 and PS4 Pro both give support to an external hard disk with up to 8 TB of storage.
You can plug in a USB 3.0 external hard drive into your PS4 to get extra storage directly. This allows you to download and install applications to the external drive. In addition, you can make it easy to manage files through the PlayStation settings menu.
Please keep this in mind: you must make sure the USB port works well so that the external hard drive can show up as expected. If you fail to see the external hard drive after connecting it, please read this post to find out the possible reasons and corresponding fixes.
Two: System of PlayStation 4 Should Be Version 4.50 or Later
The system of your PlayStation 4 or PlayStation 4 Pro must be updated to version 4.50 or later. That is simply because Sony added the external HDD support to PS4 when the 4.50 version was released early in 2017.
If you have an older system on your PS4, you’ll need to update it to the latest version before you can add a PS4 hard drive externally.
Three: Format the External Hard Drive to exFAT
Please pay attention to the PS4 external hard drive format: you’ll need to format the external drive which will be used to work with the PS4 or PS4 Pro to the exFAT file system.
Why do you need to format PS4 internal hard drive?
The PS4 internal hard drive format can only be conducted inside the PlayStation. Definitely, the format process must be completed before you can use a new PlayStation. In addition to this, you can also reformat the internal hard drive in the following situations:
- The speed of PS4 is decreasing quickly.
- The performance of the PS4 hard drive is degraded.
- The hard drive crashes due to certain errors.
- There’s a conflict between the applications and games.
- …
Useful Tips On How To Improve Windows 10 Performance.
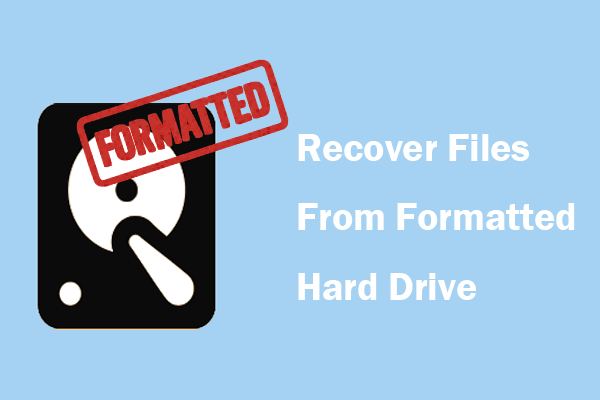
Formatting will clear any data on current drive, so you make sure you have backed up all the files you need in advance; otherwise, you’ll need to recover data from the formatted hard drive by following this:
Four: External HDD Must Be Connected Directly
To work with the PS4 or PS4 Pro properly, the external hard disk must be connected directly to one of the USB ports on the PlayStation. In other words, you cannot connect the external drive to the console through a USB hub. Apart from this, the PlayStation will recognize only one external drive at a time.
How to use external hard drive on PS4? The following content tells you all.
- How to connect an external hard drive to your PS4
- How to format the external hard disk
- How to copy PS4 games to external hard drive
- How to change the Application Installation Location
- How to disconnect external hard drive from PS4
Step 1: Connect External HDD to PS4
How to connect external HDD to PS4:
- Update the system of PlayStation 4 to version 4.50 or later.
- Find an external hard drive with a capacity of no less than 250GB and format it to exFAT.
- Plug in the external HDD to PS4 or PS4 Pro directly (through the USB port on the console instead of a USB hub).
- Set this external hard drive as the default location for all of your downloads and installs.
Step 2: Format External Hard Drive for PS4
You can reformat PS4 external hard drive directly in the console or by using Partition Wizard/Disk Management on computer. Please remember to transfer all the files saved on the external hard drive to another place before disk formatting.
Method 1: Format External Drive in PS4
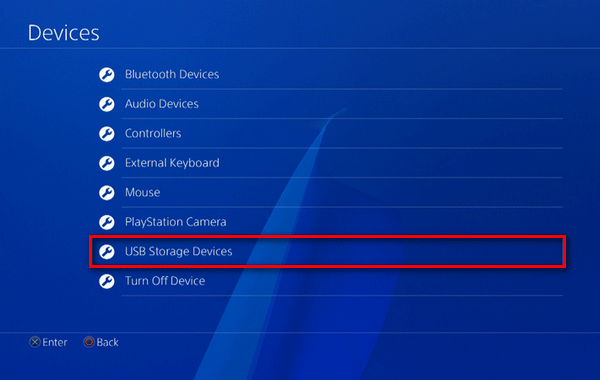
How to add external storage and format it in your PS4:
- Plug the USB drive into the USB port on your PS4.
- Open PS4 and go to Settings.
- Select Devices.
- Select USB Storage Devices.
- Choose the external hard disk you’ve just connected.
- Click on the Format as Extended Storage button.
- Click on the Next button to continue.
- The system prompt saying This device will be formatted as extended storage will appear. Now, click Format.
- Wait a second and you’ll see This device will be formatted as extended storage. Are you sure you want to continue? Now, click Yes.
- Wait for the formatting process to complete. You can’t remove the disk from PS4 during formatting.
- When you see the prompt message: This device has been formatted as extended storage. You should click on the OK button to finish formatting.
Method 2: Format USB Using Professional Partition Manager
- Get MiniTool Partition Wizard and install it properly on your PC.
- Connect the external hard drive to your PC through a USB interface.
- Launch partition manager.
- Select the external drive for PS4.
- Choose Format Partition feature from the left sidebar.
- Select exFAT from the drop-down list of File System.
- Click on the OK button in Format Partition window.
- Click Apply in the upper left corner.
- Choose Yes to allow changes.
- Wait for the format to complete.
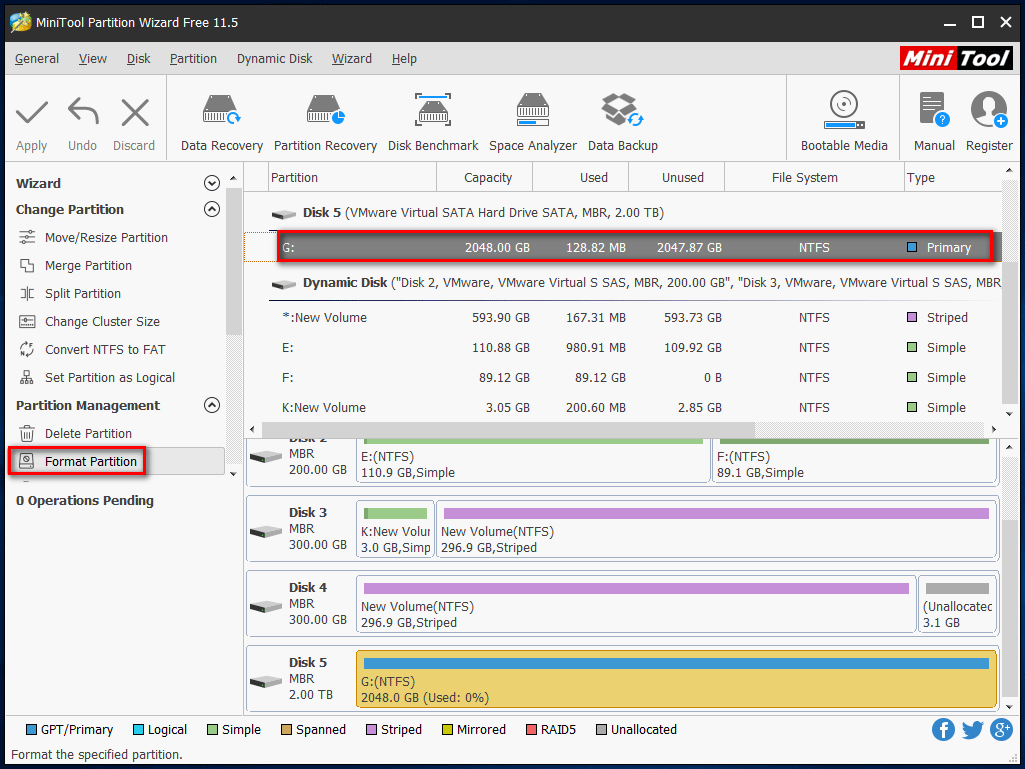
Please note that if the drive is new, you should select the unallocated space on it and select Create Partition from the left sidebar.
Method 3: Format the External Disk with Disk Management
The steps are simple and basically the same as in method 2.
Step 3: Transfer PS4 Data to External Hard Drive
When the PS4 external hard drive format has been finished, you can finally start to move games and applications to PS4 external storage from system storage.
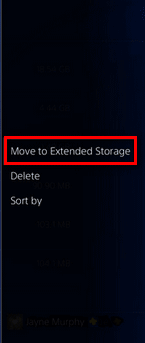
How to Move Game Data from PS4 to USB Drive
- Go to PS4 Settings.
- Select Storage from the list.
- Select System Storage where the apps are located right now.
- Choose Applications under System Storage.
- Click on the Options Menu button.
- Choose Move to Extended Storage option.
- Add a checkmark to all the applications you want to move (there are also Select All button and Deselect All button to help you check apps easily).
- Click on the Move button in the lower right corner.
- Choose OK to confirm your selection.
- Wait for the moving process to complete.
How to Recover Data from PS4
Sometimes, you will find the applications you need are lost during the transferring/deleted by mistake/disappeared after drive formatting. On this occasion, you must use a reliable data recovery tool to recover lost files immediately.
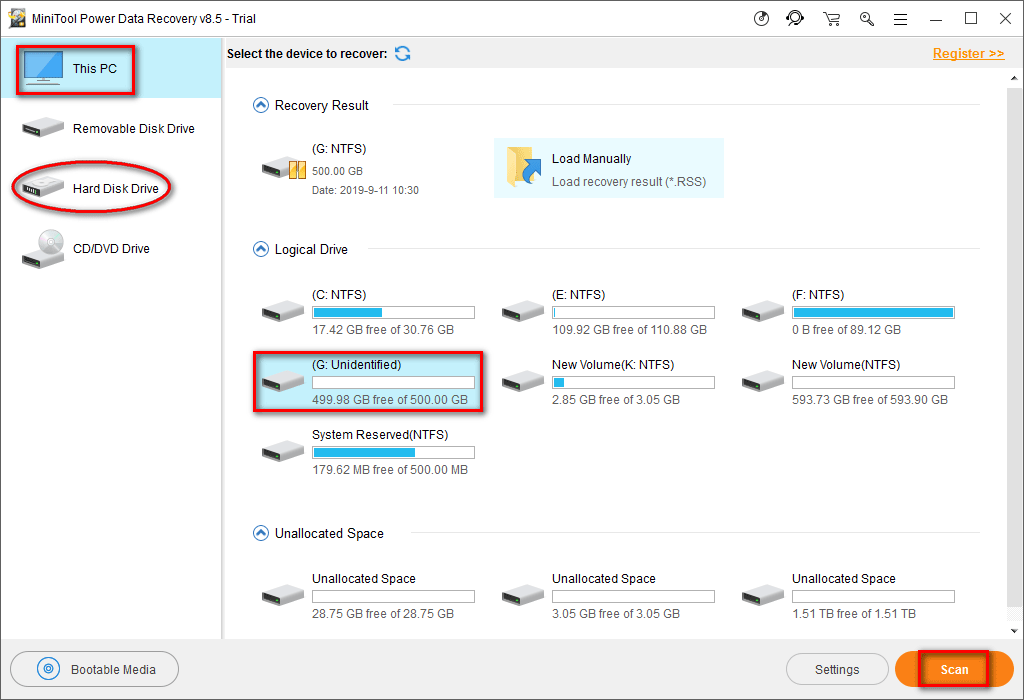
How to get the data back from the System Storage of PlayStation:
MiniTool Power Data Recovery TrialClick to Download100%Clean & Safe
- Get MiniTool Power Data Recovery and install it properly on your PC.
- Connect your PS4 to PC properly, and then launch the data recovery software.
- Select This PC or Hard Disk Drive from the left sidebar.
- Choose the target drive from the right pane and click Scan in the lower right corner.
- Browse and preview the scan result to pick out which files are needed. Then, check them all and click Save. (You’ll see a limit window after clicking Save if you’re using the Trial Edition.)
- Choose another drive as the storage path for the recovered files. Then, click on the OK button to confirm and wait for the recovery to complete.
Step 4: Change Application Installation Location
Can you install games on external hard drive PS4? Actually, you can set your PlayStation to store games and applications on external storage by changing Application Installation Location.
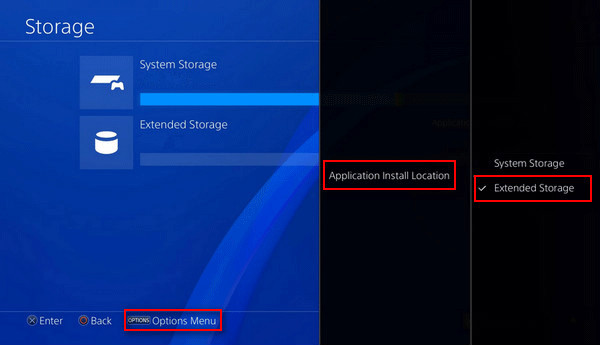
How to Install Games on PS4 from USB
- Make sure the external hard drive is formatted to exFAT and connected to PS4.
- Also, you need to go to the PlayStation Settings.
- Select Storage under Settings list.
- Click on the Options Menu button at the bottom.
- Choose Extend Storage.
- Select Application Install Location from the pop-up menu.
- Choose Extended Storage from the submenu to confirm.
Since then, you can store the downloaded applications and add-ons to the external storage so as to speed up PS4 speed and improve its performance.
Step 5: Disconnect USB Drive from PS4
You should disconnect the external storage from PS4 when you don’t want it anymore.
How to Remove Extended Hard Drive from PS4
Way 1:
- Hold down the PS button to show Quick Menu.
- Choose Sound/Devices from the left sidebar.
- Select Stop Using Extended Storage from the right pane.
- Click Yes to confirm your selection.
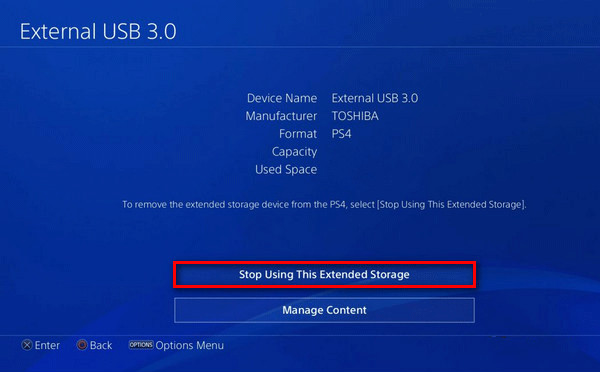
Way 2:
- Navigate to PS4 Settings.
- Select Devices.
- Select USB Storage Devices.
- Click on the Stop Using This Extended Storage button.
- Click Yes to confirm.
FYI: PS4 extended storage repair when it becomes dead.
Conclusion
That’s all you should notice and learn about how to add external drive to PS4 (or PS4 Pro). After connecting the formatted external drive to your PlayStation, you can make it easy to download new applications or copy old PS4 games from the internal storage of console by changing settings.
User Comments :