Marvel Rivals Error Code 4 on Windows
Error code 4 in Marvel Rivals usually indicates a problem with the server connection or network settings. If you receive this error message, it means that the game was unable to establish a secure connection between your device and the game server. Many factors, such as an unstable network, server downtime, or a temporary problem with the game can cause this problem. Find some solutions to deal with it.
How to Fix Marvel Rivals Error Code 4
To fix unknown error: error code 4 in Marvel Rivals, you need to troubleshoot your internet connection first. If that cannot help, keep reading to get the following advanced methods.
Fix 1: Check the Marvel Rivals Server Status
The server is particularly important for the operation of the game. If the server status is unstable or interrupted, it may cause the game to have error codes including Marvel Rivals error code 4. You can check the server from the following two websites.
X(Twitter): https://x.com/MarvelRivals
Discord: https://discord.com/invite/marvelrivals
If the server runs well, continue reading to try the following ways.
Fix 2: Reset Your Internet Connection
Resetting your internet connection can help resolve connection issues, increase internet speeds, and optimize performance by clearing temporary data stored in your router’s memory; it can also re-evaluate the best Wi-Fi channel for your network. Work with the following steps.
Step 1: Type Command Prompt in the Windows search box, right-click on the best match, and choose Run as administrator.
Step 2: When asked by the UAC window, click on Yes to continue.
Step 3: Type the following commands in the window and press Enter individually:
- ipconfig /flushdns
- ipconfig /release
- ipconfig /renew
- netsh winsock reset
- netsh int ip reset
Wait for the process to be completed and restart your computer to see if the error is fixed.

Fix 3: Allow the Game Through the Firewall
Sometimes your antivirus software or even Windows Defender can prevent the game from running properly. In this case, you need to allow the game through the Firewall. Here is how you can do it.
Step 1: Open the Control Panel and change the View by to the Large icons.
Step 2: Choose Windows Defender Firewall and click on Allow an app or feature through Windows Defender Firewall.
Step 3: Click on Change settings > Allow another app to add the game to the list.
Step 4: Tick the boxes for the game under the Public and Private tabs.
Once you completed these steps, open the game to check if the error code persists.
Fix 4: Change the DNS Server Manually
Manually changing DNS can increase your internet browsing speed and can also provide enhanced security features, such as blocking malicious websites or providing privacy benefits depending on the DNS service you choose. You can choose the DNS that best suits your needs, and Google public DNS is generally recommended. Refer to the following operations.
Step 1: Press the Win + I keys to open the Settings app.
Step 2: Click on Internet & Network > Ethernet > Change adapter options.
Step 3: Right-click on the Ethernet and choose Properties.
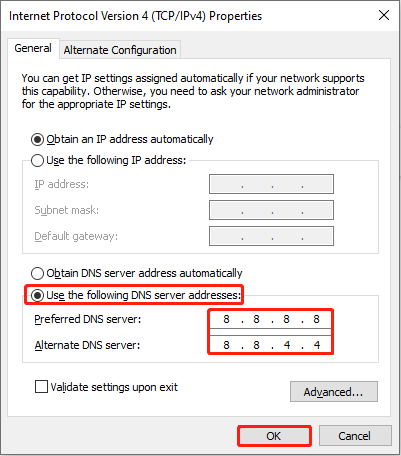
Step 4: Double-click on Internet Protocol Version (TCP/IPv4).
Step 5: Click on Use the following DNS server addresses.
Step 6: Enter 8.8.8.8 In the Preferred DNS server and enter 8.8.4.4 in the Alternate DNS server. Finally, click on OK.
Fix 5: Reinstall the Marvel Rivals Game
Because any previous corrupted or incomplete files may cause this problem. You can try to reinstall Marvel Rivals and make sure you have enough free storage space. Here are the steps to reinstall it.
Step 1: Open the Control Panel and choose Programs > Programs and Features.
Step 2: Find and right-click on the Marvel Rivals to choose Uninstall.
Step 3: Then open Steam and search for Marvel Rivals to download and install it.
MiniTool Power Data Recovery FreeClick to Download100%Clean & Safe
Bottom Line
This post lists several ways such as checking the game server, changing the DNS, allowing the game through the Firewall, and so on. Choose one to fix the Marvel Rivals error code 4. Hope they can help you.
About The Author

Position: Columnist
Chelsea graduated from university with a major in English. She has a strong interest in English writing. It is this passion for writing that led her to become an English editor. Her articles mainly focus on data recovery and other computer industry news. As an energetic and outgoing girl, Chelsea enjoys listening to music, singing, riding bikes, and eating in her spare time.
User Comments :