Is your computer slow after Windows 11 updates? On this page, MiniTool introduces the causes of this issue and presents you with 11 fixes. Just speed up the computer for optimal performance by clearing the update cache, running Disk Cleanup, disabling startup apps, and more.
Why Is Computer Slow After Windows 11 Update
Windows updates are essential since they include security patches, add new features, and fix bugs, keeping the system safer and ensuring it runs smoothly.
However, things may not go as expected. Sometimes, a Windows update can make your computer sluggish rather than improve overall performance.
On forums, users frequently report “computer slow after Windows 11 update”. There are 2 cases:
- PC is slow after upgrading to Windows 11 from Windows 10
- PC runs slowly after installing a KB update for Windows 11
Why does an update slow down the computer? Common causes include:
- Background processes use many system resources, including CPU and RAM.
- A Windows update has compatibility issues, triggering poor performance.
- Updates require free space to install, and a lack of space can cause the system to operate slowly.
- An update may fail to complete or be interrupted, leading to corrupted system files and causing the slow issue.
- Software may not be optimized for the new Windows system, leading to performance hiccups.
Now that we know the main reasons, next, we’ll explore practical methods to fix a slow PC after Windows 11 update and restore optimal performance.
Here is a quick video guide:
How to Fix PC Slow After Windows 11 Update
To repair a computer running slowly after Windows 11 updates, try the following steps: clear the update cache, disable unnecessary startup and background programs, run SFC & DISM, roll back the update, and more.
#1. Clear Windows Update Cache
Corrupted update files in the cache can slow down your computer. To fix a slow PC, try clearing the cache, which can be of some help.
Take these steps:
Step 1: In Windows 11 Search, type services, and press Enter to open this program.
Step 2: Locate the Windows Update service in the list, right-click on it, and choose Stop to end this service.
Step 3: Press Win + E to open File Explorer and go to C:\Windows\SoftwareDistribution\Download.
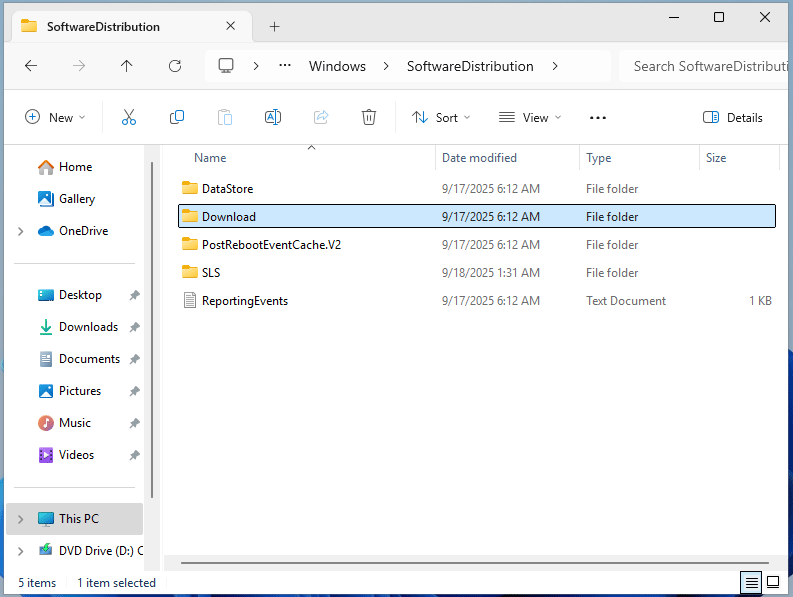
Step 4: Choose all the folders and files to delete.
Step 5: Go back to the Services window and restart Windows Update.
#2. Run SFC and DISM
Sometimes, you encounter the “computer slow after Windows update” issue when system files are missing or damaged. To repair the corruption, use System File Checker. It is a free tool developed by Microsoft that verifies the integrity of system files and attempts to repair them if it finds any issues.
Step 1: Launch an elevated Command Prompt in Windows 11 by typing cmd in Search and clicking Run as administrator.
Step 2: Type sfc /scannow in the command window and hit Enter to execute a scan.
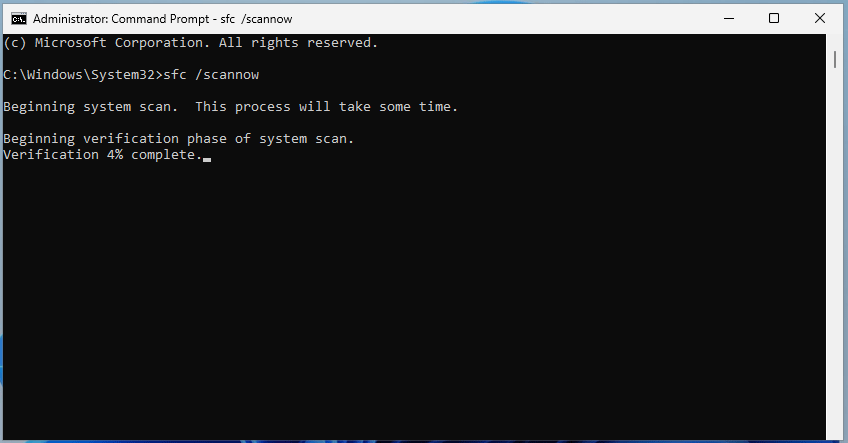
Wait until the scan process ends. Once completed, restart the system, and check if your computer is faster.
If SFC fails to resolve your issue, open Command Prompt with admin rights again, and use DISM (Deployment Image Servicing and Management) to repair corrupted system files.
To run a DISM scan, execute this command:
DISM /Online /Cleanup-Image /RestoreHealth
#3. Delete Temporary Files
Temporary files created by programs, thumbnails, temporary Windows installation files, and other junk files can accumulate. Over time, they take up a lot of storage space, leading to a slow computer.
Besides, there may be a folder called Windows.old on your computer, which temporarily contains files from the previous Windows installation to allow for a rollback. Its size can range from 15GB to 30GB.
To improve the system performance, we suggest deleting those junk files via Settings to free up disk space.
Follow the instructions:
Step 1: Press Win + I to open the Settings app in Windows 11.
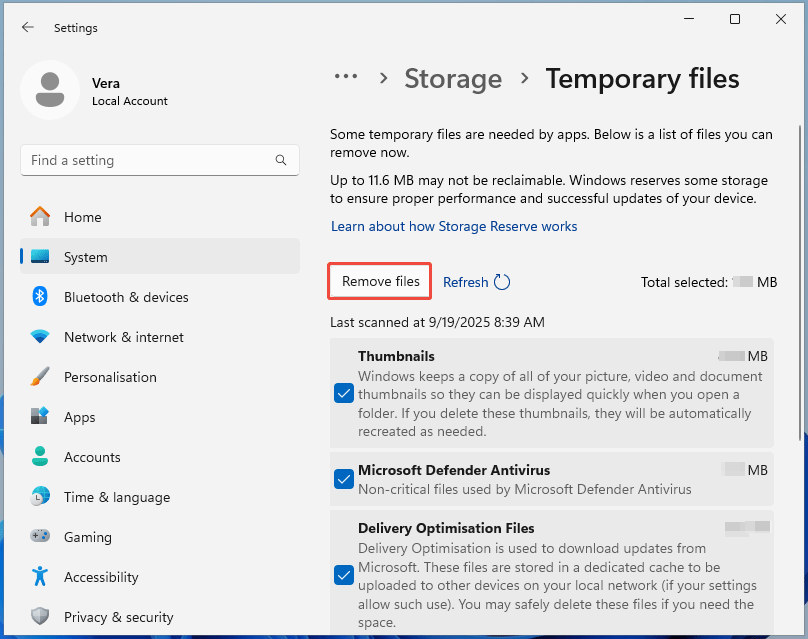
Step 2: Head to System > Storage.
Step 3: Click Temporary files and browse the list of files below.
Then, check the boxes of the items you wish to delete, including Windows Update Cleanup, Temporary files, Recycle Bin, Downloads, and more.
Step 4: Hit Remove files to delete those selected files.
After deletion, your PC may get several GB of free space.
Additionally, we recommend enabling Storage Sense under Storage and configuring it to automatically free up space every day/week/month or during low disk space. Alternatively, lick Run Storage Sense now to free up space immediately.
MiniTool System Booster TrialClick to Download100%Clean & Safe
#4. Disable Startup and Background Apps
In case of the “computer slow after Windows 11 update” issue, you are supposed to consider if Windows runs too many apps in the background. These programs may automatically open after a system startup, when a scheduled task is triggered, or when they are launched by another app.
To prevent background apps and startup programs, take these steps.
Disable Background Applications via Registry Editor
Step 1: Launch Registry Editor by typing regedit in Search, choosing the best match, and hit Yes in the UAC window.
Step 2: Copy and paste the following text to the address bar, and press Enter.
HKEY_LOCAL_MACHINE\SOFTWARE\Policies\Microsoft\Windows\AppPrivacy
If the AppPrivacy key doesn’t exist, right-click on Windows and choose New > Key to create that key.
Step 3: Right-click the blank area on the right pane, select New > DWORD (32-bit) Value, and name it LetAppsRunInBackground.
Step 4: Double-click on the new value, set its Value data to 2, and hit OK.
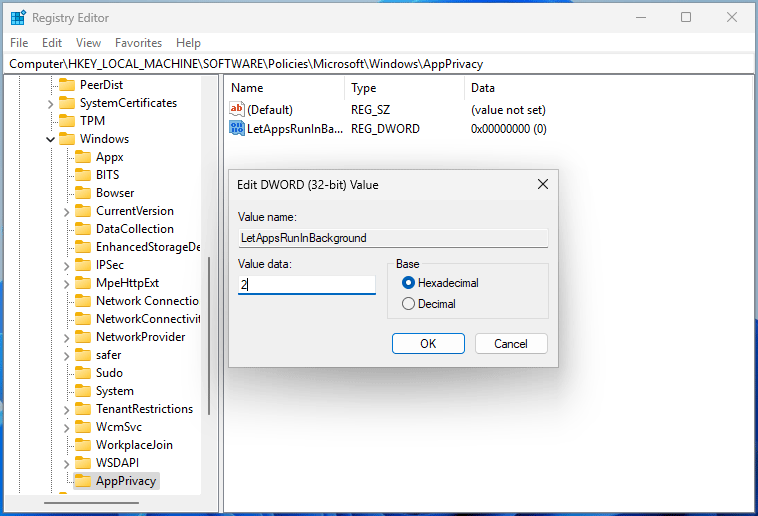
Step 5: Restart the system to apply the changes.
Now you have disabled background applications for all users. To stop those apps for a current user via Registry Editor or disable individual background apps, you can follow the guide on how to disable background apps in Windows 11.
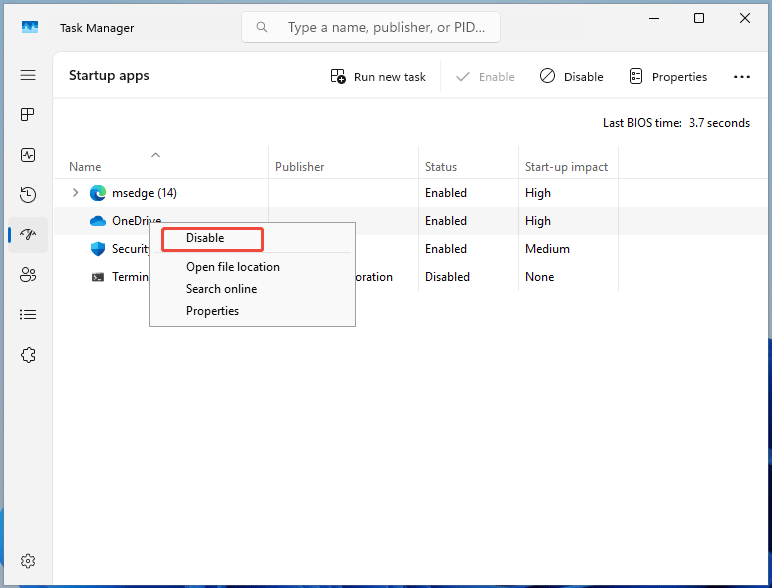
Disable Startup Apps via Task Manager
Step 1: Right-click on the taskbar and choose Task Manager.
Step 2: Under Start-up apps, right-click on a program and choose Disable.
#5. Defragment Your Disk
Repeated installation or uninstallation of programs can cause file fragmentation, where some files become scattered across your hard drive. This results in slower performance as the read/write head needs to move further to access data.

If your computer is slow after a Windows 11 update, try to defragment the hard disk drive (HDD).
Step 1: In Search, type defrag and hit Defragment and Optimise Drives.
Step 2: Choose a drive and click Optimise to begin the defrag process.
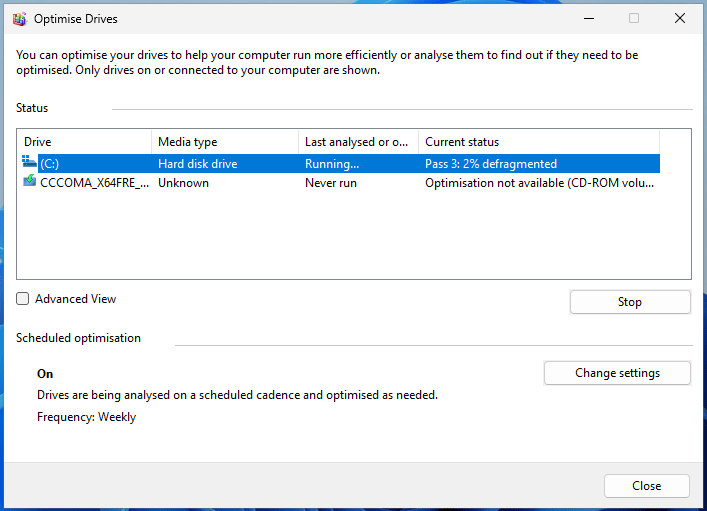
After optimizing all partitions on the HDD, your computer should have improved performance.
#6. Turn off Visual Effects
Visual effects include transparency, and animations can enhance the user experience, but consume system resources. In case of computer running slowly after Windows 11 updates, disabling visual effects is a smart way to speed up the machine.

Step 1: In Settings, go to the Accessibility tab.
Step 2: Turn the toggle off for Transparency effects and Animation effects.

#7. Update Drivers
Outdated drivers not compatible with new system versions can bring about system instability, crashes, and performance issues. To fix a slow PC after a Windows update, try to update your device drivers.
Step 1: Open Device Manager via Search.
Step 2: Check any devices that are marked by an exclamation warning. Right-click that device and choose Update driver.
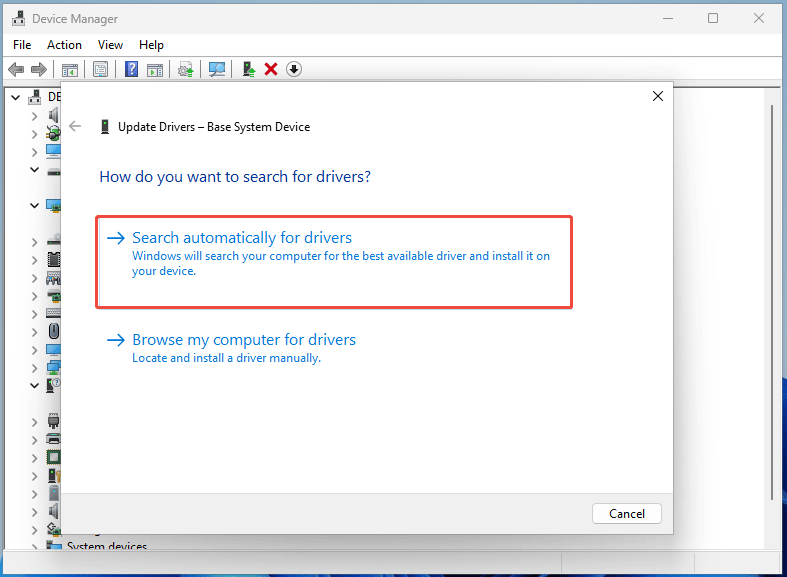
Step 3: Let Windows automatically install an available update.
Alternatively, use a professional driver update tool to check for drivers and install the latest versions with a single click.
#8. Uninstall a Windows Update
If your computer gets slow after a specific update, especially when it’s a recent, major security patch, the possibility is that the update is problematic. Try uninstalling it.
Step 1: Open Settings via the Win + X menu.
Step 2: Navigate to Windows Update > Update history > Uninstall updates.
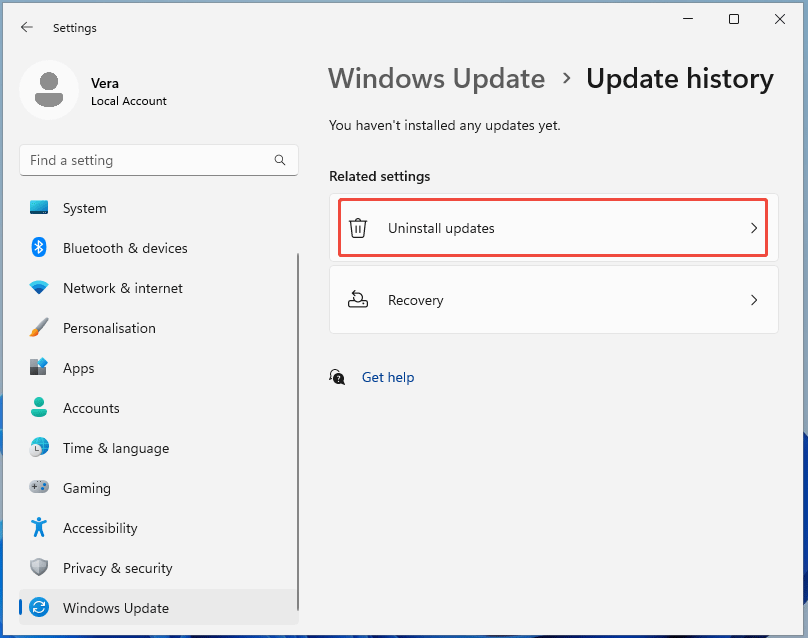
Step 3: Choose the problematic update and click Uninstall.
Step 4: Confirm the action and restart your PC.
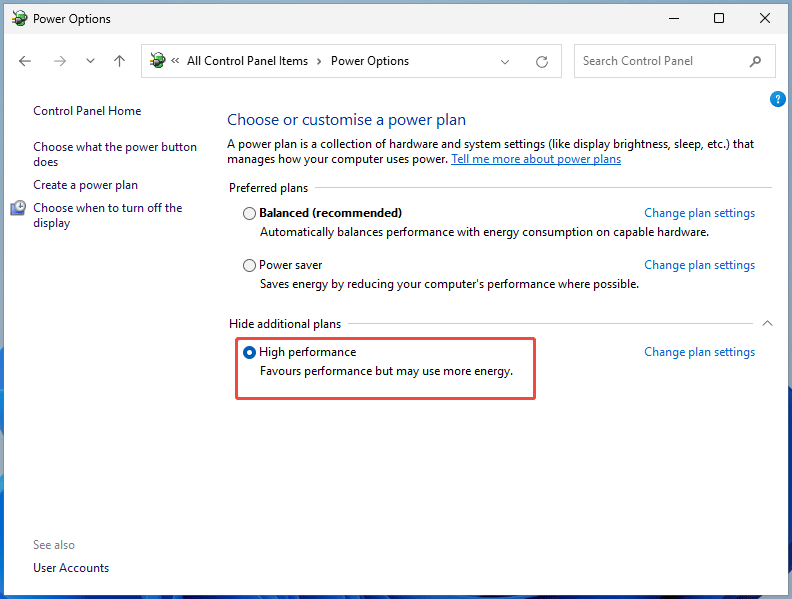
#9. Change a Power Plan
To address a computer that is slow after a Windows update, changing the power plan to high performance or ultimate performance does the trick.
Step 1: Launch Control Panel via the Search box and choose Large icons from the View by menu.
Step 2: Hit Power Options, expand Hide additional plans, and tick High performance.
#10. Extend System Drive
The C drive with insufficient space can dramatically slow down your PC. To solve the “PC slow after Windows 11 update” issue, extend that drive if other partitions have enough storage space.
To run this task flexibly, we recommend MiniTool Partition Wizard, a professional partition manager. Its Extend feature enables you to take free space from another drive or unallocated space.
Step 1: Launch the demo edition and register the software. Then hit Bootable Media, follow the prompts to create a bootable drive and boot the system from that drive.
MiniTool Partition Wizard DemoClick to Download100%Clean & Safe
Step 2: Launch this manager to its main interface. Right-click on the C drive and select Extend.
Step 3: Take some free space from another partition and click OK.
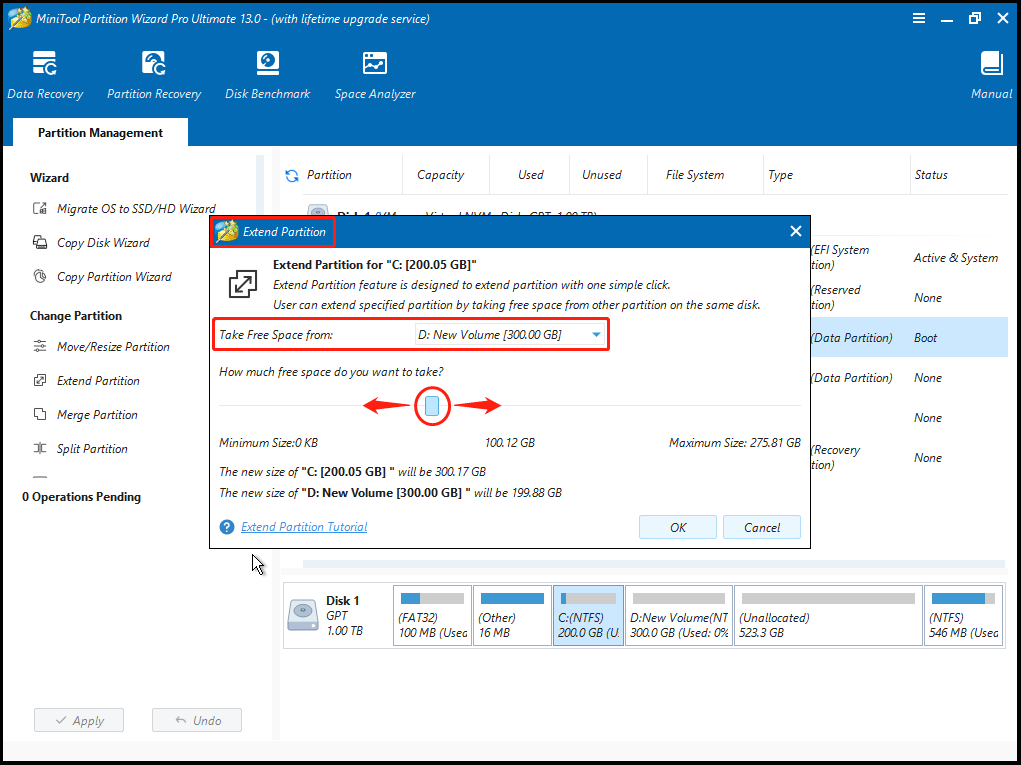
Step 4: Hit Apply.
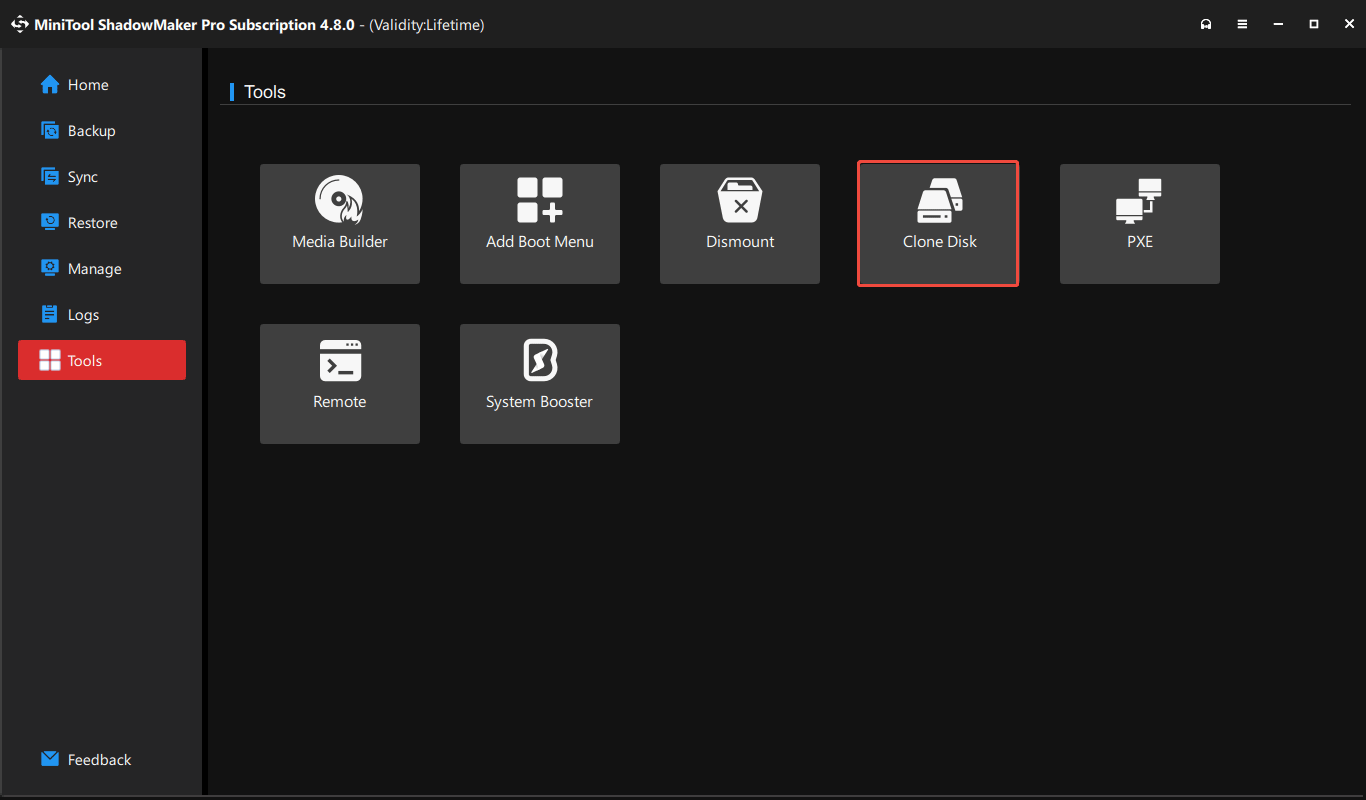
#11. Upgrade the Hard Drive to an SSD
Over time, your HDD’s performance may degrade. For better performance, we highly advise you to upgrade to an SSD.
Besides, if you use a smaller SSD, the computer can turn slow after Windows 11 updates since those updates can increase disk usage. In this case, consider upgrading to a larger SSD, which provides more space and improves overall performance.
To upgrade your hard drive to an SSD, MiniTool ShadowMaker is worth trying. Not only is this utility backup software, but it also supports disk cloning.
With the Clone Disk feature, cloning HDD to SSD or migrating a smaller SSD to a larger SSD is a piece of cake.
Let’s explore how to upgrade to an SSD.
Step 1: Connect an SSD to your slow computer via an adapter.
Step 2: Download, install, and open MiniTool ShadowMaker. Then, register it for system disk cloning.
MiniTool ShadowMaker TrialClick to Download100%Clean & Safe
Step 3: In the Tools tab, click Clone Disk to proceed.
Step 4: Choose the old hard drive as the source drive and select the new SSD as the target drive.
Step 5: Hit Start to begin the cloning.
Once completed, you need to replace the old disk with that new SSD. This is a risky and complicated operation since potential issues may arise from improper installation.
To do that:
1. Shut down the PC.
2. Use a screwdriver to open the computer case.
3. Locate the old HDD, disconnect the drive’s cable and remove it.
4. Put the new SSD in the drive bay and connect it to the power supply & motherboard.
For details, refer to this guide on how to install an SSD. If you are a computer beginner, seek help from a professional.
Next, you can boot the machine from that SSD to enjoy peak performance.
Bottom Line
Why is your computer slow after Windows 11 updates? How can you fix the slow PC? After trying these methods, you should get out of the dilemma. Now, try clearing the update cache, deleting temporary files, disabling background apps, uninstalling a Windows update, upgrading to an SSD, and more.
Do you come across problems when using MiniTool software? Don’t worry! Send us an email at [email protected].
Computer Slow After Windows 11 Update FAQ
1. Run Disk Cleanup
2. Uninstall unused programs
3. Use MiniTool Partition Wizard
4. Transfer files to external drives
5. Defragment the hard drive
6. Scan the computer for viruses
7. Clear browsing data
8. Clean the PC physically
About The Author

Position: Columnist
Vera has been working at the MiniTool Team for over 10 years as a technical editor and content writer. She mainly focuses on disk and partition management, data recovery, Windows backup and restore, and PC troubleshooting. Through in-depth software testing and hands-on experience, she has helped users solve a wide range of computer problems and better protect their data on Windows devices.
User Comments :