It is frustrating if your computer turns on by itself. Fortunately, you can fix it by disabling fast startup, disabling scheduled tasks, checking BIOS settings, and more. Here is a comprehensive guide from MiniTool to walk you through how to address this issue via these ways.
Is your computer turning on by itself, especially at night or from sleep mode? This is a common issue in Windows 11/10. Find the exact cause and fix it in minutes.
Why Does PC Turn on by Itself
The PC turns on by itself for various reasons, including:
- Incorrect settings in Windows, such as fast startup, automatic restart, wake timers, and more.
- Scheduled tasks of some programs or Windows features.
- Power settings in BIOS, such as Wake-on-LAN and Power-on by Alarm.
- Issues with hardware components, including a loose power button, RAM, power supply, CMOS battery, or motherboard.
- Unintentional input from a mouse or keyboard.
There are several variants of PC turning on automatically, including:
- After sleep
- At night
- After hibernation
- When plugged in
- No display
Depending on different cases, the solutions vary.
Try Fixes Below
- Check What Woke Your Computer
- Disable Scheduled Tasks
- Change Wake Timers Settings
- Disable Wake-Enabled Devices in Device Manager
- Turn off Wake-on-LAN
- Disable Automatic Maintenance
- Turn off Fast Startup
- Disable Automatic Restart
- Check BIOS/UEFI Settings
Self-Check: Find out What Wakes Your Computer
Before starting the troubleshooting steps, let’s do a self-check to find the problem. By running the powercfg command, it is easy to identify what woke your computer most recently.
Step 1: Press Win + R and type cmd. Then, press Ctrl + Shift + Enter to open Command Prompt as administrator.
Step 2: Type the powercfg -lastwake command and press Enter.
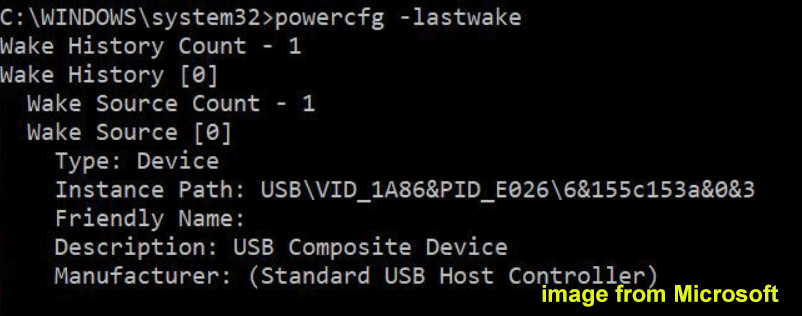
Windows displays the wake source count and the cause that initiates the wake-up event. It can be a specific device or a scheduled task.
Step 3: Run the powercfg /devicequery wake_armed command.
If you see a mouse/keyboard/network, the hardware device is waking your PC. Disable the target devices in Device Manager.
Step 4: Execute the powercfg /waketimers command.
If the CMD window displays active scheduled tasks, the tasks are waking your computer. Try to disable them.
Quick Fixes:
Try these first. They solve the issue in most cases:
- Disable scheduled tasks
- Disable wake timers
- Disable wake-enabled devices in Device Manager
- Turn off Wake-on-LAN in Device Manager
Computer Turns on by Itself When in Sleep Mode/At Night/After Hibernate
Fix 1: Disable Scheduled Tasks
When the Windows 11/10 PC turns on by itself when in sleep or hibernation mode, check if the machine has some scheduled tasks.
Task Scheduler enables you to automate programs, scripts, and tasks to run at scheduled times. To complete its job, this tool can be configured to wake up your system and perform its routine tasks.
This can be achieved by enabling the option of Wake the computer to run this task under Conditions when creating a task.
To fix your issue, try disabling scheduled tasks:
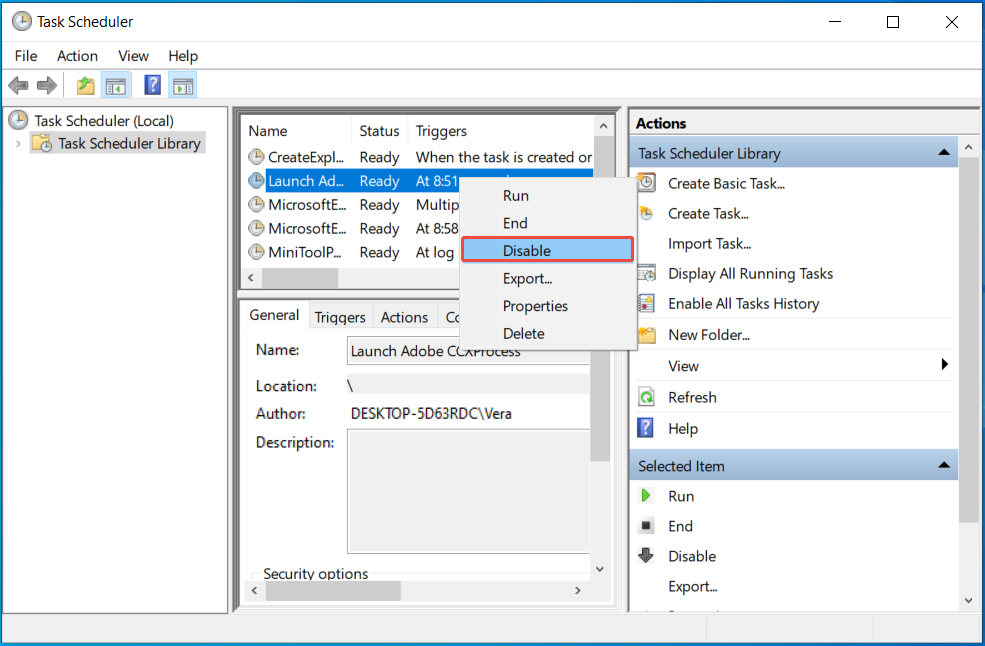
Step 1: Press Win + R to open Run, input taskschd.msc, and press Enter to open Task Scheduler.
Step 2: Head to Task Scheduler Library. Check the potential scheduled tasks, right-click on them one after another, and click Disable or Delete.
Step 3: Or, right-click the task and choose Properties.
Step 4: Uncheck Wake the computer to run this task in the Conditions tab.
Fix 2: Change Wake Timers Settings
Another reason behind the computer turning on by itself may be the wake timers settings.
Windows wake timers can bring a PC out of sleep or hibernation to perform scheduled tasks. If you enable this feature, the computer automatically turns on.
So, disable it.
Step 1: In the Search box of Windows 11/10, type Control Panel, and open it.
Step 2: Choose Large icons from the menu of View by and hit Power Options.
Step 3: Click Change plan settings > Change advanced power settings.
Step 4: Expand Sleep > Allow wake timers and choose Disable.
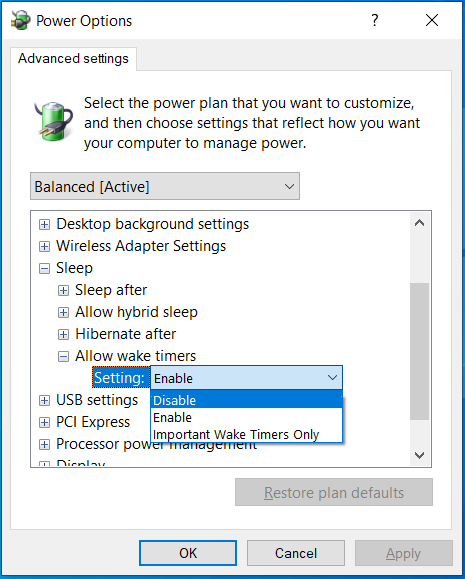
Step 5: Save the change by clicking Apply > OK.
Fix 3: Disable Wake-Enabled Devices in Device Manager
Sometimes, the computer automatically turns on due to some wake-enabled devices that can be listed after running powercfg -lastwake.
To fix your issue, try to disable these devices in Device Manager:
Step 1: Open Device Manager from the Start menu in Windows 11/10.
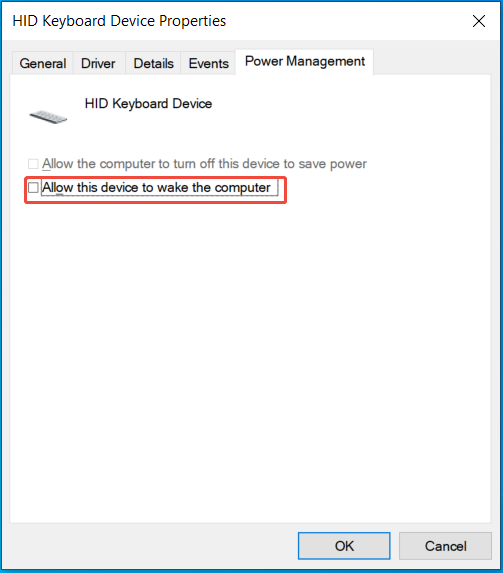
Step 2: Find the devices, right-click on them one by one, and choose Properties.
Step 3: In the Power Management tab, untick Allow this device to wake the computer.
Step 4: Click OK.
After disabling, your computer should not wake up by itself.
Fix 4: Turn off Wake-on-LAN
Disabling Wake-on-LAN in Device Manager can be another solution to stop a computer waking up.
Step 1: Expand Network adapters in Device Manager and right-click on your network controller to choose Properties.
Step 2: Under Power Management, uncheck Allow this device to wake the computer.
Step 3: Go to the Advanced tab, locate Wake on Magic Packet, and set its value to Disabled.
Step 4: Set Shutdown Wake-On-Lan to Disabled.
Step 5: Click OK to apply the changes.
Fix 5: Disable Automatic Maintenance
Windows automatic maintenance is designed to automatically run security scans, software updates, and system diagnostics to keep the system stable and smooth.
However, it may cause the PC to turn on by itself from sleep to complete the scheduled maintenance.
Hence, disable this feature in Windows 11/10 by taking these steps.
Step 1: Open Control Panel from the Search box.
Step 2: Navigate to Security and Maintenance, expand Maintenance, and click Change maintenance settings.
Step 3: Uncheck the box of Allow scheduled maintenance to wake up my computer at the scheduled time. Then, hit OK to save the change.
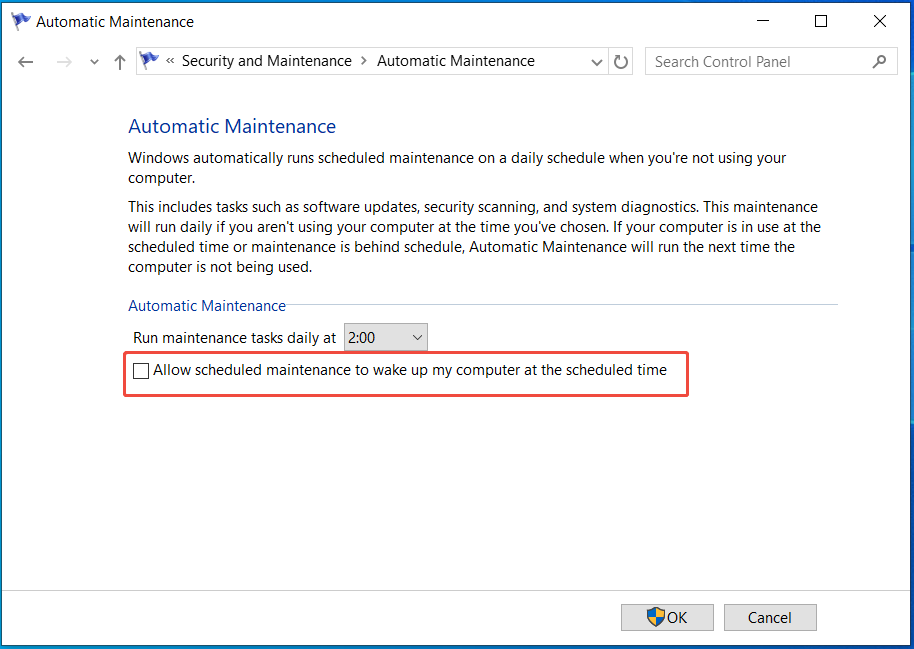
In my case, the maintenance tasks run daily at 2:00. This is why my computer turns on by itself at night when in sleep mode.
After disabling, your computer should not wake up from sleep automatically.
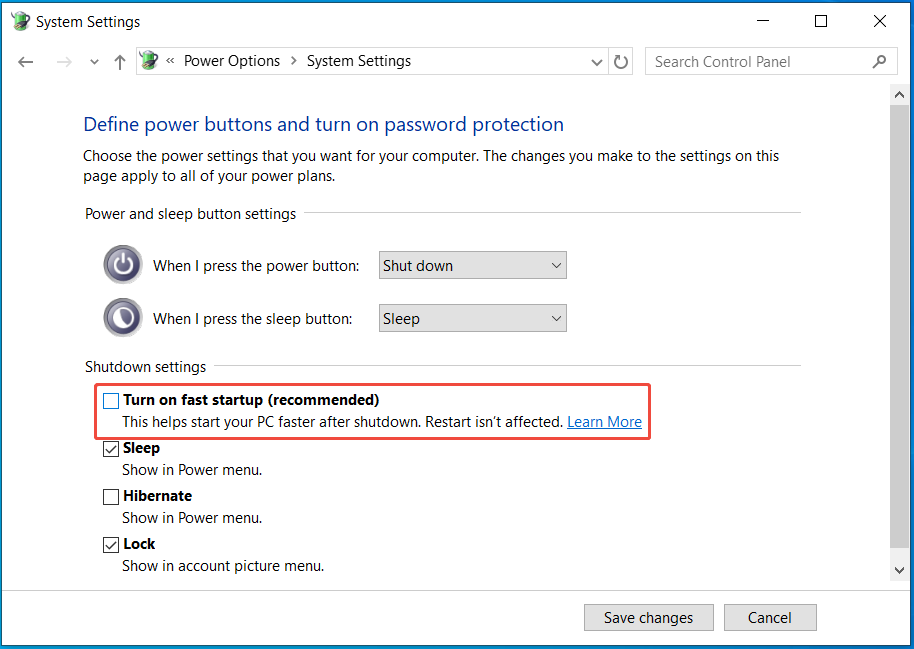
Fix 6: Turn off Fast Startup
Fast startup is a Windows feature that reduces the boot time by loading a pre-saved state. In detail, it saves the state of the system to a hibernation file, rather than a complete shutdown. When you start the system, Windows loads this state to resume faster.
However, this feature can be a culprit behind the issue of computer turning on automatically.
So, make sure you turn off fast startup.
Step 1: Open Control Panel and choose Power Options.
Step 2: Click Choose what the power buttons do in the new window.
Step 3: Hit the Change settings that are currently unavailable link to enable shutdown settings.
Step 4: Uncheck the box of Turn on fast startup (recommended) and save changes.
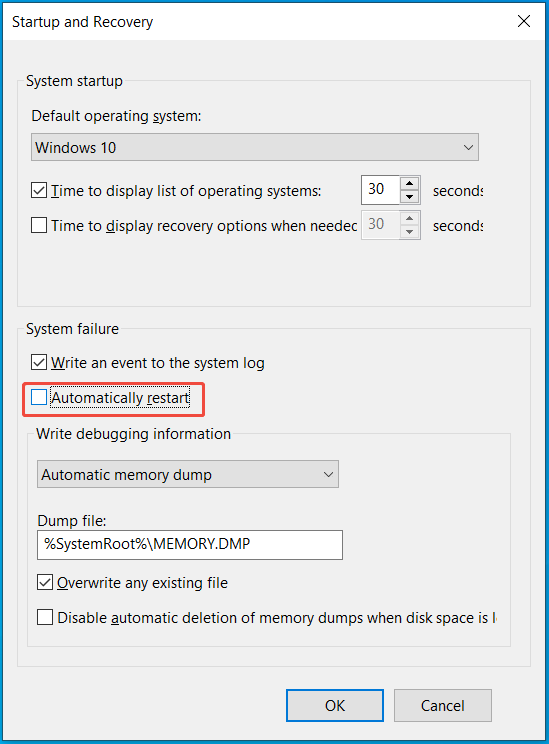
Fix 7: Disable Automatic Restart
In system settings, there is an option that can automatically restart your computer. It is a recovery mechanism to restore the system to an operational state after a crash via an automatic restart.
Nevertheless, this feature can be the reason why the computer starts by itself.
Fortunately, disabling automatic restart can resolve the issue.
Step 1: Open the Run dialog box by pressing Win + R on your keyboard.
Step 2: Input systempropertiesadvanced and press Enter.
Step 3: Under Advanced in the System Properties window, click Settings from Startup and Recovery.
Step 4: Untick Automatically restart and click OK.
Fix 8: Check BIOS/UEFI Settings
The BIOS/UEFI settings, including Power-on by Alarm and Wake-on-LAN, may be responsible for computer turning on by itself.
Power-on by Alarm enables the system to automatically power on at a preset time and date using a real-time clock (RTC). Even when the computer is completely shut down, this feature triggers the system boot.
Wake-on-LAN (WoL) refers to a networking standard. It enables a computer to be turned on or awakened from sleep or hibernation mode by a network message. This message is often called a “magic packet”, which is sent by a WoL-enabled device over the network.

To resolve the issue, try disabling these two features in BIOS/UEFI settings.
Step 1: Restart Windows 11/10 and press F2, Del, or another boot key to access the BIOS menu.
Step 2: Find RTC Alarm Power On, Power-on by Alarm, Resume by Alarm, or a similar one. Then, set it to Disabled.
Step 3: Locate Wake Up on LAN, Wake On Lan, Power On By PCI Devices, Power On By PCI-E, or a similar option, and disable it.
Computer Turns on by Itself No Display
Your PC may start automatically but display nothing on the monitor. This indicates your display may go wrong due to hardware issues.
Fix 1: Disconnect Peripheral Devices
Disconnect all unnecessary peripherals from your computer, including USB drives, printers, scanners, and more.
Fix 2: Check Hardware Components
You should check the connection between the monitor and the computer. Make sure the monitor is powered on and use the correct input source. Also, ensure the cable is not faulty or loose.
Also, open the computer case to check the graphics card and ports to see if they cause the issue.
Besides, it is necessary to check the RAM, CPU, and power supply.
PC Turns on Automatically When Plugged in
Your laptop may turn on by itself when plugged into a power source. To fix this issue, you can disable Restore AC Power Loss in BIOS, perform a hard reset, replace a dead CMOS battery, and more.
Fix 1: Adjust Power Settings
Step 1: Open Control Panel > Power Options.
Step 2: Go to Change plan settings > Change advanced power settings.
Step 3: Expand Sleep and Allow wake timers.
Step 4: Set Plug in to Disabled and save the change. This prevents any planned task from waking the PC from sleep.
Fix 2: Change BIOS Settings
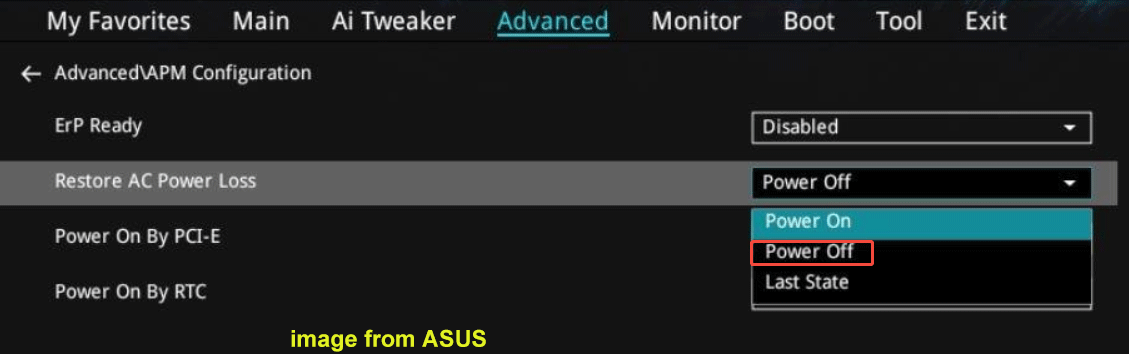
The PC’s automatic start-up issue when plugged in is mainly caused by the incorrect BIOS settings. In BIOS, there is an option called Restore AC Power Loss that determines how a computer restarts after a power outage.
Make sure this feature is set to power off.
Step 1: Access the BIOS menu by pressing Delete or F2 during a restart.
Step 2: Under Power or Advanced, set Restore AC Power Loss, AC Recovery, Restore on AC Power Loss, or a similar option to Power Off.
Fix 3: Replace a Faulty CMOS Battery
A faulty CMOS battery on the motherboard can lead to weird power issues. So, open the computer case and check if it goes wrong.
If yes, replace it to solve the automatic restart issue.
Fix 4: Check Motherboard Jumpers
Jumpers are small connectors on a motherboard used to configure hardware settings. When your computer turns on by itself when plugged in, check for jumpers that may be set to auto-on.
Suggestion: Back up System
If your computer automatically turns on due to software issues, after fixing it, we recommend backing up the machine. Once you meet a similar issue next time, it is easy to restore the PC to an earlier state, without changing related computer settings.
In terms of system backup, we recommend MiniTool ShadowMaker. As a professional PC backup software, it is designed to easily and effectively back up files, folders, disks, partitions, and systems.
It offers several advanced backup options, such as scheduled backups, differential backups and incremental backups. Besides, this backup program allows you to add a comment to quickly identify the backup, change a compression level, and make other settings.
Let’s explore how to back up the Windows system.
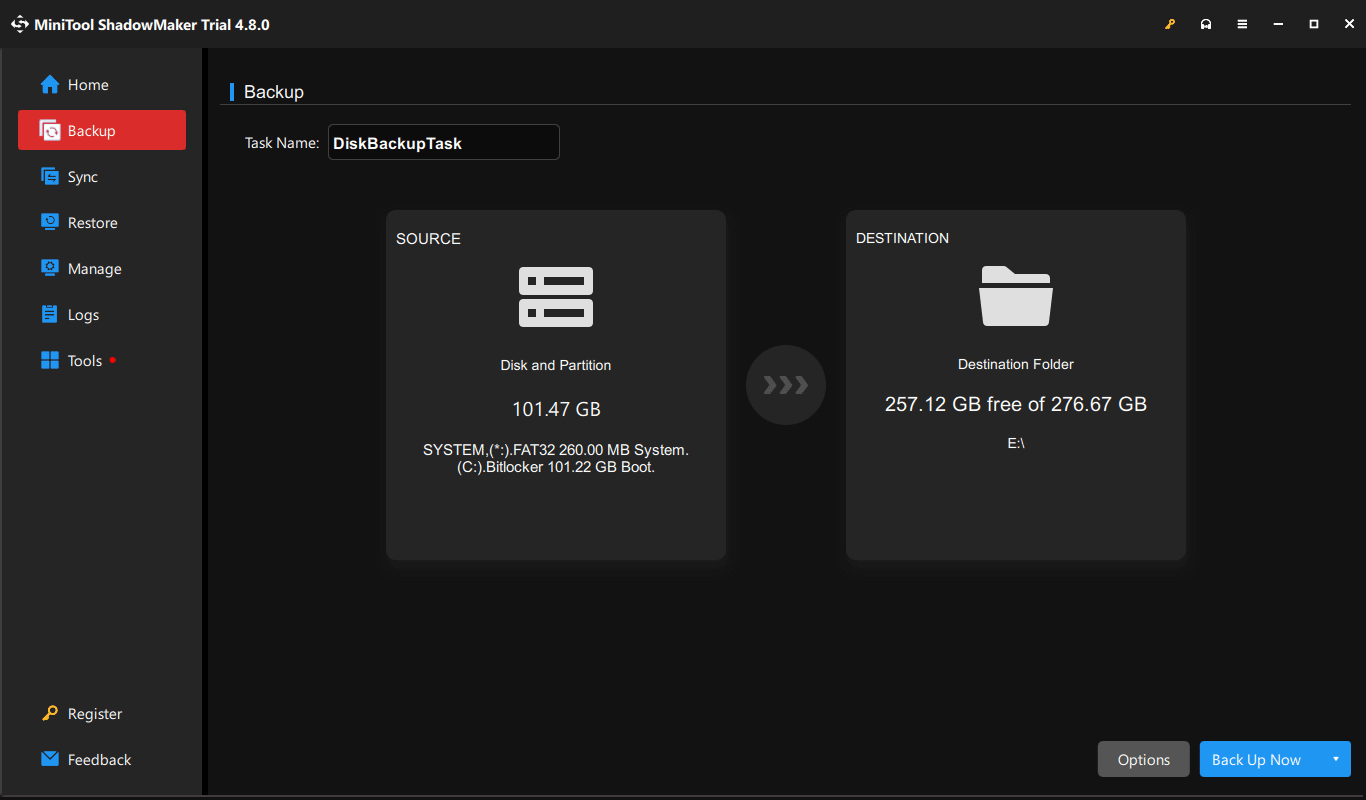
Step 1: Connect a USB drive or external hard drive to the computer.
Step 2: Install and launch MiniTool ShadowMaker.
MiniTool ShadowMaker TrialClick to Download100%Clean & Safe
Step 3: Under Backup, you notice system partitions are selected by default as the backup source. Just hit DESTINATION to pick a drive to save the system image file.
Step 4: Execute the backup now by clicking Back Up Now.
Bottom Line
It can be annoying if the computer turns on by itself, but don’t worry. By following the solutions mentioned above in 3 cases, you should get out of the trouble. Try disabling scheduled tasks/wake timers/fast startup, adjusting BIOS settings, and checking hardware.
Importantly, remember to back up your PC when it is in a normal state as a precaution.
When encountering issues with MiniTool ShadowMaker, send an email to us at [email protected].
Computer Turns on by Itself FAQ
1. Check the power supply
2. Test RAM
3. Check loose connections
4. Update/reset BIOS
5. Update drivers
1. Open Event Viewer via the Search box.
2. Go to Windows Logs > System.
3. Click Filter Current Log.
4. Type 6005 into Includes/Excludes Event IDs.
5. Click OK, and the first entry gives you the time when the PC was started recently.
1. Check power settings
2. Disable automatic shutdown
3. Update drivers and BIOS
4. Scan for malware and viruses
5. Run SFC
6. Turn off sleep mode
About The Author

Position: Columnist
Vera has been working at the MiniTool Team for over 10 years as a technical editor and content writer. She mainly focuses on disk and partition management, data recovery, Windows backup and restore, and PC troubleshooting. Through in-depth software testing and hands-on experience, she has helped users solve a wide range of computer problems and better protect their data on Windows devices.
User Comments :