When you need to upgrade your current SSD with a larger one, you might need to remove the original one from your computer due to slot limitation. In this article from MiniTool, we will guide you through the detailed instructions to remove SSD from PC.
Nowadays, Solid-State Drives (SSDs) is one of the mainstream storage devices on modern computers because they deliver superior performance, speed, and reliability compared to traditional Hard Disk Drives (HDDs). Most of the computers come equipped with an SSD to accelerate game loading, shorten wait times, and improve system responsiveness significantly.
When your current SSD is going to run out of storage space or there are some problems with your disk, you might need to remove SSD from PC. Whatever the cause is, it is essential to follow the right procedures to prevent data loss or damage to your computer.
Here comes the question: how to remove SSD from PC safely? It’s aware that pulling the SSD out when the write/read operations haven’t been fully completed might trigger data corruption or damage to the disk components, so you can’t be too careful during the process.
Tools You Need to Prepare Before Proceeding
What tools should you prepare to remove SSD from a laptop or desktop PC? Here are 4 tools for you:
- Anti-static wrist strap: It helps to prevent static electricity from accumulating on your body and keep potential damage to the sensitive electronic components of your SSD.
- Phillips head screwdriver: Most SDDs are secured to the motherboard with small screws that have a Philips head design, so you need a Philipe head screwdriver to turn and unscrew your SSD properly.
- Small flathead screwdriver: For certain parts of the computer case, you need to pry them on with a small flathead screwdriver.
- A can of compressed air: To ensure proper heat dissipation and better connection, you can use it to tidy up the dirt buildup around the SSD slot and other hardware components.
Move 1: Transfer Everything from the Old SSD to a New One
There might be a risk of data loss while removing the SSD, so you had better migrate all the data on the current SSD to a new disk with MiniTool ShadowMaker. Available in almost all the Windows systems, this PC backup software is dedicated to providing data protection and disaster recovery solutions for both individuals and companies.
Its Clone Disk feature can clone SSD to larger SSD or clone HDD to SSD. By creating an exact copy of the source disk. This includes all data, the operating system, installed programs, system settings, and partition structures. Unlike traditional backups, a cloned drive can be used directly if needed, so it will save you much time and effort. Now, follow these steps to transfer your data to another available disk:
Step 1. Download and install the 30-day free trial. Launch it and then hit Keep Trial to enter its main interface.
MiniTool MovieMaker FreeClick to Download100%Clean & Safe
Step 2. In the left side pane, select Tools and click on Clone Disk.

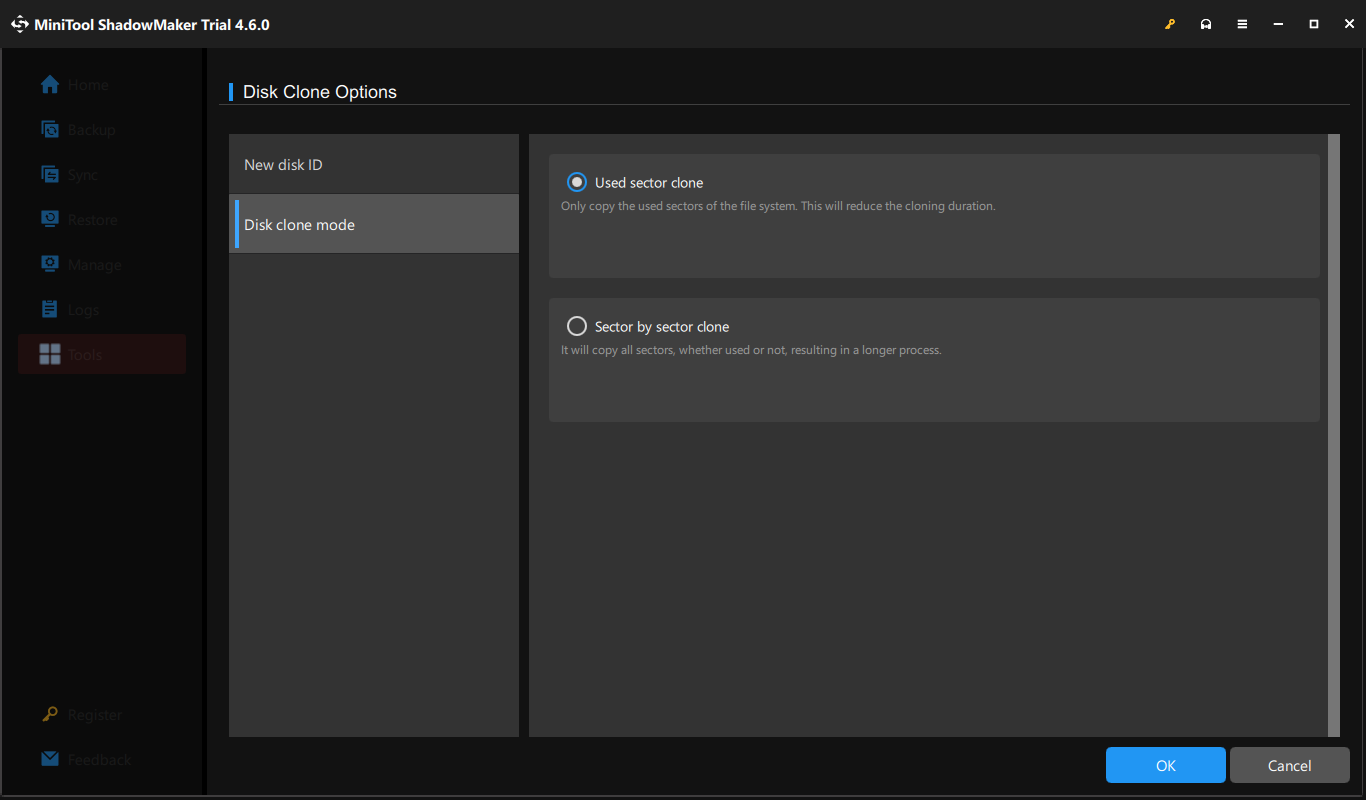
Step 3. Click on Options in the lower left corner to modify some advanced parameters:
For disk ID options, it’s recommended to keep the default settings. In other words, you should select New disk ID option to avoid disk signature collision.
For disk clone mode, there are 2 options for you: Used sector clone and Sector by sector clone. The former can be applied to cloning a hard drive to a smaller one, while the latter is suitable for a similar or larger target disk with healthy sectors.
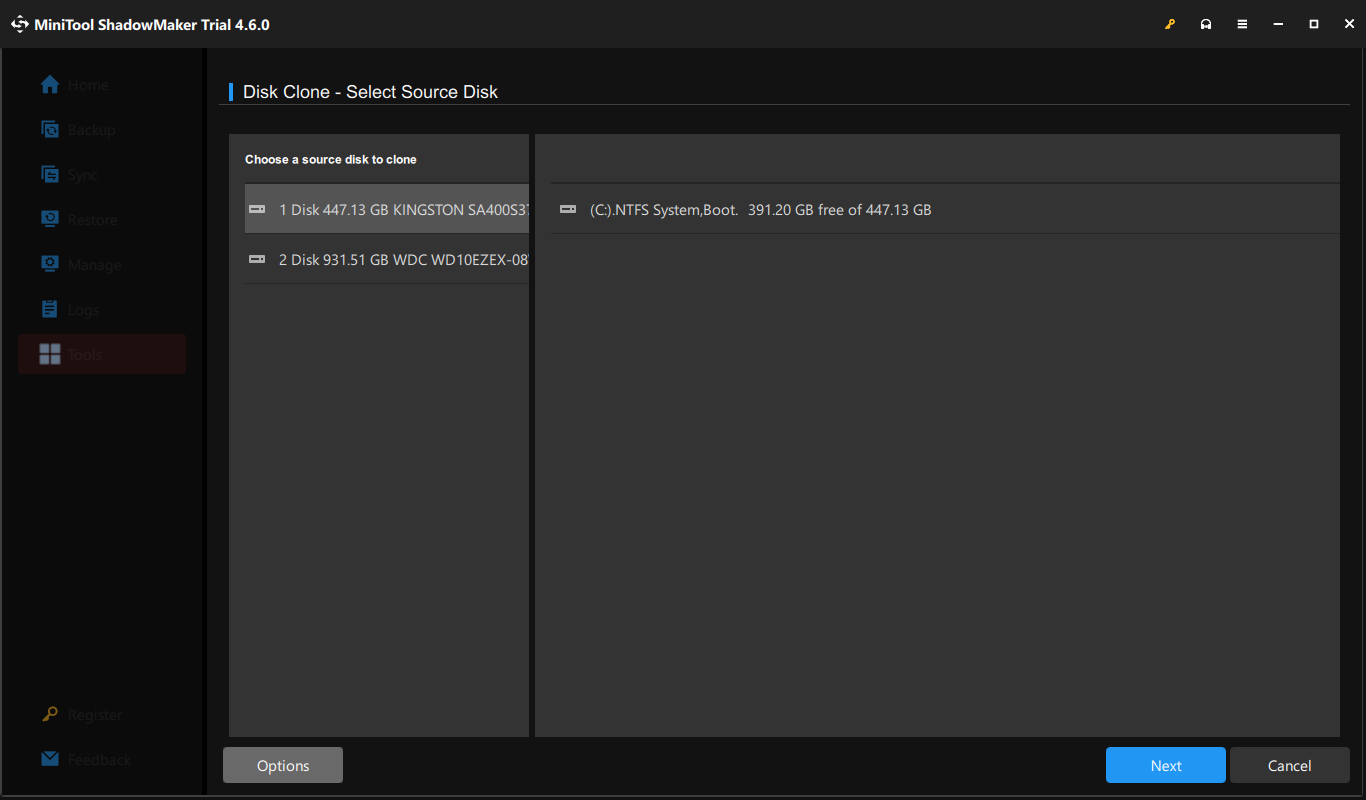
Step 4. Select the SSD you intend to remove as a source disk and then select a new SSD as a source disk.
Step 5. After confirming all the details, click on Start.
Move 2: Figure out Your SSD’s Interface Type
Before removing the SSD, you must determine its interface type, as SSDs with different interfaces are installed in different locations on the computer. Generally speaking, SSDs are connected to the motherboard through the SATA interface or the M.2 interface. Here’s how to check the specifications of your SSD:
Step 1. Right-click on the Start menu and select Windows PowerShell (Admin).
Step 2. In the command window, type wmic diskdrive get caption and hit Enter. Then it will list the model number of your SSD.
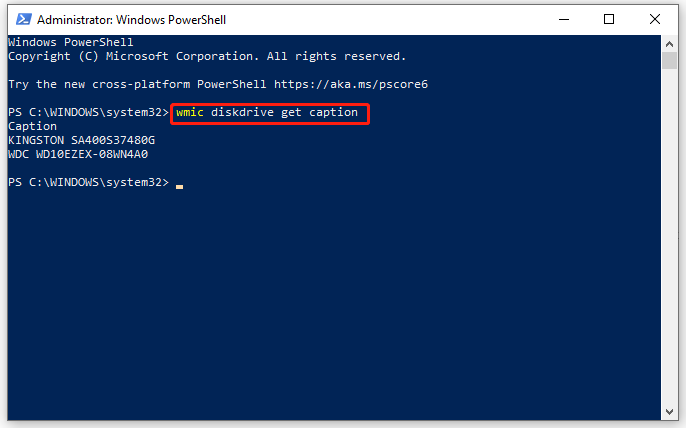
Step 3. Note it down and search it on your browser to see the listed interface type.
Do you know what the differences between SATA SSDs and M.2 SSDs are? See a quick comparison from the table below:

Move 3: Remove SSD from PC
Now, it’s time to remove SSD from PC. During the process, you must deal with these hardware components gently. Although SSDs don’t contain moving parts like traditional HDDs, they are still vulnerable to physical shock, stress, or static electricity.
Step 1. Close all the running programs and power off your computer.
Step 2. Disconnect all the cables and devices connected to your computer including the power supply, monitor, keyboard, mouse, network cables, etc.
Step 3. Open the side panel or computer case with a screwdriver.
Step 4. Locate the SSD and gently remove it from its slot. Usually, the SATA interface is located on the edge of the motherboard and is L-shaped. As for the M.2 interface, it is near the PCIe slot or SATA slot and is rectangular in shape.
Move 4: Deal with the Removed SSD
After removing your SSD from PC, how do you deal with the old SSD? No matter you plan to send it to others or reuse it in another system, you need to erase all the data on it to protect your privacy. Then, you can repartition disk with MiniTool Partition Wizard to make it usable again. This free partition manager is aimed to create, resize or format the partitions on your computer.
MiniTool Partition Wizard FreeClick to Download100%Clean & Safe
Action 1: Erase the SSD
Before selling donating, or disposing of the removed SSD, you need to wipe it to remove all the personal data and prevent anyone from recovering sensitive partition on it. Here’s how to erase removed disk:
Step 1. Connect the SSD to another computer with a SATA to USB cable.
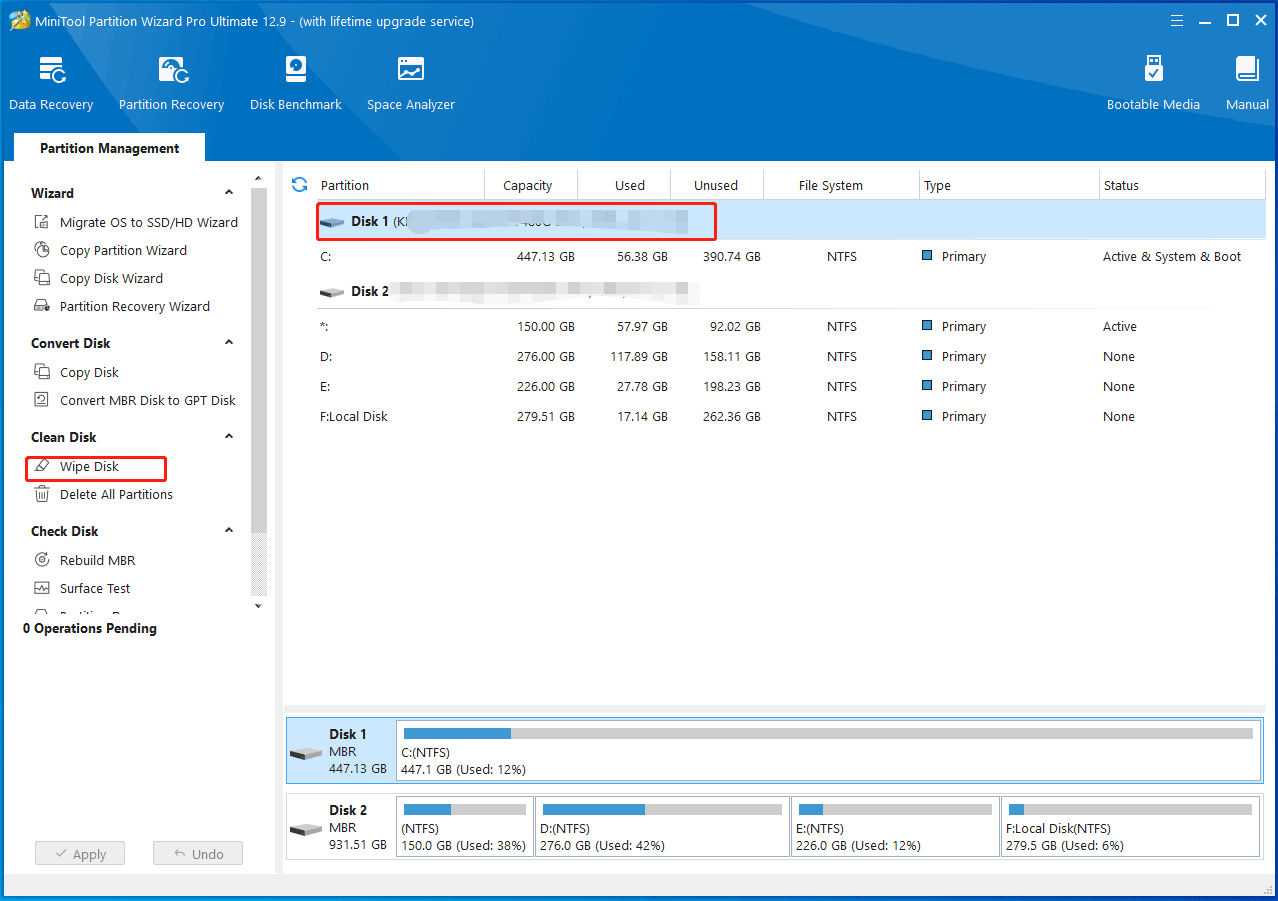
Step 2. Launch MiniTool Partition Wizard to enter the main interface.
Step 3. As you can see, the action panel is in the left and your disk map is listed in the right.
Select the SSD you connected just now from the right and click on Wipe Disk.
Step 4. Choose a wipe method and then hit the Apply button in the lower left corner to make the changes effective.
Action 2: Repartition It
After completion, the disk space of the SSD will become unallocated. Then, you need to continue to create a partition with MiniTool Partition Wizard to make the unallocated space usable:
Step 1. In MiniTool Partition Wizard. Right-click on the unallocated partition and select Create from the context menu.
Step 2. Assign parameters including Partition Label, Partition Type, Drive Letter, File System, Cluster Size, Partition Volume, Partition Location and Partition Alignment Method.
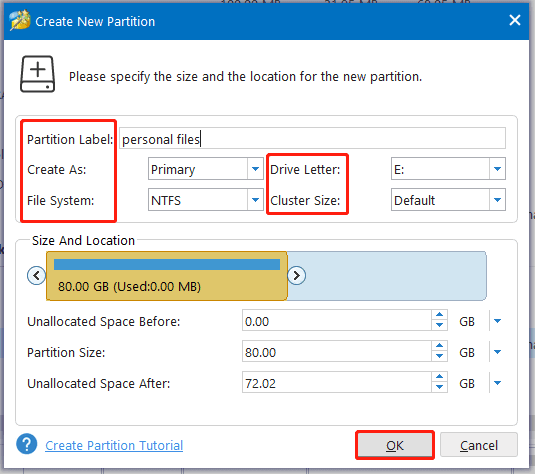
Step 3. After previewing the new partition, click on Apply to confirm the creation.
#Further Reading: What If You Remove SSD from a Running PC?
Is it safe to remove SSD from a running PC? This can be divided into 2 cases. It depends on whether you remove the internal hard drive or the external hard drive.
Case 1: Remove an Internal SSD with Power on
Since removing an internal hard drive or SSD while the computer is running can cause data corruption or damage to drive components, it’s recommended to shut down your computer properly before removing the internal SSD from your PC. Here’s what you should do before powering off your computer:
Step 1. Save all your work.
Step 2. Back up any important data stored on this SSD to a USB flash drive, external hard drive, cloud storage service or another computer with MiniTool ShadowMaker.
MiniTool ShadowMaker TrialClick to Download100%Clean & Safe
Step 3. Close all the running programs.
Step 4. Turn off your computer.
Step 5. After the computer shuts down completely, remove the power source.
Case 2: Remove an External SSD from a Running PC
However, it’s completely safe to remove an external SSD from a running PC. According to the hard drive removal policy, you need to eject any external hard drive before physically disconnecting it: click on the Safely Remove icon from Windows System Tray or the hidden icon menu to choose the SSD you want to eject.
We Need Your Voice
How to safely remove SSD from PC? Is it safe to remove an SSD disk with power on? Now, you must be clear. This guide demonstrates what preparations you should make, detailed instructions to remove SSD, as well as how to handle the removed SSD. We sincerely hope that you can benefit from it.
Do you have any queries about our products? If yes, welcome to share them with us via [email protected]. We will try our best to deliver the best software and services for you!
User Comments :