Almost nothing is more frustrating than encountering a blue screen error while working, studying, or having fun with your computer. In this post, I will offer a complete guide on blue screen video scheduler internal error.
Have you also run into the same error? If so, continue reading to get the reasons and solutions to this error.
About Video Scheduler Internal Error
The video_scheduler_internal_error is one of the most common BSOD errors in Windows 10/11. When this error happens, all processes on this PC will be interrupted, and a blue screen with this Stop Code will appear.
Before this error occurs, some symptoms may appear on the users’ computers:
- The screen is flickering.
- There are issues while using Google Chrome and Skype.
- The system is slowing down.
- System reboots recur.
- The screen keeps freezing for a short duration.
- The system freezes while loading graphic games.
Causes of Video Scheduler Internal Error
Various reasons may cause video_scheduler_internal_error. They are:
- Virus or malware interference: There are viruses or malware on the computer, interfering with graphics.
- Outdated system: An outdated Windows may contain some bugs and cause the error.
- Graphics driver issues: There are outdated, corrupted, or incompatible drivers on the PC, which causes the error.
- Software conflicts: There are some issues with security software or recently installed updates.
- Fast Startup issue: Sometimes, the enabled Fast Startup feature may trigger a BSOD error, including video_scheduler_internal_error.
- Hardware issues: There are some hardware problems on your PC, such as an overheating GPU, faulty RAM, or a bad PCIe slot.
- Overclocking: Overclocking your GPU beyond its stable threshold can result in instability and trigger this error.
- System files issues: There are corrupted system files stored on your Windows PC.
- Disk errors: Hard drive corruptions or damage can result in a blue screen error.
Back Up Data Before Fixing the Issue
Blue screen errors often indicate a critical system failure. Furthermore, this error can potentially lead to data loss or corruption. For data security, you must back up your data when you first encounter a blue screen error on your PC.
To do that, it is highly recommended to use MiniTool ShadowMaker. It is powerful Windows backup software that can easily perform file backup, data backup, system backup, and server backup.
Here’s how to use it to back up data from a PC that is unable to boot into normal Windows:
# 1. Create a MiniTool Bootable USB Hard Disk
If your computer is unbootable, creating a MiniTool bootable USB hard disk is necessary. To do that:
Step 1. Download and install MiniTool ShadowMaker on a normal Windows computer.
MiniTool ShadowMaker TrialClick to Download100%Clean & Safe
Step 2. Register this app to Pro or a higher edition with the license key.
Step 3. Go to Tools and select Media Builder.
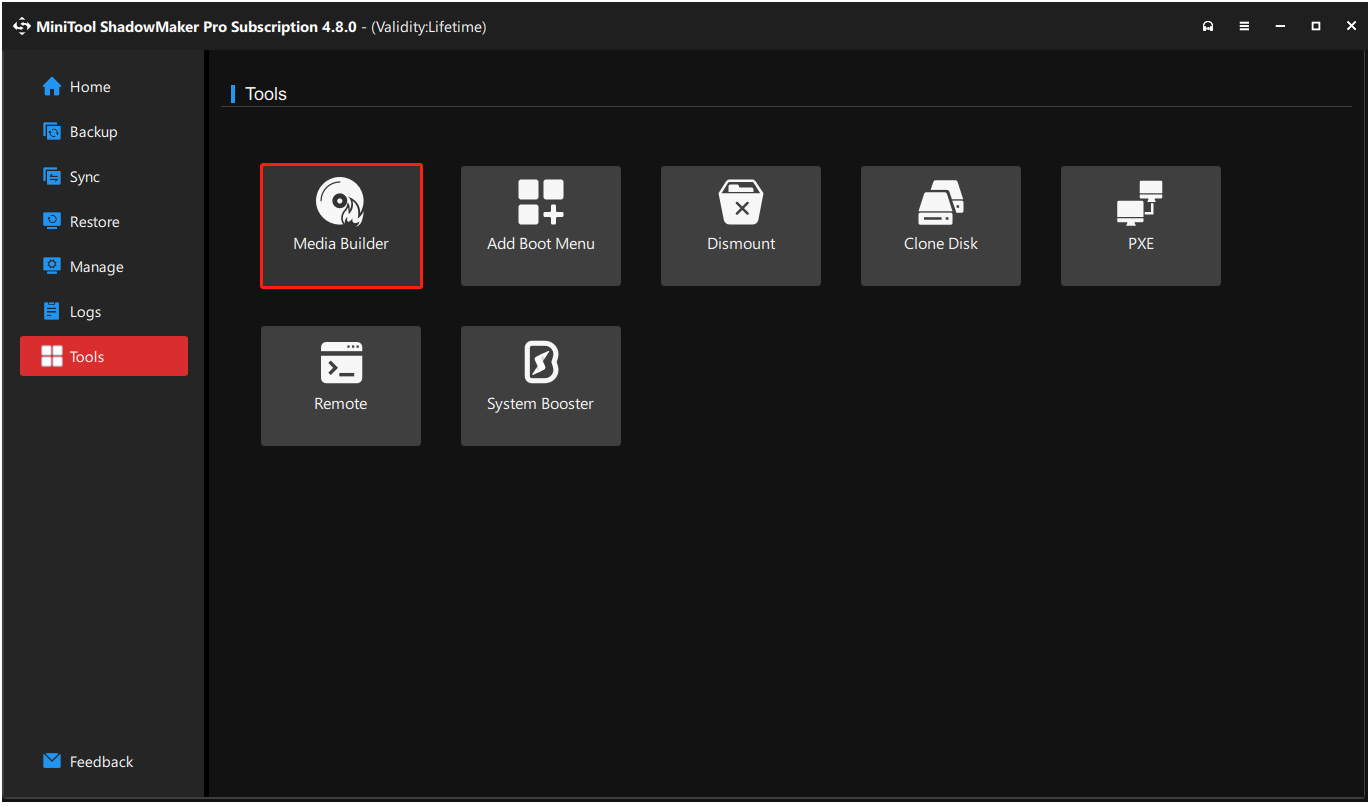
Step 4. Click WinPE-based media with MiniTool plug-in in the prompted window.
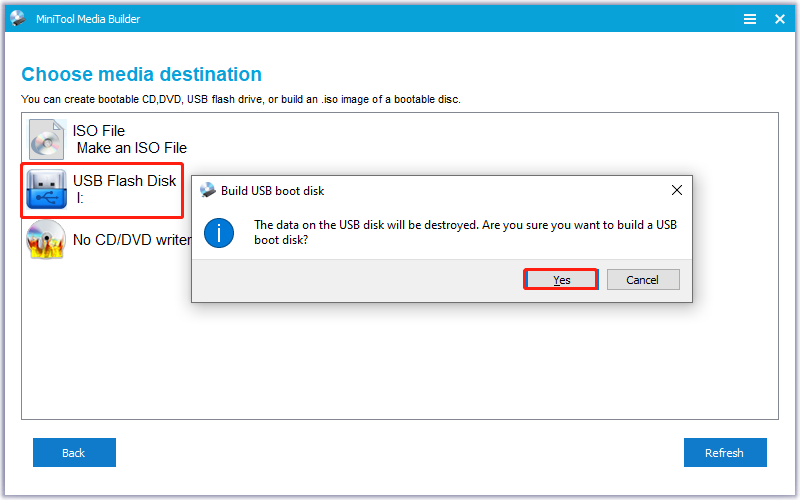
Step 5. Select USB Flash Disk. If a notice window pops up, click Yes to confirm.
Step 6. Once the process is complete, click Finish to exit the window.
# 2. Back Up Important Data
Once the MiniTool bootable USB flash disk is created, boot Windows from it and back up your data via MiniTool ShadowMaker in the WinRE environment. Here are the detailed steps:
Step 1. Connect the USB flash drive to your computer. Then, boot your PC from this USB disk.
Step 2. In the MiniTool ShadowMaker main interface, go to the Backup tab.
Step 3. Go to SOURCE, select Folders and Files, check the files that you want to back up, and then click OK.
Step 4. Navigate to DESTINATION, choose a target location to store the backup files, and click OK to continue.
Step 5. Click Back Up Now at the bottom right corner. Then, click OK in the prompted Confirmation window.
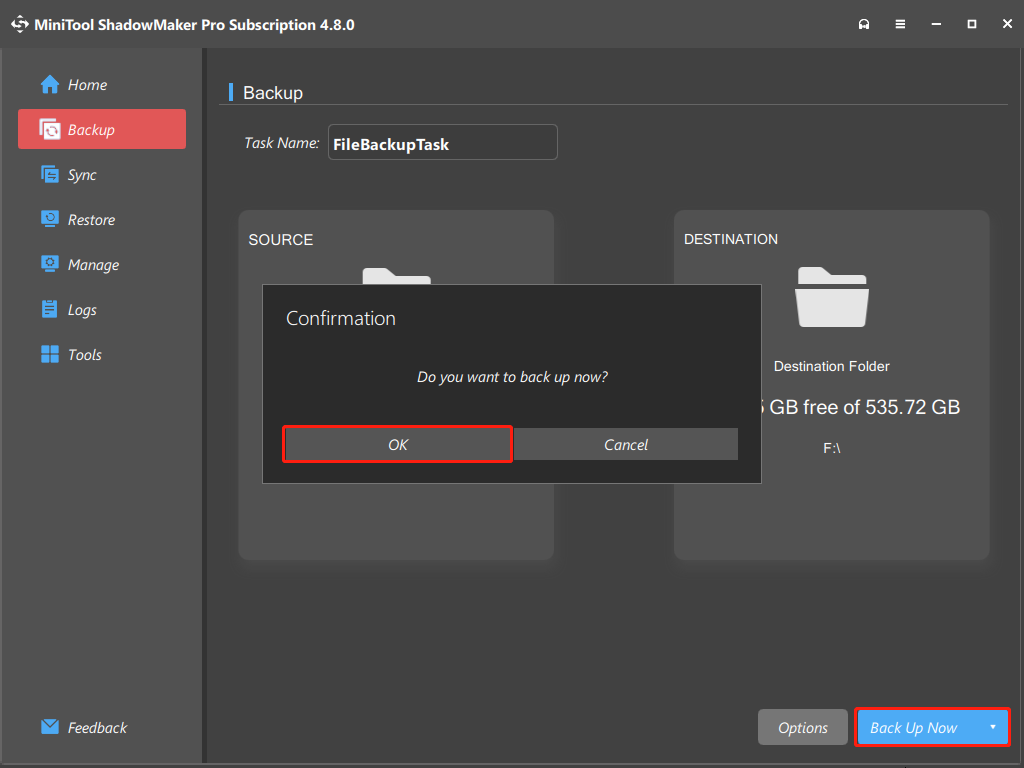
Step 6. Wait for the process to complete. Once the backup process finishes, you can see some green words that show the latest backup time.

Solutions to Video Scheduler Internal Error
To troubleshoot a blue screen video scheduler internal error, this part offers some useful solutions for two cases:
- When Windows can boot
- When Windows cannot boot
Here is the detailed guide:
Case 1: When Windows Cannot Boot
When Windows cannot boot, boot the PC into safe mode. Then, try checking the graphics driver, running SFC and DISM, running Windows Memory Diagnostic, or using other useful solutions.
Boot into Safe Mode
Follow the tutorial to boot Windows into Safe Mode:
Step 1. Force your PC to restart two or three times until the Automatic Repair screen appears.
- Power on your PC.
- As soon as you see the Windows logo, press and hold the Power button to shut it down.
- Repeat this 2-3 times until you see the “Preparing Automatic Repair” screen.
Step 2. Click Advanced options in the Automatic Repair screen.
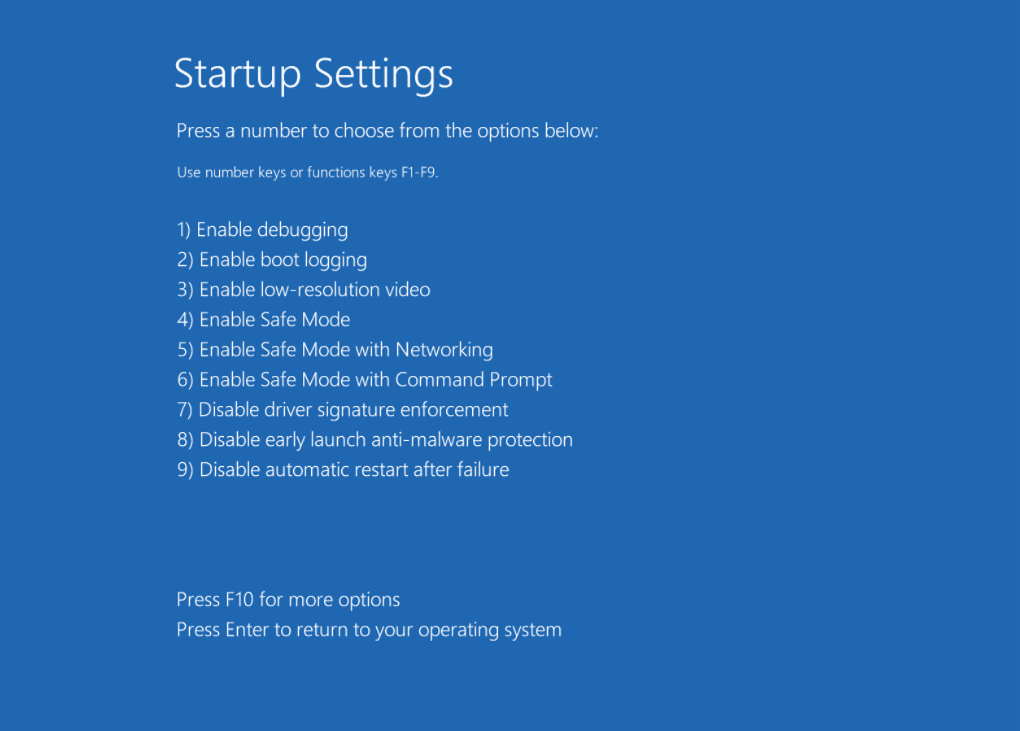
Step 3. Go to Troubleshoot > Advanced options > Startup Settings and click Restart.

Step 4. Press the number 5 or F5 key to boot into safe mode with networking.
Step 5. If you have set a password for your account, input the right password and press Enter to access Windows.
Solution 1. Update/Roll Back/Reinstall Graphics Driver
Graphics card driver issues are one of the most common reasons that may trigger video scheduler internal error in Windows 10/11 easily. In this case, update, roll back, or reinstall the graphics driver to solve the error. Here’s how to do that:
# 1. Update Graphics Driver:
Step 1. Press Win + X to open the Quick Link menu and select Device Manager from it.
Step 2. Expand the Display adapters category, right-click the graphics card driver, and select Update driver.

Step 3. Select Search automatically for drivers in the Update Drivers window.
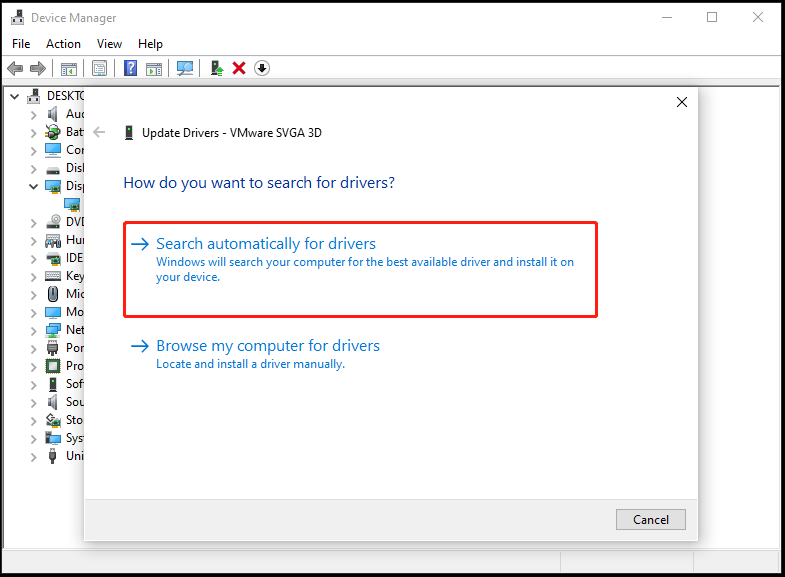
Step 4. Follow the on-screen instructions to complete the update process.
# 2. Rollback Graphics Driver:
Step 1. Open Device Manager and expand the Display adapters category.
Step 2. Right-click your graphics card driver and select Properties.
Step 3. In the pop-up window, go to the Driver tab, click Roll Back Driver.
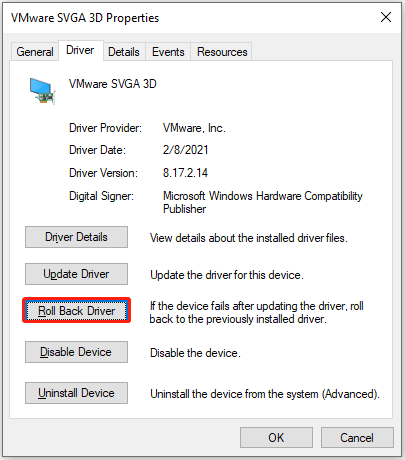
Step 4. Follow the on-screen guide to complete the process.
# 3. Reinstall the Graphics Driver:
Step 1. Navigate to your graphics card’s official website (such as NVIDIA, AMD, or Intel) to download the latest version that matches your specific graphics card and Windows version.
Step 2. Open Device Manager.
Step 3. Expand Display adapters, right-click the graphics card driver, and select Uninstall device.
Step 4. Click Uninstall in the prompted window. If the windows have the Delete the driver software for this device option, check the box as well.
Step 5. Run the driver installer file you downloaded in Step 1.
Step 6. Follow the on-screen instructions and restart your PC when finished.
Solution 2. Check for File System Corruption
Corrupted system files can cause a BSOD video scheduler internal error as well. Performing the DISM and SFC commands can scan your system files and restore any corrupted or missing files. In this case, try SFC and DISM commands:
Step 1. Press Win + S to open Search and type cmd in the search box. Then, in the right panel, click Run as administrator under Command Prompt.
Step 2. In the elevated Command Prompt window, initiate a DISM scan by running the commands below:
- DISM.exe /Online /Cleanup-Image /ScanHealth
- DISM.exe /Online /Cleanup-Image /CheckHealth
- DISM.exe /Online /Cleanup-Image /RestoreHealth
Step 3. Once DISM scanning is complete, type sfc/ scannow and press Enter.
Then, it starts to scan all protected Windows system files and replace corrupt, missing, or changed versions with correct ones.
Step 4. Once done, restart the computer to check if the blue screen error persists.
Solution 3. Check for Hard Drive Corruption
Hard drive corruption or damage may also result in the blue screen error. In this case, run CHKDSK to fix the error. Here’s how to do that:
Step 1. Run Command Prompt as administrator.
Step 2. Type chkdsk /f /r and press Enter to run the CHKDSK command to check and fix hard drive errors.
Step 3. Type Y and press Enter to move on. Then, restart your computer.
Step 4. Wait for the process to complete. Once done, disk errors may be fixed.
Solution 4. Disable Hardware-Accelerated GPU scheduling
Enabling the Hardware-accelerated GPU scheduling option allows the GPU to perform memory management and schedule rendering tasks, and reduce the pressure on the CPU. However, its effectiveness varies by app, and sometimes may cause issues.
If you have enabled this option on your PC and encounter the same error, try the following steps to disable this option:
Step 1. Right-click the blank area on your desktop and select Display settings.
Step 2. Find the Hardware-accelerated GPU scheduling option.
- For Windows 10: Scroll down and click Graphics settings.
- For Windows 11: Scroll down and click Graphics > Change default graphics settings.
Step 3. Toggle off that option and restart your computer.
Solution 5. Run Windows Memory Diagnostic
Faulty RAM can cause a blue screen video scheduler internal error as well. In this situation, run the built-in Windows Memory Diagnostic tool to scan your RAM for errors. Here’s the tutorial:
Step 1. Press Win + R to open Run, type mdsched.exe, and press Enter.
Step 2. In the prompted Windows Memory Diagnostic window, select Restart now and check for problems (recommended).
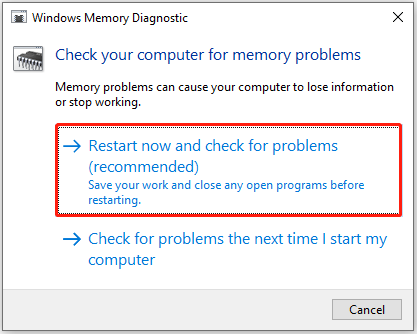
Step 3. Your computer will restart and automatically begin the memory test. During the process, press F1 to access the Windows Memory Diagnostic – Options page, use the arrow to select Extended, and press F10 to apply the operation.

Step 4. After the test finishes, check the memory test result in Event Viewer. Here are the steps:
- Open the Quick Link menu and select Event Viewer.
- Go to Windows Logs > System.
- In the right panel, click Filter Current Log.
- Check MemoryDiagnostics-Results from the Event sources’ drop-down menu.
- Click OK.
- View the filtered results for any detected errors.
If errors are detected via this memory test, it strongly indicates that one or more of your RAM modules are faulty and should be replaced.
Solution 6. Run Driver Verifier
Driver Verifier is a built-in Windows tool that can stress-test device drivers to find bugs that cause BSOD errors. Therefore, running this tool on your PC can help spot bad drivers. Here are the detailed steps:
Step 1. Run Command Prompt as administrator.
Step 2. Type verifier and press Enter.
Step 3. In the Driver Verifier window, select Create custom settings (for code developers) and click Next.
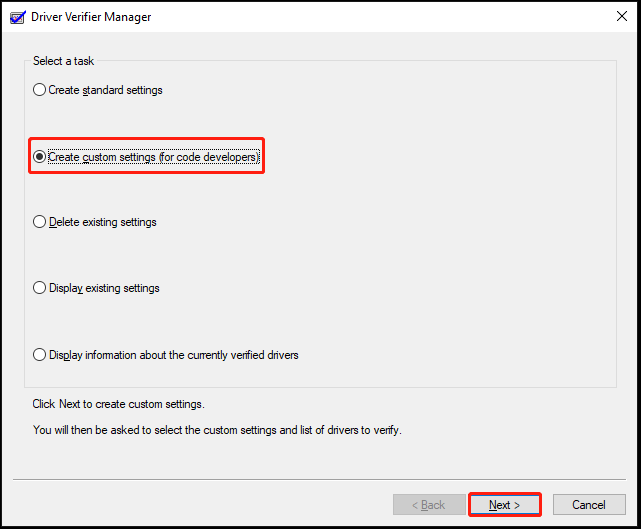
Step 4. On the next screen, click Flag Type to queue these different tests as Standard. Then, select test types like Force IRQL checking and Pool Tracking, then click Next.
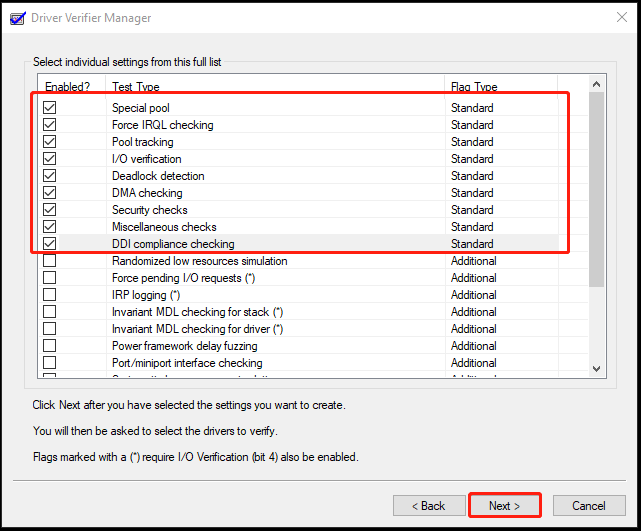
Step 5. Choose the Select driver names from a list option and click Next. Then, start by uninstalling non-Microsoft drivers.
Step 6. Follow the instructions to complete the process and restart the PC.
If a driver is malfunctioning, Driver Verifier will cause a blue screen and display the name of the problematic driver. Note the name on a paper.
Afterward, access Device Manager and take steps to either update the driver to a newer version or revert to a previous, stable version.
Solution 7. Uninstall Recent Updates and Incompatible Software
Sometimes, the recently installed updates or software may also trigger the video scheduler internal error. If you encounter this error after installing an update or application, do the following steps:
Step 1. Open the Search window, type control panel in the search box, and press Enter.
Step 2. Set View by to Large icons and select Programs and Features.
Step 3. Find the software you’ve installed recently, right-click it, and select Uninstall.
Step 4. Follow the on-screen guide to complete the process. Once done, restart your PC and check if the error has been fixed. If not, proceed with uninstalling the updates:
- Boot your PC in Safe Mode.
- Open Control Panel and go to the Programs and Features page again.
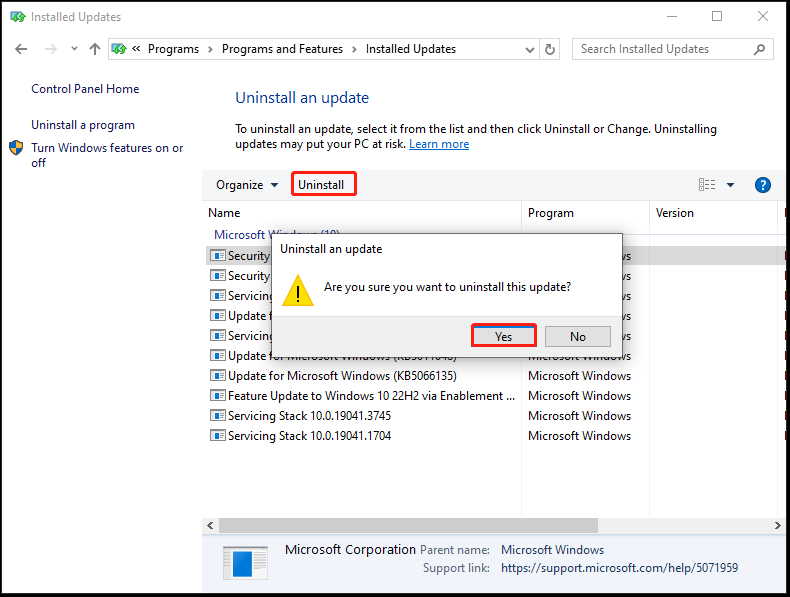
- Click View installed updates from the left panel.
- Select the latest update from the list and click Uninstall.
- Follow the on-screen instructions to complete the process.
Solution 8. Use System Restore
Performing a system restore can revert Windows to the status when the BSOD video scheduler internal error hadn’t occurred. If you have available restore points, try running System Restore with the following steps:
Step 1. Open Run, type rstrui.exe in the box, and press Enter.
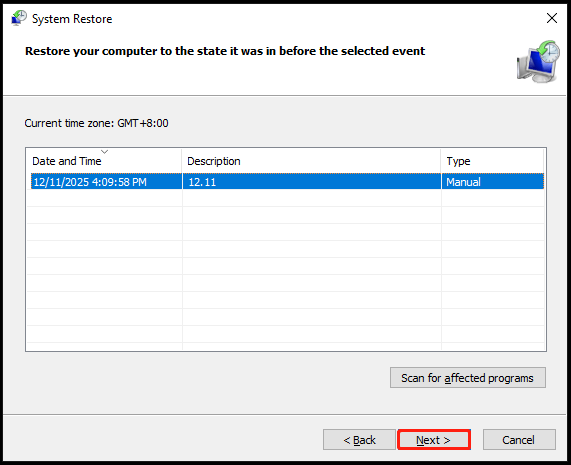
Step 2. In the pop-up System Restore window, click Next.
Step 3. Select a proper restore point from the list and click Next.
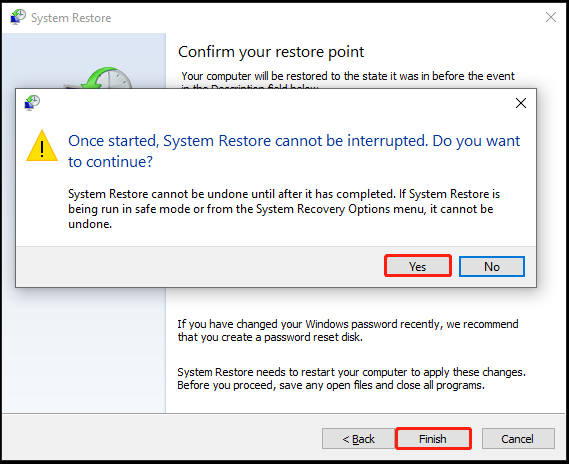
Step 4. On the next page, click Finish and Yes sequentially to execute the operation.
Case 2: When Windows Can Boot
If your Windows can boot normally, try scanning for viruses, installing the latest Windows updates, disabling fast startup, and using other methods. Here’s the detailed breakdown:
Solution 1. Update Windows
An outdated Windows operating system may have bugs that can trigger the video scheduler internal error in Windows 10/11. In this case, update Windows to the latest version to fix the error. Here’s the guide for Windows 11:
Step 1. Press Win + I to open Settings.
Step 2. Navigate to Windows Update.
Step 3. Click Check for updates. If there are available updates, update them.
Solution 2. Run Malware/Virus Scan
Viruses or malware infection may interfere with the Windows OS and cause video scheduler internal error in Windows 10/11. In this case, performing a virus/malware scan is necessary. Here’s how to use the built-in Windows Security tool to scan for viruses:
Step 1. Open the Search window, type virus & threat protection, and press Enter.
Step 2. Click Scan options in the pop-up window.
Step 3. Choose a virus scan option that suits your needs, then click Scan Now. For example, I select Full Scan here.
- Quick Scan: It needs approximal 5-15 minutes, as it just scans the most common locations where the virus hides.
- Full Scan: It needs 1-2 hours or longer, depending on the size of your entire system.
- Custom Scan: The time it consumes depends on the selected items.
- Microsoft Defender Offline Scan: It needs around 15 minutes plus reboot time. It detects and removes persistent or advanced malware that is difficult to remove when Windows is in the normal boot mode.
Step 4. Once the process is complete, go to the Protection history windows to check if there are any viruses have been found. If yes, click the virus and select a proper action for it.
Sometimes, third-party antivirus software may conflict with the Windows OS and result in the video_scheduler_internal_error. In this case, try disabling it temporarily to troubleshoot the error.
Solution 3. Disable Fast Startup
For some computers, the enabled fast startup feature may easily cause a BSOD video scheduler internal error. To fix the issue, disable the fast startup feature. Here’s how to do that:
Step 1. Open Control Panel, set View by to Large icons, and then select Power Options.
Step 2. Select Choose what the power buttons do from the left panel.
Step 3. Click Change settings that are currently unavailable.
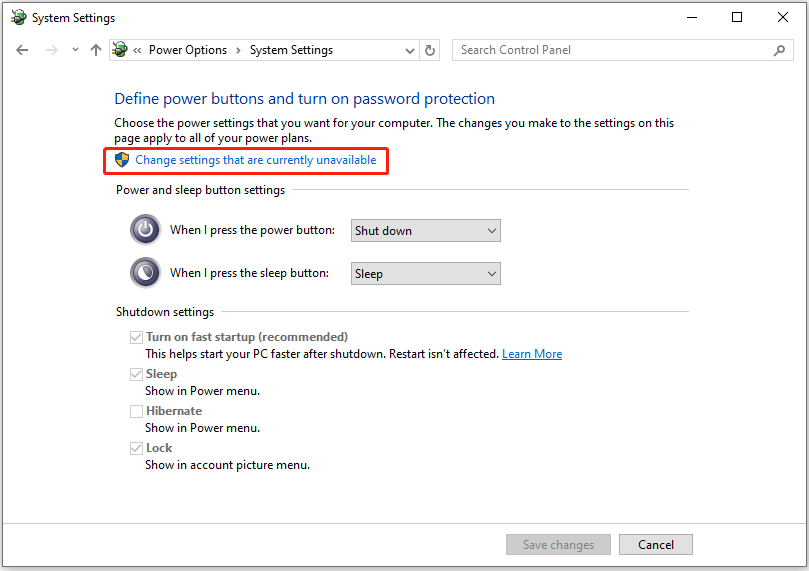
Step 4. Uncheck the box of Turn on fast startup (recommended) and click Save changes.
If the Problem Persists
If video_scheduler_internal_error persists after trying all the above solutions, use the following methods to fix the error:
- Clean Your PC internals
- Reseat hardware, such as RAM modules, graphics card
- Clear your CMOS
- Update BIOS
- Check your PCIe settings
- Reapply thermal paste
- Reset the PC
In Conclusion
The video_scheduler_internal_error is a blue screen error that can be caused by various reasons. From this post, you can know the possible causes and solutions for this error.
Additionally, this post introduces a powerful data backup tool, MiniTool ShadowMaker, to help you back up your important data. If you encounter an issue with this software, please contact us by sending an email to [email protected].
Video Scheduler Internal Error FAQ
Visual glitches, such as artifacts, lines, and flickering
Performance drops, such as lag, low FPS, and freezing
Crashes, such as BSOD and sudden restarts
Strange fan noises
Lack of display
About The Author

Position: Columnist
Charlotte is a technology columnist with a strong focus on the Windows operating system, specializing in disk management, backup, and data recovery. She is passionate about analyzing computer errors, identifying root causes, and delivering practical solutions. In her free time, she stays updated on the latest developments in computer systems and hardware while continuously learning new technologies to broaden her expertise. Her writing style is clear and easy to understand, making complex technical topics accessible even to users with limited computer knowledge.
User Comments :