While ReFS is designed for high resilience and fault tolerance, NTFS is known for its advanced features and compatibility. Sometimes, you may need to convert ReFS to NTFS without losing data. In this article, MiniTool Software aims to guide you through the process.
If you want to convert ReFS to NTFS without losing data, you can read this post to learn a full guide.
ReFS vs. NTFS
NTFS and ReFS have distinct characteristics that cater to different needs.
ReFS is optimized for fault tolerance, data integrity, and scalability, making it ideal for scenarios where large volumes of data need to be stored with minimal risk of corruption.
On the other hand, NTFS is a more versatile file system, supporting a wide range of features such as file compression, encryption, and disk quotas. While NTFS is suitable for general-purpose use, ReFS is often preferred for critical data storage.
Why Do You Need to Convert from ReFS to NTFS?
There are several reasons why you might want to convert from ReFS to NTFS. One common scenario is when you need to access files on a ReFS drive in a Windows operating system that does not support ReFS. In this case, you need to format ReFS as NTFS. Additionally, you may find NTFS more compatible with certain applications or storage devices. So, you want to convert a partition from ReFS to NTFS.
Usually, you cannot directly convert ReFS to NTFS on a Windows computer. You need to format a ReFS partition or drive to NTFS. As you know, formatting a drive will remove all files on the drive or partition. This might not be what you want.
Here comes a question: Is it possible to format ReFS to NTFS without losing data on a Windows PC?
Of course, yes. You can back up files on the partition or drive before formatting, and then you can feel free to convert ReFS to NTFS without data loss.
How to Convert ReFS to NTFS Without Losing Data?
You can use MiniTool ShadowMaker to first back up the ReFS partition or drive. Next, you can format ReFS to NTFS in File Explorer or using Disk Management. After that, you can restore the partition or drive from the backup.
Move 1: Back up Files with MiniTool ShadowMaker
MiniTool ShadowMaker is professional Windows backup software, which supports backing up files and folders, partitions and disks, and systems. You can use it to back up ReFS partitions.
This Windows backup software has a trial edition and you can experience its backup features for free within 30 days. So, you can first download this freeware to have a try.
Step 1. Download and install MiniTool ShadowMaker Trial on your device.
MiniTool ShadowMaker TrialClick to Download100%Clean & Safe
Step 2. Launch the program and then click the Keep Trial button to enter the main interface.
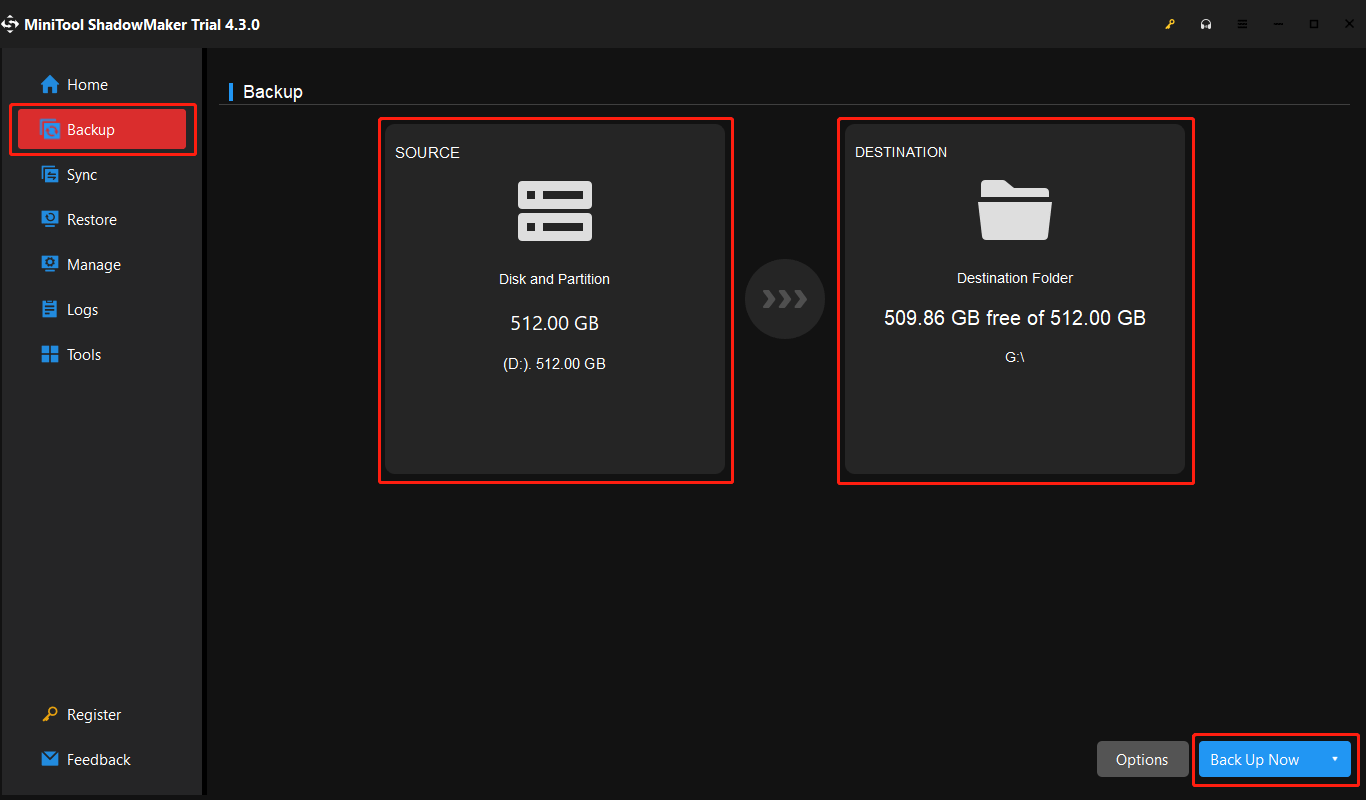
Step 3. Click Backup from the left menu to navigate to the Backup interface.
Step 4. Click SOURCE > Disk and Partition and select the target ReFS drive as the source drive. Then, click DESTINATION and specify a location to save the backup. The destination drive should have enough free space to save the backup.
Step 5. Click the Back Up Now button and click OK on the pop-up interface to start the backup process. Wait until the process ends.
Move 2: Format ReFS to NTFS
Now, you can format the ReFS partition to NTFS without losing data. You can choose one of the following two ways according to your situation.
Way 1: Format ReFS to NTFS in File Explorer
Step 1. Press Win + E to open File Explorer and then click This PC from the left menu.
Step 2. Right-click the ReFS drive you want to format and select Format from the context menu.
Step 3. On the pop-up interface, expand the File system menu and select NTFS as the file system for that partition. You can also select other parameters if necessary. For example, you can add a label for the drive. If you want to perform a full format, you will need to deselect the Quick Format option under Format options (see Quick Format VS Full Format).
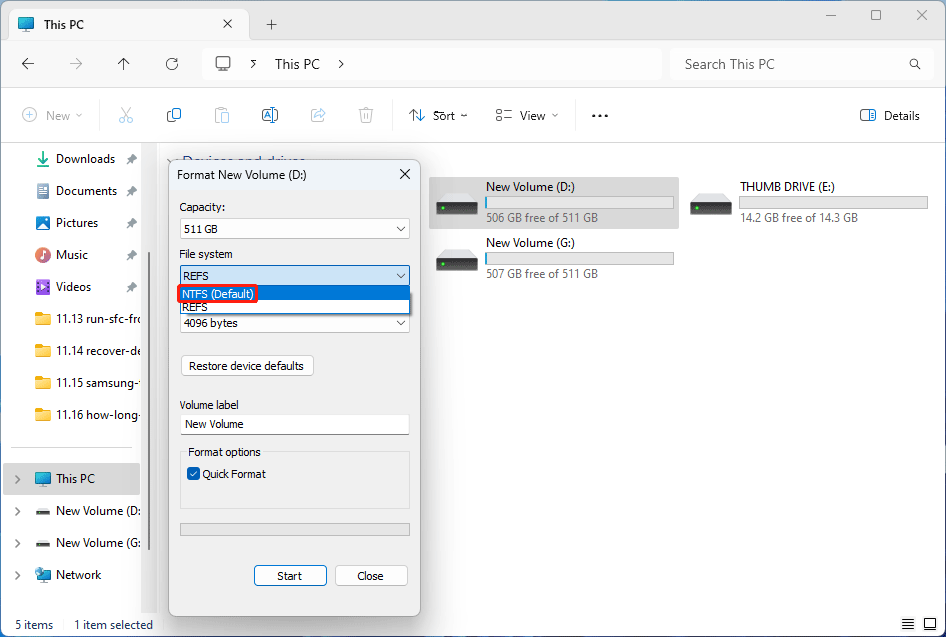
Step 4. Click Start, and then click OK on the pop-up interface to start formatting ReFS to NTFS. Wait until the process ends.
Way 2: Format ReFS to NTFS Using Disk Management
Step 1. Press Win + X and select Disk Management from the WinX menu.
Step 2. Locate the ReFS drive, right-click it, and choose Format from the context menu.
Step 3. Expand the File System options and select REFS as the file system for the partition. Likewise, you can also add a label for the partition and choose whether to perform a quick format.
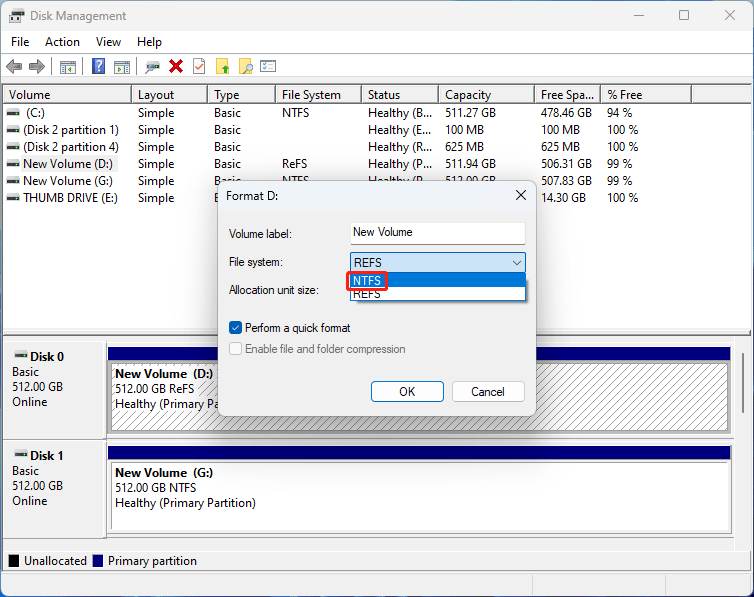
Step 4. Click OK.
Step 5. Click OK on the pop-up warning interface to confirm the operation. Then, your system will begin to format the ReFS drive to NTFS.
Move 3: Restore Files to the NTFS Partition from the Backup
Now, you can use the Restore feature in MiniTool ShadowMaker to restore files to the formatted partition using the backup. See how to restore the partition using MiniTool ShadowMaker.
How to Recover Data from a Formatted ReFS Partition/Drive?
If you format a ReFS drive to NTFS (or any other file system) without backing up files on it, you will of course lose all files on that drive. What can you do to recover data from a formatted ReFS drive?
You can use a professional file recovery tool to rescue your files from the formatted ReFS drive. MiniTool Power Data Recovery is a good choice that can help you quickly and effectively perform a formatted ReFS partition data recovery.
You can first use MiniTool Power Data Recovery Free to scan the formatted partition and see if it can find the needed files, and recover files within 1GB for free. If you want to recover more files using this MiniTool file recovery tool, you will need to use a full edition.
How to Use MiniTool Power Data Recovery to Retrieve Files from a Formatted ReFS Drive
Now, we will show you how to recover data after formatting a ReFS partition to NTFS using this software.
Step 1. Download and install MiniTool Power Data Recovery Free Edition on your Windows PC.
MiniTool Power Data Recovery FreeClick to Download100%Clean & Safe
Step 2. Open the software and you will see its main interface where all detected partitions (including existing and lost ones) are displayed. Find the drive you want to recover data from through the drive letter or capacity, then hover that drive and click the Scan button to start scanning it. Alternatively, you can double-click that drive to start the scanning process.
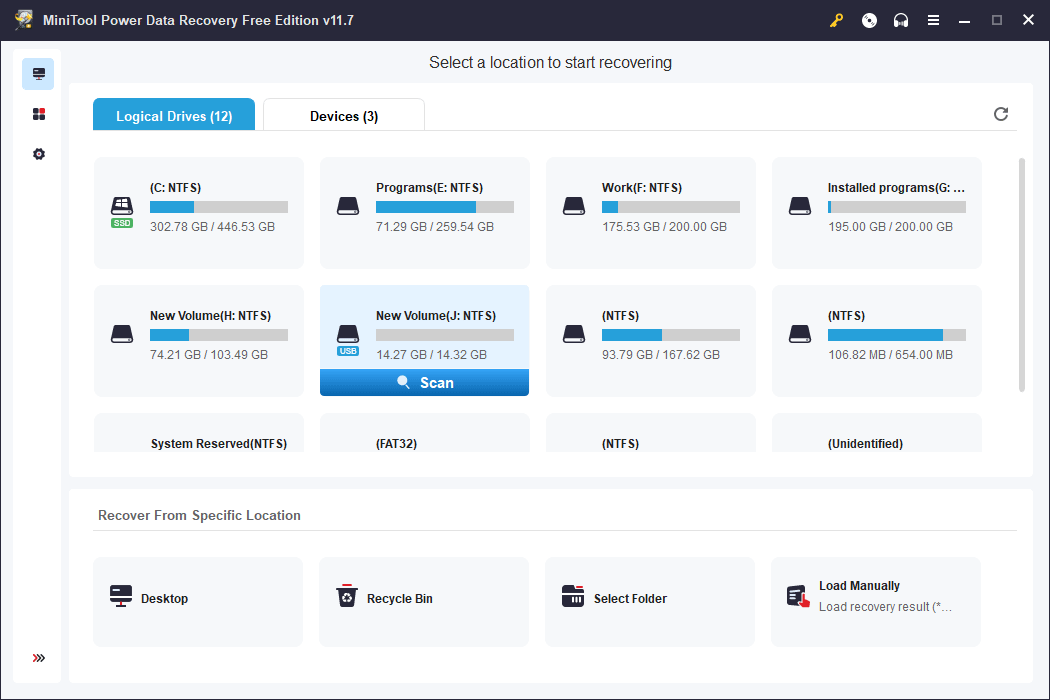
Step 3. After scanning, this software will display the scan results by path by default. You can open each path to find the needed files.
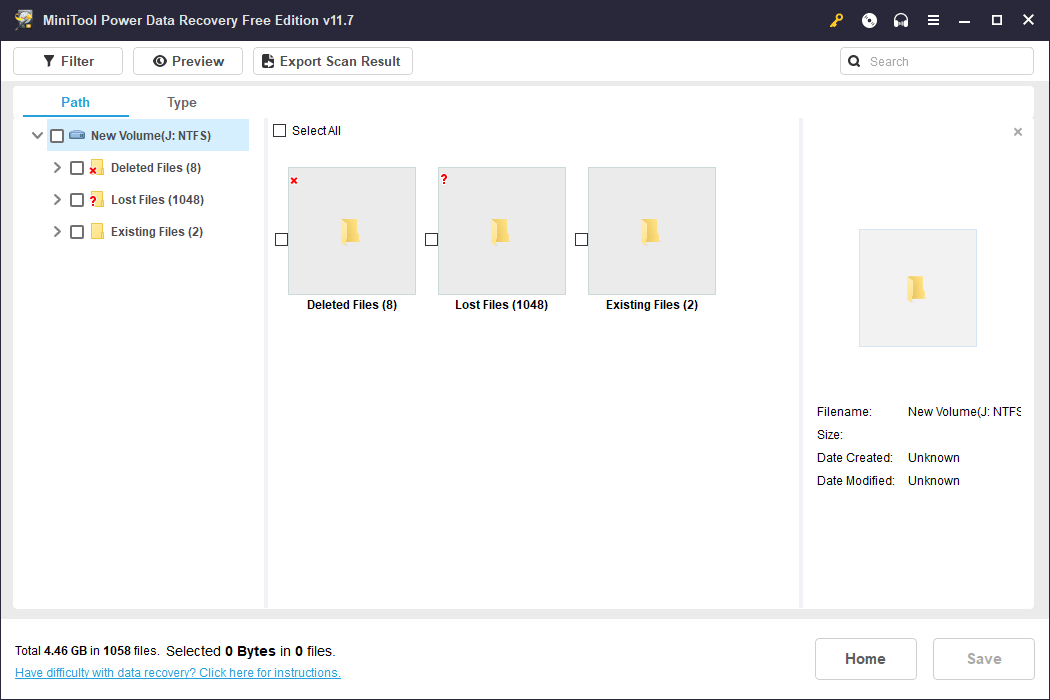
If there are so many paths and scanned files, it might take a long time to find the ones you want to recover. If so, you can use the following features to help you quickly find files:
- Type: After you click the Type tab, this software will display the scan results based on the data types like Archive, Document, Pictures, and Other files. Then, you can find your files by type easily.
- Filter: The Filter feature enables you to filter files further using file type, date modified, file size, and file category. You can combine these options to filter files according to your situation.
- Search: This feature allows you to search for the needed file by the filename. You can enter the partial or full name of the file and press Enter to directly locate the file.
- Preview: Many scanned files do not have their original names. At this time, you can use the Preview function of the software to preview and confirm the files. This software supports previewing various types of files like images, documents, emails, videos, audio files, and more. The file you want to preview should not be larger than 2GB.
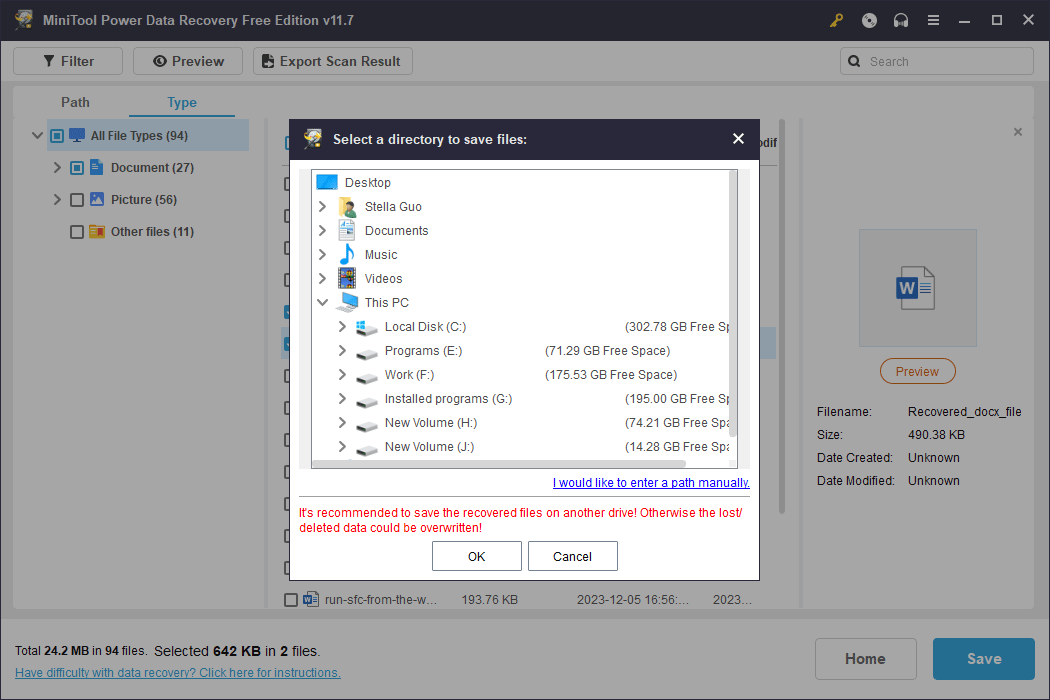
Step 4. Select the files you want to recover and then click the Save button to choose a proper directory to save the selected files. To prevent the missing files from being overwritten, you should not select the original drive as the destination drive.
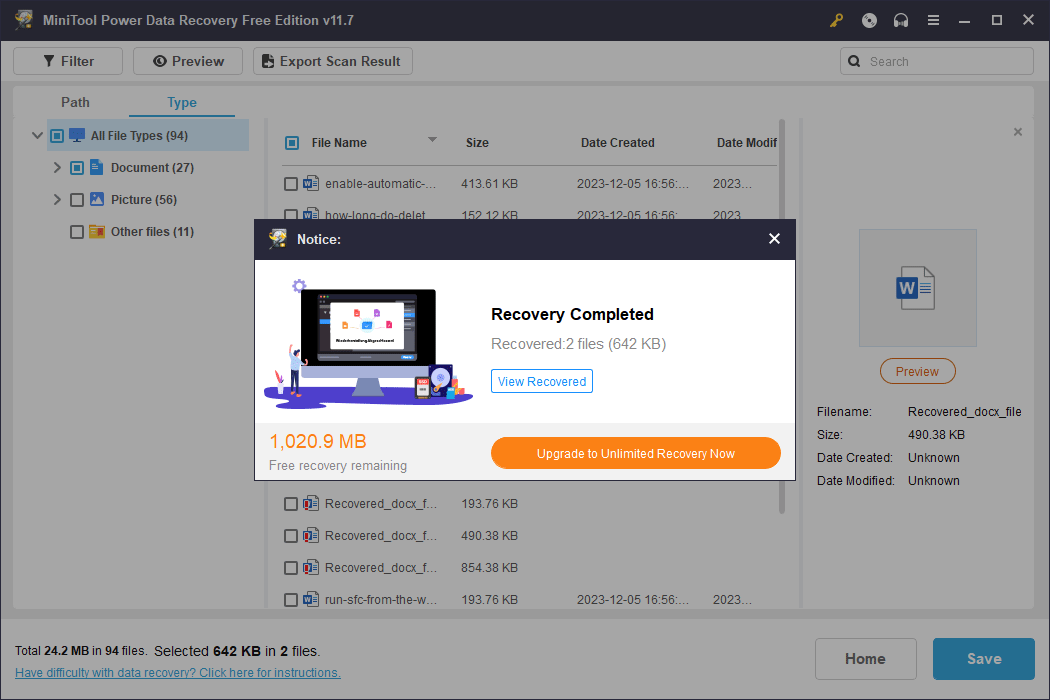
Step 5. After selecting a save location, you should click the OK button to save files. Once the data recovery process is complete, you will see a small pop-up interface. You can click the View Recovered button to directly open the location where recovered files are saved. You can then use these recovered files.
If you want to use a full edition to recover data without limits, you can go to MiniTool’s Store to select a proper one according to your requirements.
After you get the license key, you can immediately register the software in the scan results interface: you need to click the key icon on the top, enter the license key, and then press Enter to register.
More Information about MiniTool Power Data Recovery
MiniTool Power Data Recovery can recover files like images, documents, videos, audio, and more from both internal and external hard drives, SSDs, SD cards, USB flash drives, memory cards, pen drives, CDs/DVDs, etc.
This data restore tool can work in different situations:
- If you deleted files by mistake, you can use this software to get the deleted files back.
- If you format a drive or partition without a backup, you can try this software to restore your formatted files.
- If your drive is inaccessible, you can apply this file recovery tool to retrieve files from the drive and then format the drive to normal.
- If your Windows PC won’t boot, you can use MiniTool Power Data Recovery Boot Disk to recover data from the device.
No matter which data loss situation you are facing, you can just try this data restore software to rescue your files.
Conclusion
Want to convert ReFS to NTFS without losing data? By using tools like MiniTool ShadowMaker, you can safeguard your data and smoothly transition from one file system to another without the risk of data loss. Always ensure that you have a reliable backup before proceeding with any file system conversion to mitigate the potential risks associated with data loss.
However, if you format a ReFS drive by mistake and there is no available backup file, you can use MiniTool Power Data Recovery to rescue your files in time.
If you encounter problems while using MiniTool software, you can contact us via [email protected].
About The Author

Position: Columnist
Stella has been working in MiniTool Software as an English Editor for more than 8 years. Her articles mainly cover the fields of data recovery including storage media data recovery, phone data recovery, and photo recovery, videos download, partition management, and video & audio format conversions.
User Comments :