If your disk usage is running high or even at 100% all the time on your Windows 11 computer, the performance of your device will be largely reduced. Don’t worry. MiniTool Software shows you the reasons for this issue and introduces some methods to solve this problem in this article.
Windows 11 High Disk Usage/100% Disk Usage
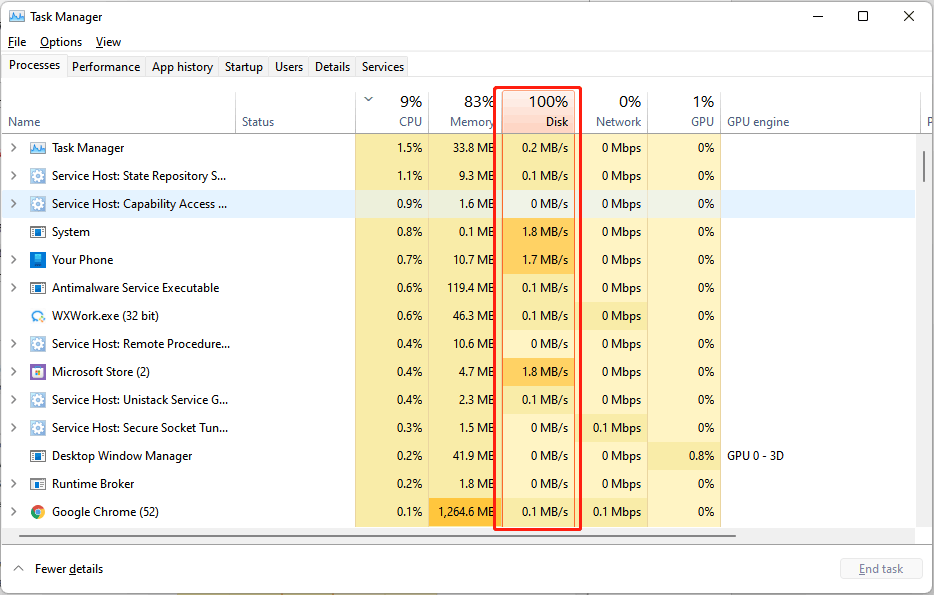
After upgrading to Windows 11, you may find that your computer runs slowly. Then, you open Task Manager and check your process running situation. Finally, you might find that your Windows 11 disk is running at 100%. In some cases, the disk usage will become lower very soon. If so, your computer is working normally. But if the disk usage is running at 100% or your disk usage spikes all the time, the situation will be serious. You need to take measures to solve Windows 11 100% disk usage or high disk usage.
Why Is My Disk at 100?
Windows 11 high disk usage or 100% disk usage always happens when:
- There are too many startup programs.
- There are too many services running in the background.
- Some drivers are outdated.
- Your system is infected by viruses or malware.
- The virtual memory is low.
- There are bad sectors or logical errors on your disk drive.
- And more….
What to Do When Windows 11 Disk Usage Is High or at 100%?
There are many things you can do to reduce disk usage on your Windows 11 computer. The first thing you can try is very simple: you can restart your computer and check if the disk usage drops to a normal level. If this doesn’t work, you can end some unnecessary apps and services especially when they are using much disk. In this part, you can find many useful methods.
Fix 1: Disable Superfetch
Superfetch is a process that can preload data for commonly used apps on your device. This can optimize your computer experience. But this can also be a cause of 100% disk usage on Windows 11 because the data preloading process might take up much disk usage. If you want to fix Windows 11 high disk usage issue, you can disable Superfetch to have a try.
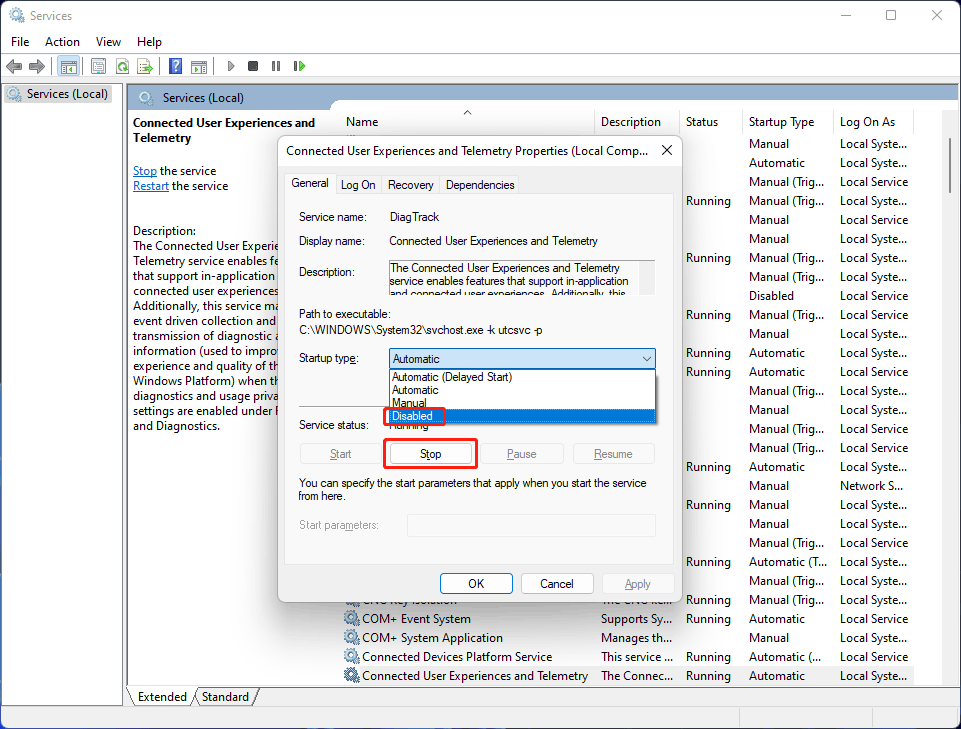
Fix 2: Disable Connected User Experiences and Telemetry
The Connected User Experiences and Telemetry service runs under svchost.exe. It can track diagnostic data and sends it to Microsoft’s servers. Fortunately, you can disable it to solve the issue.
Step 1: Press Win+R to open Run.
Step 2: Type services.msc into the Run box and press Enter to open Services.
Step 3: Scroll down to find Connected User Experiences and Telemetry and double-click it to open its Properties interface.
Step 4: Expand the option next to Startup type and select Disabled.
Step 5: Click the Stop button to stop this service.
Step 6: Click Apply.
Step 7: Click OK.
Fix 3: Disable Windows Search
The Search feature on Windows can help you easily find the files, folders, apps, and webpages you are looking for on your device. This feature is enabled by default on your device. Usually, it won’t take up much disk usage on your device. But there are exceptions. If you find it is the cause of high disk usage in Task Manager, you can disable it and then check if the problem is solved.
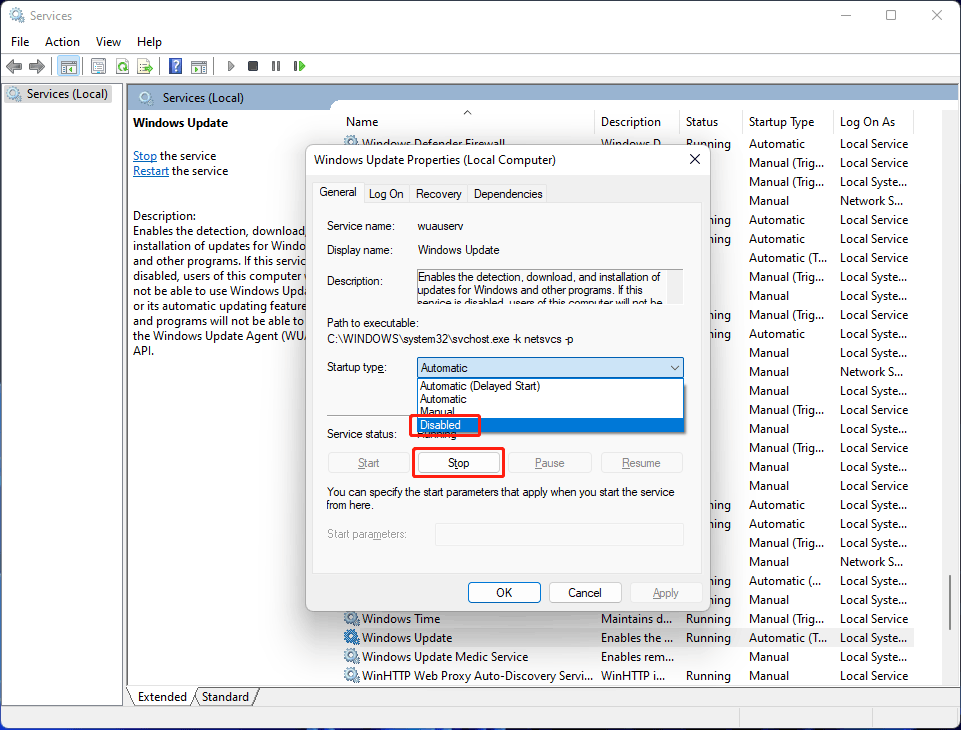
Fix 4: Disable the Windows Update Service
The Windows Update service is enabled by default on your computer. When Microsoft releases a new update for Windows 11, it can automatically detect it and start downloading & installing it on your machine. Perhaps, you don’t know the update process is running in the background. But it could cause Windows 11 100% disk usage.
If you don’t want to perform a real-time Windows 11 update and you want to fix the 100% disk usage issue on your device, you can choose to disable the Windows Update service.
Step 1: Open Services on your Windows 11 computer.
Step 2: Scroll down to find Windows Update and double-click it to continue.
Step 3: The Properties interface will pop up, then you need to select Disabled for Startup type.
Step 4: Click Stop.
Step 5: Click Apply.
Step 6: Click OK.
Fix 5: End Unnecessary Running Apps and Services
You can check which apps or services are using too much disk in Task Manager. If they are unnecessary, you can directly turn off them in Task Manager.
Step 1: Press Win+X to open the WinX menu.
Step 2: Select Task Manager.
Step 3: Find the app or service you want to close. Then right-click it and select End task. Repeat this step to end all the apps and services you want to close.
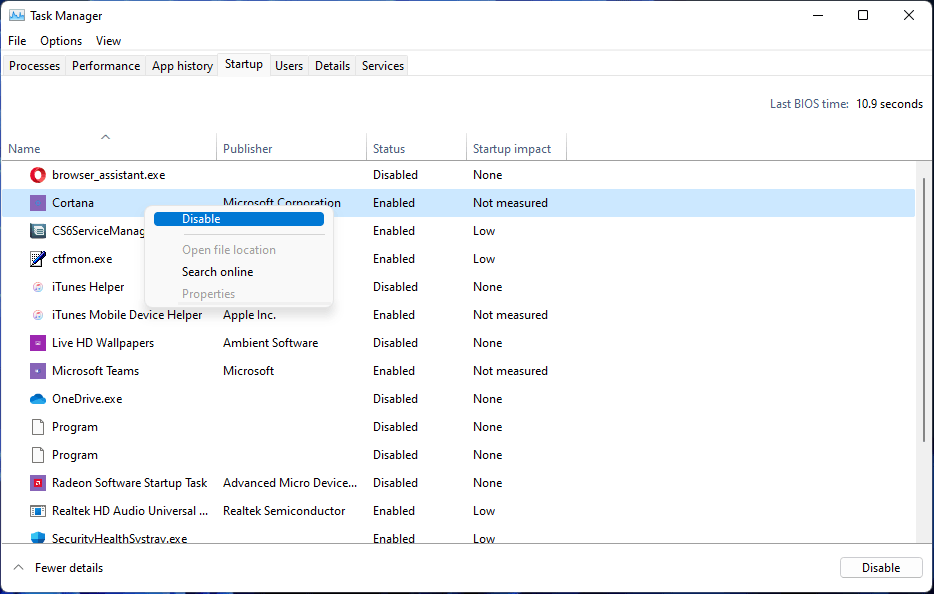
Fix 6: Disable Unnecessary Startup Apps
The startup apps can be launched with the startup of your computer. If the startup apps are not the apps you use frequently, you’d better disable them to reduce the disk usage. You can do it using Task Manager.
Step 1: Open Task Manager on Windows 11.
Step 2: Switch to the Startup tab.
Step 3: Find the startup app you want to disable, then right-click it and select Disable.
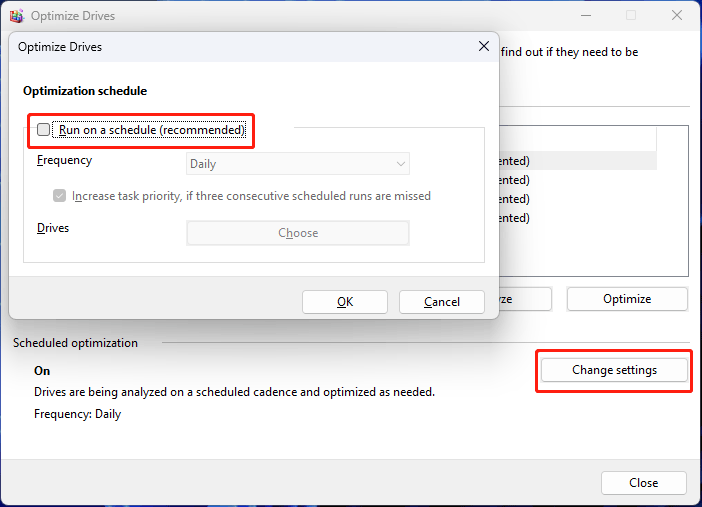
Fix 7: Turn off Scheduled Defragmentation
Disk defragmentation can also cause high disk usage on Windows 11. You can disable it to have a try:
Step 1: Click the search icon in the taskbar and search for defragment.
Step 2: Select Defragment and Optimize Drives from the search result to open Optimize Drives.
Step 3: Click the Change settings button.
Step 4: Deselect the checkbox next to Run on a schedule.
Step 5: Click OK.
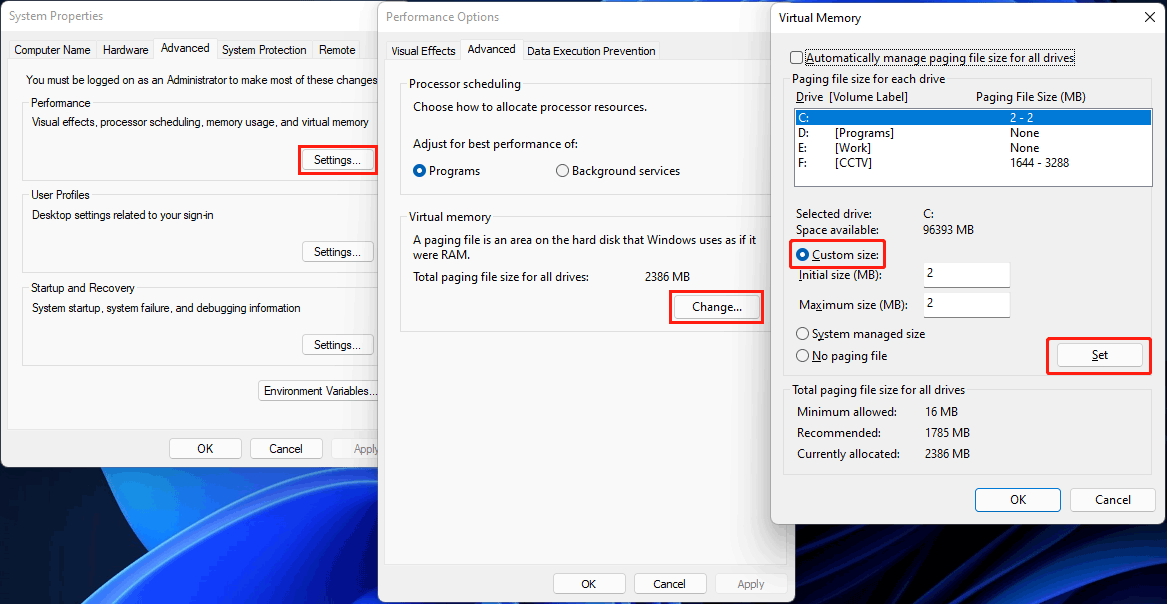
Fix 8: Reset Virtual Memory
Step 1: Press Win + R to open Run.
Step 2: Type sysdm.cpl into Run and press Enter to open System Properties.
Step 3: Switch to the Advanced tab.
Step 4: Click the Settings button under Performance.
Step 5: Click the Change button under Virtual Memory on the next interface.
Step 6: Uncheck Automatically manage paging file size for all drives.
Step 7: Select Custom size.
Step 8: Specify the initial and maximum size for the paging file in megabytes based on your requirements.
Step 9: Click Set.
Step 10: Click OK.
Step 11: Click OK again.
Step 12: Restart your computer.
Fix 9: Run CHKDSK
Bad sectors and errors on your hard disk can also be the cause of Windows 11 high disk usage or Windows 11 100% disk usage. Well then, how to solve the issue? You can run chkdsk to shield bad sectors and fix errors on the disk.
Step 1: Click the search icon in the taskbar and search for cmd.
Step 2: Right-click Command Prompt from the search result and select Run as administrator to run Command Prompt as administrator.
Step 3: Type chkdsk /f /r c: and press Enter to run the command.
Step 4: Type Y and press Enter.
Step 5: Restart your computer.
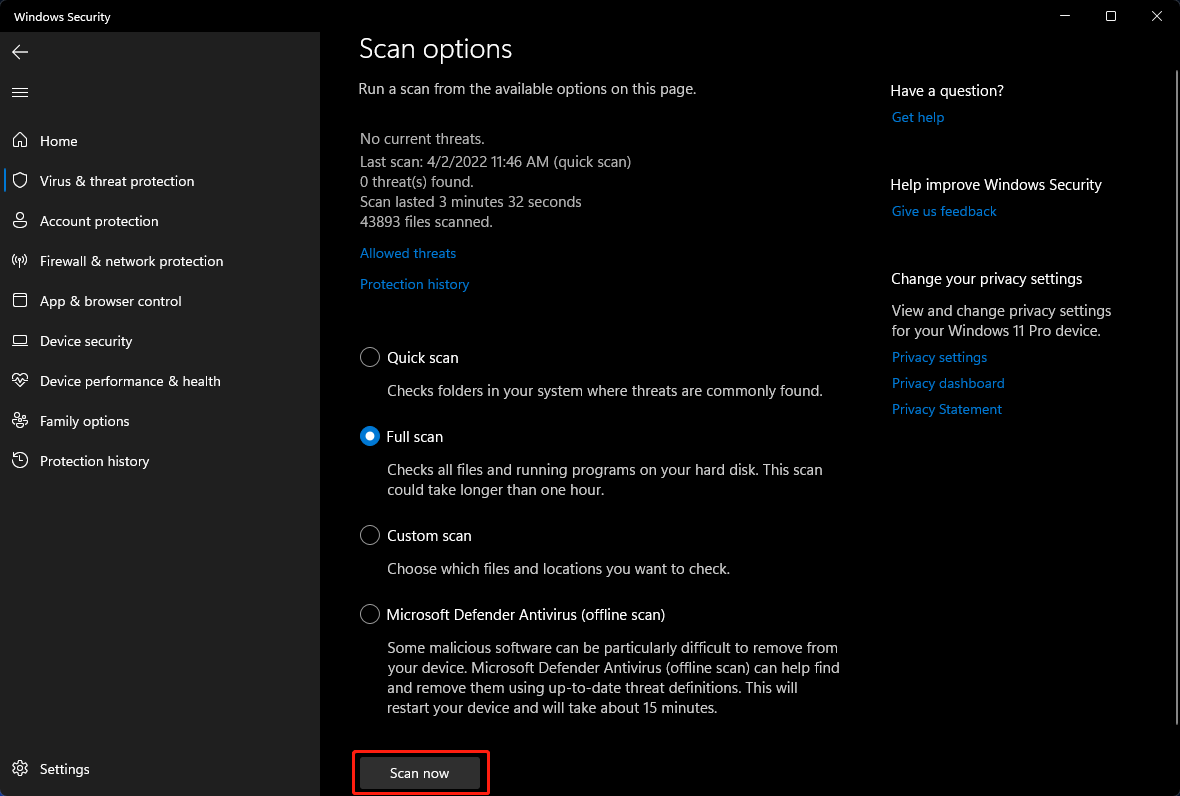
Fix 10: Scan Your Computer for Viruses and Malware
If your machine is attacked by viruses or malware, high disk usage or 100 disk usage can easily happen. So, you can use Windows Defender or third-party anti-virus software to scan your device to find and remove found viruses and malware.
How to Use Windows Defender to Full Scan Your Computer?
Step 1: Click search in the taskbar and search for Windows Security.
Step 2: Select the first result to open Windows Security.
Step 3: Click Virus & threat protection.
Step 4: Click Scan options under Current threats.
Step 5: Select Full scan.
Step 6: Click the Scan now button to start scanning your device. The whole process will last for a while. You should wait patiently.
Fix 11: Close or Uninstall Third-Party Anti-Virus Software
Third-party anti-virus software can run in the background and they might use much disk usage. If your disk usage is high or even reaches 100%, you can close or uninstall the anti-virus software to see if the issue can be solved. Many users reduce their disk usage using this method. You can also have a try.
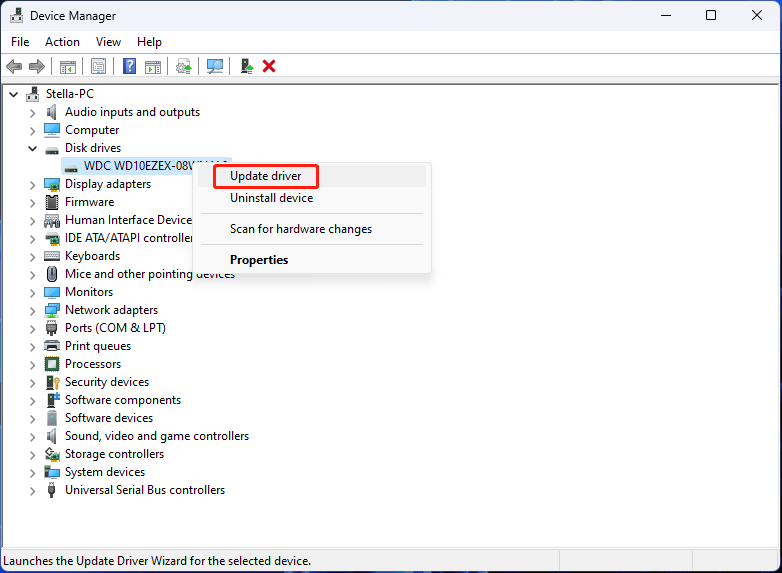
Fix 12: Update Storage Drivers
Outdates storage drivers can also cause 100% disk usage on Windows 11. You can update storage drivers to have a try.
Step 1: Press Win + X to open the WinX menu.
Step 2: Select Device Manager.
Step 3: Expand Disk drives.
Step 4: Right-click on your disk and select Update driver.
Step 5: Follow the on-screen instructions to update the storage driver.
You can do the same job to update drivers for the devices under IDE ATA/ATAPI controllers and Storage controllers.
Fix 13: Fix the StorAHCI.sys Driver
Some users fix the StorAHCI.sys driver, then the 100% disk usage issue disappears. You can also do this to try.
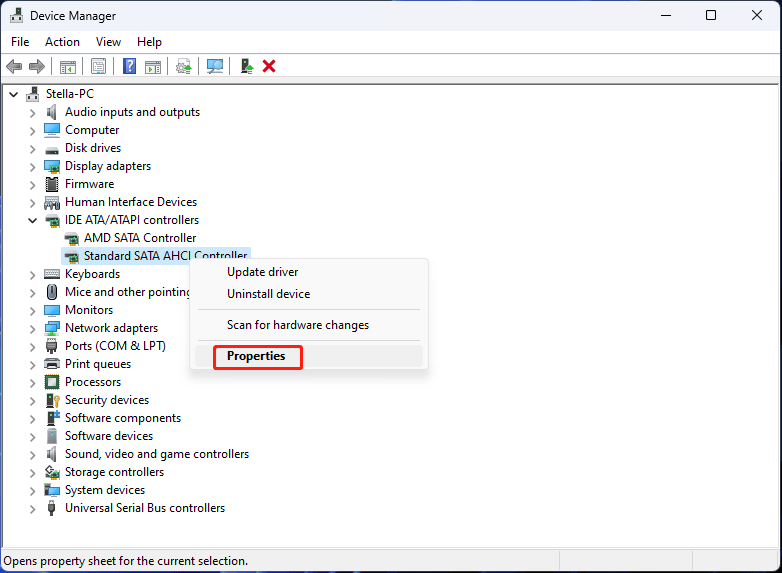
Step 1: Press Win + X to open the WinX menu.
Step 2: Select Device Manager from the WinX menu to open Device Manager.
Step 3: Expand IDE ATA/ATAPI controllers.
Step 4: Right-click Standard SATA AHCI Controller and select Properties.
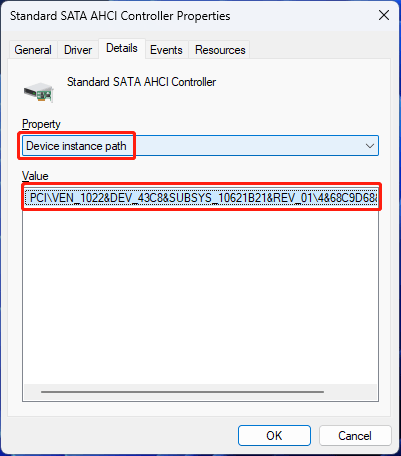
Step 5: On the Properties interface, switch to Details.
Step 6: Select Device instance path under Property.
Step 7: Remember the value in the Value box.
Step 8: Press Win + R to open Run. Then type regedit into the Run box and press Enter to open the Registry Editor.
Step 9: Go to this path:
Computer\HKEY_LOCAL_MACHINE\SYSTEM\CurrentControlSet\Enum\[the value you see in step 7]\4&68c9d68&0&010A\Device Parameters\Interrupt Management\MessageSignaledInterruptProperties.
Step 10: Double-click MSISupported to open the value interface. Then, change the value to 0.
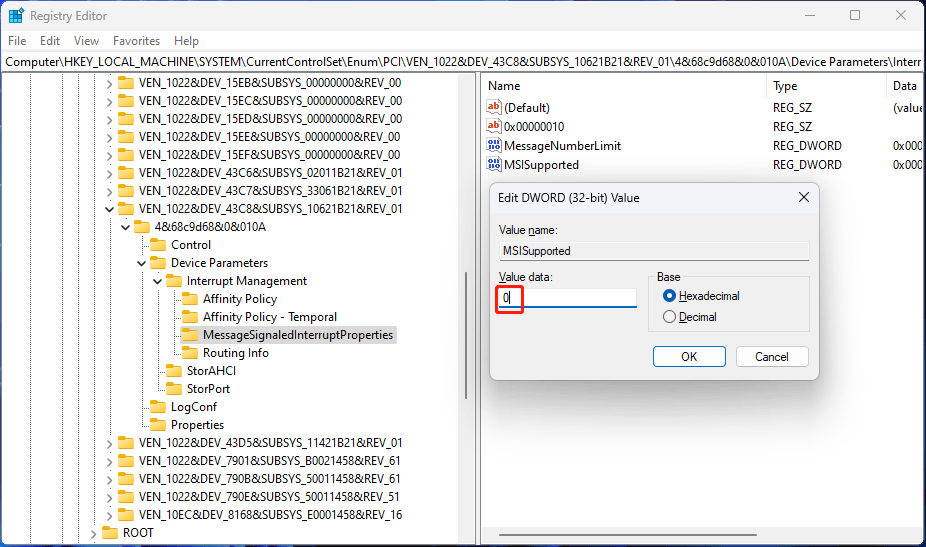
Step 11: Click OK to save the change.
Step 12: Restart your computer.
Fix 14: Change Power Mode to Best Performance
You can also fix Windows 11 high disk usage or 100% disk usage issue by changing your computer’s power mode to best performance. It is easy to do this:
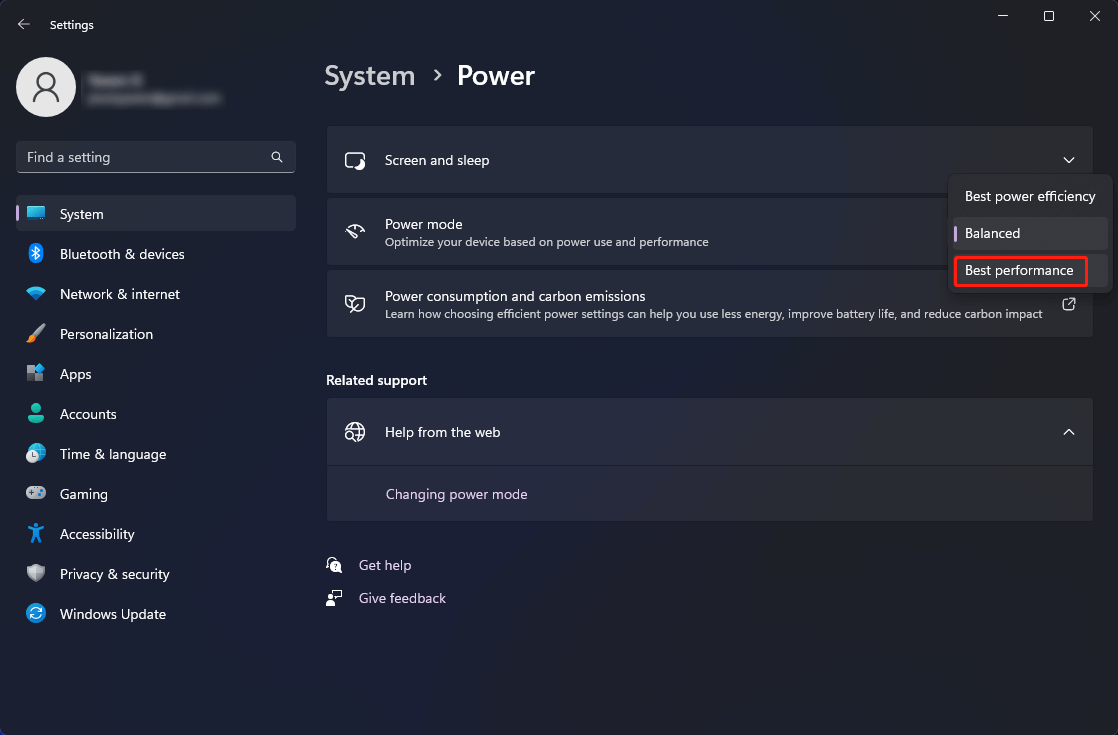
Step 1: Press Win + X to open the WinX menu.
Step 2: Select Power Options.
Step 3: Expand the power mode and select Best performance.
Fix 15: Install the Latest Windows 11 Updates
High disk usage or 100% disk usage might be a bug on your Windows 11 computer. A fix might be contained in a Windows 11 update no matter it is a feature update or an optional update. So, you can go to Windows Update to check if there are available updates.
Step 1: Press Win + I to open Settings.
Step 2: Select Windows Update from the left panel.
Step 3: Click the Check for updates button.
Step 4: If there are available updates, you need to click the Download & install button to install them on your computer.
Recommendation 1: Back up Your Files
If you need to install a Windows 11 feature update, we think you should back up your files before you do that because a Windows update might delete files on your device. MiniTool ShadowMaker, a professional backup software for Windows, can be you good choice.
This software can back up your files, folders, partitions, disks, and systems on Windows 11, Windows 10, Windows 8/8.1, and Windows 7.
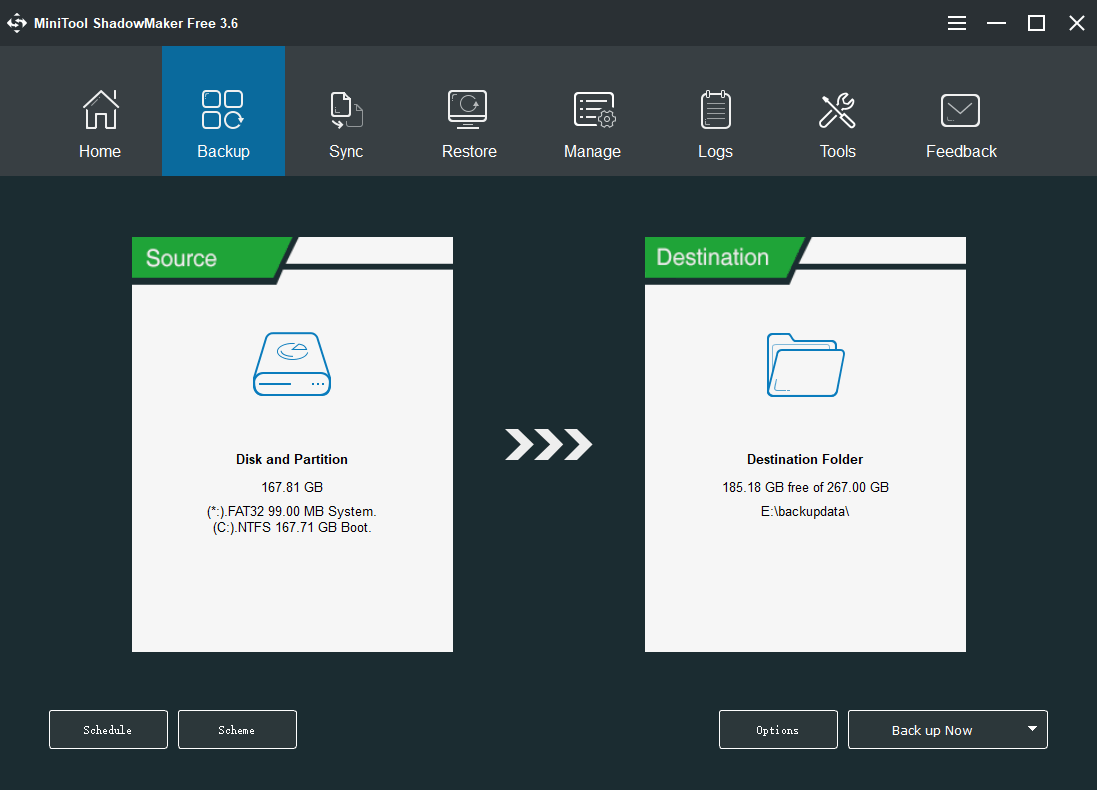
This software has a trial edition. You can use it for free within 30 days.
MiniTool ShadowMaker TrialClick to Download100%Clean & Safe
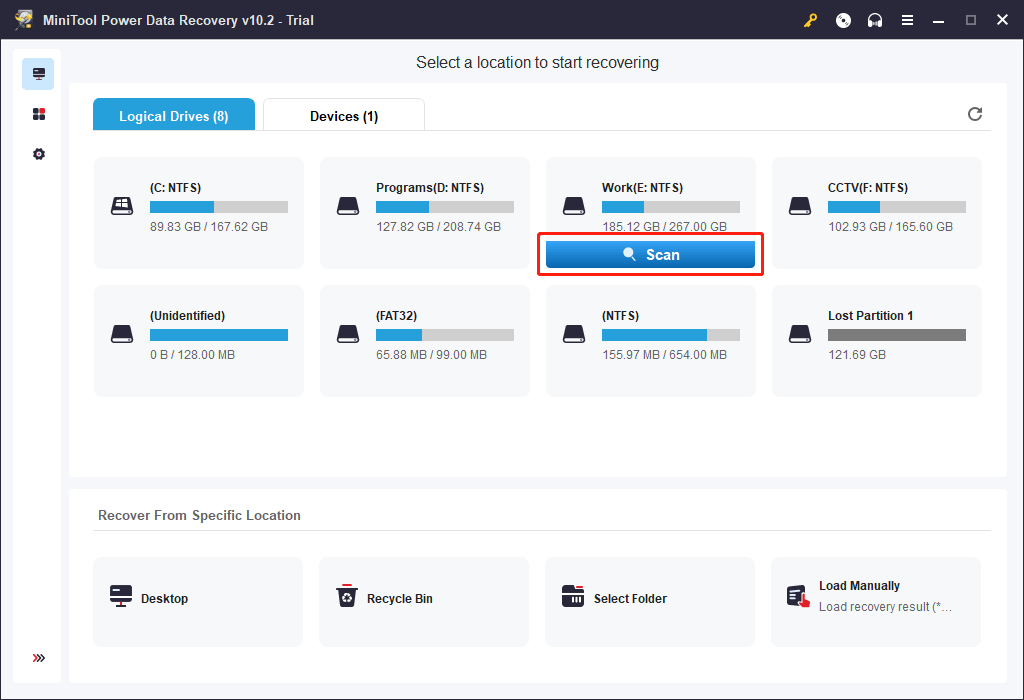
Recommendation 2: Recover Your Lost Files
If your files are lost or deleted accidentally and there are no available backups, you can use a free file recovery tool to get them back. You can try MiniTool Power Data Recovery, which can work on all versions of Windows including Windows 11.
![How to Recover Lost and Deleted Files in Windows 11? [6 Ways]](https://images.minitool.com/minitool.com/images/uploads/2021/08/how-to-recover-deleted-files-windows-11-thumbnail.jpg)
This data recovery software supports recovering data from all types of data storage devices like internal hard drives, external hard drives, USB flash drives, memory cards, SD cards, pen drives, and more.
You can first use the trial edition of this software to scan the drive you want to recover data from and see if it can find your needed files. You need to upgrade to a full edition to recover all your files without limits.
MiniTool Power Data Recovery TrialClick to Download100%Clean & Safe

Fix 16: Go back to Windows 10
If all the above methods can’t solve the high disk usage or 100% disk usage issue on your Windows 11 computer, you can choose to go back to Windows 10 and keep Windows 10 up-to-date. Windows 11 might not be suitable for you at present.
Bottom Line
When your Windows 11 computer doesn’t work smoothly due to high disk usage or 100% disk usage, you can just try the methods mentioned in this article to solve the issue. If you have any other good suggestions, you can let us know in the comments. You can also contact us via [email protected].
About The Author

Position: Columnist
Stella has been working in MiniTool Software as an English Editor for more than 8 years. Her articles mainly cover the fields of data recovery including storage media data recovery, phone data recovery, and photo recovery, videos download, partition management, and video & audio format conversions.
User Comments :