Read this guide to learn how to format a hard drive Windows 10/11. First of all, back up or recover important data using MiniTool Software. Then, use Storage Settings, File Explorer, Disk Management, CMD, or Partitioning Tool to format your hard drive.
A hard drive is a device used for storing data in computers for long-term retention. It can store operating systems, software, documents, photos, and videos, even when the computer is turned off.
However, sometimes you have to format your hard drive for normal use. Read on to get why you need to format the drive and how to format it.
Here is a quick video guide:
About Hard Drive Formatting
Format Types: Quick & Full Format
There are two common types of formatting: Quick Format and Full Format.
1. Quick Format
A quick format only removes the directory entries of the file system without overwriting data sectors or scanning for bad sectors. This makes it faster but less secure for data wiping. It’s suitable for use when the drive is in good condition and doesn’t require a thorough cleanup.
2. Full Format
A full format not only rebuilds the file system but also scans the drive for bad sectors, clears the data, and rebuilds the file system. This method is more secure and reliable, suitable for hard drive failures, when preparing to sell a drive, or when preparing to reuse it.
Why You May Need to Format a Hard Drive
If your hard drive is experiencing severe logical errors or persistent performance issues, formatting can be considered as a solution. This cleans up data, builds file systems, and optimizes storage performance. Here are some specific benefits:
1. Erase old data
Full Format completely removes all files on a hard drive, including hidden system files, helping to protect privacy and data security.
2. Create a file system
The Full Format process creates a new file system (such as NTFS, FAT32, or exFAT) that enables the operating system to recognize and manage data on the hard drive. Without a file system, the hard drive cannot function properly.
3. Repair hard drive errors
If a hard drive experiences logical errors or file corruption, formatting can help restore it to normal and clear error messages.
4. Install or upgrade an operating system
Formatting a hard drive before installing a new operating system ensures a clean environment and prevents residual files from the old operating system from affecting the new system.
5. Change use or transfer a device
If you plan to sell, donate, or repurpose your computer, formatting erases all personal data and prevents information leakage to a large extent.
Back Up or Recover Data Before You Format a Hard Drive
While formatting has many benefits, it also means data will be erased and may be difficult to recover, so be sure to back up or recover important files if necessary before proceeding.
Option 1: Back Up Data Using MiniTool ShadowMaker
If your hard drive is in good condition, you can just choose to back up your data. It ensures that your important files can be safely restored after the hard drive is erased.
MiniTool ShadowMaker allows you to easily back up your system, files, or entire disks to another location (such as an external hard drive or network drive) to avoid data loss.
It provides an intuitive interface and a clear operation process, so backup and recovery are very convenient. Download and install it to enjoy a 30-day free trial.
MiniTool ShadowMaker TrialClick to Download100%Clean & Safe
Step 1: Launch the software
Launch MiniTool ShadowMaker and click Keep Trial to enter the main interface.
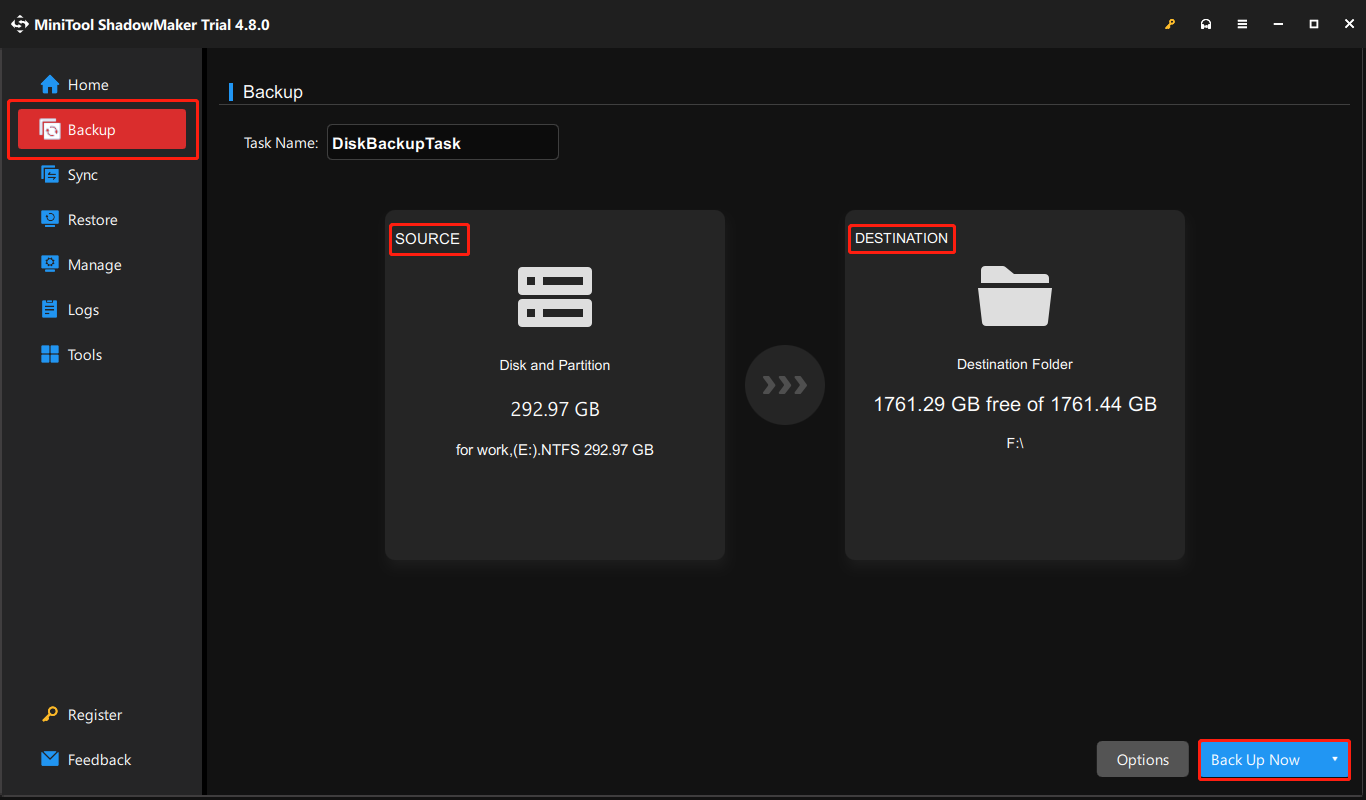
Step 2: Select backup source
Switch to the Backup section, click the SOURCE section, and select Disks and Partitions. Check the entire disk or specific partitions you want to back up, and then click OK.
Step 3: Select a backup destination
Click the DESTINATION section. Select the location you want to back up to. (It’s recommended not to select the system drive.)
Step 4: Set up a backup plan (optional)
Click Options to set the frequency of automatic backups. After selecting, click OK. This ensures that you have regular backups of the latest data.
Step 5: Start backup
Click Back Up Now or Back Up Later, and the software will begin creating the disk image file.
Once the backup is complete, your disk data will be safely stored in the designated location and can be easily restored even if the hard drive is formatted.
Option 2: Recover Data from an Inaccessible Hard Drive
What if your hard drive cannot be accessed? The first step is to recover data from this inaccessible disk.
When you are facing a situation where your hard drive fails to respond or becomes inaccessible, or you have lost data, MiniTool Power Data Recovery is a tool worth trying.
This tool handles a variety of data loss scenarios, including inaccessible hard drives, partition loss, system crashes, and accidental formatting.
It supports restoring almost all kinds of files, such as documents, pictures, audio, videos, etc. What’s more, USB flash drive recovery, external hard drive recovery, and SD card recovery can be completed with this software.
You can use this free file recovery software to retrieve 1 GB of files without spending a cent. Download and install it to have a try.
MiniTool Power Data Recovery FreeClick to Download100%Clean & Safe
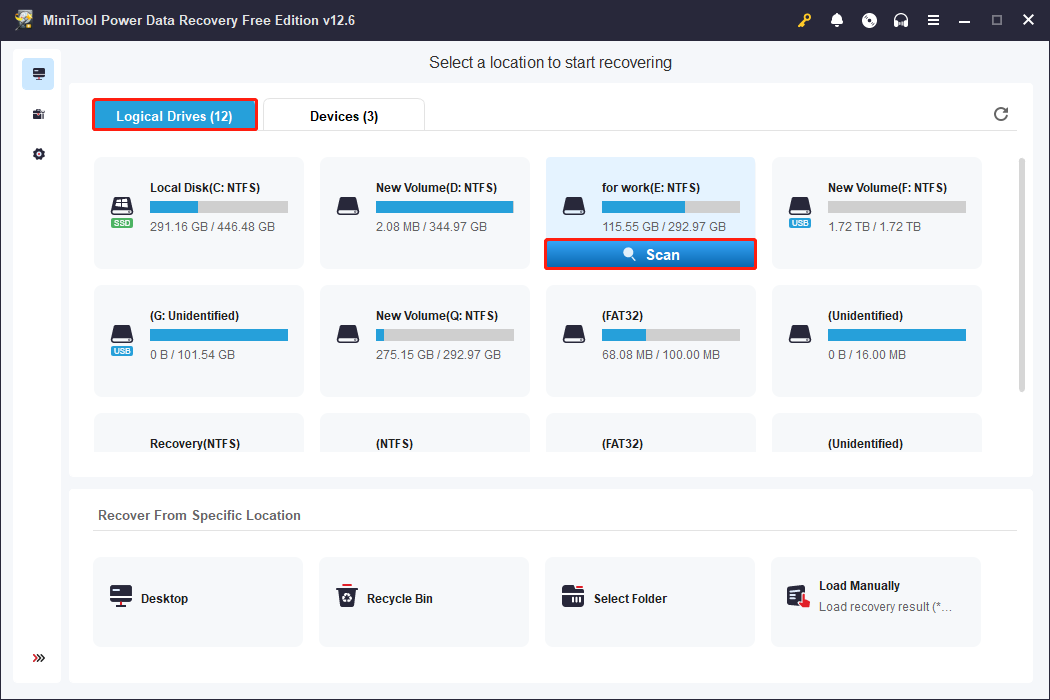
Step 1: Launch the software and scan your hard drive
After installing MiniTool Power Data Recovery, launch it now. When entering the main interface, you will be in the Logical Drives by default. Here, you can see all the partitions, including existing partitions, lost partitions, or unallocated space.
Find the target drive, move your cursor to the section, and click Scan to scan for data.
Step 2: Use Type, Filter, Search to locate the files you want
The scanning process may take some time, depending on the hard drive capacity and data content. It is recommended to wait patiently for all files to be scanned.
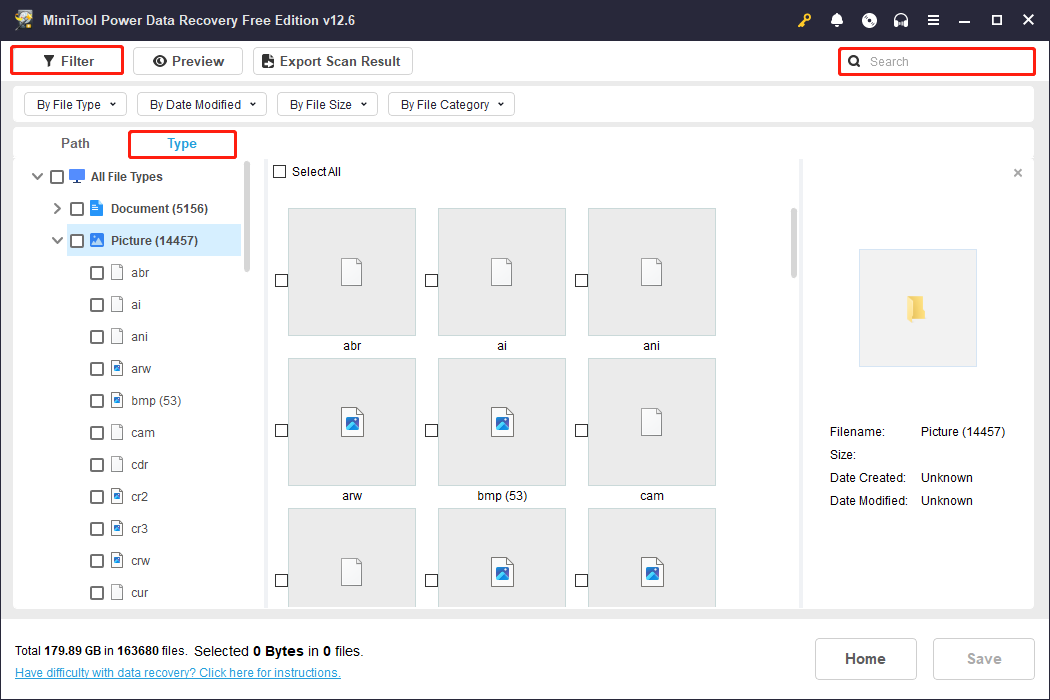
When it ends, all the files will be listed under the Path tab. You can find files according to the file structure. Besides this, there are some other filtering criteria.
- The Type feature allows you to find target files by file type, such as documents, pictures, audio, videos, compressed files, etc. Go to the Type tab and click All File Types. All types will be expanded.
- The Filter feature allows you to filter by file type, modification time, file size, and file directory, thereby narrowing the search scope and improving search efficiency. Click Filter, and you can set four filter conditions at once.
- The Search feature allows you to find specific files by entering a full or partial file name. Just type the name in the upper-right box and press Enter.
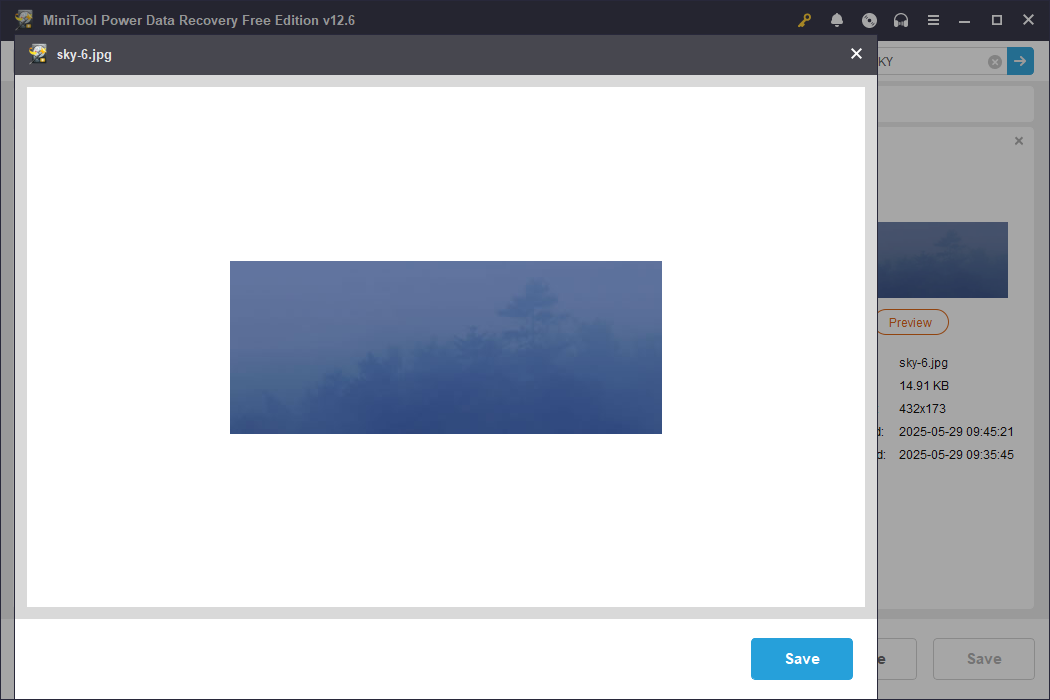
Step 3: Check the file content before recovery
This tool also offers a Preview feature. This helps you confirm the integrity of files and whether they contain what you need before restoring them, thus avoiding blind recovery and wasting capacity and time.
In the file list, double-click the file. If the file supports previews (such as images, documents, and videos), you’ll see its contents. Repeat the same operation to confirm the remaining files.
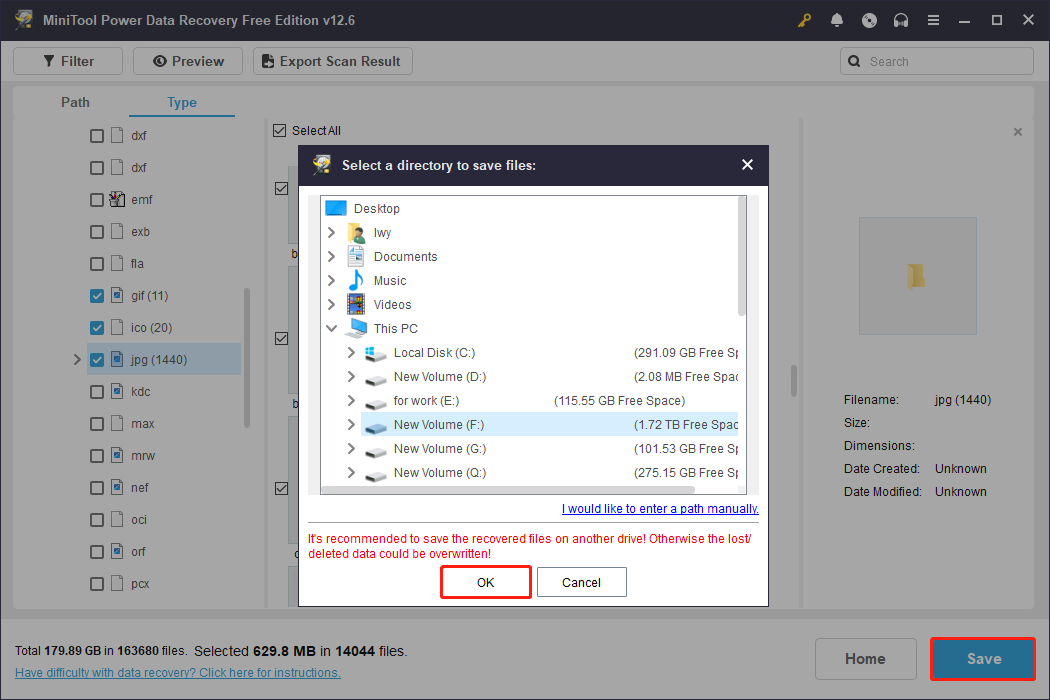
Step 4: Save the files to a new location
After confirming the files, tick them and click Save. Choose a safe location to save the file in the pop-up window. Finally, click OK to start the recovery process.
As mentioned above, the free edition only provides 1 GB of free recovery capacity. Once it is used up, you have to upgrade to an advanced edition.
How to Format a Hard Drive Windows 11
After backing up or recovering the important data, learn how to format a hard drive. Here are several ways you can refer to.
Method 1: Format the Hard Drive Using Storage Settings
The first method to format the hard drive is using Storage Settings. It is a simple, intuitive, and safe way in Windows 11, especially suitable for ordinary users to perform basic disk management.
Step 1: Press Win + I to open the Settings app.
Step 2: Select the System section from the left pane and click Storage.
Step 3: Expand Advanced storage settings under Storage management.
Step 4: Click Disks & volumes. All the disks connected to your computer are here.
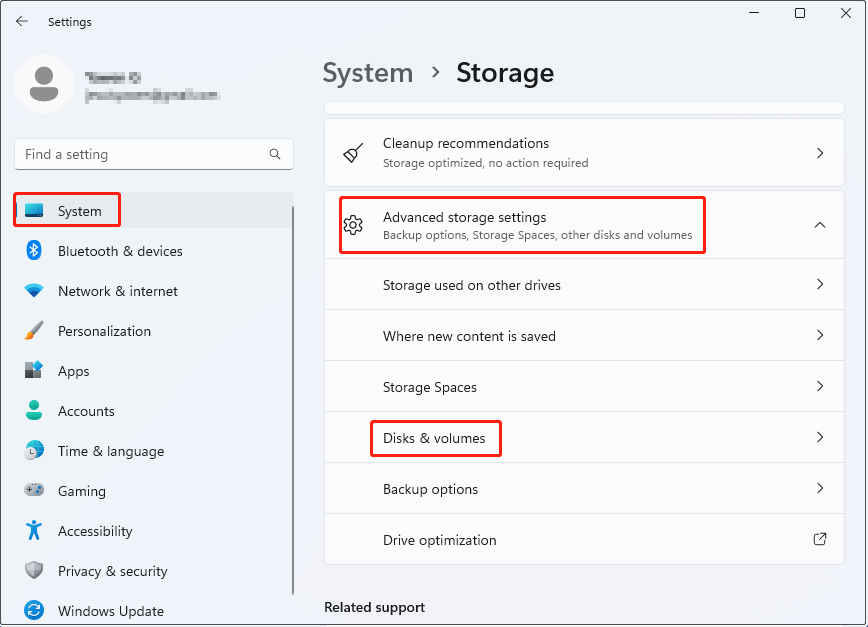
Step 5: Choose the one you want to format and click Properties.
Step 6: Select Format, and then set the volume label and file system.
Step 7: Hit Format to start the format process.
Method 2: Format Your Disk with File Explorer
File Explorer can also be used to format hard drives. This is one of the most common format methods used by Windows users, especially for external hard drives, USB flash drives, or non-system drives.
Step 1: Press Win + E to open File Explorer.
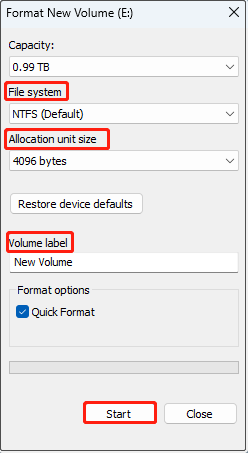
Step 2: Find the target drive from the left pane, right-click it, and choose Format.
Step 3: Set the file system you want to change to and the volume label.
Step 4: Finally, click Start > OK to make the change take effect.
Method 3: Format the Drive in Disk Management
Disk Management is a powerful and professional tool built into Windows that’s perfect for handling complex disk tasks. Compared to File Explorer, it offers deeper control and more options.
Step 1: Press Win + X and choose Disk Management.
Step 2: Right-click your drive and choose Format.
Step 3: Give it a volume label and choose a file system.
Step 4: Click OK. In the prompt window, click OK again to confirm the change.
Method 4: Format It Through Command Prompt
Command Prompt is a command-line tool in the Windows operating system. It is also an option to format your hard drive. It is a more flexible, powerful, and suitable method for special situations.
This is especially useful when the graphical interface cannot be used or advanced control is required.
Step 1: Open an administrative Command Prompt
Press Win + S to open the search box. Type cmd in the box, right-click Command Prompt, and choose Run as administrator. When prompted by UAC, click Yes to continue.
Step 2: Run the commands
Type the following commands one by one in the prompt window, and press Enter after each:
- diskpart
- list disk
- select disk * (Replace * with the disk number of your disk.)
- clean
- create partition primary
- format fs=exfat (Formats the partition with the specified file system. You can replace exfat with fat32 or ntfs as needed.)
- assign (Assigns a drive letter automatically)
- exit
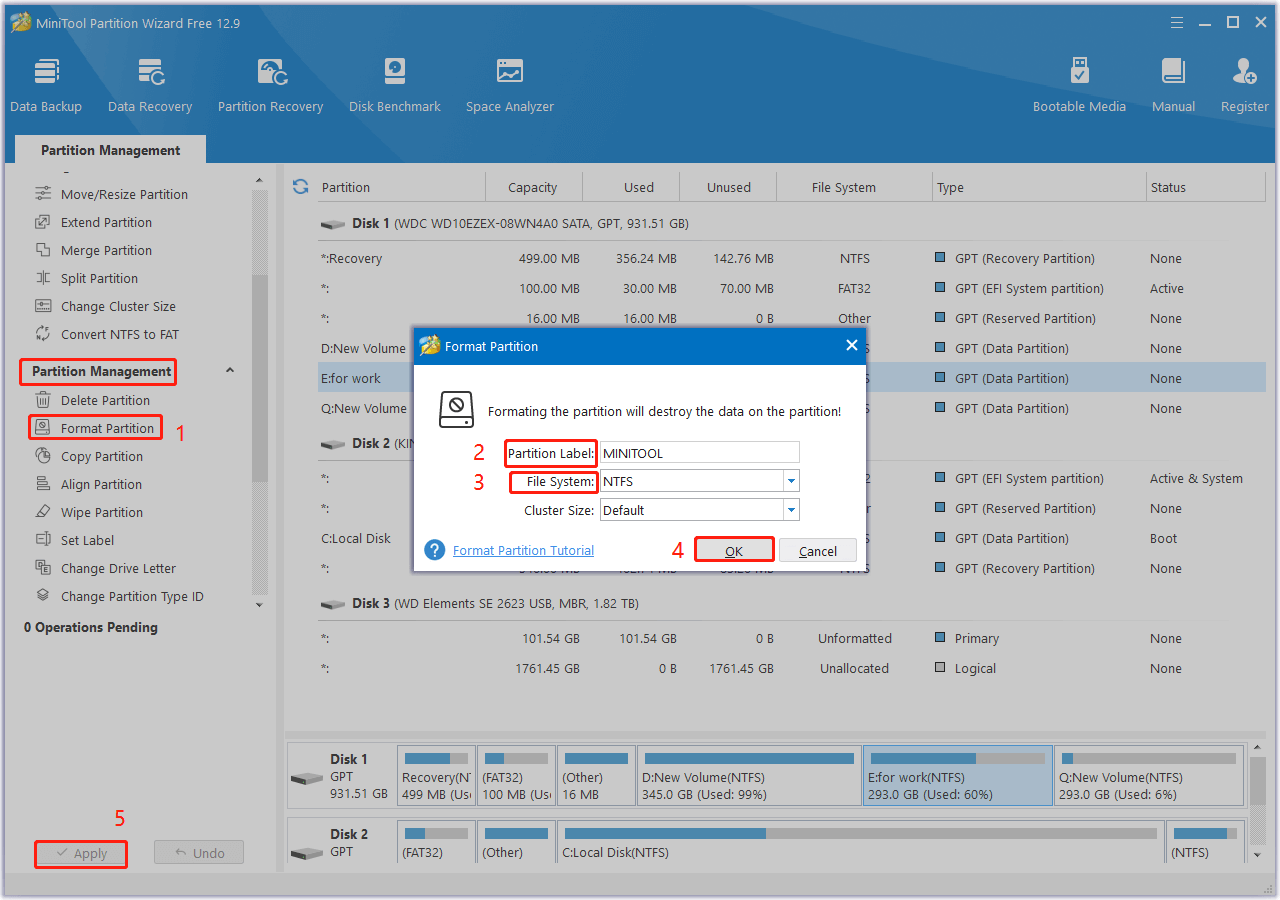
Method 5: Try MiniTool Partition Wizard
MiniTool Partition Wizard is a powerful yet user-friendly professional disk management tool. It is suitable for handling complex or advanced disk operations.
This tool offers more powerful partition management capabilities than native operating system tools, supporting multiple file system formats and handling complex disk structures and abnormal partitions.
With its clear, easy-to-use interface, it’s ideal for efficiently and securely formatting hard drives.
Step 1: Download and install MiniTool Partition Wizard on your computer.
MiniTool Partition Wizard FreeClick to Download100%Clean & Safe
Step 2: Find and select your drive you want to format.
Step 3: Click Format Partition under Partition Management in the left pane.
Step 4: Type the disk name in the Partition Label box and choose a suitable file system, and click OK.
Step 5: In the lower left corner of the main interface, click Apply. The format process will start.
That’s all the information about how to format a hard drive.
Wrapping Things Up
While formatting may seem simple, every operation is crucial for data security, so be sure to back up or restore your data before proceeding.
After confirming the data is secure, you can start formatting a hard drive using Storage Settings, File Explorer, Disk Management, Command Prompt, and the partition tool, MiniTool Partition Wizard.
Keep connected with us through [email protected]. And any questions about MiniTool products are welcome.
About The Author

Position: Columnist
Chelsea graduated from university with a major in English. She has a strong interest in English writing. It is this passion for writing that led her to become an English editor. Her articles mainly focus on data recovery and other computer industry news. As an energetic and outgoing girl, Chelsea enjoys listening to music, singing, riding bikes, and eating in her spare time.
User Comments :