According to research, laundry lists of users have had the experience of encountering low disk space. In this case,
- Some of them choose to delete unnecessary files and programs manually.
- Some of them choose to depend on disk defragmenter.
- Others take DiskPart clean into consideration.
It’s hard to tell which method is the best one. In fact, there’s no absolute answer for this type of question since the circumstance differs from person to person.
DiskPart Clean Performed Accidently
All of those methods seem practical, right? But have you ever thought of one question – what if you delete valuable files accidentally. What are you planning to do to make up for your mistake? Do you know how to recover data lost by DiskPart clean?
Top Recommendation
When you deleted files accidentally by using common shift-del methods, you can easily find back those permanently deleted files. Tips On Recovering Permanently Deleted Files From Windows & Mac will show you how to do in detail.
A Specific Case of Accidental DiskPart Clean
“I was running win 7 with 4 partitions, one (partition A) only for OS. Later, I thought to upgrade to win 8.1. While installing it didn’t allow me to install on any partition cause it wants the partition in GPT. I thought I can run diskpart clean on one particular partition, so I selected one volume (partition) and ran clean command, but it still cleaned all the partitions.” – by 1mran5haik at Tom’s Hardware
1mran5haik said he thought DiskPart clean could be applied to only one partition, but the result turns out that he was totally wrong – all the partitions are gone. Now, he needs to recover data from cleaned partitions.
Stay Calm, You Can Retrieve Data after DiskPart Clean
Don’t be knocked down. You’ve still got chance to get back files deleted by mistake. And I’ll offer 2 solutions to cope with DiskPart clean data recovery in different cases; those solutions are said to have helped many people get rid of the annoying data loss issues.
Now, experience the MiniTool Power Data Recovery v8.0 – Trial if you have finished DiskPart clean by mistake or you have chosen the wrong disk to clean.
MiniTool Power Data Recovery TrialClick to Download100%Clean & Safe
Recover Data Lost by DiskPart Clean & DiskPart Format
You can see from above case, once DiskPart clean command is performed to a disk, all partitions and data will be deleted permanently.
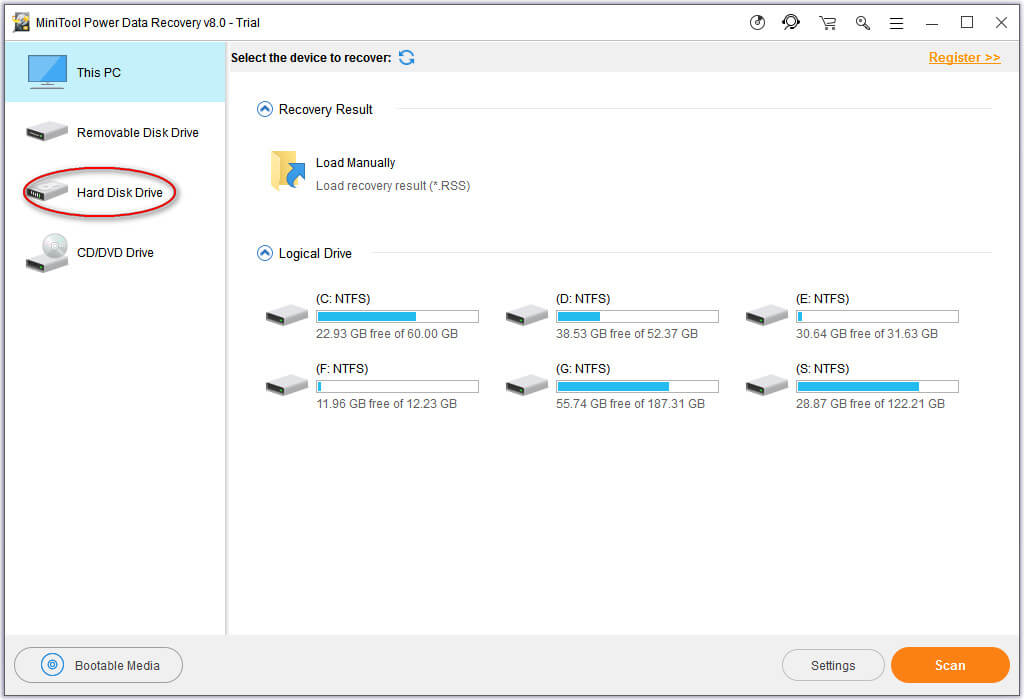
- Situation 1: so if you run the DiskPart clean command accidentally, you are suggested to select “Hard Disk Drive” from the left side of MiniTool Power Data Recovery interface.
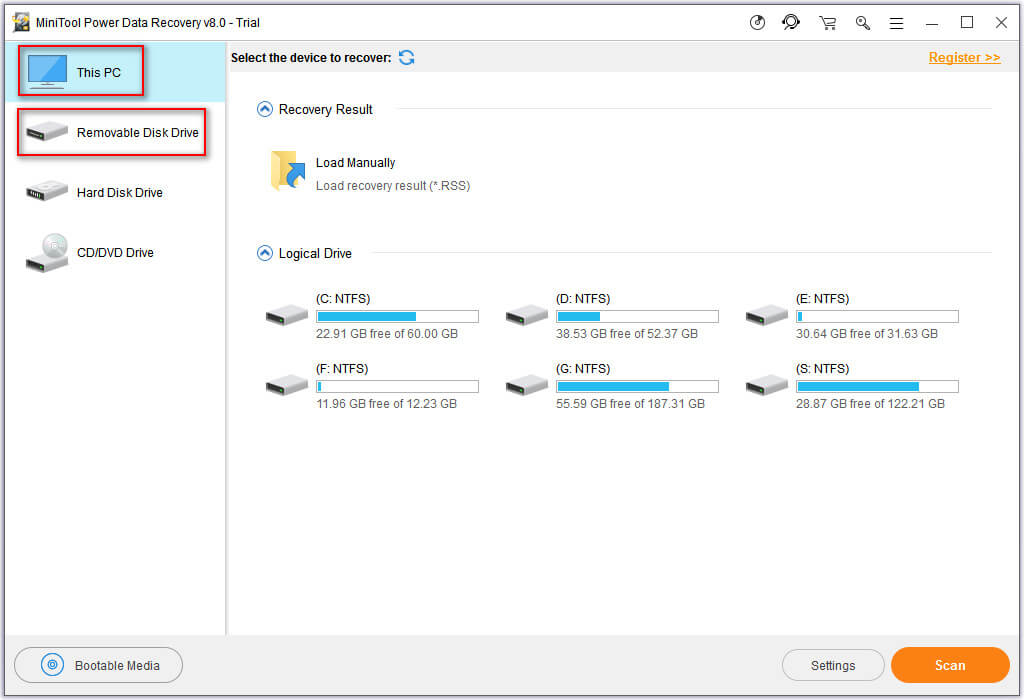
- Situation 2: however, if you used the DiskPart format command, instead of clean, only the selected partition will be formatted. To recover data in this case, you may choose “This PC” from the left side.
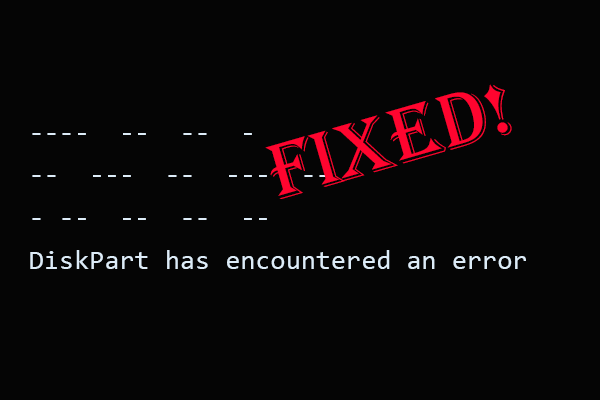
What if your DiskPart has encountered an error? Please see how to fix:
How to Recover Data from DiskPart Clean Command
Step 1: open MiniTool Power Data Recovery to see the main interface, in which you can see 4 options in the left panel. Then, click on “Hard Disk Drive” to start.
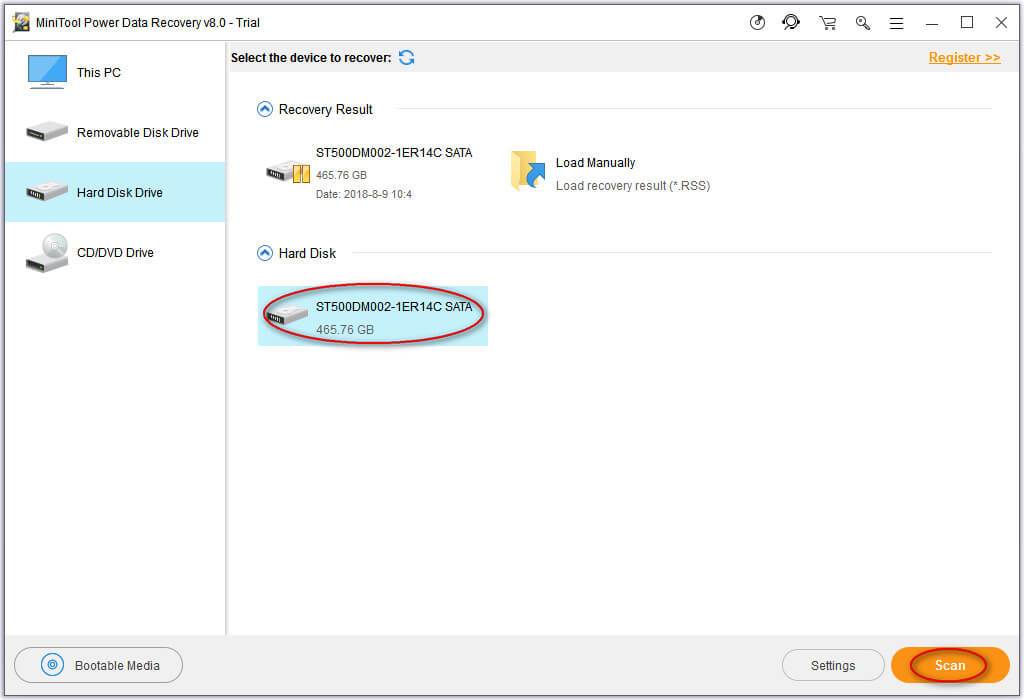
Step 2: select the disk which is cleaned by DiskPart and press the “Scan” button in the lower right corner to start a full scan.
Step 3: when the full scan is over, all possible partitions and data that could be found in this selected disk will be displayed in the result interface of this file recovery software. And now, just browse the found data to check all the files & folders you need, and then press the “Save” button & choose another disk to store those them.

After all of them were saved to the chosen disk, you can go there to check. If all needed data are recovered, you can close the software and put an end to data recovery after DiskPart clean. If there’re still some data waiting to be rescued, you could repeat this process.
Sometimes, when you find your HDD shows as unknown, you can also try this module to recover data. For more detailed information, please see Recover Data From HDD Shows As Unknown Without Damaging It.
How to Recover Data Lost by DiskPart Format
Step 1: you also need to open MiniTool Power Data Recovery and choose “This PC” (or choose “Removable Disk Drive” if the formatted disk is a removable one) from the main interface.
Click to see how to recover data from formatted hard drive.
Step 2: you should select the partition which is formatted by DiskPart and press the “Scan” button to start to detect files and folders in it.
Step 3: at the end of full scan, you also should look through the found data carefully to pick out all needed ones. And then, save them out to another drive by tapping the “Save” button.
Users’ Feedback
1. How to recover data when there is no OS to boot the computer?
Issue: the user said he used this DiskPart command while loading an operating system. Presently there is no OS to boot his laptop. But there is important data on it, so he wants to know how to recover it.
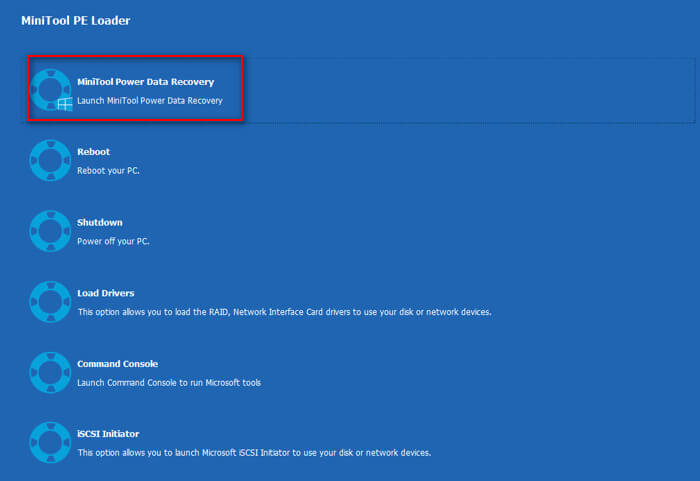
Solution: in the case, the laptop won’t start up, so the user can’t get MiniTool recovery software downloaded and worked in this computer. To solve the problem, I advise that you create a MiniTool Power Data Recovery Bootable Disk and then, use it to boot your PC & recover data. As for how to do exactly, please refer to this post talking about operating system not found error.
2. How to recover more when few files are found and the directory structure was damaged?
Issue: the user used MiniTool data recovery software, but he only finds 20% of the data; meanwhile, the found data lose its directory structure.
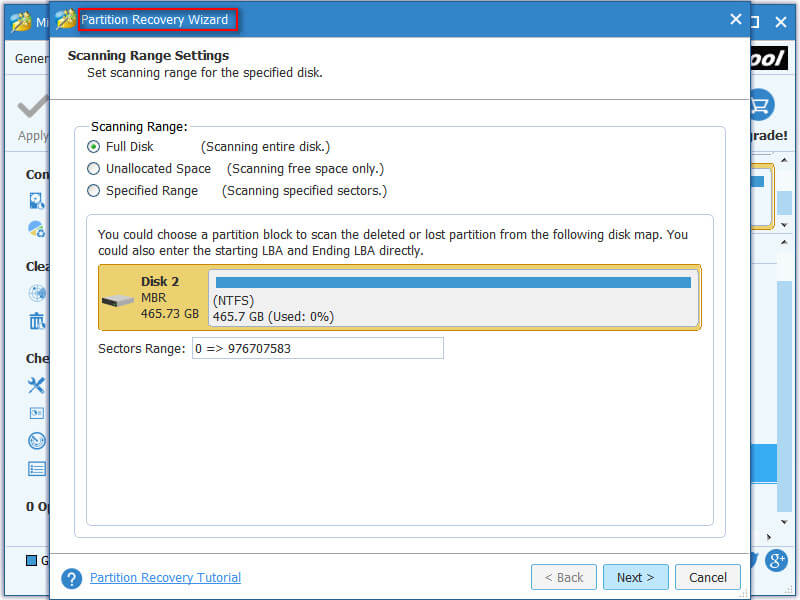
Solution: in the case, I suggest using another useful tool of MiniTool company – MiniTool Partition Wizard.
- Run this software on the target computer.
- Then, select the disk which has performed DiskPart command.
- Click on “Partition Recovery” from left panel.
- After that, you should follow the wizard to finish the rest work.
Delete Partition & Initialize Disk with DiskPart
You may have heard a lot about Windows DiskPart, but do you know exactly what it is and how to use it to achieve simple disk management? Now, I’ll show you the brief introduction and how to delete & format partition with this Windows built-in tool.
How to Start
Please start diskpart.exe by using the following ways:
- Click on the Start button -> choose “Run” to see the corresponding dialog -> type “cmd” and press “OK” -> type “diskpart” and press “Enter” in keyboard.
- Just press the Windows + R keys in the keyboard at the same time to open “Run” dialog -> type “cmd” into the textbox after “Open:” -> click on the “OK” button to confirm -> type “diskpart” into cmd.exe -> press “Enter” key to confirm.
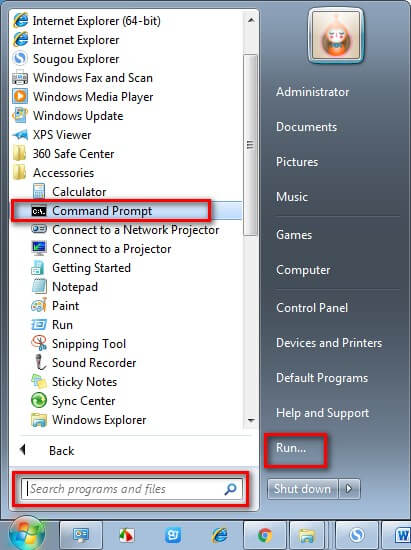
- Input “cmd” into the “Search programs and files” textbox after clicking on Start button -> right click on the “cmd” option from the result -> choose “Run as administrator” -> type “diskpart” and press “Enter” key to confirm.
- Click on the Start button -> click on the “All Programs” option -> open “Accessories” -> click on the “Command Prompt” -> type “diskpart” and press “Enter” in keyboard to confirm.
How to Delete Partitions to Re-initialize Disk
Step 1: open Windows Disk Management to determine the number of disk you’re going to clean partitions from, in order to prevent any error clean.
Step 2: just choose a way to start diskpart.exe as I have suggested above.
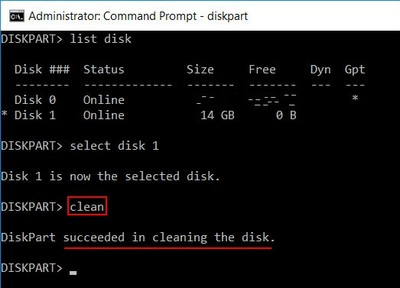
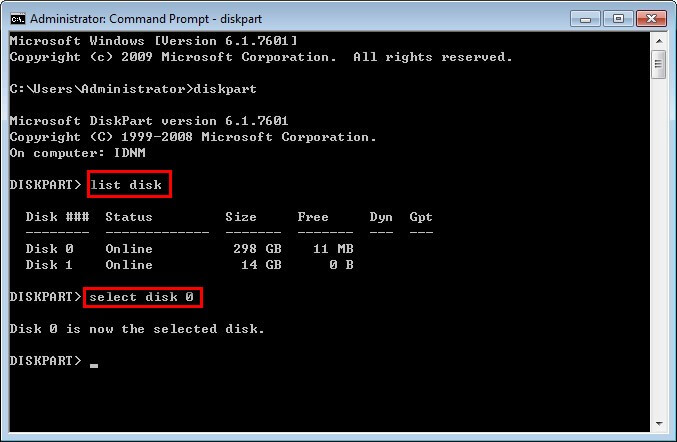
Step 3: when “DISKPART>” appears in the windows, you need to type “list disk” and then press “Enter” button in keyboard. At the end of those actions, all disks in the computer or connected to the computer will be listed out in order.
Step 4: Type the command “select disk *” and press “Enter”; “*” stands for the number of the disk you’d like to clean.
Step 5: type “clean” and press “Enter”. Then, DiskPart will finish this task automatically.
At the end of DiskPart clean, you’ll see a prompt saying “DiskPart succeeded in cleaning the disk”. Now, you can exit and end the disk re-initialization task.
But if you still want to check the result, you could type “list disk” again and press “Enter” to see if the free space of cleaned disk equals to its capacity. Or you can just check it in the Windows Disk Management.
How to Format a Partition with DiskPart Tool
If you want to format a drive to prepare it for data storage or change the file system of a drive, you can also choose DiskPart tool rather than “Format” function of Disk Management.
Step 1: go to check the disk number and the specific drive letter of partition you plan to format. Then, open DiskPart.
Step 2: at this time, cursor will be placed right after the item “DISKPART>” and you should type “list disk” and press “Enter” to see disk layout.
Step 3: now, you can type command “select disk *” (* represents the exact disk number you can see from disk layout) and press “Enter”. When this action is completed, DiskPart will give you a prompt saying “Disk * is now the selected disk”.
Step 4: type “list partition” and press “Enter” to see the partition layout of the disk you selected just now. Then, DiskPart will show you all the partitions in selected disk with related information, like partition type, partition size and offset.
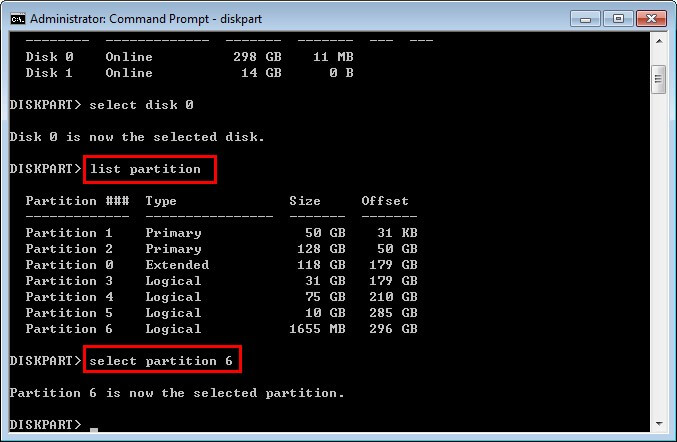
Step 5: in this step, you’re supposed to type “select partition *” and press “Enter” to select the partition you want to format (also, * represents the exact partition number). After that, “Partition * is now the selected partition” will appear.
Step 6: type “format” and press “Enter” again. And you’ll see the completed percent is changing automatically. When the percent becomes 100, another prompt will appear – “DiskPart successfully formatted the volume” – to inform you that the format process is done.
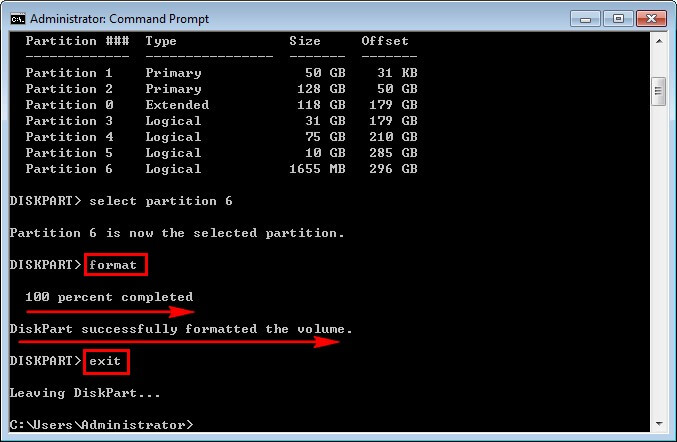
Now, you can click the red “X” in the upper right corner of Command Prompt window to close it or just type “exit” and press “Enter” to leave DiskPart. Since format will remove all your data from the certain partition, you also need to consider seriously before actually formatting the operation.
Conclusion
DiskPart is a great tool to help us achieve basic disk management operations. But you need to think twice before using DiskPart commands to make changes due to the following reasons:
- A tiny mistake will result in a huge problem.
- The commands may be too complex for ordinary users, so you may tend to make mistakes when you’re not careful enough.
- What’s more, once the process is started, it can’t be paused or canceled.
Yet, you don’t need to be too depressed after mistake was made. It’s not impossible to recover data lost by DiskPart commands. You can use the methods I’ve mentioned to rescue your data and please don’t worry, it will not cause any further damage to your disk.
All in all, no matter you want to recover lost data or partition in Windows, the recommended MiniTool software could be your best assistant. If you doubt this, you may as well use the trial edition first to experience its power and then you can decide whether you’d like to buy a license or not.
Recover Data Lost by DiskPart Clean FAQ
- Click on the search box/icon on taskbar and type cmd.
- Right click on Command Prompt to choose Run as administrator.
- Type diskpart and hit Enter.
- Type these commands and hit Enter after each: list disk, select disk *, list volume, select volume *, assign letter=* (replace * with your own information).
User Comments :