USB drives are among the most common portable storage devices we use daily. However, sometimes they can suddenly become RAW, rendering the data inaccessible.
Understanding why a USB drive becomes RAW, how to recover data from RAW USB flash drives, and subsequent repair methods are key to resolving this issue.
Part 1. USB Has Become to RAW Format
When a USB flash drive’s file system is corrupted, the operating system cannot determine whether it is in a common format such as FAT32, NTFS, or exFAT. Therefore, it will mark it as RAW.
This means the disk structure is lost or damaged, making it impossible to access the data within.
What Are Typical Signs of a RAW USB
To help you recognize a RAW USB flash drive, this section lists its typical signs.
- After insertion, the system prompts “You need to format the disk before you can use it.”
- Data cannot be accessed when opening it, with the message “Not recognized” or “Inaccessible.”
- The properties show a capacity of 0 bytes or an abnormal size.
- An error or failure occurs when attempting to format or perform any other operation.
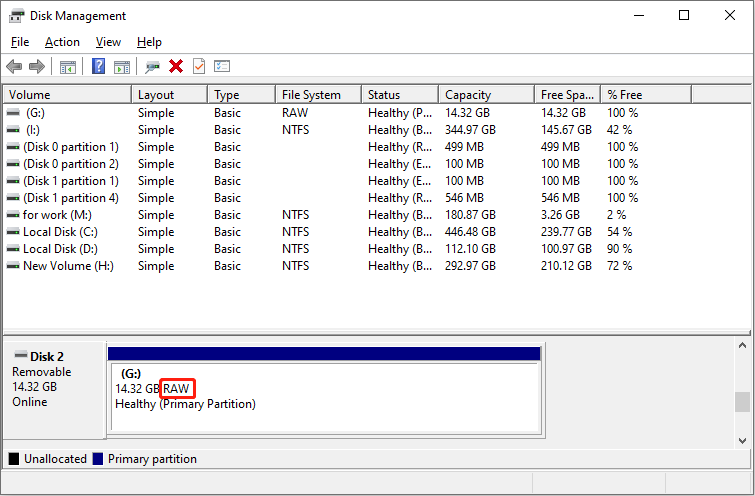
How to Check if Your USB Is in a RAW State
To confirm if your drive is in a RAW state, use the Windows Disk Management tool.
Step 1: Press Win + X and choose Disk Management.
Step 2: Locate your disk. If it displays RAW instead of a normal file system, you’re stuck with a RAW file system issue.
Why Does the USB Become RAW
Why did your USB flash drive become RAW? Here are some common causes.
1. File system corruption
During data read/write operations, a sudden power outage, forced unplugging of the USB drive, or a system crash can damage the file system. This prevents the operating system from recognizing the original format and displays it as RAW.
2. Lost or corrupted partition table
The partition table records the disk’s partition information and structure. If it’s damaged or lost, the system cannot recognize the USB partition, marking it as RAW.
3. Hardware issues
When the USB interface is damaged or the device is aging, the file system information may not be read correctly. This causes the system to recognize it as RAW.
4. Improper cross-device use
Frequent switching between different systems, such as Windows, Mac, and Linux, can sometimes cause file system compatibility issues. This leads to the USB drive being recognized as RAW.
5. Etc.
After understanding the causes, recovering the USB data should be the first step. The following section shows you how to retrieve data from RAW USB drives.
Part 2. Recover Data from RAW USB Flash Drive
When a USB drive becomes RAW, the operating system often prompts that it needs to be formatted before it can be used.
If you format it directly, the original data will be erased. Therefore, you should first save important files before formatting or performing other repair operations to ensure data safety.
MiniTool Power Data Recovery is a highly targeted RAW USB data recovery software, primarily for the following reasons.
This software can bypass the corrupted file system, directly scanning the physical sectors of the USB drive for files.
This tool can recover most file types, such as documents, images, videos, and audio. It boasts strong compatibility, running on Windows 11/10/8/8.1. Therefore, in most cases, you can use it directly without upgrading or downgrading Windows.
MiniTool runs in read-only mode, without writing any data to the RAW-formatted USB drive. This avoids further damage to your data.
The free edition provides 1 GB of free file recovery space. With these advantages, download MiniTool Power Data Recovery Free now to recover data from RAW USB flash drive.
MiniTool Power Data Recovery FreeClick to Download100%Clean & Safe
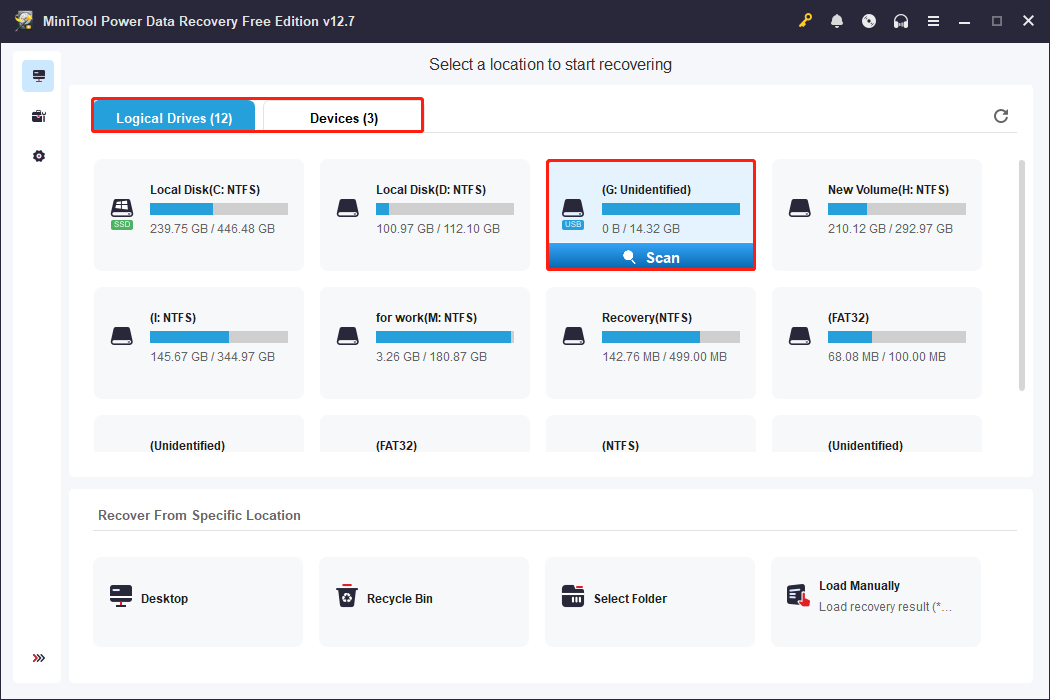
Step 1: Launch the software and scan your USB drive
Open MiniTool Power Data Recovery and you will enter the main interface. Under Logical Drives, find your drive, move the cursor to it, and click Scan.
If you cannot locate the USB drive, switch to the Devices tab to scan the whole disk.
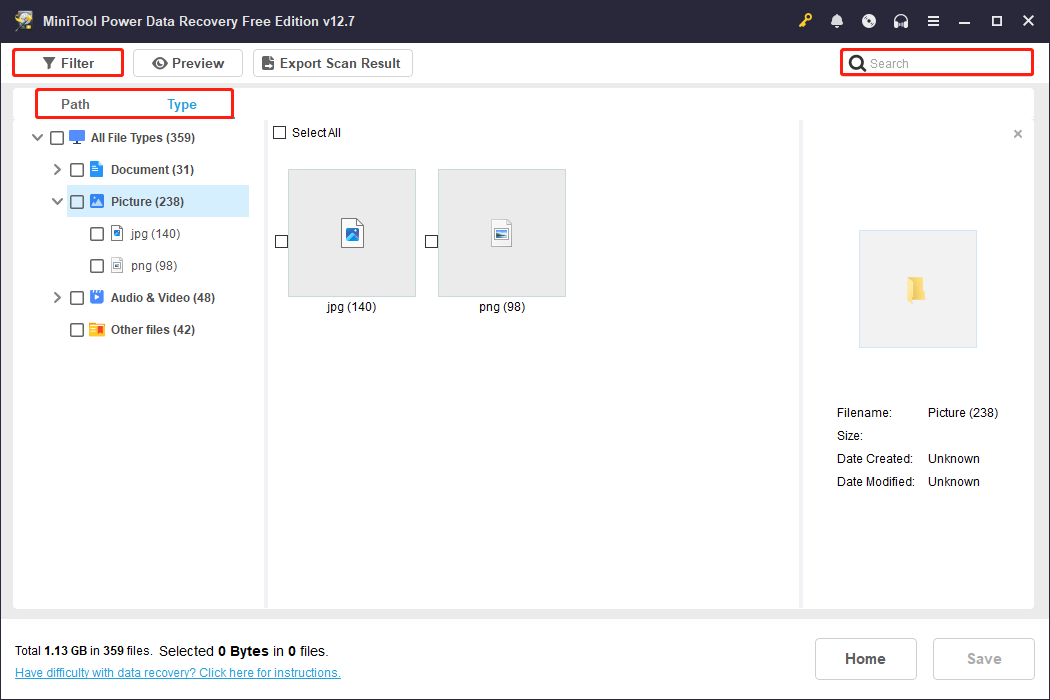
Step 2: Wait for the scan process to complete and find the target files
This scan process may take some time. For the more complete scan results, it is best to wait patiently for it to end.
When it is done, use Path, Type, Filter, and Search to find the target files.
- The Path feature displays the scan results according to the disk’s directory hierarchy. Expand the folders layer by layer to find the original path where the lost file was located.
- The Type feature categorizes found files by type, such as documents, pictures, videos, and audio. Knowing the type allows you to directly navigate to the corresponding category to find the file.
- The Filter feature offers multi-dimensional filtering criteria, including file type, modification date, file size, and file category. You can combine these criteria to further narrow down your search.
- The Search feature allows you to directly enter the full or partial filename to quickly locate the target file. This makes it the fastest way to locate files.
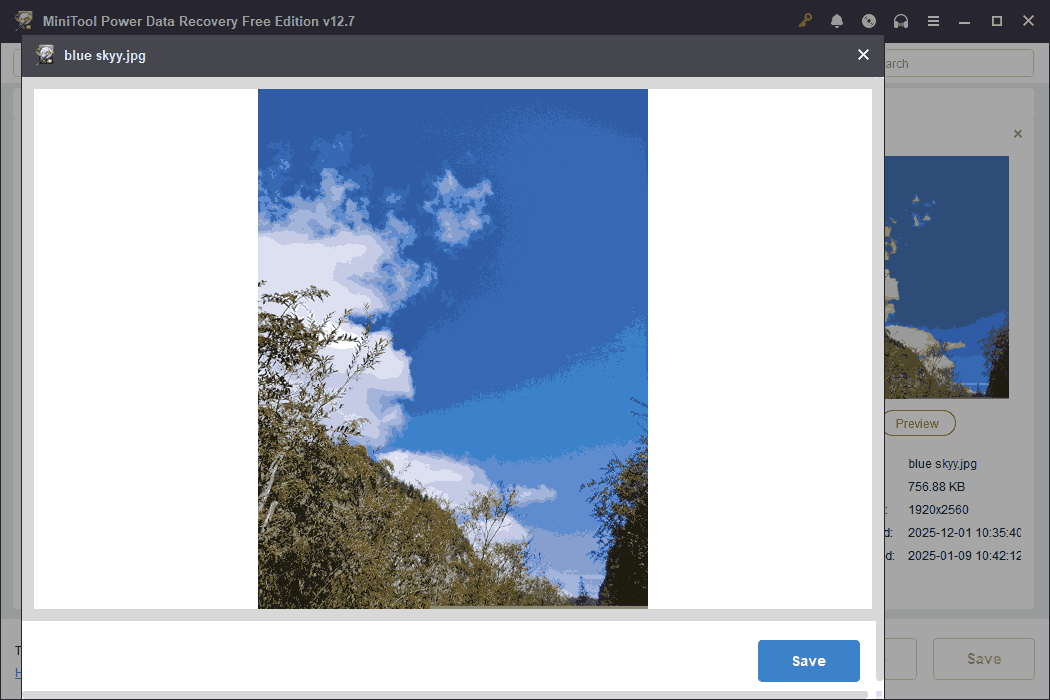
Step 3: Preview the found files before recovery
Often, scan results contain a large number of files, some of which may have blurry, corrupted, or missing file extensions. In such cases, it’s difficult to determine the actual content only based on the filename.
The Preview feature is a very useful tool. It allows you to preview the contents of files before actually recovering them. This avoids recovering invalid or erroneous files and reduces storage space waste.
You can easily preview common file formats, such as pictures, audio, documents, and videos.
Double-click the files to view them. When you’ve confirmed your view, continue with the next step.
Step 4: Recover files to a new and safe destination
Check all necessary and confirmed files, then click Save. When the window appears, select a new and secure storage location to save the recovered files. Finally, click OK to start recovery.
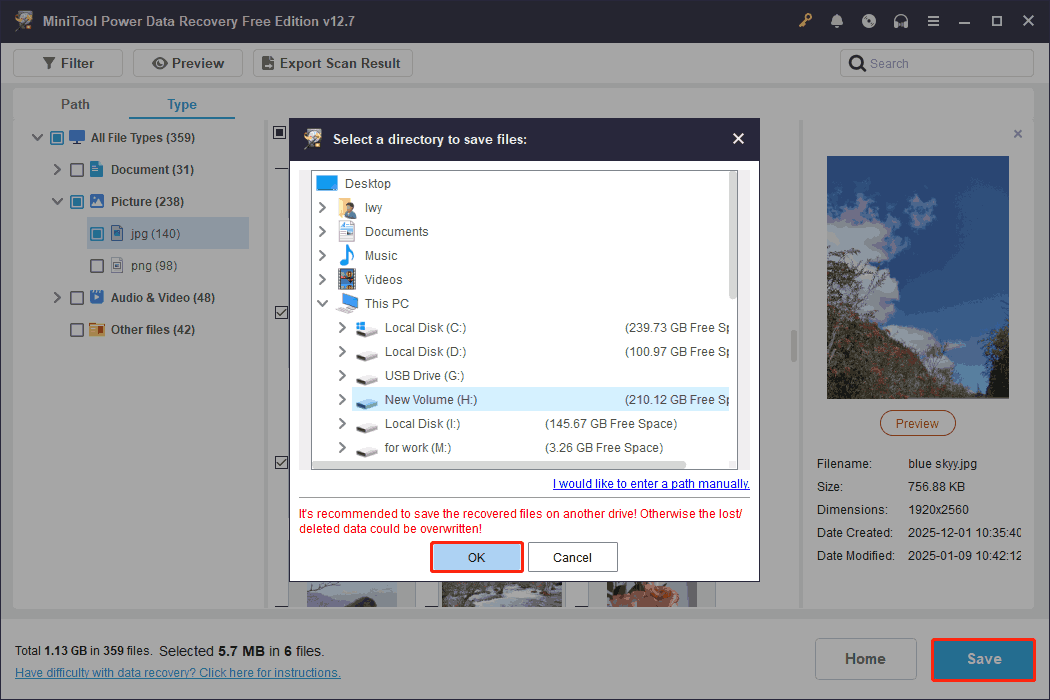
When the Recovery Completed window shows, check your files. This window displays the size of the recovered files and the remaining free recovery capacity.
When only 0 remains, upgrade to an advanced edition to obtain unlimited recovery rights.
Now, your files are secure. It’s time to resolve the RAW issue.
Part 3. Fix Your RAW USB Flash Drive
This section explains how to fix a RAW USB drive. First, try the Error Checking tool, CHKDSK, and DiskPart, then try formatting the drive.
Solution 1: Use the Error Checking Tool
The Error Checking tool can scan and detect file system errors or bad sectors on a disk. Here is how to run it.
Step 1: Press Win + E to open File Explorer.
Step 2: Under This PC, right-click your USB drive and choose Properties.
Step 3: Switch to the Tools tab and click the Check button under the Error Checking section.

Sometimes, there will be a pop-up window saying “The disk check could not be performed because the disk is not formatted.” If that occurs, proceed with the next option.
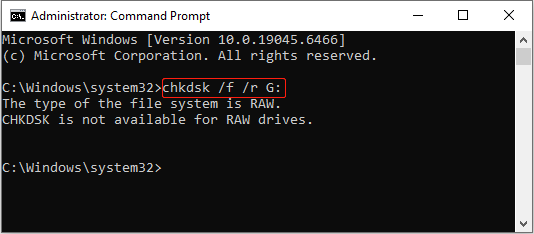
Solution 2: Run CHKDSK in Command Prompt
Although the Error Checking tool provides a convenient graphical interface, it does not offer the same level of control as the CHKDSK utility.
With CHKDSK, you can specify parameters like /f to fix file system errors or /r to locate bad sectors. This makes the disk repair process more thorough.
Here is how to run CHKDSK.
Step 1: Type cmd in the Windows search bar, right-click Command Prompt, and choose Run as administrator.
Step 2: In the UAC prompt window, click Yes to continue.
Step 3: Type chkdsk /f /r G: and press Enter to scan and fix the drive. The letter G should be replaced with the drive letter of your drive.
If you get the error message “CHKDSK is not available for RAW drives”, continue trying the following methods.
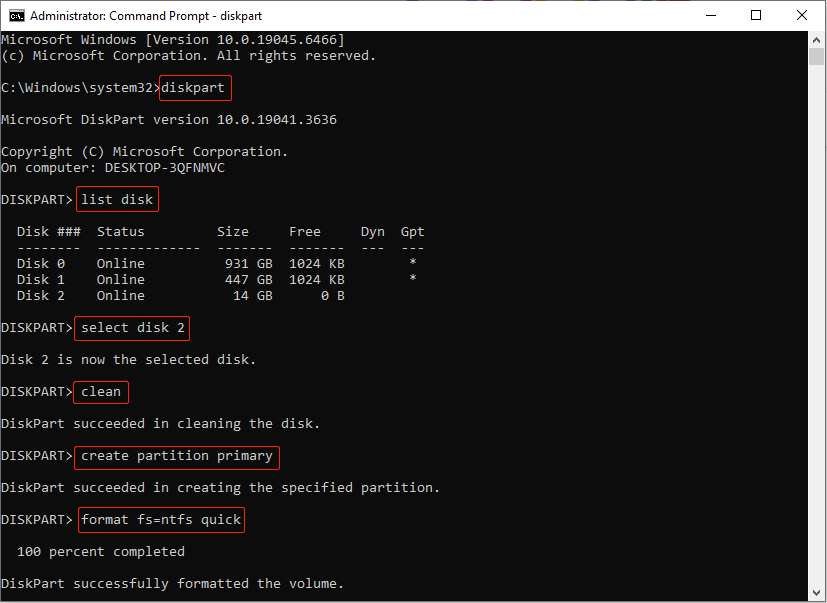
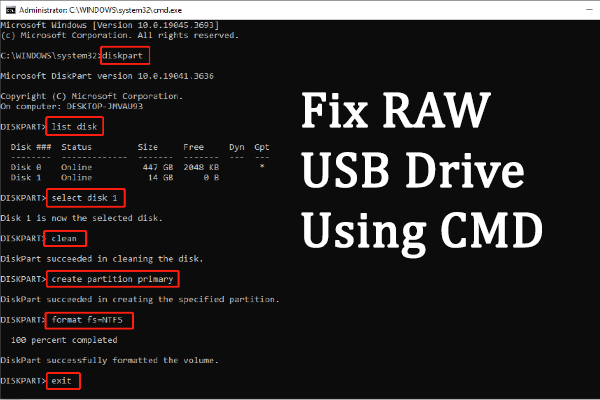
Solution 3: Use the DiskPart Command
When a USB drive is in RAW, regular tools cannot recognize the file system. However, you can use the DiskPart command to clear corrupted partition tables and file system information and recreate new partitions.
Step 1: Open Command Prompt with administrative privileges.
Step 2: Type the following commands and press Enter after eachto clear the current partitions and create a new one:
- diskpart (launch the DiskPart tool)
- list disk (list all disks connected to your computer)
- select disk # (replace # with the actual number of the USB drive)
- clean (clean the drive)
- create partition primary (create a new primary partition)
- format fs=ntfs quick (replace ntfs with a preferred file system, like fat32 or exfat)
Solution 4: Format the RAW USB Drive
If the command line doesn’t work, try the following two formatting methods. Formatting can restore the USB to a normal, usable state, allowing you to store and access data again.
Option 1: Format the drive with Disk Management
Disk Management is a built-in disk management tool on Windows. It allows you to intuitively view and manipulate hard drives, partitions, and external devices.
Here is how to format the RAW drive in Disk Management:
Step 1: Press Win + X and choose Disk Management.
Step 2: Right-click your disk and choose Format.
Step 3: Type a volume label and choose a desired file system.
Step 4: Finally, click OK to apply the change.
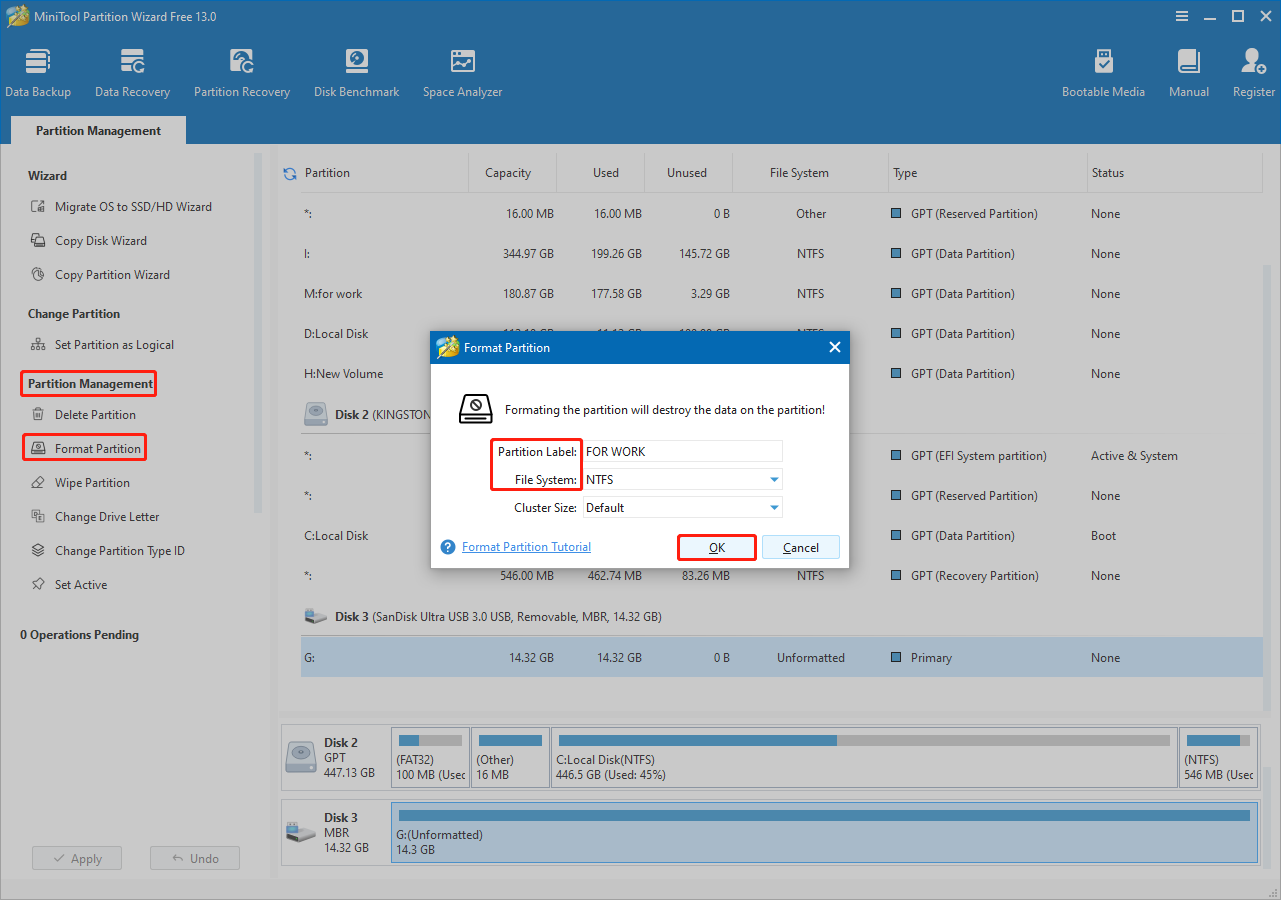
Option 2: Format the disk using MiniTool Partition Wizard
MiniTool Partition Wizard is a professional disk partitioning management software. It offers more powerful features than the built-in Windows tools.
This software can recognize and process partitions in RAW state and supports multiple file systems (such as NTFS, FAT32, and exFAT). The user interface is intuitive and highly secure, effectively avoiding common formatting failures.
Step 1: Download and install MiniTool Partition Wizard by clicking the following button.
MiniTool Partition Wizard FreeClick to Download100%Clean & Safe
Step 2: Launch the software, and then select your USB drive.
Step 3: In the left pane, click Format Partition under Partition Management.
Step 4: Set a partition label and choose a file system.
Step 5: Click OK to return to the main interface. Finally, click Apply.
When the format process ends, check if your USB drive works properly.

Part 4. Tips on How to Protect Your USB Drive
While USB errors cannot be completely avoided, the following measures can reduce the probability of them occurring.
- Properly insert and remove. Always use the “Safely Remove Hardware” function before unplugging the USB drive. This can avoid file system corruption caused by sudden power outages or forced removal.
- Avoid frequent writes. Frequent copying and deleting of large files will accelerate wear and tear. It is recommended to use them primarily for data transfer rather than long-term storage.
- Regularly back up USB data. Don’t store important files solely on the USB drive. Back them up regularly to your computer or the cloud to prevent damage or loss.
- Prevent virus infection. USB is a common route for virus transmission. Always use USB drives on computers with antivirus protection and avoid plugging them into untrusted devices.
- Avoid extreme environments. Do not expose the USB drive to high temperatures, humidity, or strong magnetic fields.
- Use reliable brands. Choose high-quality USB products and avoid cheap, low-quality flash drives, as they are more prone to bad blocks or file system errors.
- Regularly check USB health status. Use disk tools (such as Windows Error Checking or third-party tools) to check the USB file system and bad sectors.
Part 5. Conclusion
Now, review what this article was about. The first part introduces the common causes of a RAW USB flash drive. The second part teaches you to recover data from RAW USB flash drive via MiniTool Power Data Recovery.
The third part provides several methods, such as using Error Checking, running CHKDSK and DiskPart, and formatting the drive, to repair your RAW drive. The last part lists some tips to help you protect your USB drive.
Should you have any questions regarding MiniTool products, send us an email at [email protected].
About The Author

Position: Columnist
Chelsea graduated from university with a major in English. She has a strong interest in English writing. It is this passion for writing that led her to become an English editor. Her articles mainly focus on data recovery and other computer industry news. As an energetic and outgoing girl, Chelsea enjoys listening to music, singing, riding bikes, and eating in her spare time.
User Comments :