Section 1: The Request Failed Due To a Fatal Device Hardware Error
Have you ever met the fatal device hardware error? Do you know what does this mean exactly? And do you want to recover data from the device on which such error appears? I guess the answers to those questions are “yes”, “no” and “yes”.
What Does Fatal Device Hardware Error Mean
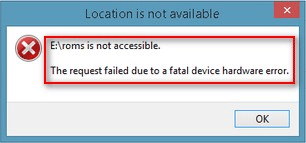
The error “The request failed due to a fatal device hardware error” usually appears when the operating system can’t access the HDD/SSD or unable to read/write files on it. This fatal device hardware error can also be resulted from a cable problem, hard drive/SSD physical damage, etc. Besides, you may found this error in removable drives like USB flash disk.
The not accessible fatal device hardware error (once this error occurs on a drive, that drive will become not accessible) shows up now and then on different devices (WD external hard drive and Seagate hard drive are two most common devices).
Hard Disk Fatal Error Appears on WD Drive & Seagate Drive
Now, let’s take a look at the following true cases.
1. WD fatal error device discovery:
Hi my name is Brianne and I’ve run into some issues with my WD my passport external hard drive and I’m unsure if purchasing your program will help. First off, I am computer illiterate! When I plug in my external drive, it shows up in my devices but I’m unable to view anything. After googling my issue I found that going to disk management and changing the letter would fix the problem however, my external drive shows up as ‘disk 1, unknown, not initialized’. After more googling I found that I need to initialize my hard drive by rebuilding MBR. Again, I have no idea what any of this means but I follow the instructions and I get an error message ‘The request failed due to a fatal device hardware error’. Your program was suggested but I’m not sure what needs to be done to fix my issue and if your program does whatever I need. Can you please help me?– from Ball, Brianne, a potential customer of MiniTool
2. Seagate fatal error device discovery:
I just bought a new hard drive because my last one ended up not working. It’s a 2 Terabyte Hard internal hard drive from Seagate. When I put it in my computer to install Windows 10, it said it had 0.0 space left. So I connect it to my laptop (with a sata cord I bought) to see what’s the issue and I can’t do anything to it. Can’t format it (I think it needs to be initialized first cause currently, disk management has it labeled as unknown), can’t initialize it (Says request failed due to fatal device hardware error) can’t delete anything either. I’m so perplexed because this is a new hard drive, why is this happening?– from Mr.Ashy, a visitor on Tech Support Guy Forums
The Best Fatal Device Hardware Error Solution
Few people know the reason why their drives become unavailable suddenly and give such a fatal error message – the request failed due to fatal device hardware error. But what they’re more concerned about is how they can recover data from inaccessible drive or how to fix the fatal device hardware error.
Considering that data is more important than the drive itself to most people and that there are often many valuable data on it when the hard drive is not accessible, I’ve made the decision to teach you how to recover data from the not accessible flash drive/hard drive. During this process, MiniTool Power Data Recovery could be a good assistant.
Advanced features of Power Data Recovery:
- It is really powerful (be able to recover data from both inaccessible partition and unallocated/initialized disk).
- It has high compatibility (gives support to USB flash drive, SD card, hard drive, and other common storage devices).
- What’s more, it is provided with wizard-style interfaces so that even inexperienced computer users can handle it effortlessly.
- Most important of all, you can get enough guarantees since you get one copy.

Section 2: Recover Files from Not Accessible Drive
Encountering the fatal device hardware error on SD card or any other devices is not the end of the world; on the contrary, you still have a chance to recover your important data from that problematic drive and then fix the error if possible.
No matter you want to fix fatal hardware error on a hard drive or on SD card, the first thing to do should always be data recovery from the not accessible drive. When all your needed files have been recovered successfully from the drive on which such an error occurs, you can try all sorts of possible ways to fix fatal device hardware error.
As for the data recovery, of course, you can get a trial edition to experience the performance of MiniTool Power Data Recovery at first by installing & launching it on your computer.
- If you are satisfied with this software, you may click here to buy a license for a full edition.
- If you are not content with it, just uninstall it from your computer and you won’t lose anything.
MiniTool Power Data Recovery TrialClick to Download100%Clean & Safe
How to Recover Data from Inaccessible Hard Disk
Since the Trial Edition is not able to recover any data for you, I’ll just take the Personal Edition as an example to show you how to recover data from not accessible drive in the following content.
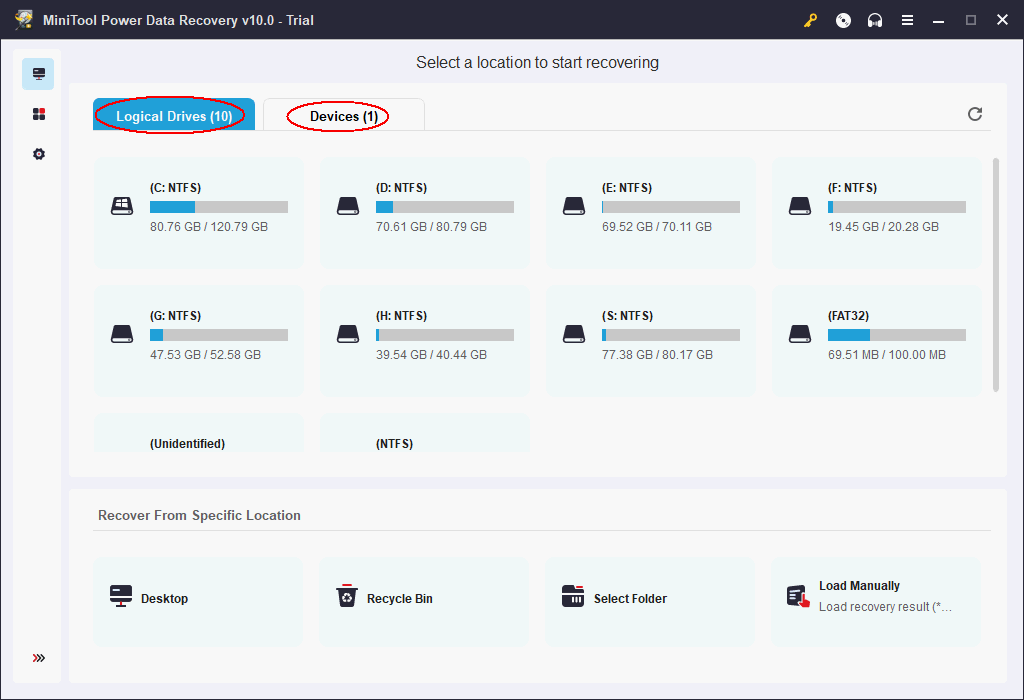
Step 1: choose a suitable tab.
If you can see the hard disk and its partitions in Windows Explorer, but receive an access is denied error when trying to access it, you should keep Logical Drives selected.
You need to connect your device to the computer first when it is not an internal hard drive, in order to see whether it appears in Windows Explorer or not.
- If the flash drive shows up, but you fail to access it, you should run MiniTool Power Data Recovery and select Devices.
- If it doesn’t appear, you should read Fix USB Flash Drive Not Recognized & Recover Data – How To Do to try to figure out the problem and then fix it.
You must know that you are able to recover data from inaccessible flash drive only when it can be recognized by Windows Disk Management. If the disk doesn’t show up in Windows Explorer but does appear in Disk Management, marked with the label of Unallocated, Not Initialized or Unknown, you may resort to the following passage to solve disk unknown problem:
You can also read My Drive does not appear in Windows Explorer view to find proper resolutions provided by Microsoft.
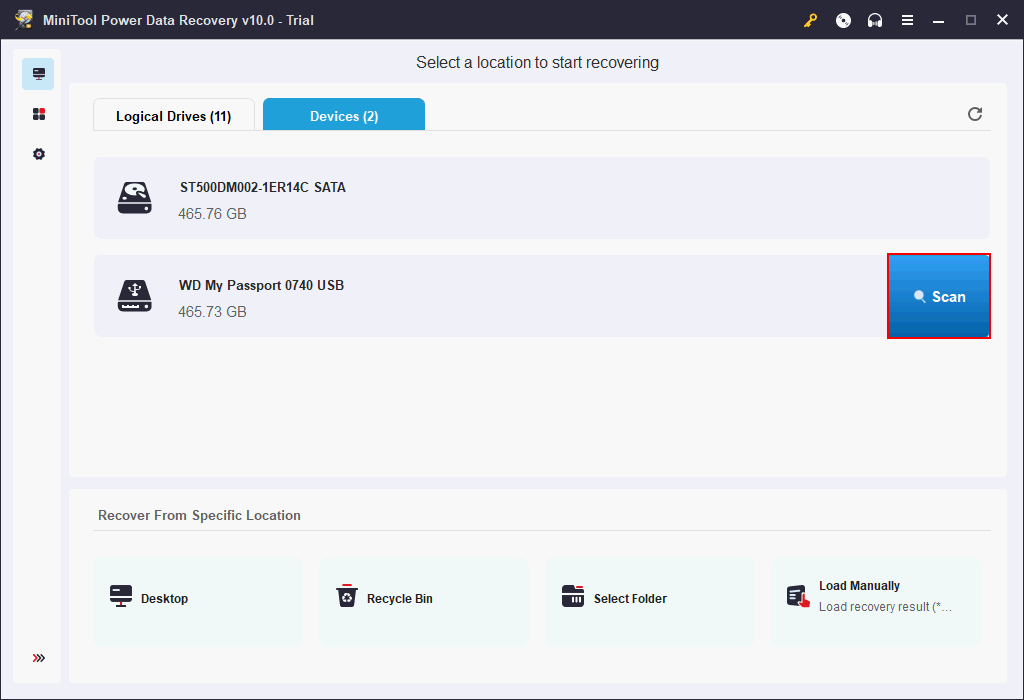
Step 2: select the correct disk or partition to scan.
You need to select the exact partition/hard disk that becomes not accessible and gives you the not accessible fatal device hardware error when you tried to open it. Then, click on the Scan button next to the drive to start detecting files.
Step 3: check all the needed files & folders to recover.
No matter what option you choose and which partition/disk you scan, you’ll be provided with more than one partition sometimes during the scan and when the scan is finished. At this time, you’ve got a lot of work to do:
- You have to open all the found partitions and folders inside one by one to browse the files.
- You should pick out which files are needed and which ones are not.
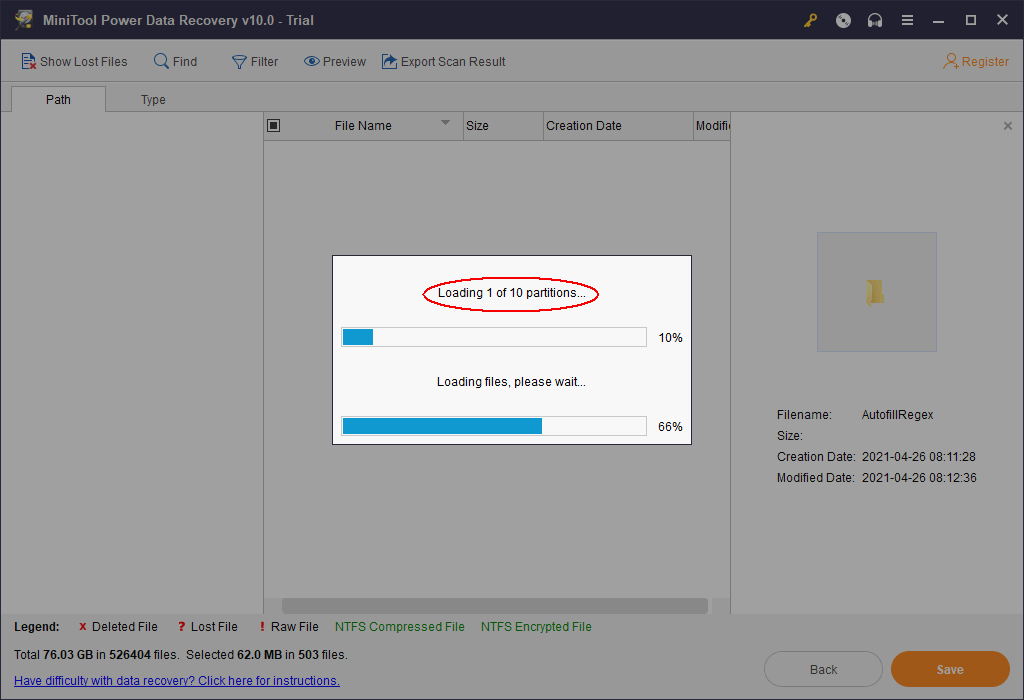
If you have ever stored large amounts of data on the disk, this process would be long and boring, but you need to be careful all the time.
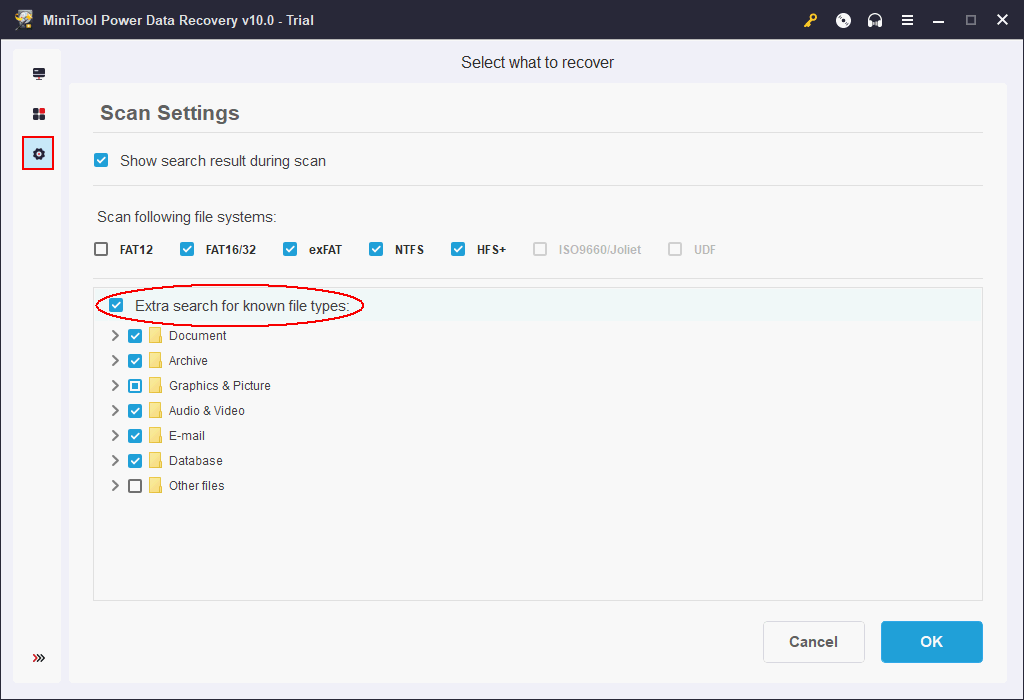
Please note that the Preview, Find and Filter functions are able to help you locate a file more easily.
- Preview helps you to view the content of a picture/photo/text file before you check it.
- Find function is able to search for an exact file by typing filename.
- Filter function is useful when you prefer to search for files by file extension, file size or file creation/modification date.
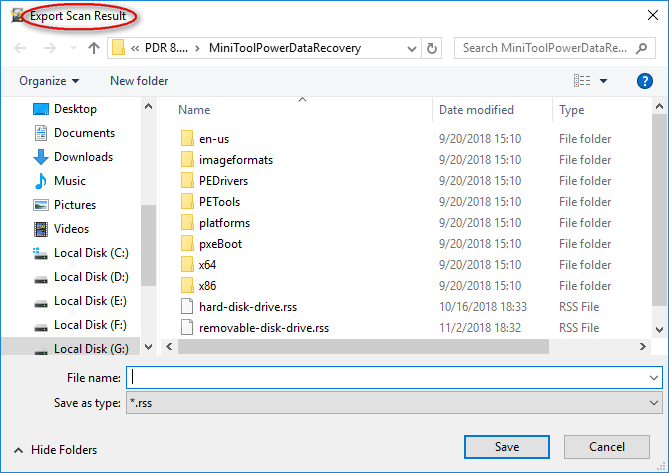
Step 4: set a safe storage directory for the files waiting to be recovered.
After adding a check mark in the square box in front of all the files you plan to recover, you should click on the Save button in the lower right corner to see the Select a directory to save files window. Obviously, you need to select a storage path for the files you’ve checked.
And you must pay attention to the following two things:
- Please do not choose the original flash drive/hard drive with the fatal device hardware error as the destination of the file recovery.
- Please make sure that the target storage drive has enough free space to store all the files you’ve selected to recover.
After making your decision, you ought to click on OK button below to confirm.
You’ll need to wait for a short time before all the files are saved to the destination drive. And when you see a pop-up window informing you that the files have been recovered, you can go to check them.
Section 3: Fix Fatal Device Hardware Error
After people have recovered all useful data from the not accessible drive or for people who don’t care about the data in that drive at all, how to fix the not accessible fatal device hardware error comes first in their to-do list. Here, I will talk about some of the commonly used repair methods.
Reformat the Drive
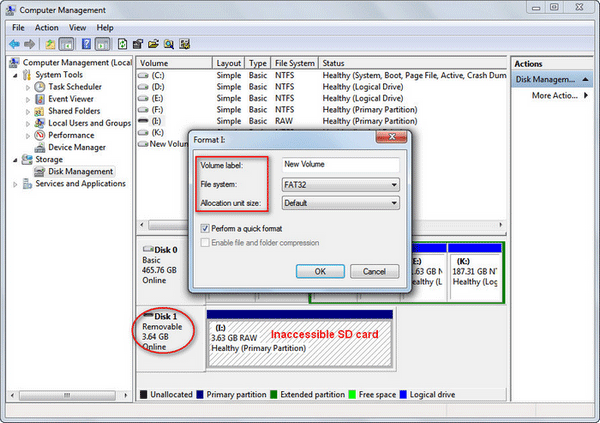
- Open Windows Disk Management.
- Find the inaccessible flash drive/hard drive.
- Right click on it and choose Format….
- Set a proper volume label, file system and allocation unit size (you can also keep the default information provided by the system).
- Click on the OK button to confirm in the same interface
- Click on the OK button in another pop-up window to start formatting.
- Wait for the completion.
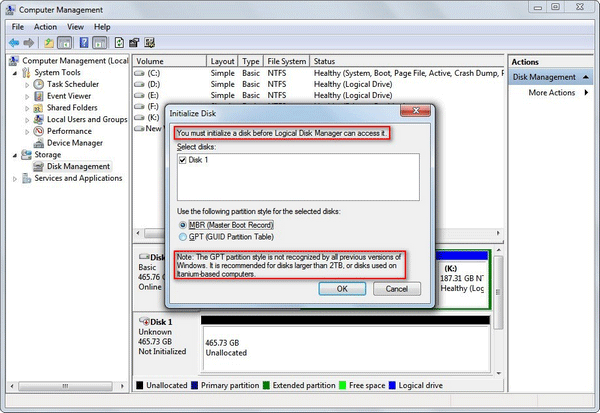
Initialize the Disk
- Open the Windows Disk Management.
- Right-click on the Unknown & Not Initialized disk if the Initialize Disk Window doesn’t pop up automatically.
- Choose a partition style (MBR or GPT) for the selected disk.
- Click on the OK button to confirm your selection.
In addition to above two methods, you can also try to change USB port or computer, check & shield bad sectors or replace the bad component (such as the magnetic head) to fix the fatal device hardware error.
Section 4: Draw a Conclusion
Though the request failed due to a fatal device hardware error is inevitable sometimes, I have the right way to deal with it. That is:
- Recover data from the not accessible drive.
- Make sure you have got back all the data you need.
- Try any possible ways to fix the error and make the drive work normally again.
So you shouldn’t get into panic immediately when encountering this hard disk fatal error. What you really need to do is staying calm & following the steps I have mentioned above to rescue your data and device as much as possible.
The Request Failed Due to A Fatal Device Hardware Error FAQ
- Click on Start in the lower left corner.
- Scroll down to find Windows System folder and expand it.
- Select Command Prompt under it.
- Type wmic and press Enter.
- Wait for the command to finish.
- Type diskdrive get status and press Enter.
- Wait for the command to finish.
- Restart computer and programs.
- Change a USB port or USB cable.
- Make sure the power supply is enough and stable.
- Connect the external hard drive to another computer.
- Go to Device Manager to define hard drive problems.
- Run CHKDSK to check disk for errors.
- Use other third-party software.
- Connect the external drive to your computer.
- Open File Explorer and look for the external drive.
- Right click on it and choose Properties.
- Shift to the Tools tab.
- Look for the Error checking area.
- Click on the Check button and wait.