Can I Recover Permanently Deleted Files on Windows 10/11
Permanently deleted files can still be recovered in many cases. When a file is permanently deleted on Windows, the system does not immediately erase the file’s contents.
Instead, it simply marks the file as deleted in the file system’s index table and frees up storage space for new data to overwrite.
If you stop writing data to the disk immediately after deletion and then attempt recovery, the success rate of file recovery is very high.
However, once new data is written and overwrites the original storage area, the success rate of recovery drops significantly. And it may even become completely unrecoverable.
Furthermore, different storage media can affect recovery results. For example, traditional hard disk drives (HDDs) are relatively easy to recover from.
Solid state drives (SSDs), on the other hand, use the TRIM command to erase deleted data much faster, making recovery more difficult.
In general, permanently deleted files can still be recovered. Now, take steps to recover them as soon as possible.

Recover Permanently Deleted Files Without Software
This part explains how to recover permanently deleted files from PC using cloud backups, File History, and Backup and Restore.
Method 1: Check the Cloud Backup
If you have enabled syncing with OneDrive, Google Drive, Dropbox, etc., restoring from the cloud storage is a good choice.
Even if you permanently delete files on your local computer, a copy may still be retained in the cloud.
Most cloud storage services move deleted files to the trash and retain them for a period of time (usually 30 days), during which time they can be recovered.
Now, open the cloud storage service you used to use, find the trash, and restore your files.
If you don’t have a cloud backup, try the next method.
Method 2: Recover with File History
File History is a built-in file backup and version management feature on Windows. When enabled, it saves copies of the files. And it also retains multiple historical versions, making it easy to recover deleted files.
If it was enabled and the file was backed up before deletion, this feature can help you recover permanently deleted files.
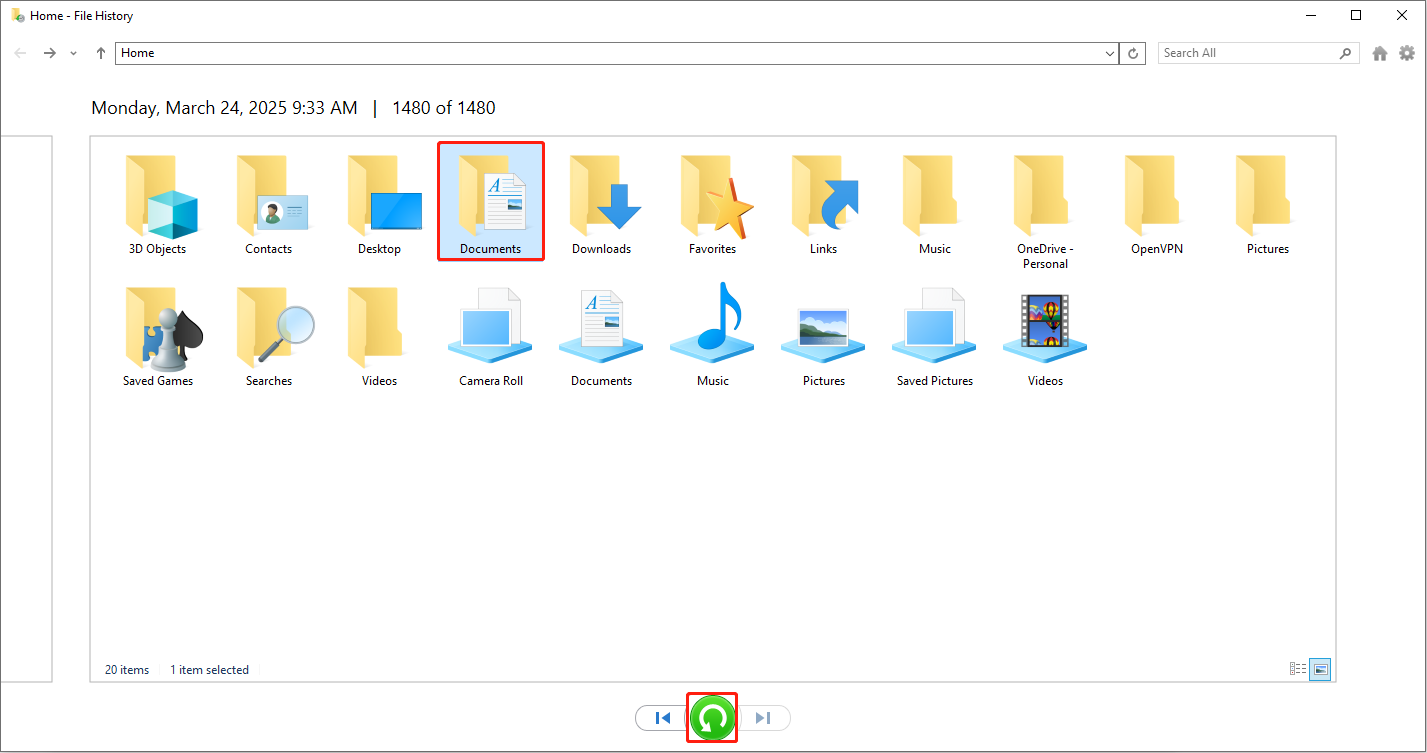
Step 1: Access the File History
Type Control Panel in the Search box and press Enter. Change the view to Large icons, click File History, and click Restore personal files on the left.
Step 2: Browse and locate the target backup
A window will appear displaying all backed-up files and folders. View versions from different dates using the arrow buttons to locate the file or folder you need to restore.
Step 3: Perform recovery operation
Select the target file and click the green Restore button. The file will be restored to its original location.
If this method isn’t available, consider the next option.
Method 3: Restore via Backup and Restore
Backup and Restore is another built-in tool on Windows. It is used to create backup copies of files or systems and restore them when needed.
If a backup was created using Windows Backup and Restore before, use it to restore your deleted files.
Step 1: Access Backup and Restore (Windows 7)
Open Control Panel and select System and Security > Backup and Restore (Windows 7).
Step 2: Find the backup files or folders
In the Restore section, click the Restore my files button. Click Browse for files or Browse for folders to add the file or folder you need to restore.
Step 3: Choose a storage location
Click Next and then choose a storage location. To restore to the original location, check In the original location. To restore to another location, check In the following location, then click Browse to select a new location and click OK.
Step 4: Start recovering files
Finally, click Restore to start the process. When the process finishes, check your files.
If you don’t have a backup, try the data recovery software to rescue your permanently deleted files.
Restore Permanently Deleted Files with Software
Here is how to recover permanently deleted files using Windows File Recovery and MiniTool Power Data Recovery.
Method 1: Use Windows File Recovery
Windows File Recovery is a command-line tool from Microsoft. It can be used to recover deleted or lost files from local storage devices, such as hard drives, USB flash drives, SD cards, etc.
This tool can scan for and attempt to recover permanently deleted files. Follow the steps below.
Step 1: Install the tool
Open the Microsoft Store and search for Windows File Recovery. Click Install and wait for the process to complete.
Step 2: Open the command line
Press Win + S, type Windows File Recovery, and press Enter.
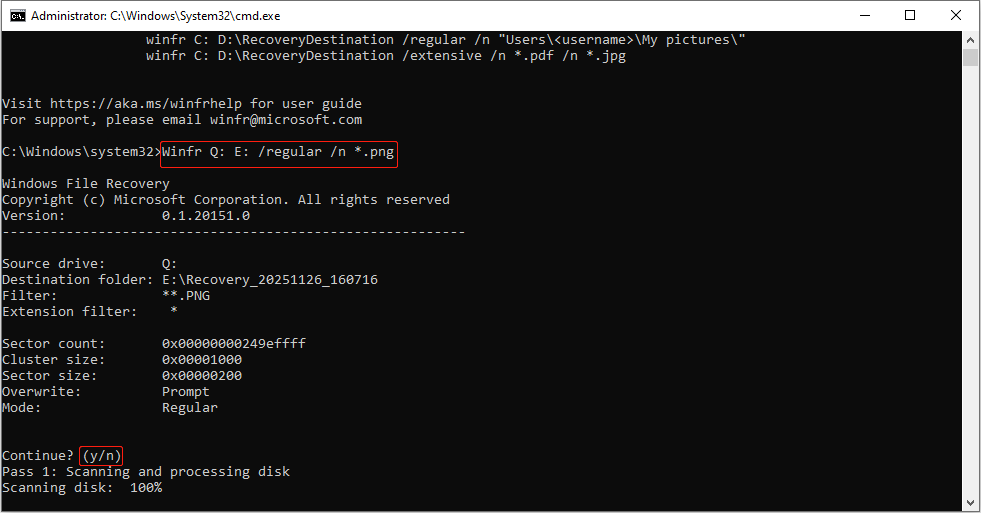
Step 3: Execute the command
Type winfr <source-drive>: <destination-drive>: /recovery-mode /n *.<filter> in the window and press Enter.
- Winfr: The command that launches Windows File Recovery.
- <source-drive>: The drive where files were deleted.
- <destination-drive>: Where recovered files will be saved (must be different from the source drive).
- /recovery-mode: Use regular mode for recently deleted files on NTFS drives. Use extensive mode for all file systems.
- /n *.<filter>: Define what to search for, including file names, file paths, file types, or wildcards.
For example, to recover PNG files from Q: to E: using the regular mode, type Winfr Q: E: /regular /n *.png and press Enter.
Step 4: Wait for recovery
When prompted to continue, press Y. The tool will scan the disk and attempt to recover the files. When the process is done, the PNG files deleted on the Q drive will be restored to the E drive.
If this solution fails, try MiniTool Power Data Recovery.
Method 2: Try MiniTool Power Data Recovery
MiniTool Power Data Recovery is a powerful and comprehensive data recovery tool. These are some of its features.
- Multi-scenario data recovery. This tool supports data recovery caused by accidental deletion, disk formatting, partition loss, and other reasons.
- Multi-storage media support. MiniTool is not limited to hard drives; it can also recover data from USB drives, SD cards, and other storage media.
- Strong compatibility. This software supports common file systems such as NTFS, FAT, and exFAT. It can recover documents, pictures, videos, audio, and more in almost all formats. It is compatible with Windows 11/10/8/8.1.
- User-friendly. This software has a clean interface and simple operation. Even a novice can easily use it to recover files.
This free file recovery software can recover up to 1GB of files for free. Download and install it to recover deleted files.
MiniTool Power Data Recovery FreeClick to Download100%Clean & Safe
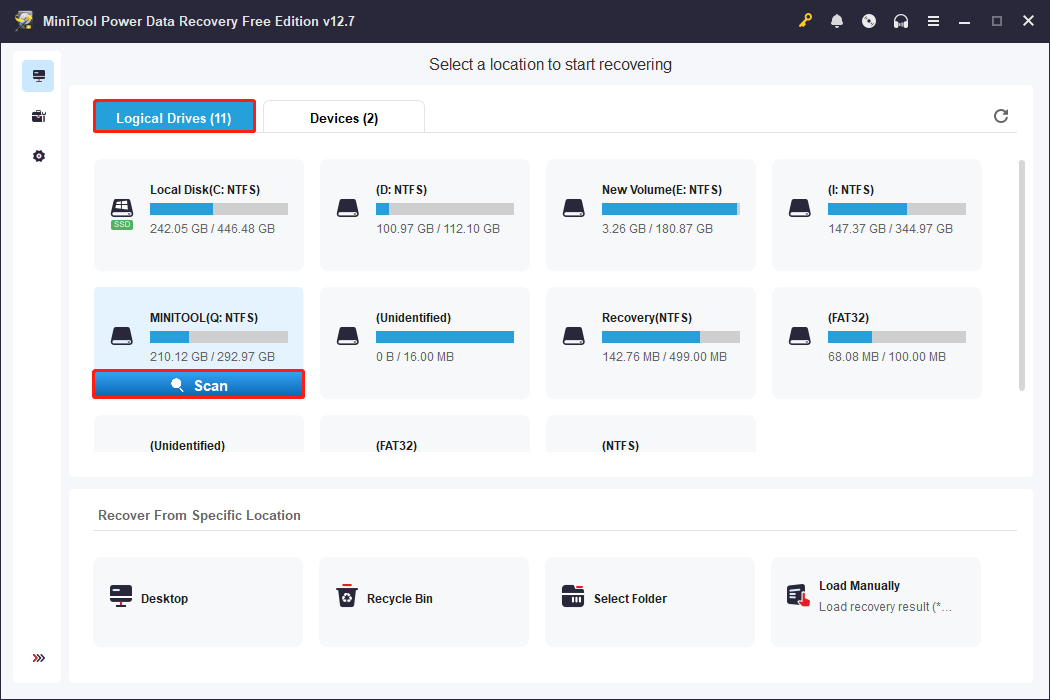
Step 1: Scan the target drive
Launch MiniTool Power Data Recovery. Under the Logical Drives tab, find the target partition, move the cursor to it, and click Scan.
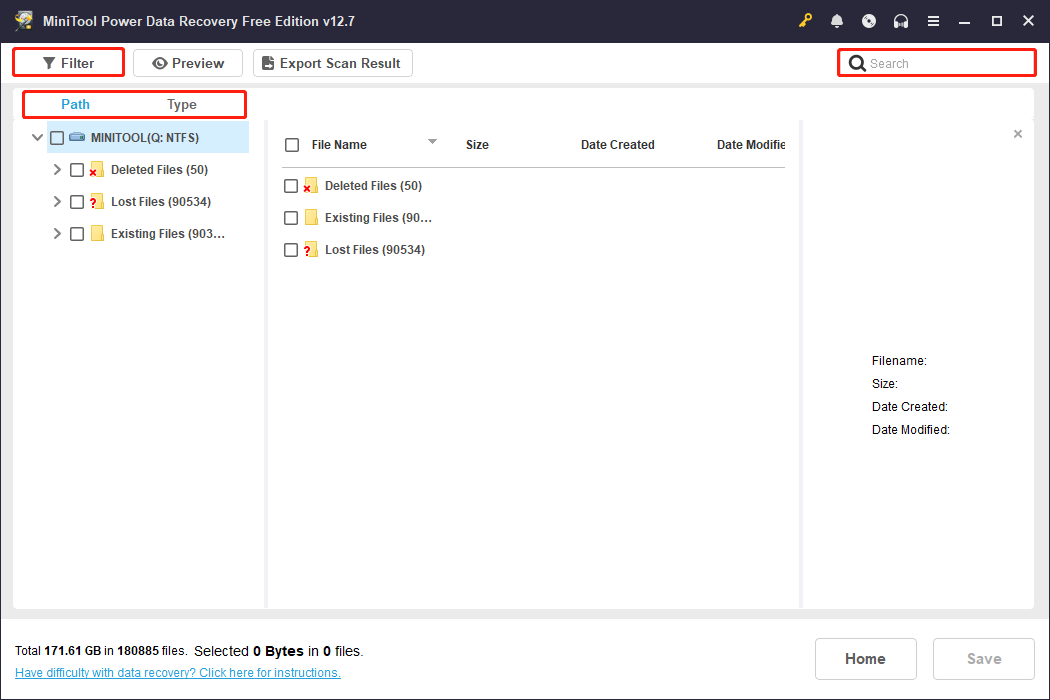
Step 2: Find the required files
When the scan ends, use Path, Type, Filter, and Search to find the files you want.
- Path: Lets you view found files organized by their original folder structure.
- Type: Categorizes scan results by file type (e.g., documents, pictures, videos).
- Filter: Allows you to quickly narrow files by file type, modification date, file size, and file category.
- Search: Enables you to locate specific files by entering keywords of file names.
Step 3: Preview the file
The Preview feature helps you check the file content. When finding the file, double-click it to preview.

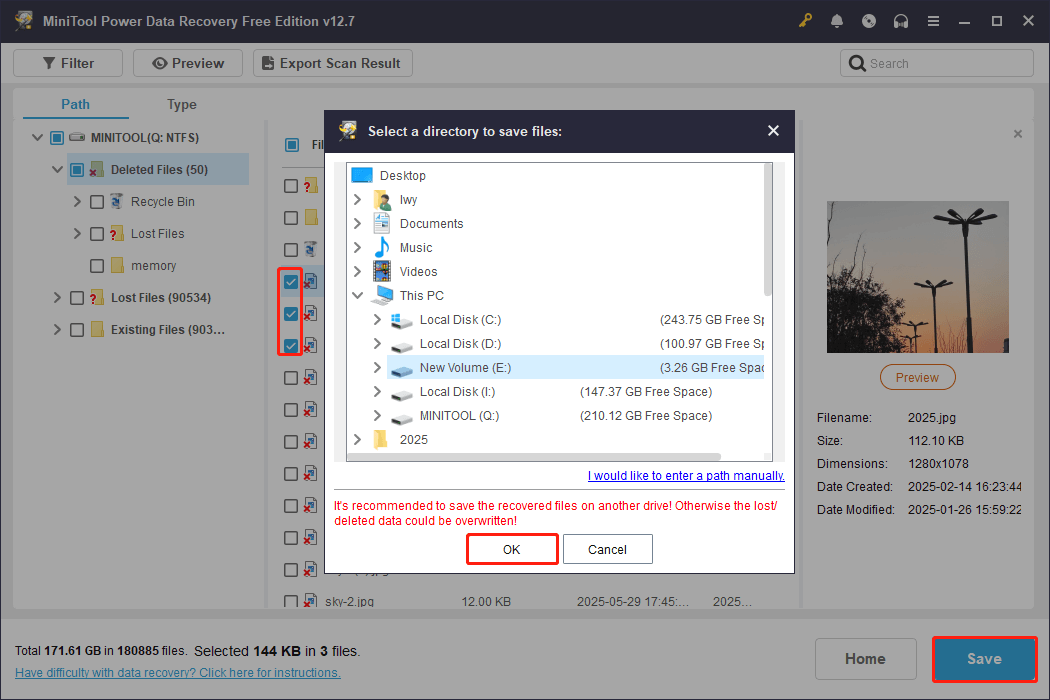
Step 4: Save the file to a new location
Select all the desired files and click Save. In the new window, choose a new and safe location and click OK. The recovery will start.
Windows File Recovery and MiniTool Power Data Recovery are professional data recovery tools. The former requires inputting commands, while the latter does not. Choose according to your actual situation.
How to Permanently Delete Files on Windows
When files are no longer needed, take up a lot of disk space, or contain sensitive information, you may choose to permanently delete them. This part provides methods for permanently deleting files.
Approach 1: With the Shortcuts
This is the easiest method to delete files permanently. Here are the steps.
Step 1: Select the file you want to delete and press Shift + Delete.
Step 2: In the prompt window, click Yes to confirm the operation.
This file will be deleted and will not appear in the Recycle Bin.
Approach 2: Via the File Explorer
File Explorer also offers the function to permanently delete files. Here is how to do it.
Step 1: Open File Explorer and find the target file.
Step 2: Select the file, click the red Delete button, and select Permanently delete.
Step 3: In the pop-up window, click Yes to confirm the change.
Approach 3: Through PowerShell
You can also permanently delete files using the command line. It directly calls the underlying file system operations, freeing up space immediately without going through the Recycle Bin.
Step 1: Right-click the Windows button and select Windows PowerShell (Admin).
Step 2: When prompted by UAC, click Yes to continue.
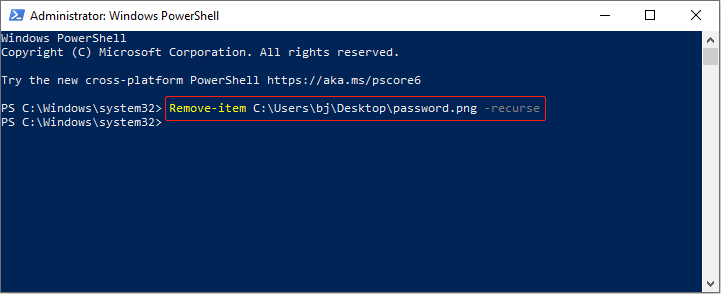
Step 3: Type Remove-item file location\filename.extension -recurse and press Enter.
For example, type Remove-item C: \Users\bj\Desktop\password.png -recurse and press Enter. The file will be erased from the desktop.
Approach 4: Empty the Recycle Bin
Emptying the Recycle Bin will also permanently delete files. Find and right-click the Recycle Bin icon, then select Empty Recycle Bin. In the Delete Multiple Items window, click Yes. All files will be deleted forever.
Bottom Line
This post tells you how to permanently delete files using the Shift + Delete keys, the File Explorer, the PowerShell, or emptying the Recycle Bin.
When you need to recover deleted files, check your backups, such as cloud backup, File History, and Backup and Restore. If the backup isn’t available, use Windows File Recovery or MiniTool Power Data Recovery.
Contact us at [email protected] with any product questions you may have.
About The Author

Position: Columnist
Chelsea graduated from university with a major in English. She has a strong interest in English writing. It is this passion for writing that led her to become an English editor. Her articles mainly focus on data recovery and other computer industry news. As an energetic and outgoing girl, Chelsea enjoys listening to music, singing, riding bikes, and eating in her spare time.
User Comments :