When a USB partition is accidentally deleted, the device often becomes unusable, and data is lost. This MiniTool article explains how to recover deleted USB partition. The methods include recovering individual files followed by partition rebuilding, or restoring the original partition with its data.
In daily use, USB flash drives are often used to store important study materials, work documents, or personal pictures.
However, a careless operation, such as accidentally deleting a partition or incorrectly cleaning the USB drive, can cause the USB data to be lost.
As long as no new partitions are created, there’s a chance to reintroduce the lost partition into the system, making the data visible again.
At the beginning of the article, first understand possible scenarios for partition deletion or missing.
USB Partition Not Showing/Unallocated/Offline
USB drive partition loss may manifest in the following situations:
Case 1: The USB partition is not showing in File Explorer after insertion. Typical reasons why USB drives may not appear are as follows:
- Unassigned drive letter
- Corrupted partition table
- Disk set to Offline
Case 2: The partition is actually deleted or lost. In this case, the USB drive will display as Unallocated in Disk Management.
While these situations may appear different, they essentially all mean that the system cannot properly mount or recognize the partition.
Continue reading to learn about how to recover a missing USB partition.
Do Preliminary Checks Before USB Partition Recovery
Method 1. Bring the USB Drive Online
When a USB disk shows Offline in Disk Management, try setting it to Online. This step is a prerequisite for restoring disk availability.
That’s because if the disk is Offline, the system cannot access or recognize the partitions and data within it.
Only by removing the system’s disabled flag can subsequent partition repair, data recovery, or reallocation operations proceed.
Here is how to set your USB drive to Online:
Step 1: Press Win + X and select Disk Management.
Step 2: Locate the USB drive that appears as Offline from the device list.
Step 3: Right-click the disk and select Online.
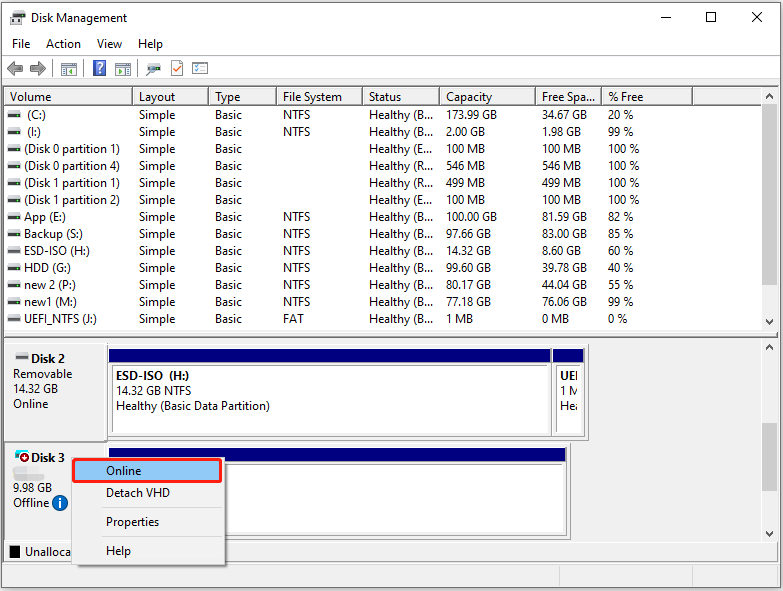
The disk will now switch to the Online status.
Method 2. Assign a Drive Letter
If the USB drive does not have a drive letter, it won’t show up in Windows Explorer. Follow the steps below to assign it a new drive letter.
Step 1: In Disk Management, right-click the partition and click Change Drive Letter and Paths.
Step 2: Click the Add button, choose a letter, and click OK.
Once completed, the USB drive will appear in File Explorer.
If the problem isn’t just the disk status, but rather that the partition has been deleted, simply setting it to Online or adding a drive letter won’t solve the issue.
In this case, you’ll need to use a partition recovery tool to recover the deleted partition.
How to Recover Deleted USB Partition on Windows
This section shows you how to use professional data recovery tools to recover deleted USB partition on Windows safely.
Deleting a partition only removes the partition table and file system index. It does not immediately erase the underlying data.
USB partition recovery can be performed either by recovering files first and then rebuilding the partition, or by directly restoring the entire partition with its data.
Option 1: Recover Lost Files from USB Partition
This powerful data recovery software, MiniTool Power Data Recovery, can scan and recover files even if the USB drive shows as unallocated.
This tool can handle not only deleted partitions but also RAW partitions, damaged partition tables, system crashes, and other data recovery cases.
In addition, it supports multiple file systems (NTFS, FAT32, exFAT), various storage devices (USB drives, SSDs, HDDs), and diverse Windows systems (Windows 11/10/8/8.1).
Furthermore, it can recover almost all types of files, such as documents, pictures, videos, and audio files.
This recovery tool uses read-only scanning and does not write to the source disk, preventing secondary data damage.
Best of all, this free data recovery software allows you to recover up to 1 GB of files for free. Download it on your computer and restore your USB data now.
MiniTool Power Data Recovery FreeClick to Download100%Clean & Safe
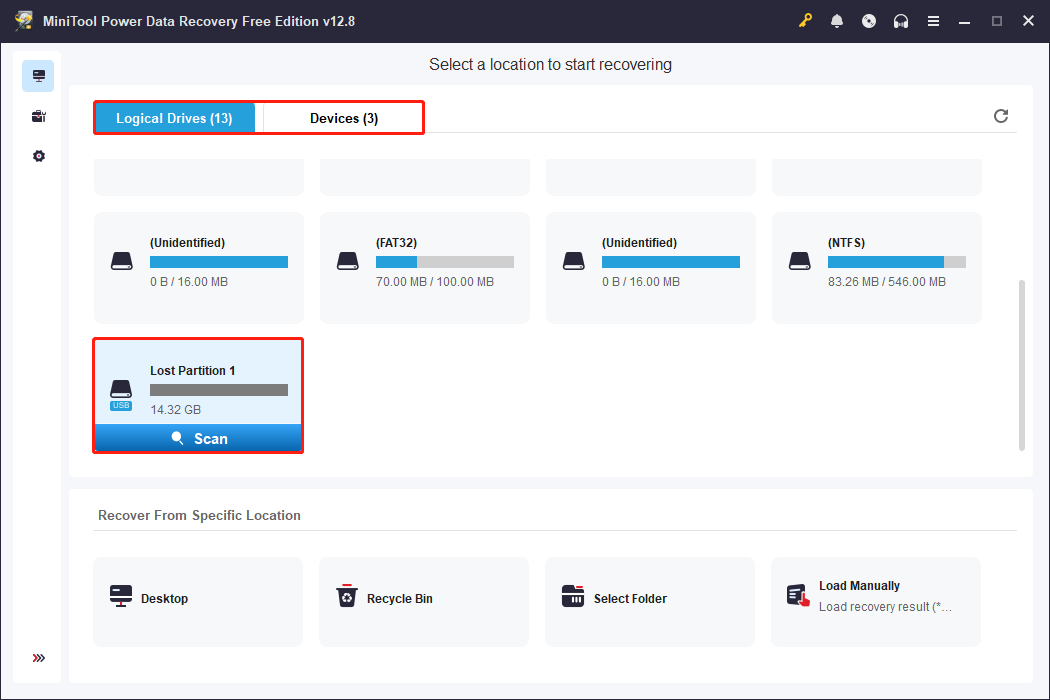
Step 1: Launch the software and scan the USB drive
Open MiniTool Power Data Recovery. When entering the main interface, all the partitions, including existing partitions, lost partitions, and unallocated spaces, are displayed under Logical Drives.
Select the target USB partition and click Scan. Alternatively, you can choose to scan the whole disk. Switch to the Devices tab, select the disk, and click Scan.
Step 2: Wait for the scan process to end and find the target files
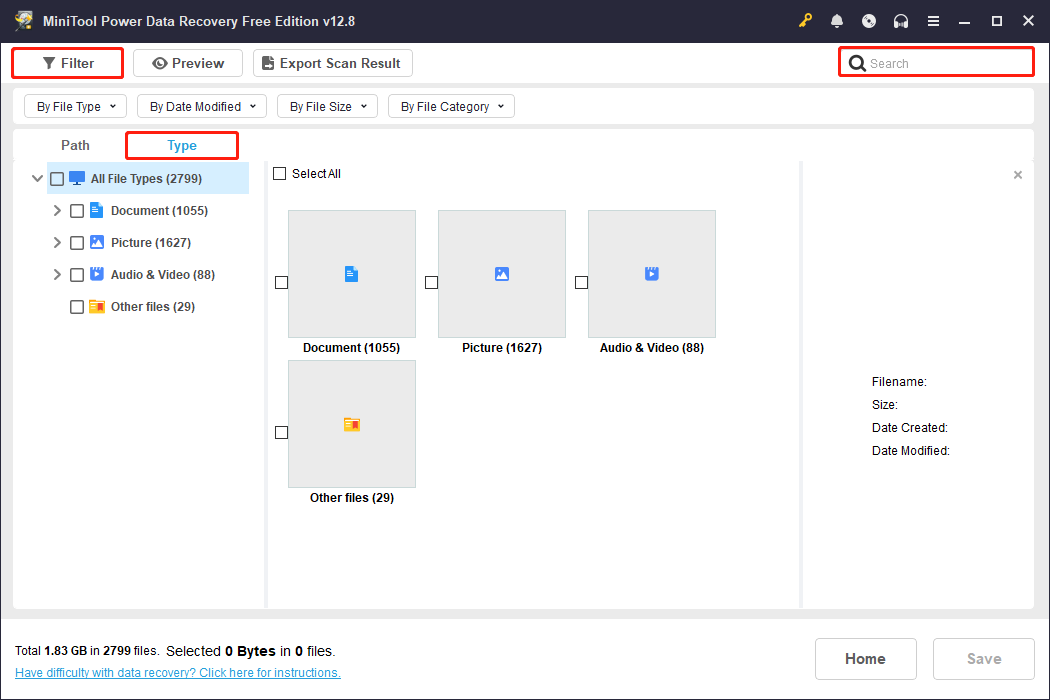
This scan process may take some time. For the best recovery results, wait patiently for it to complete. When it ends, files will be listed under Path by the file structure. Expand Deleted Files, Lost Files, and Existing Files to find the items you want to recover.

Besides this, there are several features to help you locate the wanted files quickly.
- Type: It classifies recoverable files by their file types, such as documents, pictures, audios, and videos. It makes it easy to locate specific kinds of data.
- Filter: It allows you to narrow down the results scope according to file type, modification date, file size, and file category.
- Search: It enables you to search for the specific file by entering the partial or full filename.
Double-click the files to preview them. The software supports previewing common formats (such as pictures, audios, videos, and so on).
If the files can be previewed normally, the data is intact and can be recovered.
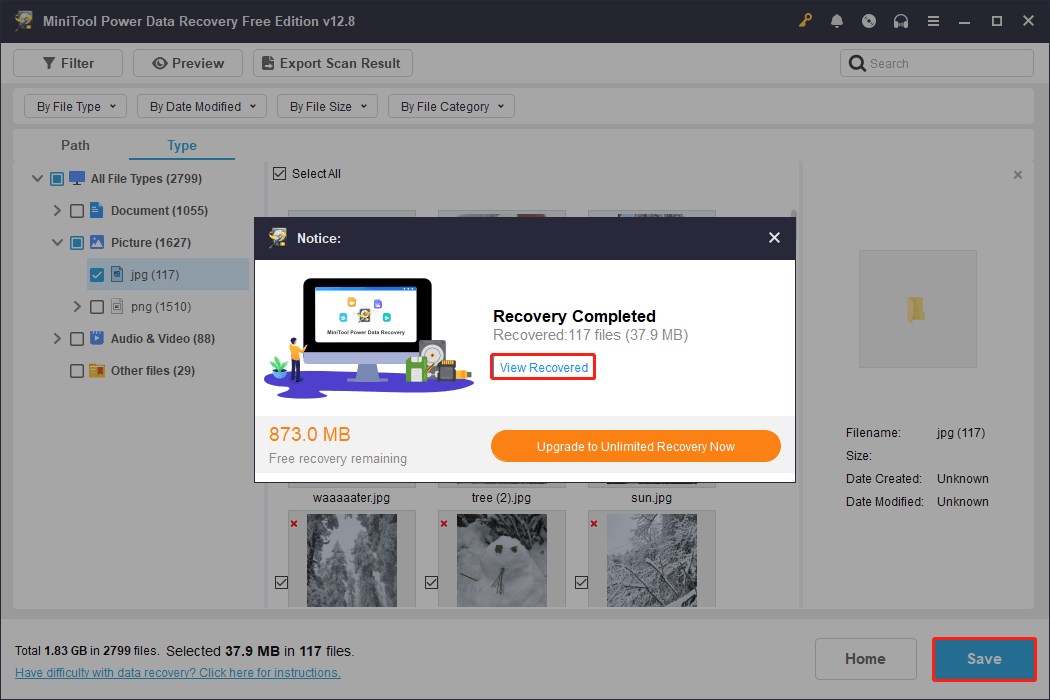
Step 3: Check the needed files and recover them to a safe location
Check all the confirmed files and click the Save button. In the prompt window, select a safe path and click OK. The recovery starts.
When the Recovery Completed window pops up, click the View Recovered button to check your files.
After data recovery, the next step is to partition the USB drive for normal use. Repartitioning can create a new partition table and file system for the USB drive.
Step 1: Press Win + X and choose Disk Management.
Step 2: Right-click the unallocated space and choose New Simple Volume.
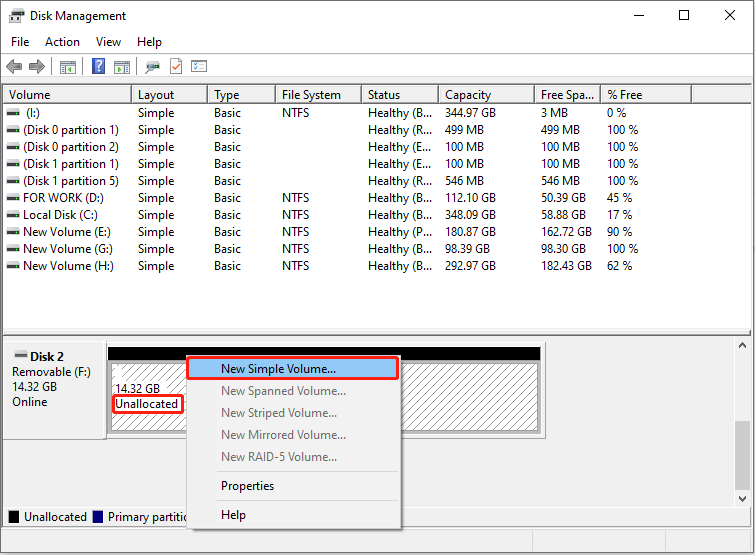
Step 3: Follow the wizards to set the volume size, assign a drive letter, choose a file system, and type a volume label.
Option 2: Restore the Deleted Partition Directly
Besides retrieving single files and rebuilding USB partitions, you have the option to directly recover deleted partition from USB drive with its data.
MiniTool Partition Wizard is a highly reliable choice when it comes to partition recovery. It supports quick and full disk scanning to locate lost or deleted files.
The software is compatible with FAT32, exFAT, NTFS, and other file systems. And it works not only with USB drives but also with memory cards, HDDs, and SSDs.
MiniTool Partition Wizard FreeClick to Download100%Clean & Safe
Now, follow the steps below to recover a deleted USB partition with its original files.
Step 1: Launch Partition Recovery
On the main interface of this partition manager, click the Partition Recovery module at the top. Then click Next in the pop-up window to continue.
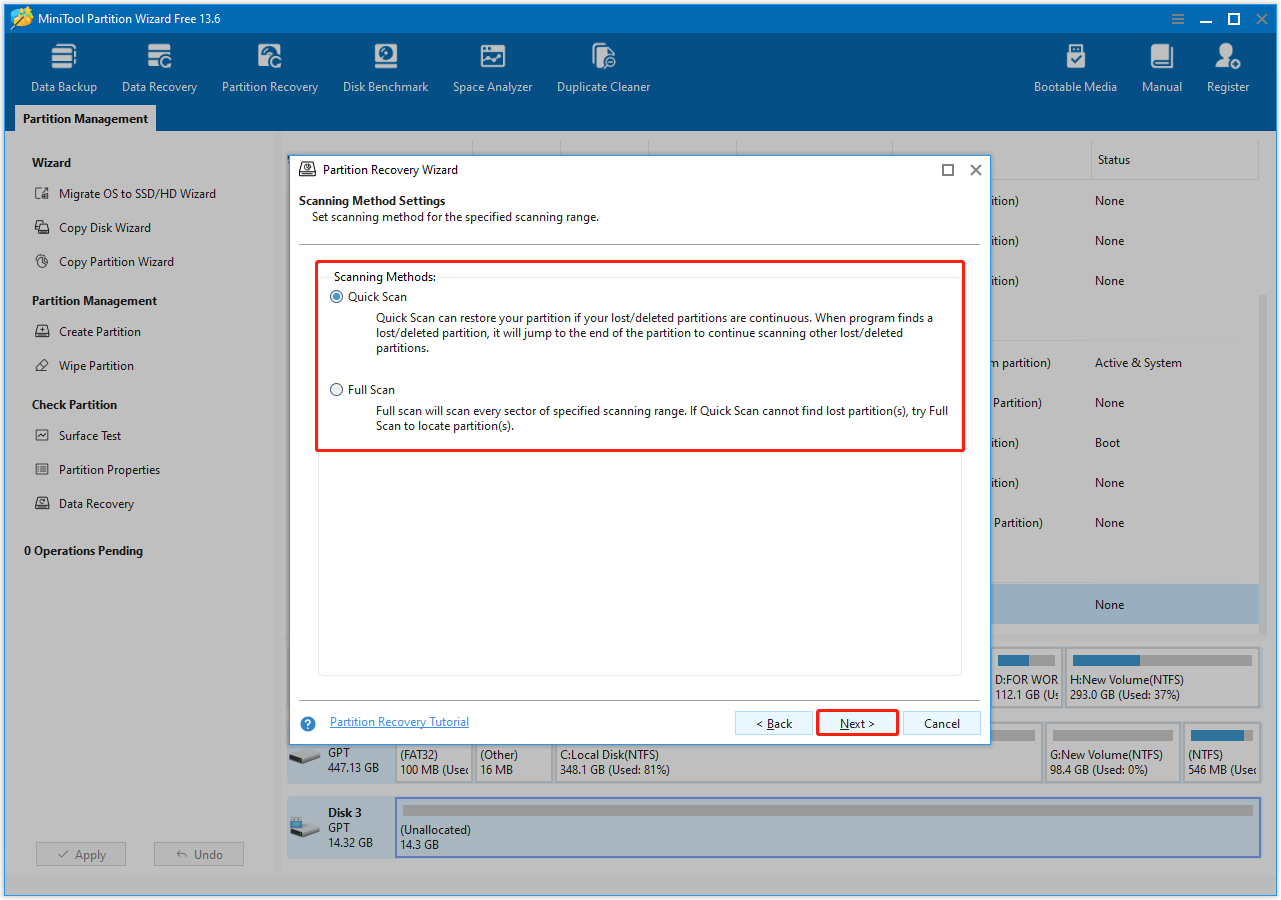
Step 2: Scan the disk
Select the target disk and click Next. Then the software will provide three scan ranges:
- Full Disk: Most thorough, but takes longer.
- Unallocated Space: Only scans blank areas.
- Specified Range: Allows you to customize the sector range.
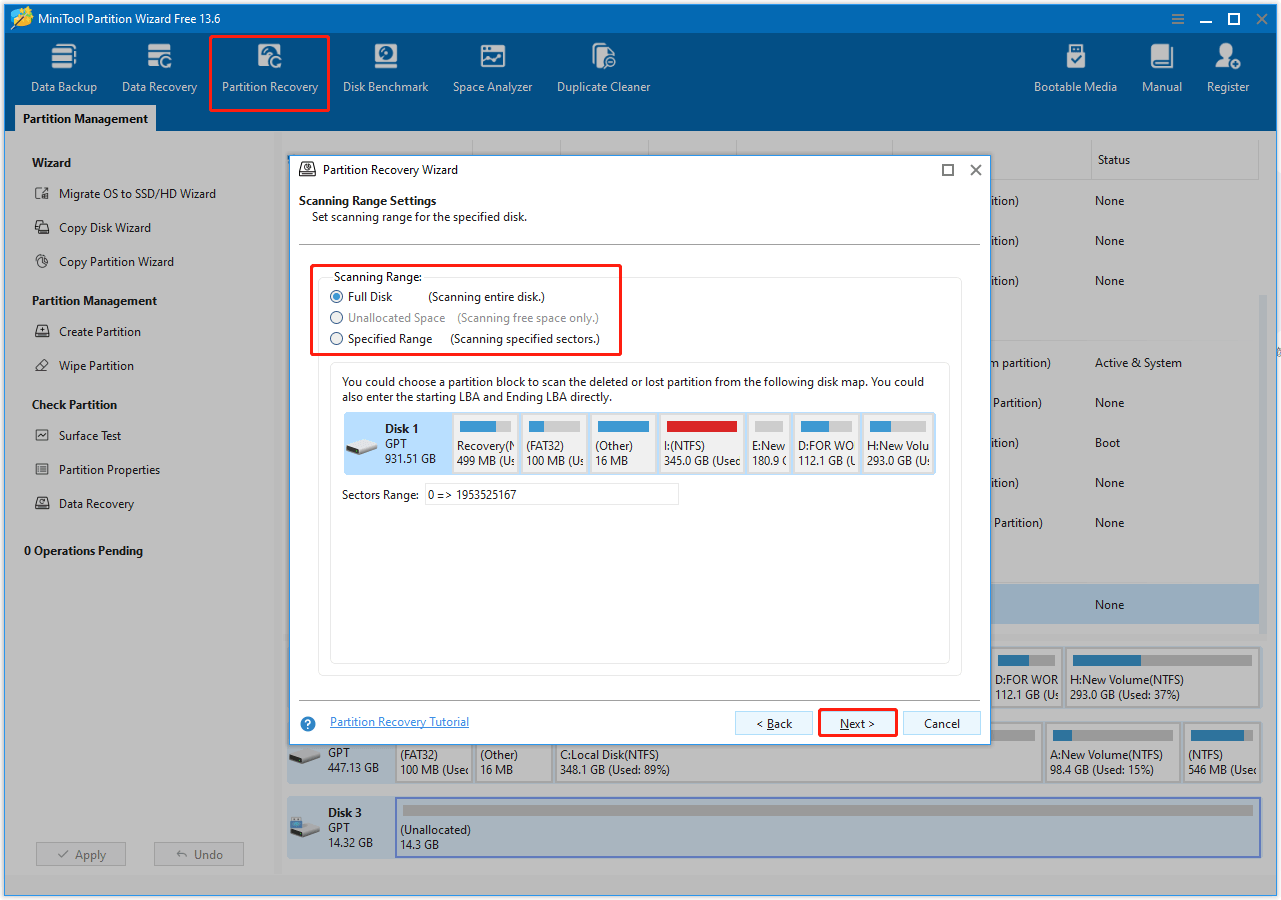
It is recommended to select the Full Disk option to ensure that all lost partitions are recovered. Then, click Next.
In the next window, choose a scan method between Quick scan and Full scan, then click Next.
Step 3: Preview the recovery effect
After the scan is complete, the software will list the found partitions. Select all required partitions and preview the recovery results. Existing partitions are selected by default and should not be deselected to prevent partition loss.
Step 4: Perform partition recovery
Click Finish, and the software will remount the partitions to the disk partition table.
Step 5: Add a drive letter
Right-click the recovered partition and select Change Letter. Choose a letter from the New Drive Letter list. Finally, click Apply to execute the operation.
Check Disk Management or File Explorer to confirm that all required partitions have been restored.
USB Drive Not Working After Deleting a Partition
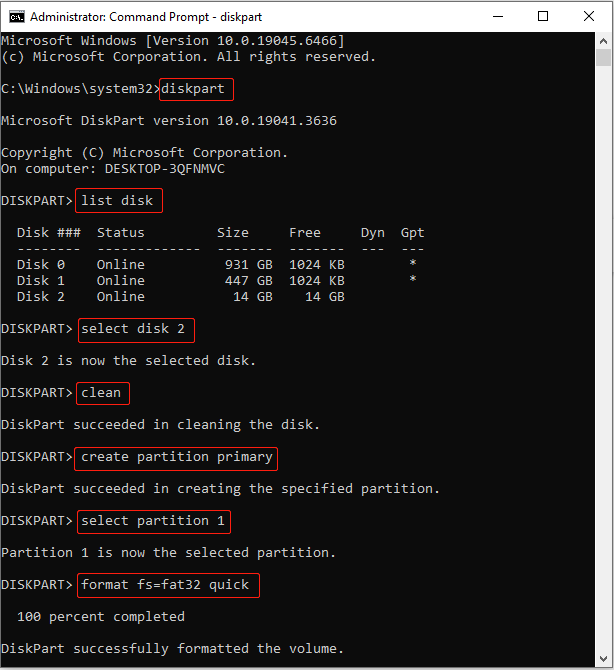
In some cases, after a partition is deleted, the USB drive may stop working or may not be properly recognized by the system. If you encounter this issue, try using the built-in Windows DiskPart tool to fix it.
DiskPart allows you to clean the disk completely and recreate partitions without file system errors or other logical issues. In many cases, this can make the USB drive usable again.
Step 1: Type cmd in the Windows search box, right-click Command Prompt, and choose Run as administrator.
Step 2: When prompted by the UAC window, click Yes to continue.
Step 3: Type diskpart in the prompt window and press Enter to launch this tool.
Step 4: Continue typing the following commands and press Enter after each one:
- list disk
- select disk # (replace # with your USB disk number)
- clean
- create partition primary
- select partition 1
- format fs=fat32 quick (fat32 can be replaced with ntfs or exfat)
- exit
After the USB drive is back to normal, check the common causes of partition loss and preventative measures.
Common Causes of Deleted USB Partition
USB partition loss or deletion is usually caused by human error, file system corruption, or hardware problems. The most common causes can be categorized as follows:
1. Human error
- Partitions may be accidentally deleted during disk management.
2. File system and partition table problems
- Power outages, unsafe ejections, or sudden shutdowns can corrupt file systems or even cause partition loss.
- A corrupted partition table (MBR/GPT) may make the partition invisible.
3. Virus infection
- Viruses may overwrite partition information, hide partitions, or delete volumes.
4. System and driver conflicts
- When multiple drives use the same signature, Windows may mark one of them as offline.
Best Practices to Prevent Partition Loss on a USB Drive
Rather than struggling to recover data afterward, it’s better to take preventative measures in advance. Mastering best practices can not only reduce the risk of partition loss but also ensure long-term data security.
- Safely remove. Before unplugging the USB drive, always use the Safely Remove Hardware option. This prevents partition table corruption caused by sudden power outages.
- Regularly check for errors. Run CHKDSK or the built-in error checking tool regularly. These tools can detect and repair minor file system errors, preventing problems from worsening.
- Update drivers. Keep your USB controller and card reader drivers up to date to prevent partition recognition issues.
- Prevent viruses. Use reliable antivirus software to block malware that may hide or delete partitions.
- Avoid physical damage. Store the USB drive in a safe, dry environment, away from heat sources and humidity.
- Regularly back up data. Back up important files to other devices or cloud storage. Even if the partition is lost, critical data will not be lost.
Conclusion
To recover deleted USB partition, here are two options:
- Recover files from the deleted partition using MiniTool Power Data Recovery, and then repartition the USB drive.
- Recover the deleted partition directly using MiniTool Partition Wizard.
If the USB drive fails to work after deleting a partition, use DiskPart to clean it.
Finally, developing good usage habits will fundamentally reduce the risk of partition loss.
When you encounter any questions about the MiniTool products, contact us at [email protected].
About The Author

Position: Columnist
Chelsea graduated from university with a major in English. She has a strong interest in English writing. It is this passion for writing that led her to become an English editor. Her articles mainly focus on data recovery and other computer industry news. As an energetic and outgoing girl, Chelsea enjoys listening to music, singing, riding bikes, and eating in her spare time.
User Comments :