Deleted files can usually be recovered if they haven’t been overwritten. You can restore them from the Recycle Bin, File History, or use data recovery software. This MiniTool guide also explains how to recover deleted files on Mac from Trash or Time Machine.
When a file is deleted, Windows or macOS usually does not erase the data immediately. Instead, the system only removes the file reference from the file system metadata.
The deleted files remain recoverable until new data overwrites them. How to recover deleted files?
Quick Answer:
| Problem | Windows Solution | Mac Solution |
| Files are deleted moments ago | Press Ctrl + Z to undo deletion | Undo deletion using Command + Z |
| Files are deleted from internal hard disks | Restore from the Recycle Bin | Restore from the Trash |
| Deleted files are not in the Recycle Bin/Trash | Use free data recovery software | Use Mac data recovery software |
| Files were backed up | Restore from File History | Restore using Time Machine |
Important Recovery Notes:
To improve recovery success, stop using the affected drive immediately and avoid the following actions:
- Storing new files to the target drive
- Installing data recovery software to the same disk
- Saving recovered files back to the original drive
“I’m reaching out to the community in hopes of finding a solution to recover files. I’ve accidentally permanently deleted some important files from my Windows 10 PC, and I’m desperately trying to recover them. Is there any way?”techcommunity.microsoft.com
In most cases, the files can be recovered by using the following methods.re.
How to Recover Deleted Files on Windows 10/11
In Windows, you can recover accidentally deleted files in several ways.
First, try using Ctrl + Z immediately after deletion because it can undo the last action. Next, check the Recycle Bin, as deleted files often remain there until emptied.
If these options do not work, you can use File History to restore files from previous backups if you have File History enabled. Alternatively, you can use MiniTool data recovery software to scan your drive for recoverable files.
Finally, Windows File Recovery can also help retrieve files, but it’s command-line only and hard to use.
Now, we will go through them one by one.
Method 1. Use Ctrl + Z
Ctrl + Z is a common keyboard shortcut that reverses the last action performed in many computer programs. It is extremely useful for correcting mistakes and reverting data to a previous state.
To evaluate this shortcut, I created a file on my Windows 10 desktop and then deleted it. Immediately afterward, I pressed Ctrl + Z, and the file was restored to the desktop as if nothing had happened.
I repeated the same process in library folders, external hard drives, and USB drives, and it worked in each case.
However, this method no longer works after multiple additional operations are performed or after the computer is restarted.
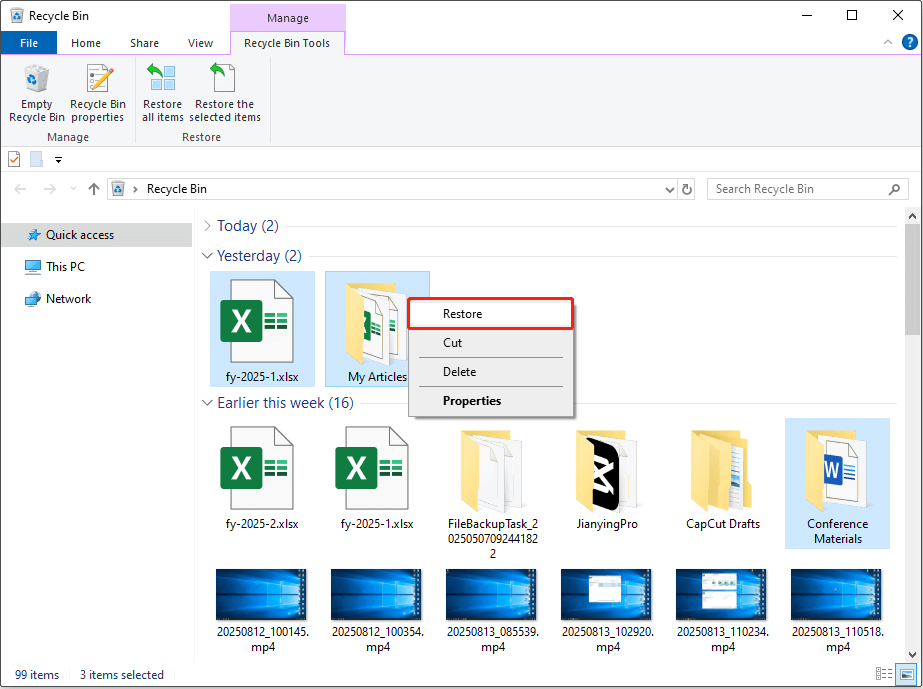
Method 2. Check the Recycle Bin
The Recycle Bin is a special folder that temporarily stores files you have deleted from internal hard drives. It allows you to recover accidentally deleted items before the Recycle Bin is emptied.
Here is how to restore files from the Recycle Bin:
Step 1. Open the Recycle Bin on your desktop.
Step 2. Look for the deleted files, select them and right-click them, and then click Restore.
This restores the deleted files to their original location. If you want to restore them to another location, simply drag and drop them.

Method 3. Use MiniTool Power Data Recovery
If your files are permanently deleted, use data recovery software. MiniTool Power Data Recovery is effective in various situations and can recover many types of files. To be specific, it has these features:
| Features | Details |
| Supported file types | Documents, pictures, videos, audio, emails, archives, etc. |
| Supported data loss situations | Accidental deletion, quick disk formatting, partition loss, file system corruption, etc. |
| Supported storage media | HDDs, SSDs, USB drives, SD cards, CDs/DVDs, etc. |
| Supported file systems | NTFS, FAT32, exFAT, etc. |
| Supported operating systems | Windows 11/10/8/8.1 |
| File preview available | Yes |
| Free data recovery limit | 1 GB |
MiniTool Power Data Recovery FreeClick to Download100%Clean & Safe
To evaluate its effectiveness, I deliberately created several data loss scenarios and measured the software’s performance.
My Test Environment:
- Device: Desktop PC
- OS: Windows 10 22H2
- Drive Type: Internal HDD (D:)
- File System: NTFS
- Partition Size: 65.5GB
- Free Space: 58.8GB
How I Created the Data Loss Scenario:
I intentionally deleted multiple file types (21 files in total) from the test partition. The test files included:
- 13 JPG photos
- 2 DOCX documents
- 3 MP4 videos
- 1 PPTX file
- 1 PDF file
- 1 PNG photo
After deleting the files, I emptied the Recycle Bin and restarted the computer.
The Recovery Steps:
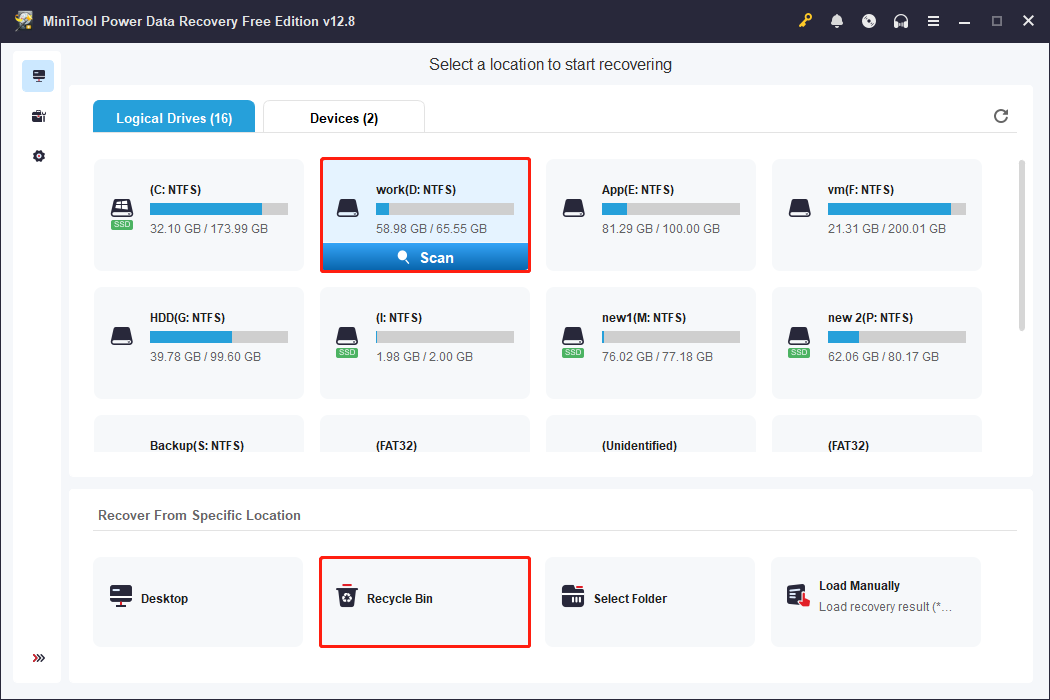
Step 1. Select the location to scan
On the main interface of MiniTool Power Data Recovery, I had three options for scanning files:
- Select the D: drive under Logical Drives
- Choose the entire HDD under Devices
- Scan the Recycle Bin separately under Recover From Specific Location
Since I knew where the files had originally been stored, I selected the D: drive for scanning. To compare scan efficiency and evaluate scan time, I also performed a separate scan of the Recycle Bin.
| Scan time | Files found | Test files found | |
| Scan the D: drive | 18 minutes | 186246 | 21 files |
| Scan the Recycle Bin | 1 minute | 321294 | 21 files |
Step 2. Find and preview files
After the scan was completed, the Path view displayed the files based on the original folder structure, while the Type view grouped files by format.
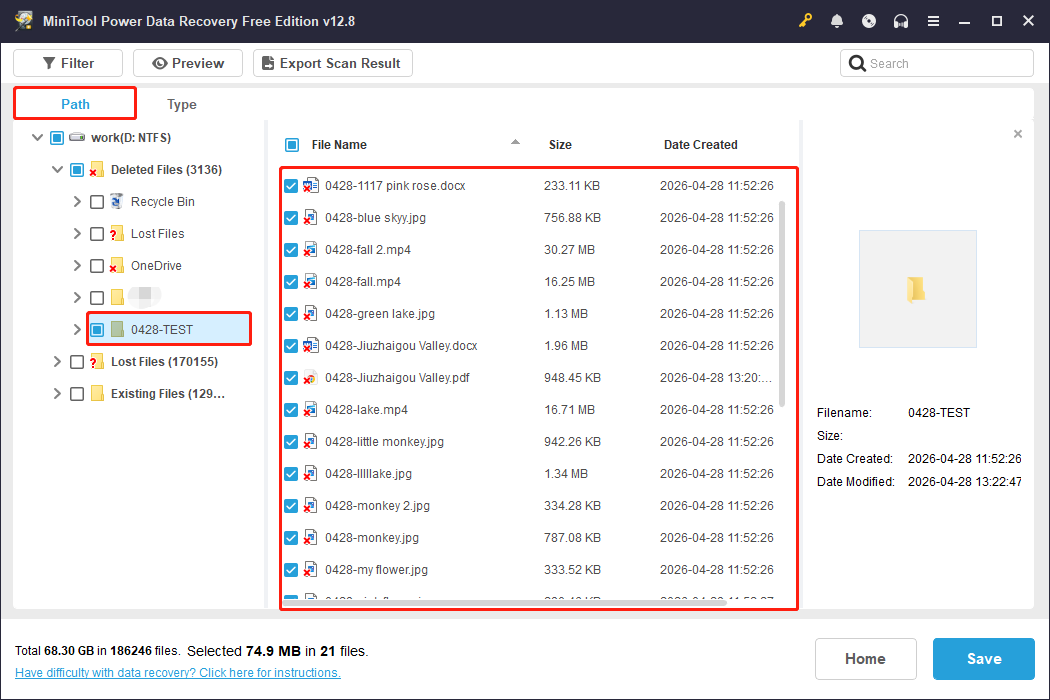
In addition, the Filter and Search features helped narrow the results. For example, I entered 0428 in the search box to locate all test files with the 0428 prefix.
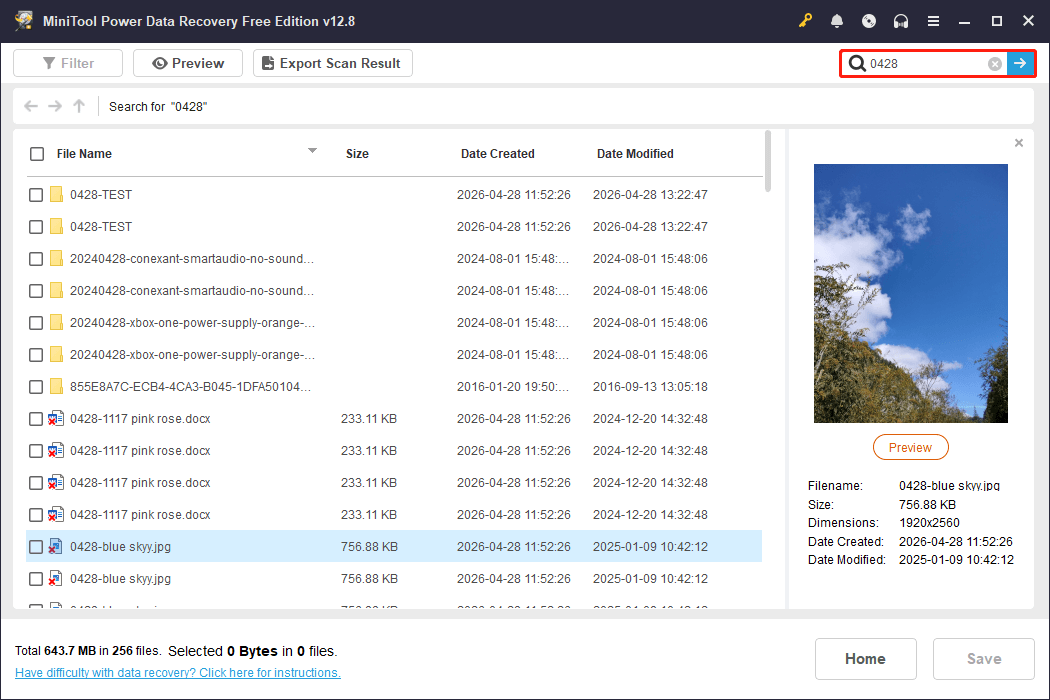
The Preview feature helped confirm file integrity. All test items were successfully previewed. However, if some files have been corrupted before recovery, they cannot be previewed.
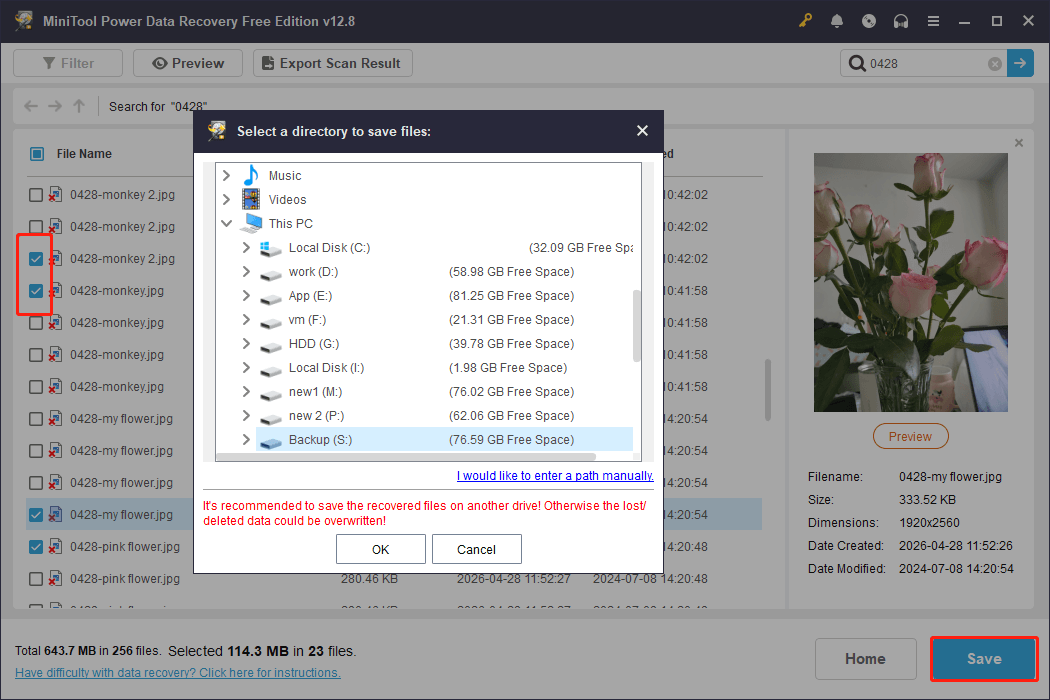
Step 3. Recover files
Finally, I selected all the test files and saved them to a different location. Avoid storing recovered files to the original drive, as this may cause data overwriting.
See, MiniTool Power Data Recovery works great for deleted file recovery on Windows. If you find it helpful, do not forget to share it with your friends on Twitter.
Method 4. Use File History
File History is a built-in feature on Windows that automatically backs up files from your libraries. When your files are deleted or corrupted, you can restore them from a previous version.
How to use File History to restore your files? Follow the instructions below:
Step 1. Navigate to the folder where the lost files were located. Then right-click that folder and choose Restore previous versions.
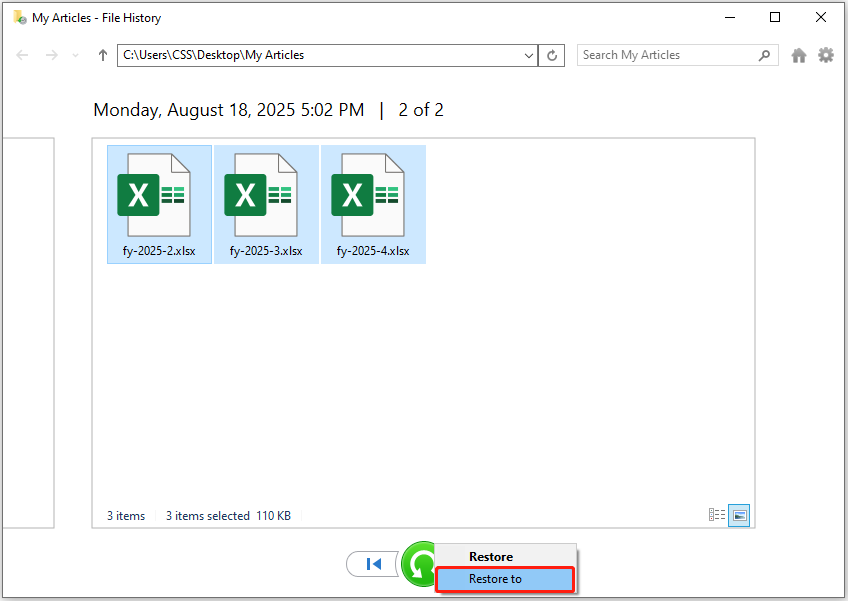
Step 2. In the pop-up window, you will see all the available previous versions of your files. Select one, expand Open, and click Open in File History to view it.
Step 3. Right-click the green button and choose Restore to. Then choose a location to store the recovered files.
If you did not enable File History before the files were deleted, File History won’t help. In this case, try using MiniTool Power Data Recovery, a reliable data recovery tool for Windows.
Method 5. Use Windows File Recovery
Quick Video Guide:
If you do not want to download third-party software, you can use Windows File Recovery to restore files.
It is a free command-line tool from Microsoft that is designed for Windows 11/10 users to recover deleted photos, videos, documents, etc. It uses the Winfr command along with recovery mode and file-related parameters to recover files.
To use it, go to the Microsoft Store to download it first. Then, follow the instructions below.
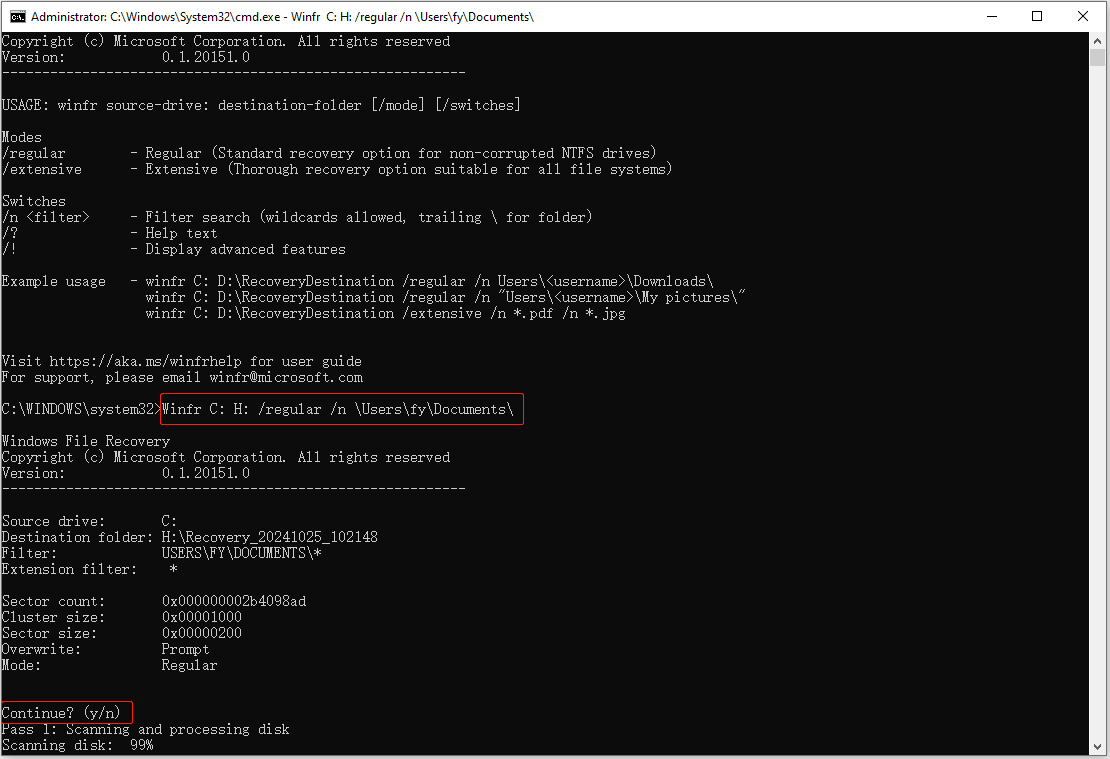
Launch Windows File Recovery and type the command in the following format:
winfr source-drive: destination-drive: [/mode] [/switches]
- source-drive: The drive you want to recover files from.
- destination-drive: The drive where recovered files will be saved.
- [/mode]: Specifies the recovery mode. The regular mode is the standard recovery option for non-corrupted NTFS drives. The extensive mode is a thorough option suitable for all file systems.
- [/switches]: Represents optional switches for more control, such as file name, file path, etc.
For example, to recover the Documents folder from the C drive to the H drive with the regular mode:
Winfr C: H: /regular /n \Users\<your username>\Documents\
When the Continue? (y/n) prompt appears, press Y on your keyboard to start.
For more examples, check this official guide: How to use Windows File Recovery.
This is all about how to recover deleted files on a PC.
How to Recover Deleted Files on Mac
If you are using a Mac, there are also several ways to recover deleted files. You can use Command + Z, check the Trash, restore from backup files, or use data recovery software. Keep reading for the details.
Method 1. Use Command + Z
The Command + Z shortcut quickly undoes accidental deletions or typing mistakes. If you haven’t done many other operations or restarted your computer, you may still be able to reverse the deletion.
So, if you find that important files were deleted by mistake, immediately go to their original location and press Command + Z to restore them.
If Command + Z cannot undo the deletion, try checking the Trash. It may still hold your files.
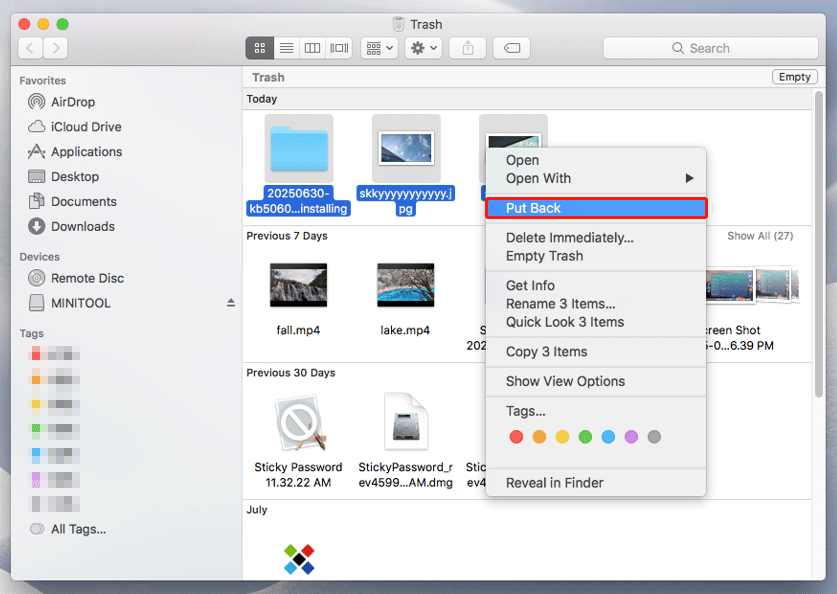
Method 2. Check Trash
The Trash temporarily stores deleted files before they are permanently removed. As long as the Trash has not been emptied, you can restore your files.
Open the Trash, find and select the files you want to recover, then right-click them and choose Put Back. The files will go to their original location.
Method 3. Use Time Machine
Time Machine is a built-in backup feature on Mac. If you made a Time Machine backup of your files, you can restore them now.
Here is how to restore your files with Time Machine:
Step 1. Navigate to the folder where your deleted files were originally located.
Step 2. Use Launchpad to open Time Machine.
Step 3. Use the timeline or arrows to browse through your backups and locate the desired backup.

Step 4. Select the files or folders you want and click Restore. Then they will return to their original location.
How to recover deleted files on Mac without Time Machine? Stellar Data Recovery for Mac can help.
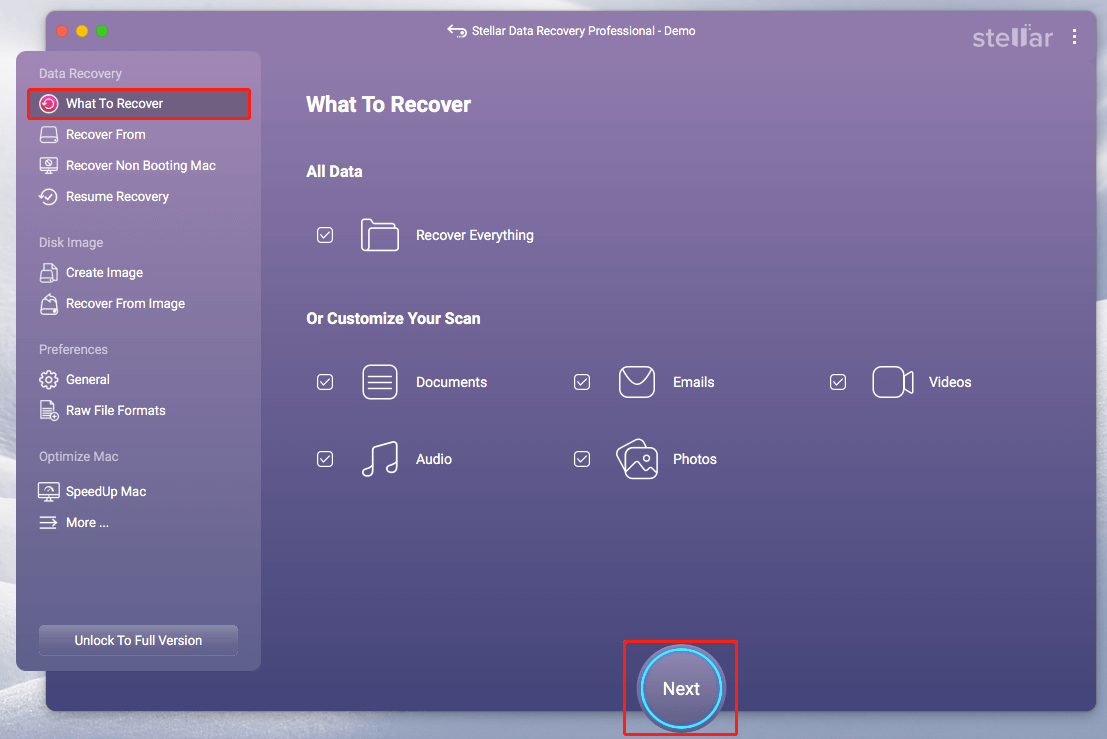
Method 4. Use Stellar Data Recovery for Mac
Stellar Data Recovery for Mac is a reliable file restore tool designed for Mac computers.
It supports recovery from Mac internal drives, external drives, USB drives, and SD cards. With its quick scan and deep scan modes, you can efficiently retrieve data lost due to accidental deletion, formatting, virus infection, and so on.
Supported file types include documents, photos, videos, audio, etc.
Now, download, install, and launch Stellar Data Recovery for Mac to scan your disk, preview files, and save them.
Data Recovery for MacClick to Download100%Clean & Safe
Step 1. On the What to Recover tab, keep the default setting to scan everything or choose specific file types you want to recover. Then, click Next to proceed.
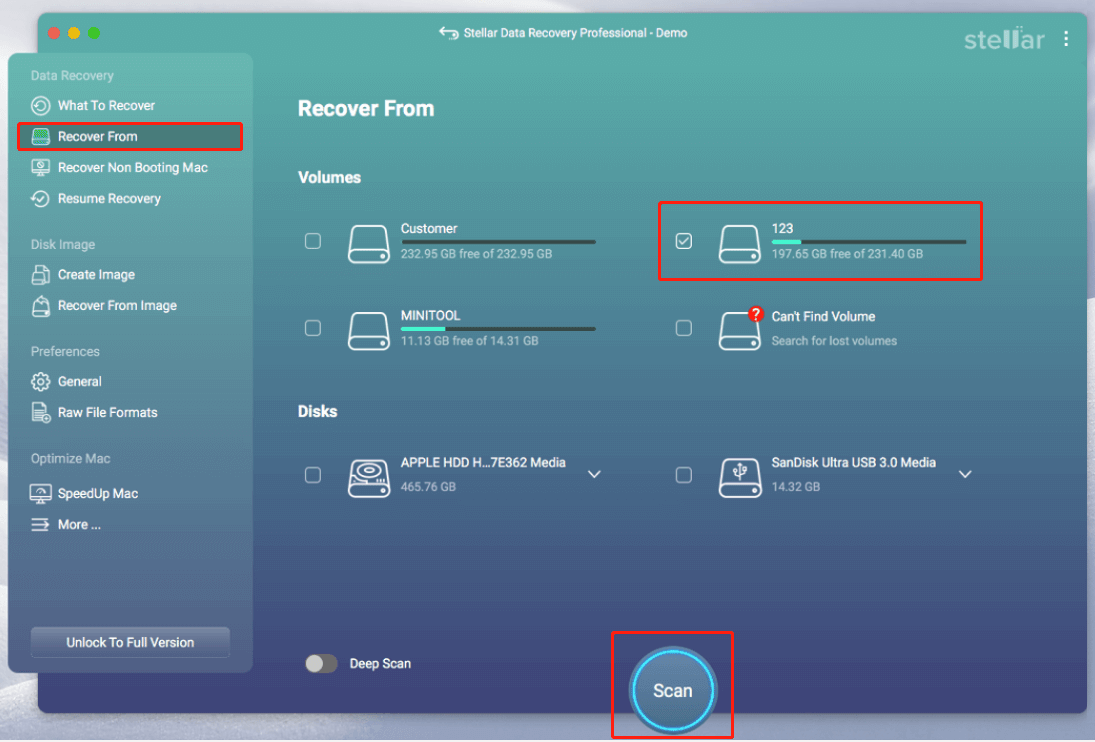
Step 2. In the Recover From tab, tick the volume you want to scan and click Scan.
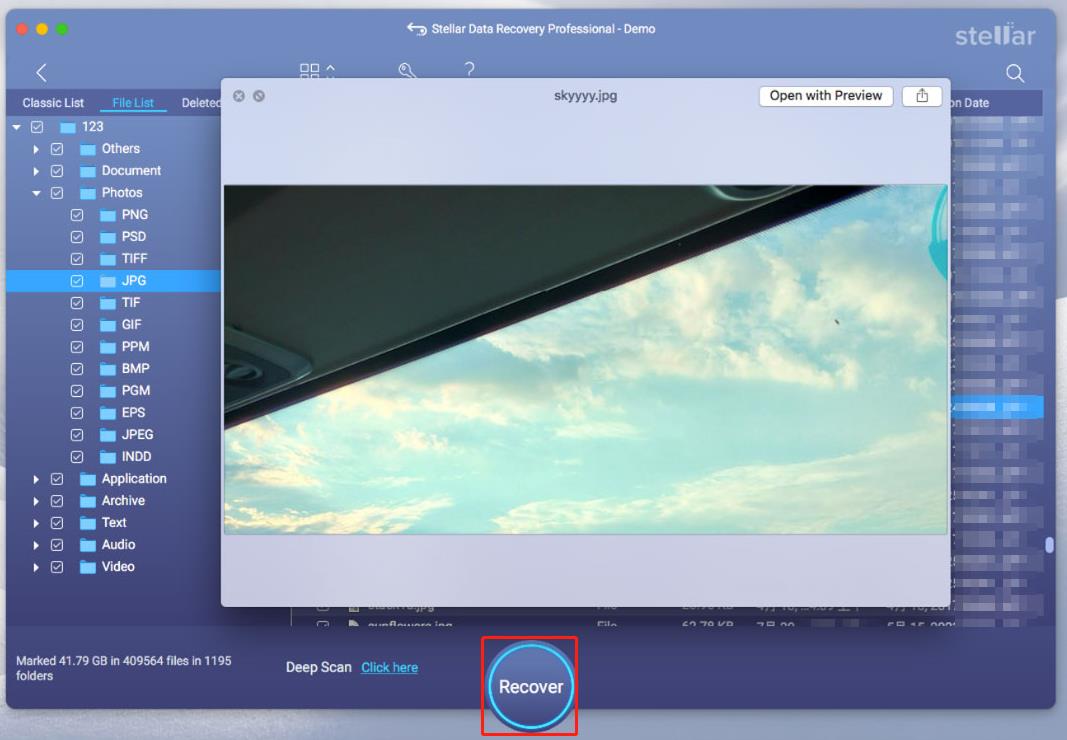
Step 3. After scanning, browse through the found files under Classic List or File List. Find the files you want to recover and double-click them to preview. Once confirmed, tick all required files and click Recover to save them.
Now that your files are restored, I’d like to share some tips with you to prevent data loss in the future.
Useful Tips to Prevent File Loss
Here are a few practical tips to help you avoid losing data:
- Be careful with file operations. Double-check before deleting files and avoid careless cutting or moving. Do not interrupt the file transfer process.
- Organize your files. A clear folder structure helps you locate files and reduces accidental deletion.
- Check your hardware. Monitor hard drive health with professional tools. This prevents data loss due to disk corruption.
- Keep your system updated. Install the latest updates to reduce the risk of system crashes.
- Enable antivirus. Keeping Windows Defender or other antivirus software turned on can protect your files from virus infection.
- Back up files. Enable File History or other built-in backup tools to make file copies automatically. Or, use reliable data backup software like MiniTool ShadowMaker to back up important files to an external drive.
MiniTool ShadowMaker TrialClick to Download100%Clean & Safe
Bottom Line
If you have not started recovering your files, start now. The earlier you begin, the higher the chance of a successful recovery. Whether you are using a Windows PC or a Mac, you can find solutions above to retrieve your files.
Once your files are back, store them properly and follow the precautionary tips above to prevent future data loss.
If you need any help using MiniTool’s products, please feel free to contact the support team at [email protected].
About The Author

Position: Columnist
Shirley holds a bachelor’s degree in English and has been an editor at the MiniTool Team for many years. She specializes in IT-related content, with a focus on data recovery, file backup, disk management, and other technical topics. She is committed to delivering clear, accurate, and practical solutions to help users resolve common computer issues.
User Comments :