In this post on MiniTool, you will learn how to back up your Surface Pro to an external hard drive or OneDrive on Windows 11/10. Choose the way you prefer among given 4 options to easily back up Microsoft Surface files for data protection.
About Microsoft Surface Backup
Microsoft Surface, designed and developed by Microsoft, is a series of touchscreen-based personal computers, tablets, and interactive whiteboards. Its family has several lines of devices, such as Surface Pro, Surface Go, Surface Laptop Go, Surface Book, Surface Studio, and so on. The majority of the Microsoft Surface lineup runs the Windows operating system, compatible with Windows 11 or Windows 10.
Like computers from other brands, you should realize the importance of data backup on Microsoft Surface. Once data gets lost suddenly, it will bring huge losses to you. Nowadays, virus attacks, mistaken operations, hard drive failure, update issues, sudden power outages, etc. may trigger data loss or system breakdown.
In case you ever chose to back up Microsoft Surface beforehand as a prevention tip, you won’t fret when computer accidents happen. What’s more, you may need to create a Microsoft Surface backup in another case, for example, preparing Surface for service.
So, how can you back up your Surface on Windows 11/10? Several options can be found here and let’s delve into them one by one.
#1. Back up Microsoft Surface with MiniTool ShadowMaker
When it comes to “how to back up Surface Pro to external hard drive”, one of the best ways to secure your Microsoft Surface is relying on a third-party backup tool. And we highly recommend MiniTool ShadowMaker, the best backup software for Windows 11, Windows 10, Windows 8.1 & 8, and Windows 7.
It not only helps back up files on a Surface but also enables you to easily create a system image so as to perform data recovery & system recovery in the event of file loss & system failure. There are some highlighted features:
- Multiple backup sources: MiniTool ShadowMaker facilitates file backup, folder backup, system backup, partition backup, and disk backup.
- Automatic backup: You can schedule a plan to perform automatic backups, for instance, daily, weekly, monthly, or on an event.
- Three backup types: This backup utility supports full backup, incremental backup, and differential backup, allowing you to choose one as per your needs. To only back up newly changed data, make incremental or differential backups.
- Several backup destinations: You can back up Microsoft Surface to different locations, such as an external hard drive, USB flash drive, NAS, HDD, SSD, etc.
- System compatibility: MiniTool ShadowMaker can work well on Windows 11/10/8.1/8/7 and Windows Server 2022/2019/2016 and more.
Importantly, MiniTool ShadowMaker won’t be limited to the device brands, that is, it can help you back up your Windows computer from any manufacturer, for instance, Toshiba, HP, Dell, Lenovo, Microsoft Surface Pro & other models. Without hesitation, now download this software and follow the steps below to back up Microsoft Surface.
MiniTool ShadowMaker TrialClick to Download100%Clean & Safe
Step 1: Install MiniTool ShadowMaker Trial Edition using the downloaded setup.exe file. Then, connect a USB drive or external hard drive to your Surface and launch the tool which allows a 30-day free trial.
Step 2: After hitting Keep Trial to enter the main interface, head to the Backup page on the left side. You will spot this backup software backs up the Windows system by default. To create a system image on Windows 11/10, skip to the final step to begin the backup process.
To back up Surface files, hit on the SOURCE section, click Folders and Files, check and select the items you want to back up, and hit OK to return to Backup.
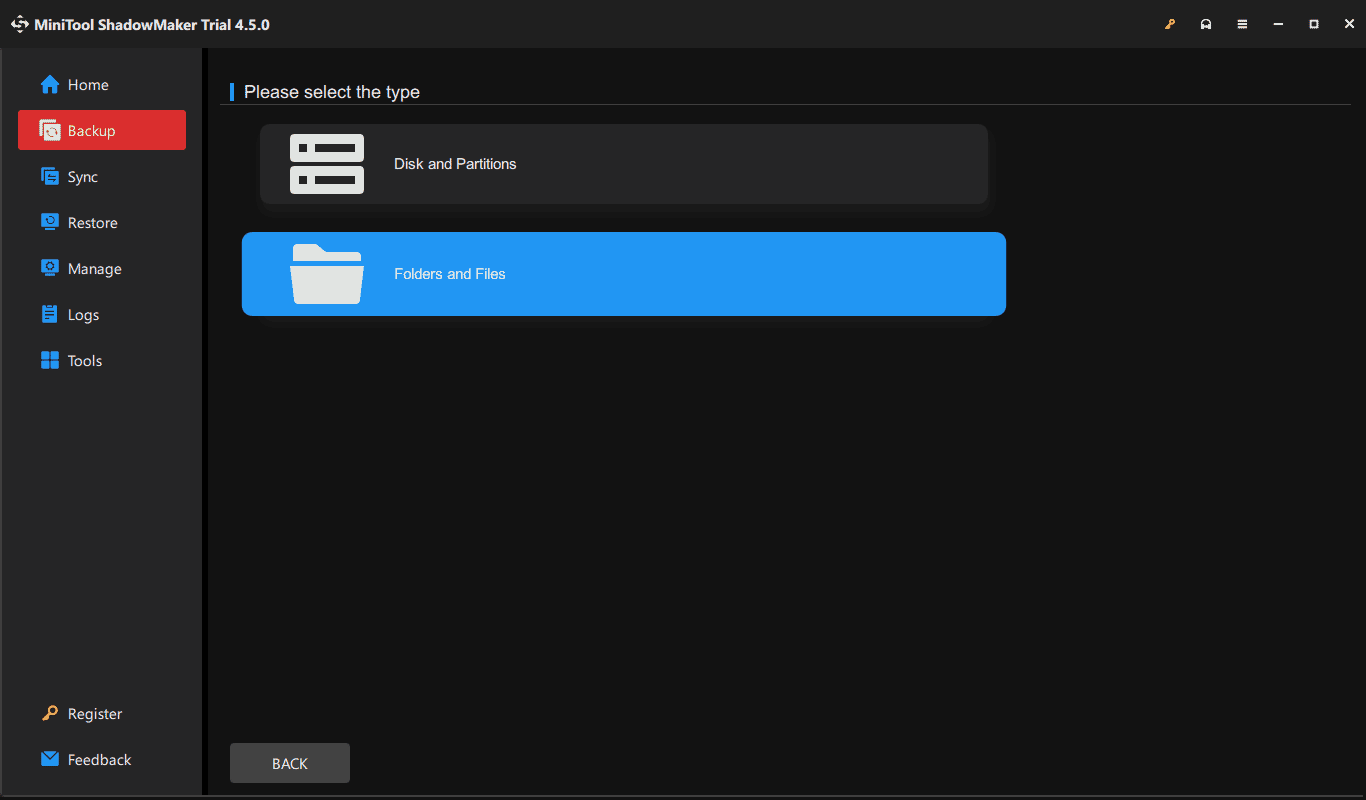
Step 3: Hit DESTINATION to locate your connected USB or external drive and then choose it.
Step 4: At last, begin the backup process by tapping on Back Up Now.
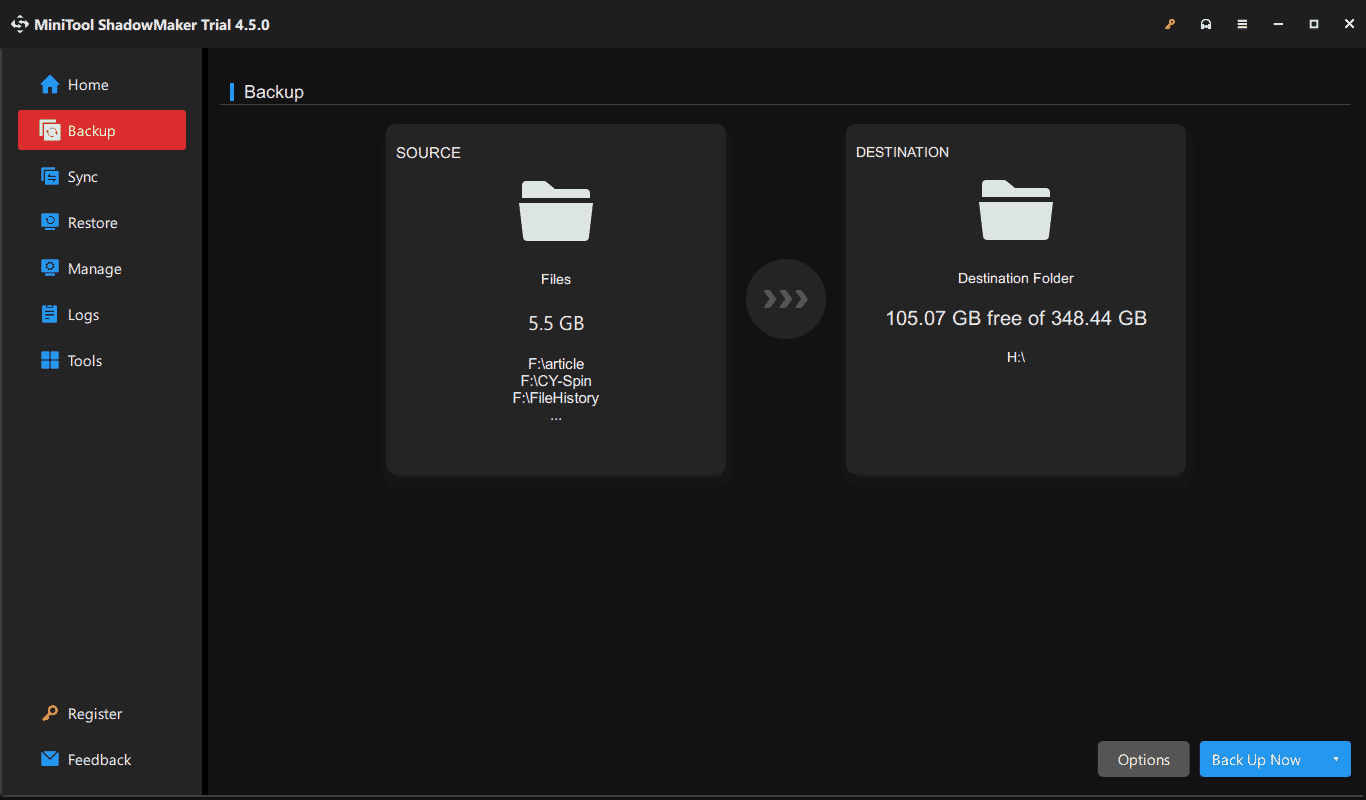
Once a full backup is done, remember to go to Tools > Media Builder, connect a USB drive, and create a bootable drive for a quick recovery in case the Surface fails to boot.
Optional advanced settings:
Before executing a full backup, MiniTool ShadowMaker offers some options for you to make advanced settings for Microsoft Surface backup.
- To regularly back up your device, hit Options > Schedule Settings, turn on this feature, and schedule a plan as per your needs.
- To make incremental or differential backups meanwhile, delete old backup versions, go to Options > Backup Scheme, enable it, and set a scheme.
- To change a compression level, set an image creation mode, allow the software to send an email notification, etc., head to Options > Backup Options.
#2. Backup Surface Files via File History
Windows 11/10 has a built-in file backup tool called File History that automatically backs up folders in the Library by default, such as Desktop, Documents, Downloads, Pictures, Videos, and so on. In Windows 10, you are allowed to add folders from other locations for backup. Speaking of “how to back up Surface Pro to external hard drive”, consider running File History.
Take Windows 10 as an example:
Step 1: Connect an external hard drive to Microsoft Surface.
Step 2: Type File History and click Backup settings.
Step 3: Hit Add a drive and choose your external drive, then ensure you enable Automatically back up my files.
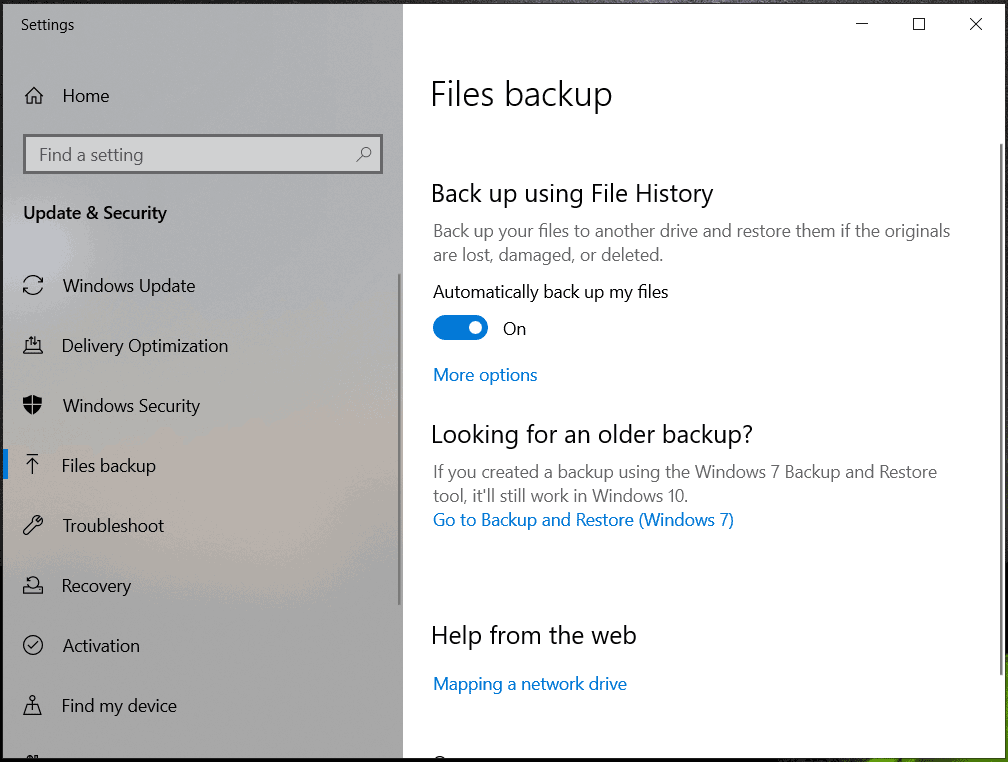
When clicking More options, it is available to decide how often you back up Surface files and how long you keep backups, add a folder, and execute a folder as per your situation.
#3. Create a System Image for Surface
If you would like to back up the Microsoft Surface system, another built-in backup tool in Windows 11/10, Backup and Restore (Windows 7) makes this task easy for you. It enables you to create a system image on an external hard drive, a network location, or a DVD.
Here is how to do it:
Step 1: Open Control Panel via the Windows Search box.
Step 2: View all the items by Large icons and hit Backup and Restore (Windows 7).
Step 3: Tap on Create a system image from the left side.
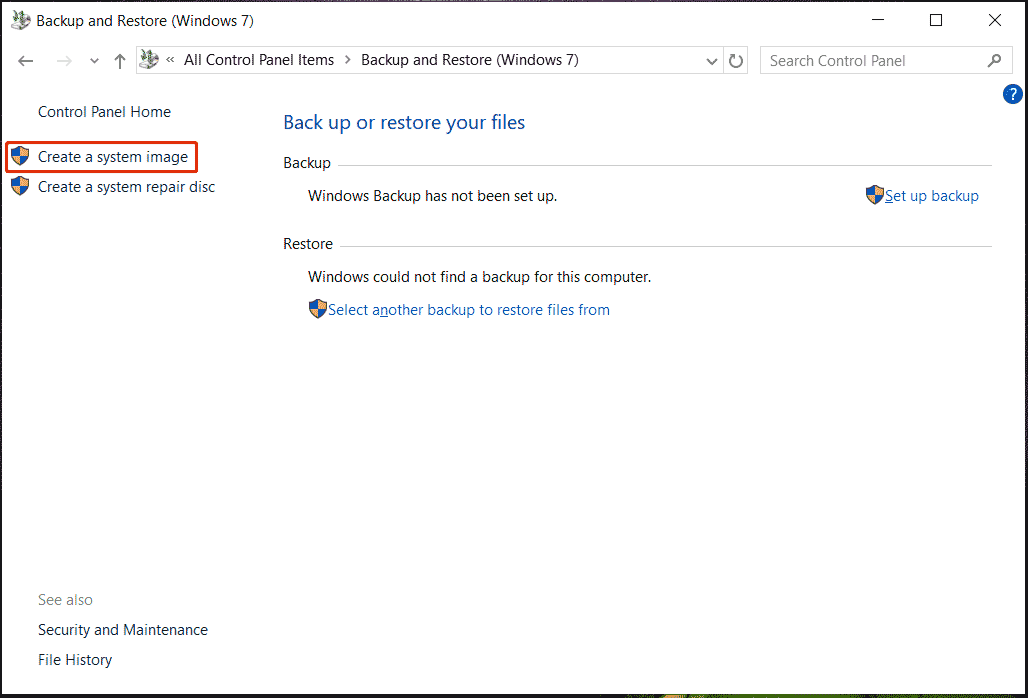
Step 4: Connect an external hard drive to your Surface and choose it to continue.
Step 5: You will spot drives required for Windows to run are selected by default and confirm backup settings, then click Start backup.
#4. Backup Surface to OneDrive
Apart from backing up Microsoft Surface to an external hard drive, you can consider backing up your device to the cloud such as OneDrive to offer double safety. This also accords with the best backup strategy – 3-2-1 backup rule. By backing up data to OneDrive, you can access files & folders anytime and anywhere, without being limited by devices.
How can you back up Microsoft Surface to OneDrive? Two available ways are worth a shot.
Via a Browser
OneDrive has a web version that allows syncing files and folders to the cloud for backup. To do so:
Step 1: Open your browser and access the OneDrive website.
Step 2: Hit Sign in to finish login with your Microsoft account.
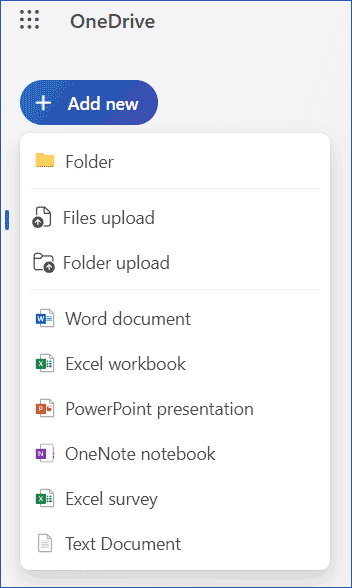
Step 3: Tap on Add new in the upper left corner, click Files upload or Folder upload, and choose the items on your Surface that you want to upload.
Via OneDrive Desktop App
Check your Microsoft Surface to see if it comes with the OneDrive app. If not, manually download this desktop app and install it on the device for Microsoft Surface backup.
Step 1: Download OneDrive using this link. Then, launch this app and sign in with your Microsoft account.
Step 2: Go to the system tray, click on the OneDrive icon, hit the gear icon, and choose Settings.
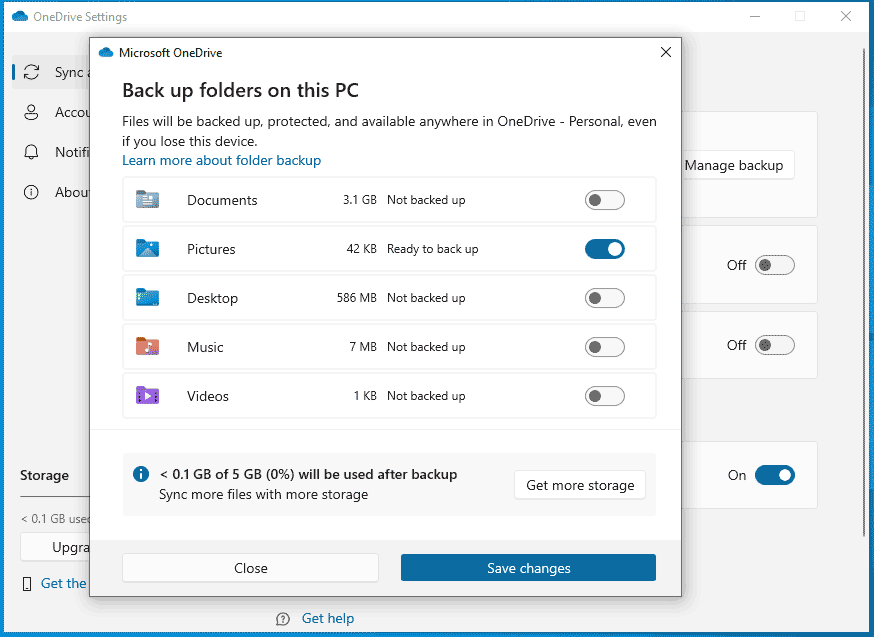
Step 3: To decide which folders you want to back up, head to the Sync and backup tab under the OneDrive Settings page, and tap Manage backup.
Step 4: Switch the toggle of the items you wish to back up to the on status, such as Documents, Pictures, Desktop, Music, and Videos. Next, tap Save changes.
Which Way Best Works for You
Let’s have a general idea of these four ways, as shown in a table:
| MiniTool ShadowMaker | File History | Backup and Restore | OneDrive | |
| Features | Supports several backup sources, targets, backup types, etc. | Only backs up folders in the Library by default | Creates a system image and backs up folders | Syncs files & folders to the cloud |
| Supported systems | Windows 11/10/8/7 & Server 2022/2019/2016 | Windows 11 and 10 | Windows 11/10/8/7 | Any devices |
To sum up, MiniTool ShadowMaker has richer features to satisfy your needs, such as backing up data & system to an external drive, USB drive, SSD, and HDD, creating automatic, incremental, and differential backups, cloning a disk, etc. Of course, don’t neglect other methods, and choose one as per your situation.
MiniTool ShadowMaker TrialClick to Download100%Clean & Safe
Wrapping Things Up
How to back up Surface Pro to external hard drive? In regard to this question, now you have an answer. Run MiniTool ShadowMaker, File History, or Backup and Restore (Windows 7) and follow the given instructions to back up Surface files or make a backup for the operating system. Furthermore, for extra safety, we recommend you to backup Surface to OneDrive by taking some steps above.
Any suggestions or questions regarding MiniTool software are appreciated. Do this by sending an email to [email protected]. Thanks much.

User Comments :