What Is ACPI BIOS Error Windows 11/10
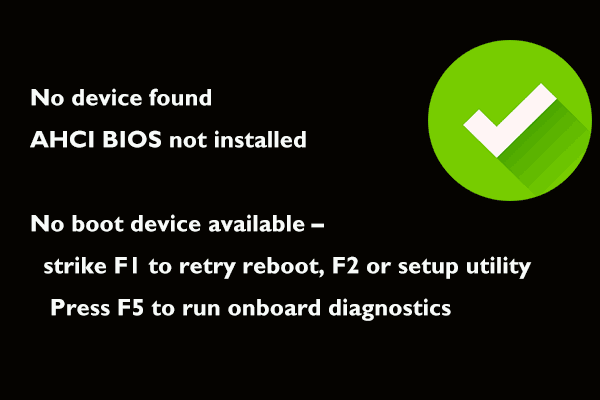
In computing, the Blue Screen of Death (BSOD) often happens on Windows 11 and 10, preventing the system from booting up properly. Many users in forums like Reddit and Microsoft reported ACPI BIOS Error among various blue screen errors. Perhaps you are affected by the same error.
Usually, it appears in multiple cases:
- When starting up the computer.
- When installing Windows 10 or other systems.
- When resuming the machine after a period of hibernation.
ACPI BIOS Error can occur on any Windows device, although it is more commonly reported on systems from manufacturers such as HP, Dell, and ASUS.
What Is ACPI
ACPI, short for Advanced Configuration and Power Interface, is an industry standard that the operating systems can use to manage the power and configuration of computer hardware. ACPI plays an important role in orchestrating the communication between the system and hardware components. To know details about it, refer to our library on what is ACPI.
Causes of ACPI BIOS Error
Windows 11/10 ACPI BIOS Error indicates a problem with ACPI in the system BIOS. This error is a common BIOS error message that appears due to various reasons, as shown:
- Outdated or corrupt system drivers
- A change during hibernation
- Issues with RAM modules
- An outdated or incompatible BIOS version
- BIOS configuration issues
- Hardware issues
Retrieve Files Before Proceeding
Before introducing how to fix ACPI BIOS Error, first, let’s focus on the data backup. This is because some of the following fixes, such as BIOS updates or Windows reinstallation, may result in data loss. So, you had better make a backup of your important files or folders in advance. Moreover, for safety, it is necessary to back up data in the event of blue screen errors.
How to retrieve your vital data before fixing the BIOS error? MiniTool ShadowMaker comes in handy.
As the best backup software, this utility brings many a wide range of powerful features, including various supported types (file backup, folder backup, system backup, disk backup and partition backup), 3 common backup types (full, incremental, and differential backup), broad compatibility with various operating systems (Windows 11/10/8/7 and Server 2022/2019/2016), etc.
Aside from the backup method, MiniTool ShadowMaker allows cloning HDD to SSD, migrating Windows to another drive, and more with ease.
Importantly, although your Windows fails to boot to the desktop, you can run this backup program to perform the data backup. You only need to create a bootable drive, boot the system from that drive and perform the data backup.
Download and give it a try!
MiniTool ShadowMaker TrialClick to Download100%Clean & Safe
Step 1: Connect a USB flash drive to a working PC and launch MiniTool ShadowMaker. Then, register this software.
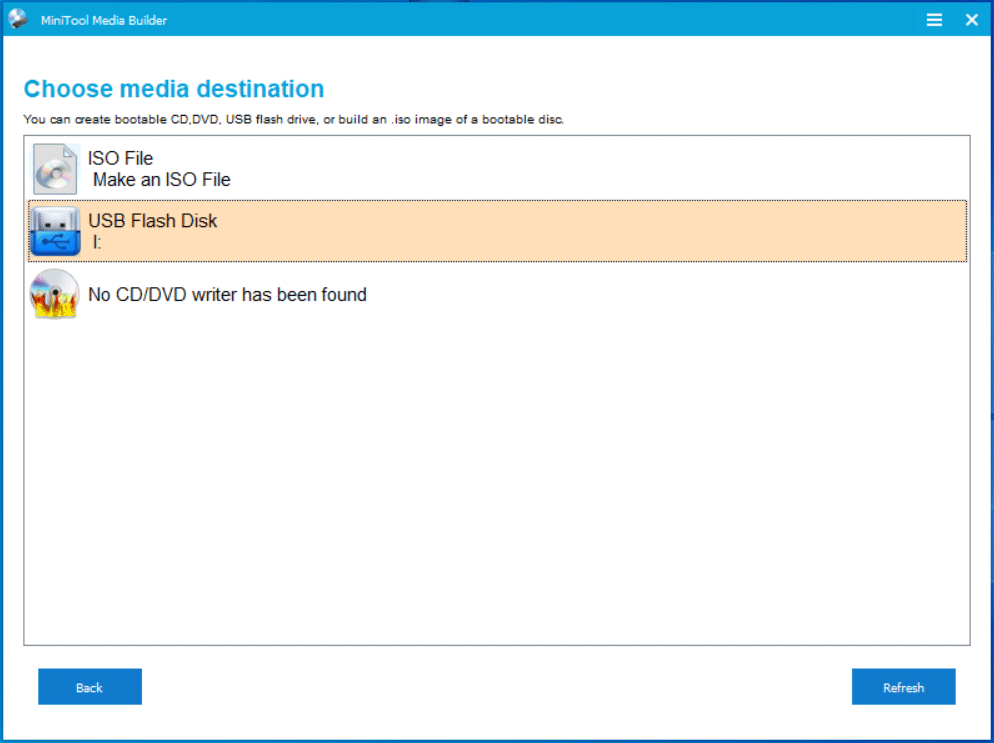
Step 2: Head to Tools and click Media Builder.
Step 3: Create a bootable USB drive by following the prompts.
Step 4: Unplug the USB drive, connect it to the PC with ACPI BIOS Error, boot the system to the BIOS menu, and set that drive as the first boot order.
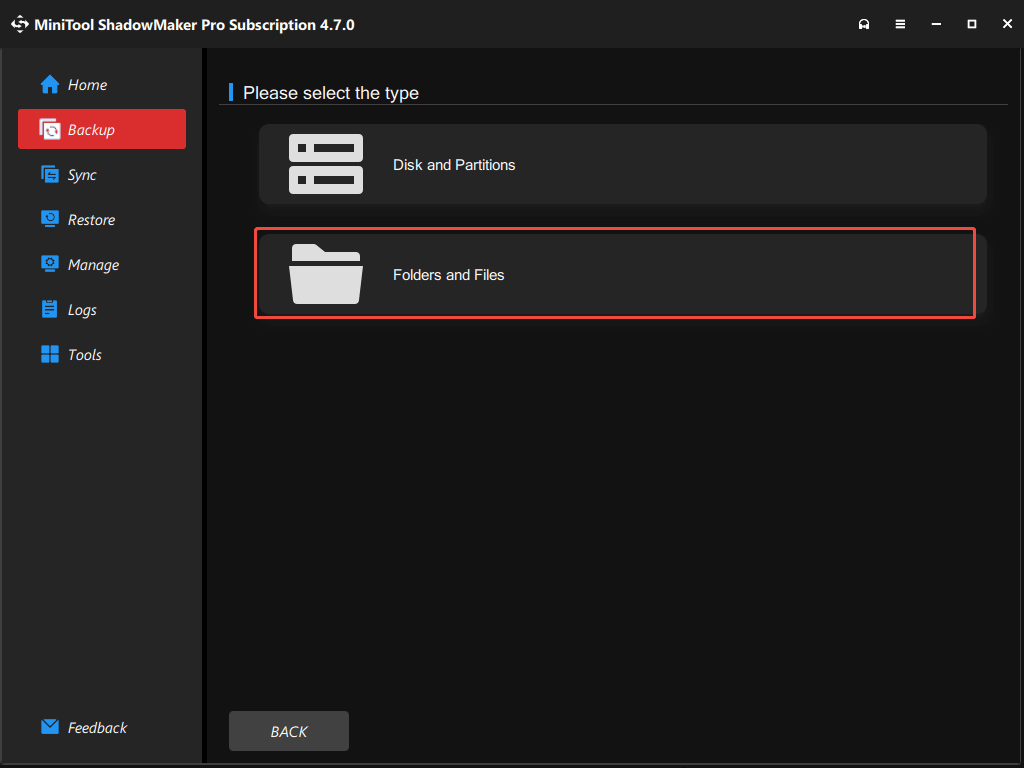
Step 5: Launch MiniTool ShadowMaker and go to its Backup page.
Step 6: Hit SOURCE > Folders and Files, open a drive to locate the files or folders you wish to back up, tick them, and click OK.
Step 7: Click DESTINATION to choose a location to save the backup.
Step 8: Begin the backup by tapping Back Up Now.

Now your data is secure. It’s time to solve the ACPI BIOS Error blue screen issue.
How to Fix ACPI BIOS Error Windows 11/10
Remove External Devices
Some users have reported that removing all peripherals from your computer, especially the Bluetooth devices, does the trick. This way has helped many users out. So, have a try if you are stuck in this same blue screen loop. These external devices include your Bluetooth headphones, USB drives, speakers, memory cards, etc.
Check the Hardware Connection
In some cases, hardware conflicts may result in ACPI BIOS Error. For example, if the connected devices are not compatible or hardware components go wrong, this can happen.
To troubleshoot your issue, make sure all the computer parts are properly or correctly connected to your computer. Besides, if you have recently installed new hardware, consider removing it and checking if the error persists. If not, the culprit is the new hardware.
If you’re not confident performing these checks, it’s recommended to contact the manufacturer’s support team for assistance.
Update BIOS
An outdated BIOS version may be incompatible with the ACPI settings required by your operating system, leading to the ACPI blue screen error. So, make sure your PC BIOS is up-to-date.
MiniTool ShadowMaker TrialClick to Download100%Clean & Safe
How to update the BIOS? Take the steps.
Step 1: On a working PC, visit your manufacturer’s website, enter the computer model, and enter the Software and Drivers section or a similar one.

Step 2: Download the latest BIOS version and save the file to a USB flash drive.
Step 3: Restart the PC to BIOS, go to the BIOS flashing utility or a similar tab.
Step 4: Select the BIOS file and proceed with the update.
For different PCs, the BIOS update steps vary. Some vendors offer a professional tool to update the BIOS. If you use an HP PC, follow the guide on HP BIOS update. If you meet ACPI BIOS Error Dell, see the tutorial on how to update BIOS on the Dell computer.
Disable AHCI Mode
AHCI, known as Advanced Host Controller Interface, refers to a standard interface that enables software to communicate with SATA devices such as hard drives and SSDs. Sometimes, disabling the AHCI mode in BIOS can address ACPI BIOS Error.
Here is how to do that:
Step 1: Press Del, F2, or another boot key to enter the BIOS menu during a restart.
Step 2: Go to the Advanced section, locate the SATA Mode item, and disable it.
Step 3: Save the change and exit the BIOS menu to apply it.
Set ACPI Mode to S1
The BSOD ACPI BIOS Error can happen when waking up from sleep mode. By setting the ACPI Mode to S1, you can enable the system to use a specific low-power sleep state, helping fix compatibility issues and specific BIOS issues where the PC may not be fully ACPI compliant.
To configure ACPI:
Step 1: Enter the BIOS setup.
Step 2: Find and choose Power Management or Advanced Power Management. The exact location differs between computers.
Step 3: Locate ACPI Suspend Type or a similar one and set it to S1.
Step 4: Save the change and exit BIOS.
Reset BIOS Settings
Incorrect BIOS settings may be another reason for ACPI BIOS Error. To address this BSOD issue, try to reset the BIOS settings to the default values.
Step 1: In BIOS, go to an option like Load Setup Defaults, Load Default Options, Restore Defaults, or Load Optimal Defaults.
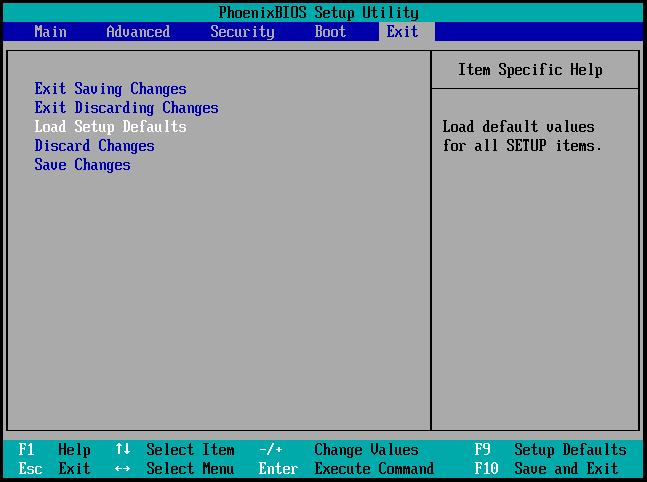
Step 2: Press Enter to begin the process.
Step 3: Press F10 to save and exit BIOS. The PC will boot without meeting the ACPI blue screen error loop.
Update Drivers
Device drivers are responsible for the communication between the PC hardware and the operating system. Once they get outdated or damaged, the ACPI blue screen error may occur on your PC. Update them now.
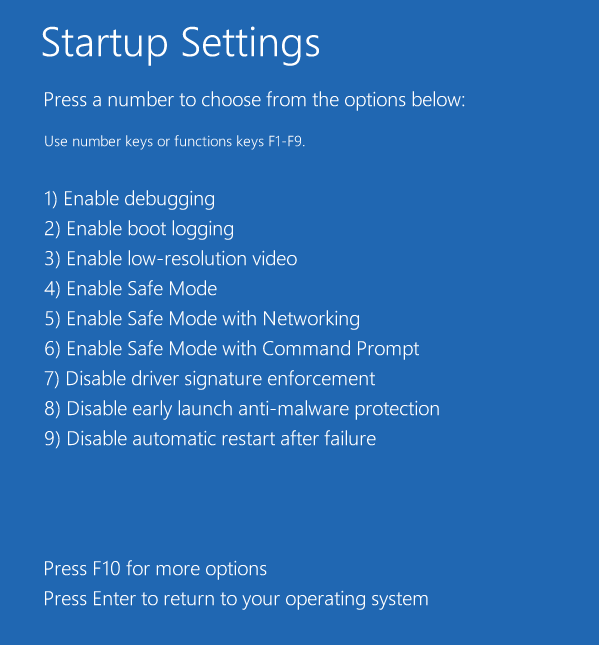
Step 1: Since your PC gets stuck in the ACPI BIOS Error loop, first, you need to boot the PC to its Safe Mode.
1. To do this thing, restart Windows 11/10 and press the Power button to interrupt the boot process when the Windows logo appears. Repeat this several times (usually 3) until the PC enters the Automatic Repair interface.
2. Navigate to Advanced options to open Windows Recovery Environment (WinRE).
3. Go to Troubleshoot > Advanced Options > Startup Settings > Restart.
4. Press F5 to enable Safe Mode with Networking.
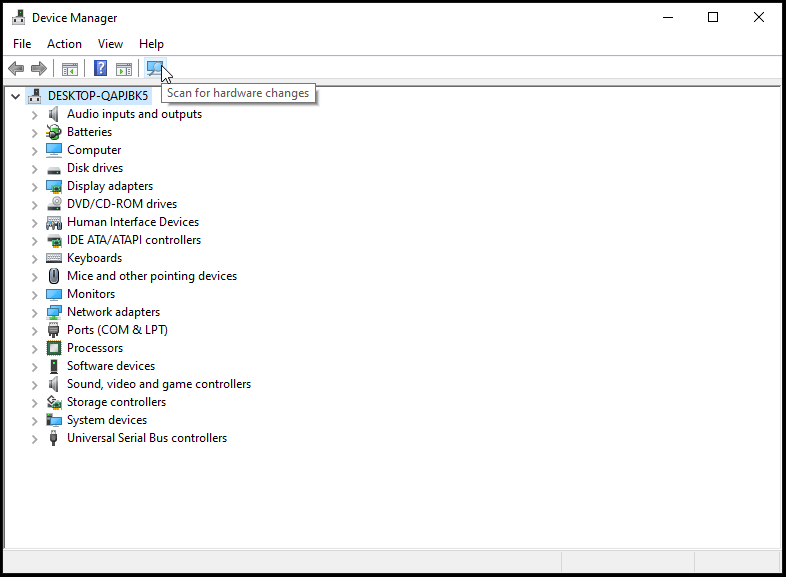
Step 2: Open Device Manager by pressing Win + X in Safe Mode.
Step 3: Right-click on the device drivers one by one and select Update driver.
Step 4: Hit Search automatically for drivers and start the driver update.
Uninstall Microsoft ACPI-Compliant Driver
Some users have reported uninstalling the Microsoft ACPI-Compliant driver can solve Windows 11/10 ACPI BIOS Error. To get rid of the BSOD loop, do this in Safe Mode.
Step 1: In Device Manager, expand Batteries.
Step 2: Locate Microsoft ACPI-Compliant Control Method Battery, right-click on it, and choose Uninstall device.
Step 3: Hit the Scan for hardware changes option.
Step 4: Restart the computer after completing the scan.
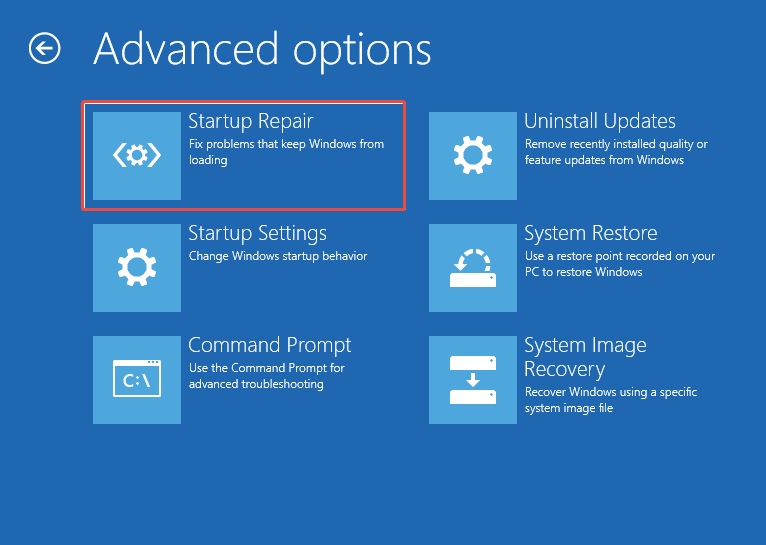
Startup Repair
Windows 11 or 10 offers an option called Startup Repair to fix problems that keep Windows from loading. In case of ACPI BIOS Error, try this tool and see if it works.
Step 1: Access WinRE (as stated in Update Drivers).
Step 2: Head to Troubleshoot > Advanced Options > Startup Repair.
Step 3: Perform the repair process.
Address Memory Issues
Dell/HP/ASUS ACPI BIOS Error may stem from memory issues. Take these steps below:
Reseat RAM Modules: If the RAM modules are not installed properly, you may encounter the issue. Go to power off the PC, unplug all the cables, open the computer case, remove and reinsert the RAM modules properly.
Test RAM Modules: If your PC has multiple RAM sticks, boot the PC with one stick at a time to check if a particular one is faulty.
Replace RAM: If you find that a specific RAM stick goes wrong, replace it with a new one.
Reinstall Windows
In case all the solutions cannot work, consider a clean installation of Windows 11/10. Make sure you have backed up important data before proceeding. Do this with MiniTool ShadowMaker, free backup software. Follow the instructions as the Retrieve Files Before Proceeding section says.
MiniTool ShadowMaker TrialClick to Download100%Clean & Safe
Then, take these steps to clean install the system.
Step 1: Download Media Creation Tool from Microsoft and use it to create a bootable USB drive.
Step 2: Boot the machine using the USB drive.
Step 3: In the Setup interface, set your preferences and click Install now.

Step 4: Follow the prompts to complete the system installation.

Bottom Line
ACPI BIOS Error is common and can occur on your Windows 11/10 PC at any time, but there’s no need to be alarmed. In this comprehensive guide, you have learned what this error is, the possible causes, and how to fix it without much effort. To keep your data safe, we recommend backing up important files before performing the troubleshooting.
Hope this post helps a lot, and you never encounter the BIOS error again.
About The Author

Position: Columnist
Vera has been working at the MiniTool Team for over 10 years as a technical editor and content writer. She mainly focuses on disk and partition management, data recovery, Windows backup and restore, and PC troubleshooting. Through in-depth software testing and hands-on experience, she has helped users solve a wide range of computer problems and better protect their data on Windows devices.
User Comments :