This article talked about on MiniTool official web page mainly elaborates on the blue screen of death (BSOD) error with the ntkrnlmp.exe file. It explains its meaning and provides multiple solutions to the issue. Just continue reading for more details.
What Is Ntkrnlmp.exe?
Ntkrnlmp.exe (NT Kernel Multi-Processor) is an executable file related to Windows operating system (OS). When the system starts operating on your computer, the programs that contain ntkrnlmp file will be executed and loaded into memory and run there as an NT Kernel & system process.
About Ntkrnlmp.exe BSOD Windows 11
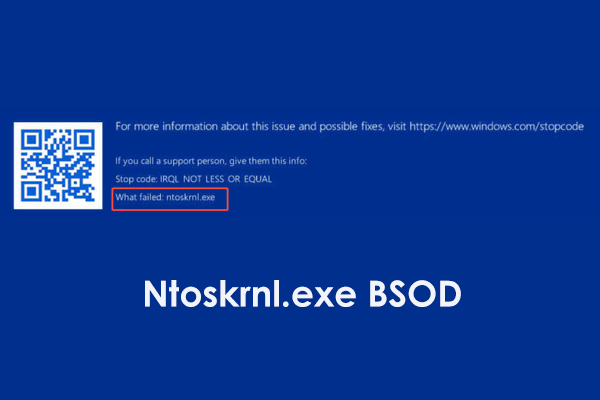
Ntkrnlmp exe BSOD refers to the blue screen of death involves in ntkrnlmp-exe file. Such kind of error is probably caused by ntkrnlmp.exe. For the reasons, graphics card driver corruption is the most common one. Besides, malware or viruses may also be the causes.
Usually, the ntkrnlmp.exe BSOD error is seen in Windows 11/10. Also, some users have encountered it in Windows 8 and Windows 7. Next, let’s see how to solve this problem.
In general, there are many methods to deal with ntkrnlmp BSOD issue. Yet, for different situations, the solution is unlike. It is recommended that you try the following ways one by one until finding the method that suits you.
#1 Run System File Checker (SFC)
The ntkrnlmp.exe crash is probably caused by corrupted system files. To check for that, just perform the following steps.
- Open PowerShell or command prompt (CMD).
- Type dism /online /cleanup-image /restorehealth and press Enter.
- Key in sfc /scannow and press Enter.

The above commands will search for corrupted system files and fix them up.
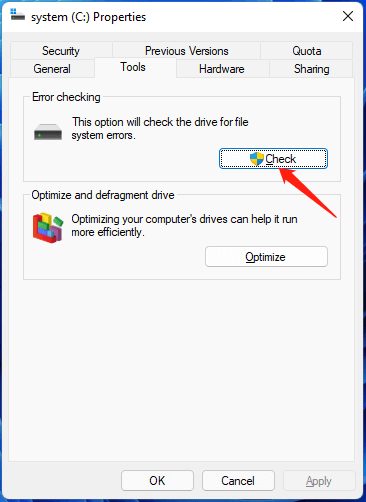
Or, just rely on the check disk feature of Windows. Right-click on the target disk in Windows File Explorer and select Properties > Tools. Then, click on the Check button.
#2 Fix Disk Bad Sectors
Ntkrnlmp.exe BSOD Windows 11 error may also result from bad sectors on your hard disk drive. To figure it out, you can take advantage of the Disk Surface Test utility in MiniTool Partition Wizard.
MiniTool Partition Wizard DemoClick to Download100%Clean & Safe
Or, you can make use of the CHKDSK command to do that. Just input chkdsk /r /f in your command platform and press Enter. It will pop up asking for a restart, just type Y to confirm the restart.
#3 Upgrade/Reinstall Graphics Driver
First of all, the GPU driver is out of date, corrupted, or missing will probably cause the ntkrnlmp.exe blue screen. Thus, the first step you should do is to make sure your graphics driver is there of a good condition and up to date. To achieve that, just do as the below guide shows.
- Open Windows 11 Device Manager.
- Expand the Display adapters.
- Right-click on the target graphics card and select Update driver.
- Follow the on-screen instructions to complete the task.
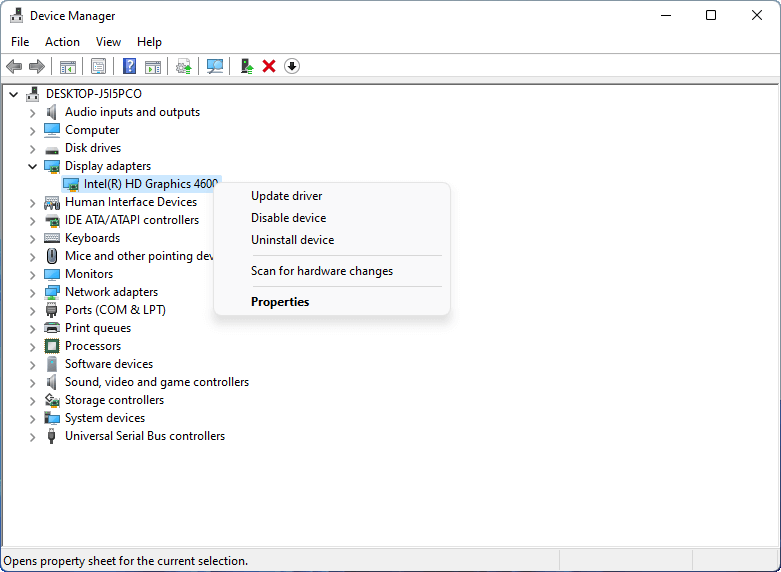
If you would like to reinstall the graphics driver, just choose Uninstall device when you right-click on the target GPU. Then, restart your computer to let Windows reinstall the removed driver automatically.
- Sometimes, updating the operating system contains the update of device drivers.
- If updating the graphics driver fails to solve the problem, you may try to update other drivers you think may help.
#4 Uninstall Problematic Apps
In addition to corrupted software drivers, you should also uninstall the programs that may cause ntkrnlmp.exe BSOD Windows 11 error, especially the tools that you recently installed or apps you downloaded from unauthorized channels.
There are several ways to uninstall a program from your PC.
- In Control Panel > Programs and Features.
- In Settings > Apps > Apps & features.
- Use the uninstallation execute file in the installation folder.
- Rely on an app uninstaller.
Just pick the one you like. After completing uninstallation, check to see whether the ntkrnlmp.exe BSOD still exists or not.
#5 Check for Driver Issues with Driver Verifier Manager
Driver Verifier Manager controls kernel-mode drivers and graphics drivers. It assists to detect any driver problems in OS and offers available solutions.
1. Search “verifier” in Windows Search and open the best result.
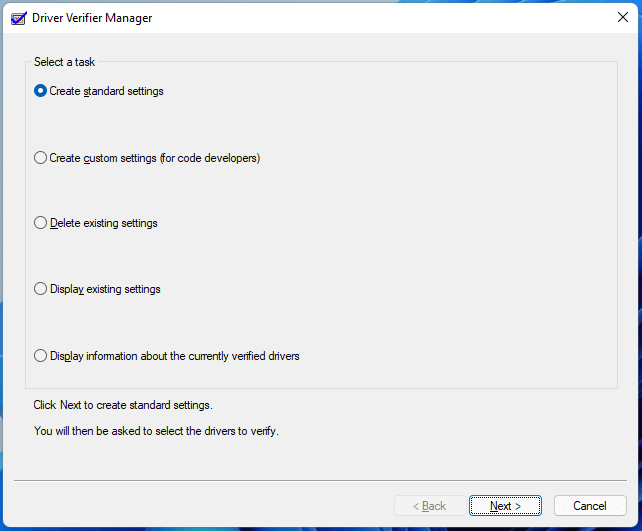
2. In the Driver Verifier Manager, select Create standard settings option.
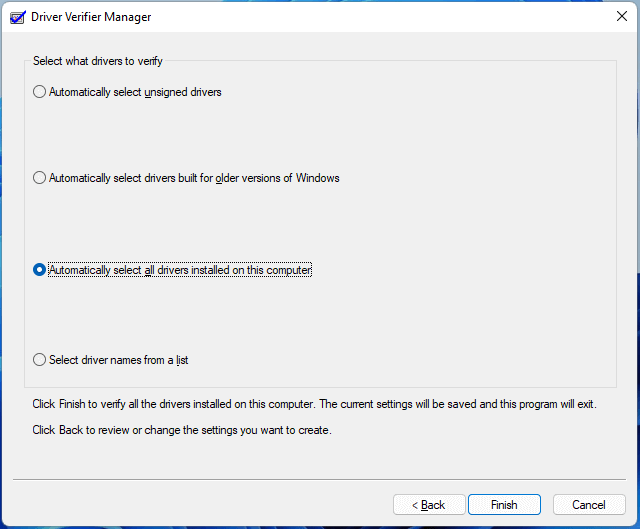
3. Next, choose Automatically select all drivers installed on this computer and click Finish.
4. Restart the PC.
It will start verifying all the drivers installed on this computer. When the verification completes, the current settings of all drivers will be saved and Driver Verifier Manager will exit. If there is something wrong with the drivers, just follow the provided solutions to handle it.
If you want to manually stop Driver Verifier Manager, just reopen it and choose Delete existing settings on the first screen.
#6 Disable EIST and C-State in BIOS
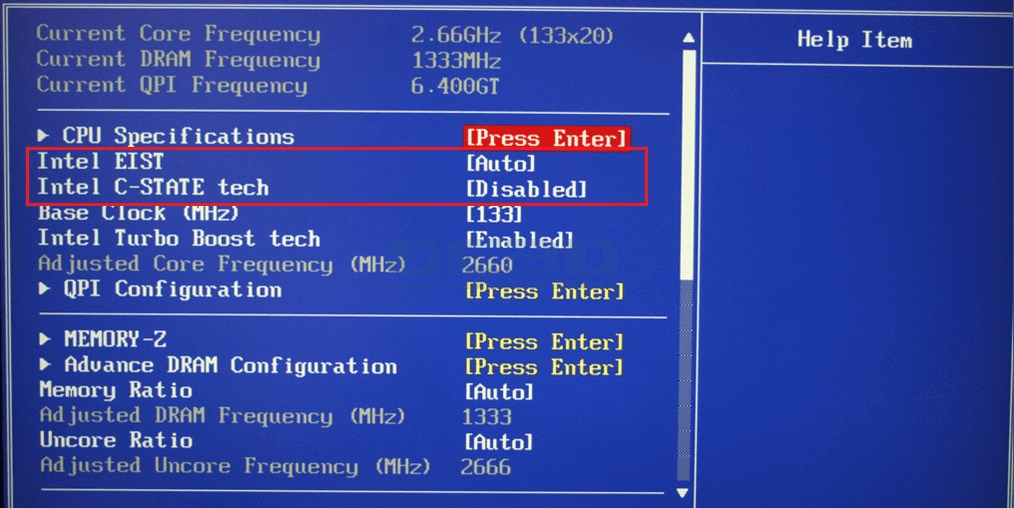
EIST (Enhanced Intel SpeedStep Technology) is a power-saving feature that enables software to control the clock speed of Intel processor cores. If it is turned on, this utility will probably cause ntkrnlmp.exe BSOD Windows 11. To handle this situation, you can disable EIST and C-State in BIOS.
2. Navigate to Advanced > CPU Configuration (CPU specifications or similar option).
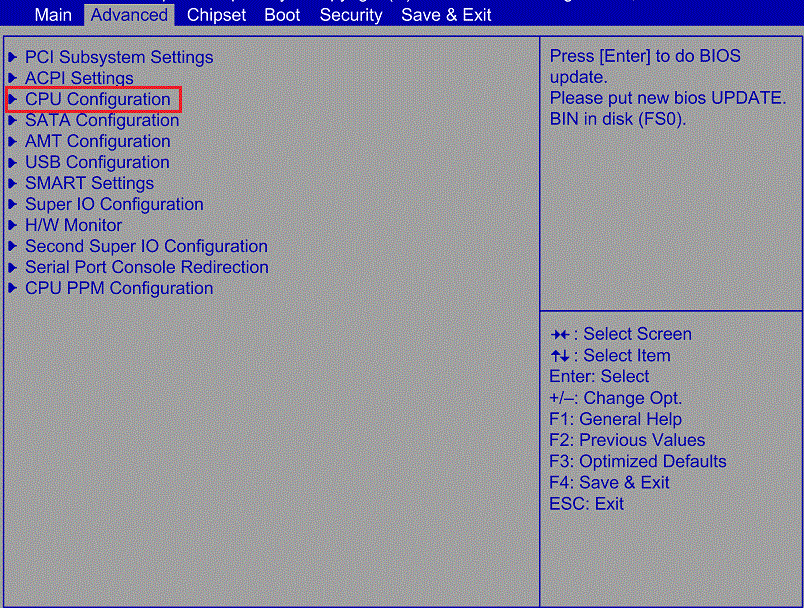
3. On the next screen, select CPU Power Management Configuration.
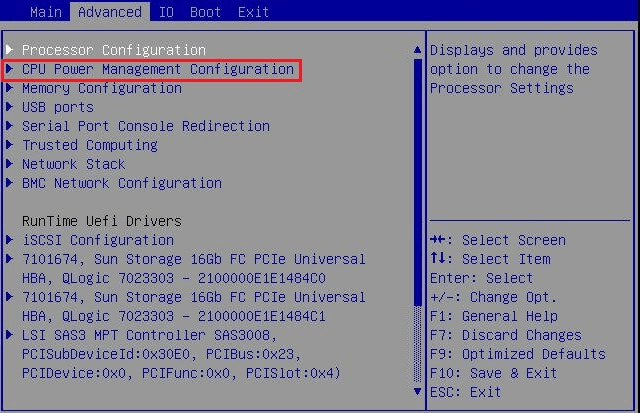
4. Then, Disable Intel EIST and Intel C-SATE tech.
5. Save changes and exit.
6. Restart your machine.
If this solution fails to solve your problem, move to the next method.
#7 Disable CPU Overclocking
If you have enabled CPU/GPU or other hardware overclocking to receive better computer performance while doing activities that have higher resource requirements like video editing and gaming, you’d better stop the overclocking when you come across BSOD of ntkrnlmp.exe error code.
#8 Clean Boot Computer
A clean boot is to start Windows with only necessary system files and apps. It will also make sure to replace the corrupted files and settings.
1. Open Windows System Configuration.
2. Within the General tab, choose Selective startup and check both Load system services and Load startup items.
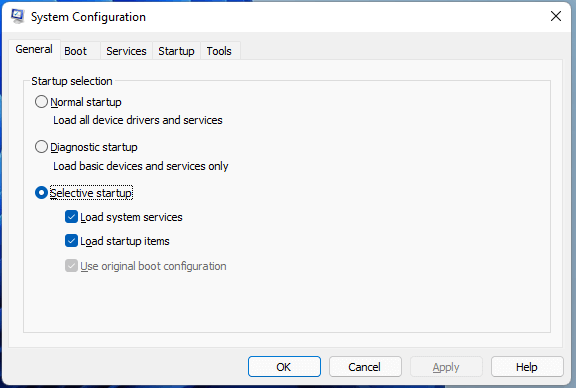
3. Switch to the Services tab, uncheck all services you suspect. Or, you can tick the Hide all Microsoft services option to exclude all Microsoft services and then uncheck the suspicious services.
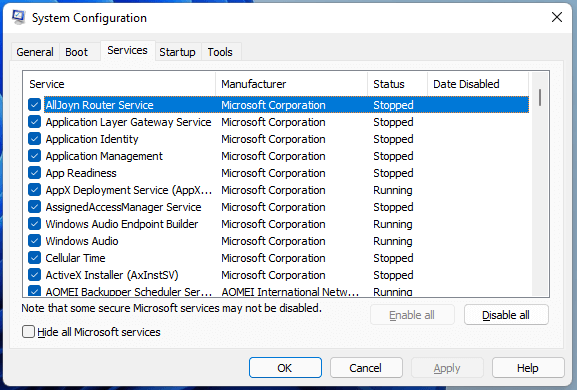
4. Click Apply > OK and restart your machine.
After clean boot your PC, check whether the ntkrnlmp.exe BSOD Windows 11 error is fixed or not.
#9 Boot the PC into Safe Mode
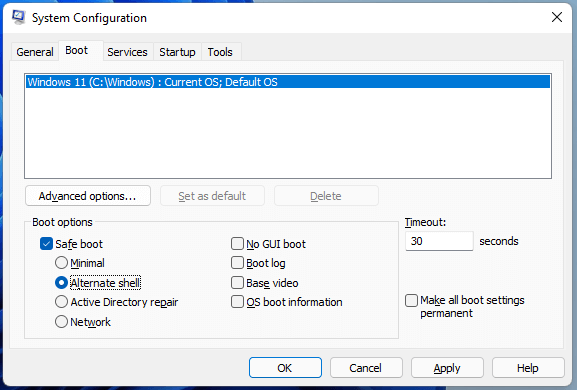
If you are not able to normally reboot your computer, you can choose to boot into its Safe Mode. It is easy to achieve that. Just shift to the Boot tab in the System Configuration application. There, check Safe boot and choose Alternate shell, which equals to Enable Safe Mode with Command Prompt option in the Startup Settings (blue screen). Finally, click Apply > OK.
#10 Scan for Virus/Malware
Ntkrnlmp.exe blue screen of death error can also be a result of malware or viruses attack. Therefore, it is necessary that you conduct a security scan of your computer with Windows Defender or a third-party antivirus you prefer.
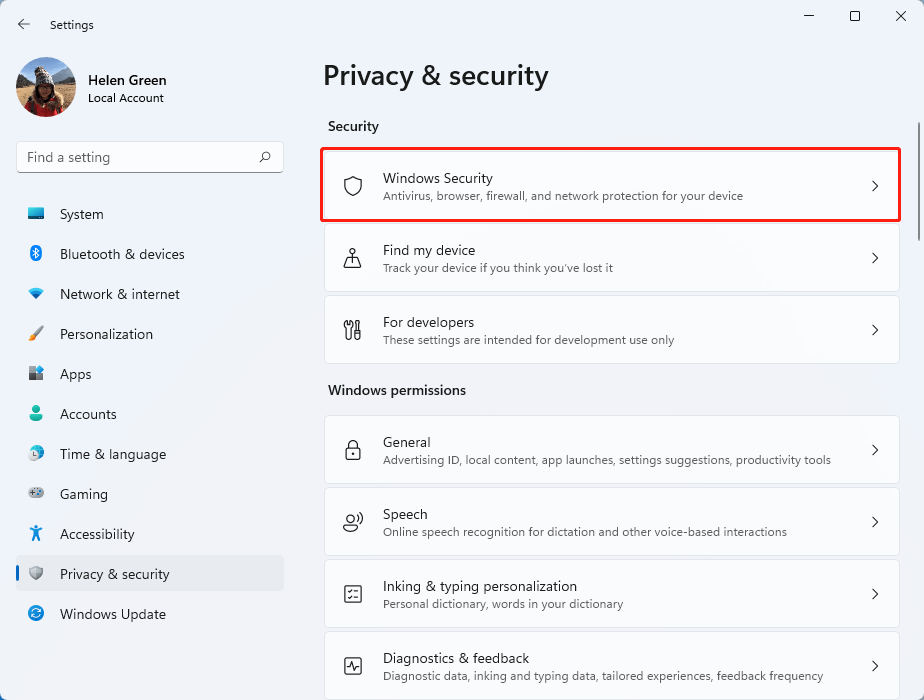
1. Go to Start > Settings > Privacy & security > Windows Security.
2. Next, click the Open Windows Security button.
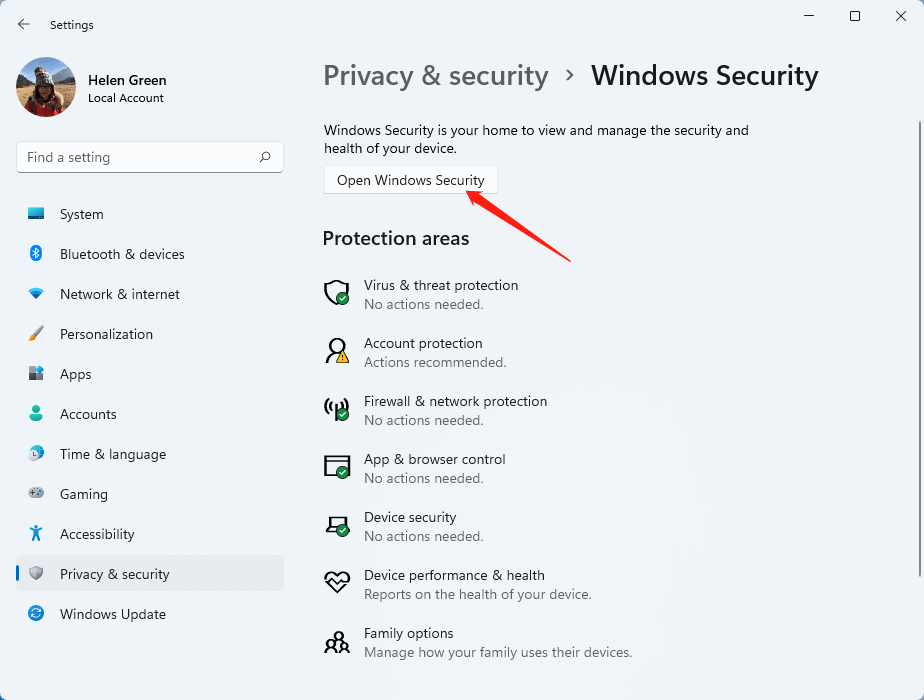
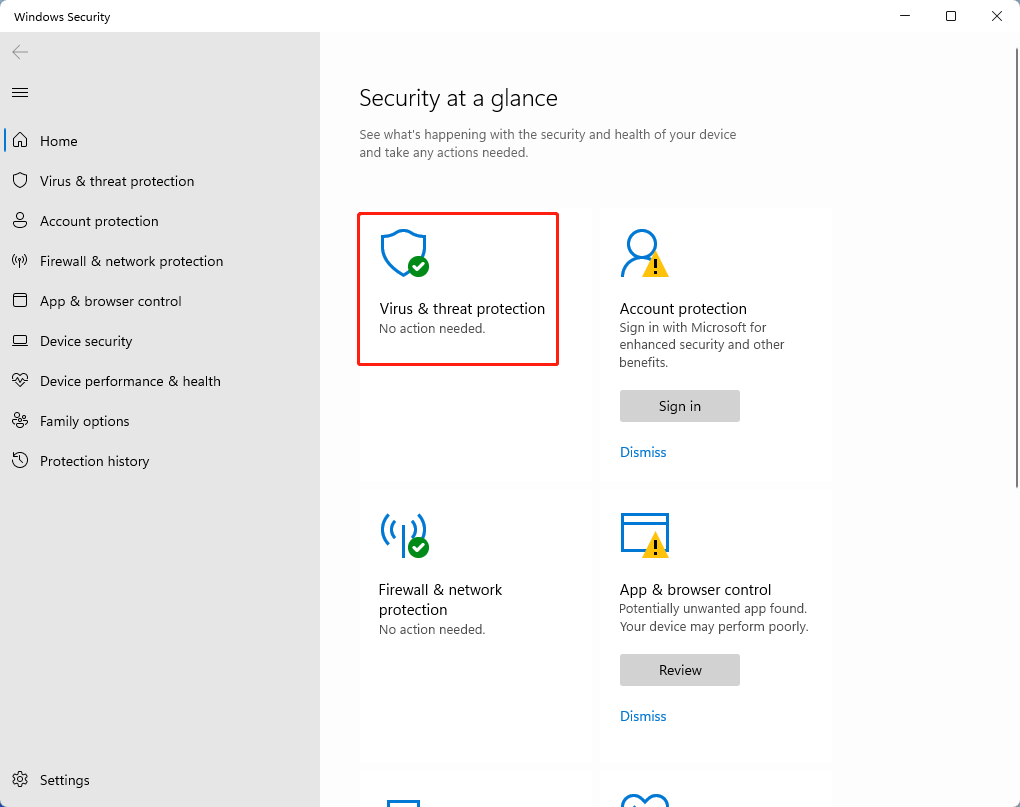
3. On the next screen, choose Virus & threat protection.
4. Then, click the Quick scan button to start a general virus scan.
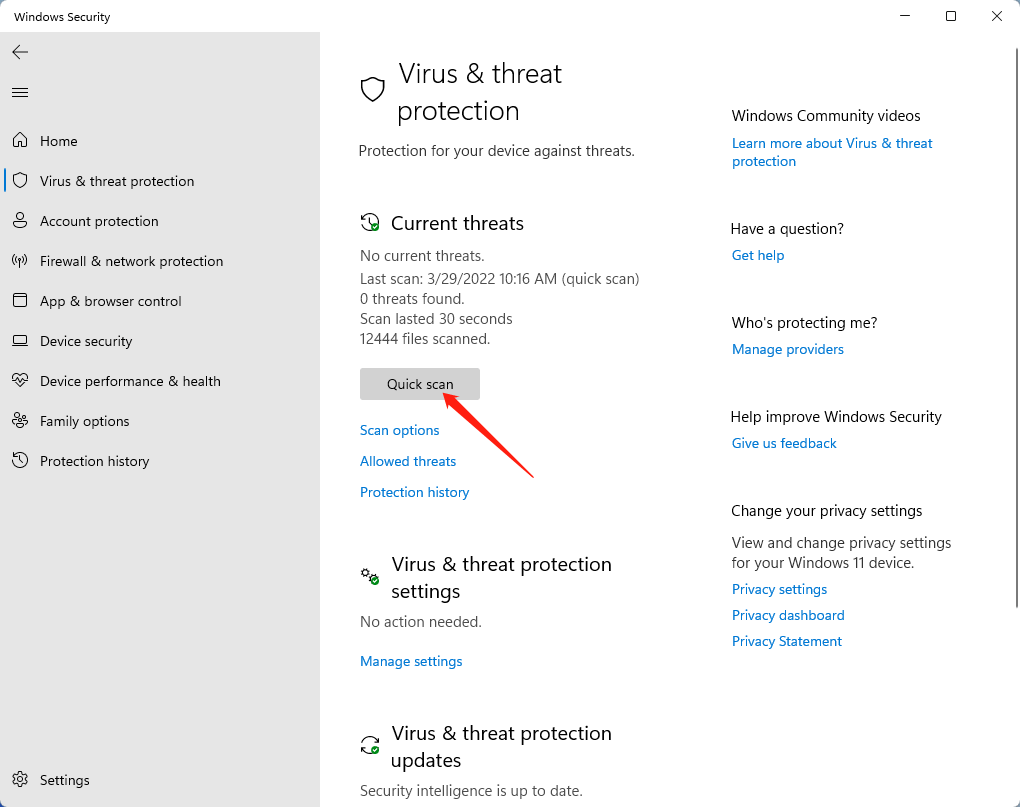
If the quick does not detect any problem, you can further perform a full scan by clicking the Scan options below the quick scan button.
#11 Carry out System Restore
If none of the above solutions manage to fix the ntkrnlmp.exe BSOD Windows 11 issue, the last option you can try is to restore the system to its previous working state. Yet, this is based on the premise that you already have created at least one system restore point.
Before performing system restoration, it is strongly recommended that you create a backup of important files on your computer, especially the recently installed programs and drivers. Although System Restore claims that it does not affect any of your documents, pictures, or other personal data, it is still better to make double insurance.
To back up crucial data, MiniTool ShadowMaker is worth trying for its reliable features and easy operations. Just download this free software and enjoy its wonderful features!
MiniTool ShadowMaker TrialClick to Download100%Clean & Safe
Now, let’s see how to conduct recover Windows with System Restore.
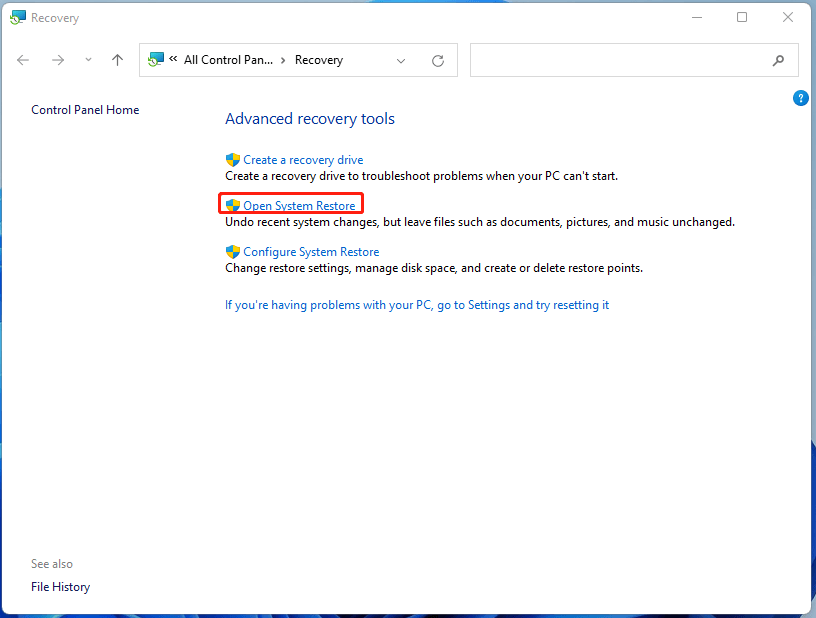
1. Navigate to Control Panel > All Control Panel Items > Recovery.
2. Click Open System Restore.
3. On its introduction page, click Next to continue.
4. Select a system restore point you prefer and click Next.
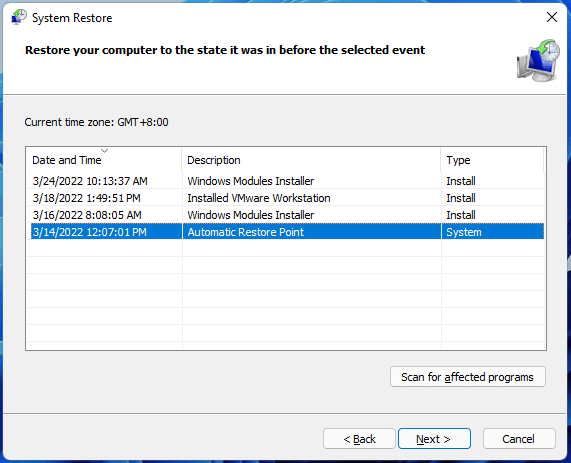
5. Follow the guide to finish and restore the computer.
Actually, MiniTool ShadowMaker can also create a system restore point and restore Windows to its previous condition. Just make use of its System Backup utility and keep your OS safe!
Besides System Restore, you can also reset your PC to get rid of ntkrnlmp exe crash problem. Just get started by clicking the Reset PC button in Settings > System > Recovery and follow the instructions. This utility also enables you to keep your personal files while removing apps and settings during rolling the system back to factory settings.
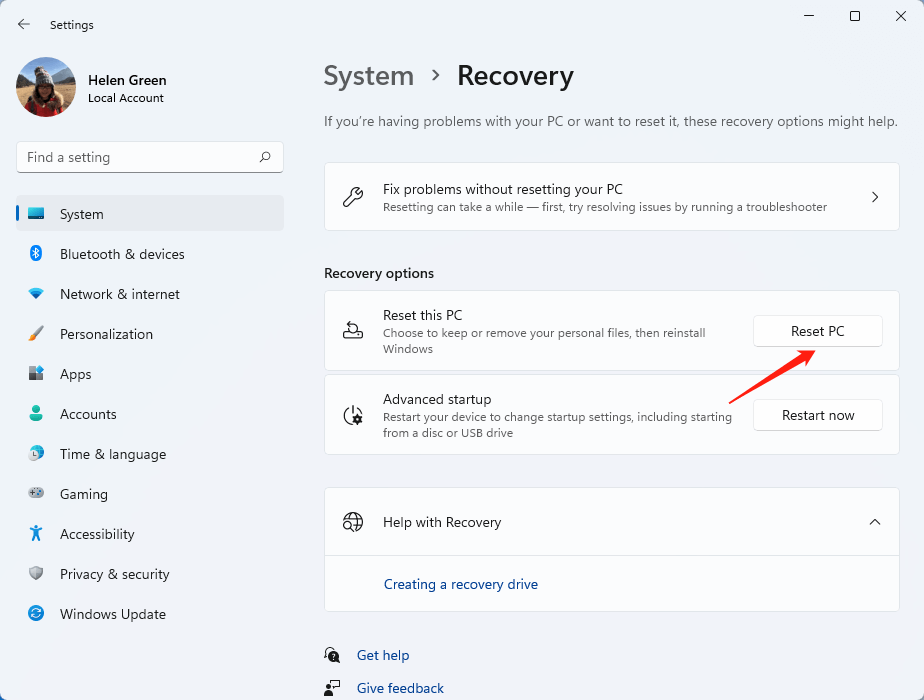
Still, you are recommended to build a copy of vital items before resetting your PC.
Write at the End
Reading here, you are believed to have your ntkrnlmp.exe BSOD Windows 11 issues fixed. If unfortunately, you are still suffering from the problem, please write down your condition below to hope for other readers to have a solution.
Or, if you have an extra solution that does not mention in this article, please share it here with others. If you have encountered any problem while using MiniTool products, just contact [email protected] and you will get a reply as soon as possible.
User Comments :