Have you ever used the file sharing feature in your Windows 11/10? Have you encounter the Windows 10 file sharing not working issue when using it? Do you know how to fix this problem? This post from MiniTool offers you top 9 solutions to solve the problem, you can find answer in it.
Issue: Windows 10 File Sharing Not Working
HomeGroup has been removed from Windows 10, version 1803. However, even it was removed from Windows, you can still share files and printers within Windows.
Windows 10 file sharing is a useful Windows snap-in tool provided by Microsoft. It is designed to facilitate users’ file sharing works. Just with several simple steps, you can share your files on your PCs to users on the same LAN. Users can even look through these files on mobile phones.
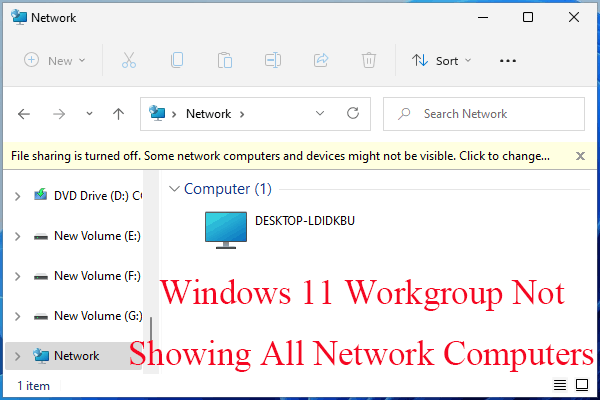
However, an increasing number of users complain about this function now because they find Windows 10 file sharing not working after update 1809/1803. Just as Windows cannot access shared folder Windows 7, users running Windows 10 meet this problem as well. So, they encounter the issue file sharing not working Windows 10. Usually, Windows 10/11 file sharing not working may be caused by the following reasons:
- The File sharing settings are incorrect.
- Antivirus software interference blocks Windows file sharing.
- Lack of proper credentials.
- The file sharing connection is not compatible.
- Disabled SMB 1.0 in Windows 10 updates.
In consideration of the inconvenience the problem may bring, it is vital to find out solutions to deal with it. Hence this post is going to present you detailed solutions to how to enable file sharing in Windows 10.
Try Free File Sharing Alternative – MiniTool ShadowMaker
Before using the following solutions, we would like to introduce a free file sharing alternative to the file sharing in File Explorer, that is MiniTool ShadowMaker. It is a piece of professional file sync software which allows you to share files to a different computer.
Apart from file sync, MiniTool ShadowMaker is also a backup software designed to backup files, folders, disks, partitions and even the operating system. With the backup, you can restore them to protect your PC and data when your computer encounters virus attack or disk failure.
In addition, when your old HDD has poor performance and you want to replace it with an SSD, MiniTool ShadowMaker supports cloning HDD to SSD, or you can clone SSD to larger SSD to prevent your old SSD from running out of space.
Now, click the following button to get the free MiniTool ShadowMaker and have a try.
MiniTool ShadowMaker TrialClick to Download100%Clean & Safe
Step 1: Launch MiniTool ShadowMaker and click Keep Trial to enter its main interface.
Step 2: Go to the Sync section and select files you want to share under the SOURCE tab. Then click OK.
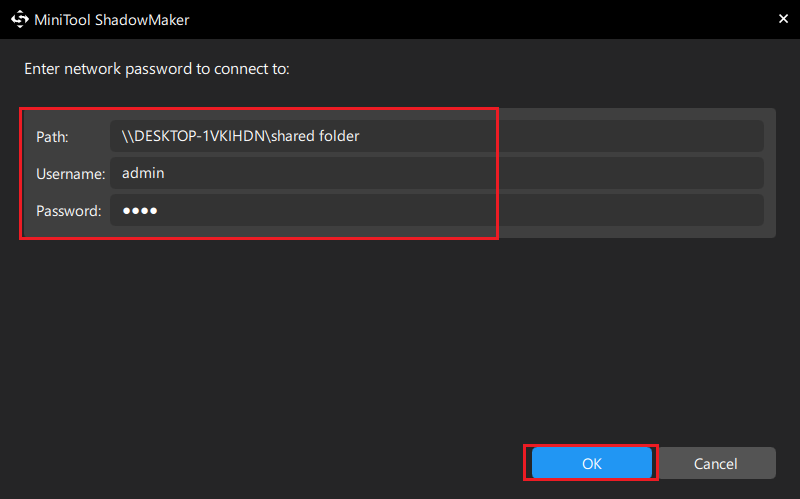
Step 3: Choose a target shared folder created by another computer (on the same LAN) to save the files in the DESTINATION tab. Here, click Shared as the destination. Click on Add and input the Path, Username and Password. Then click OK.
Step 4: Choose Sync Now to perform file sync immediately or Sync Later to delay the file sync. You can find the delayed sync task in the Manage page.
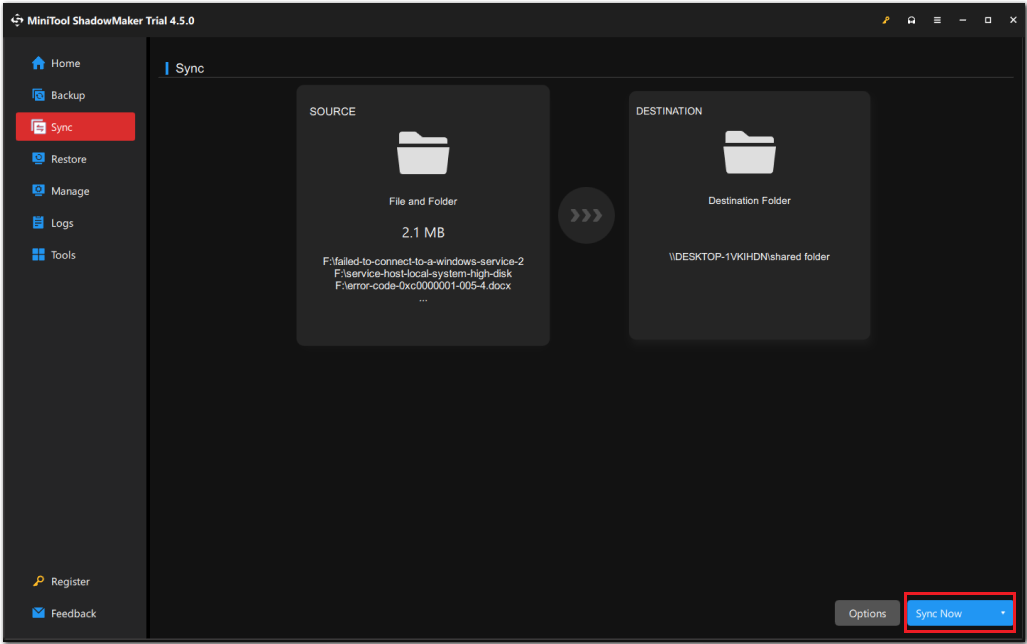
After all the steps are finished, you have successfully shared files.
Next, we will show you other 9 ways to fix the file sharing not working in Windows 10/11 problem. You can keep on reading and try them out.
How to Fix Windows 10 File Sharing Not Working Problem?
Solution 1: Restart Your Computer
Many of you may doubt this method. But it is true that when you try this way, you sometimes can perform Windows file sharing right away. Restarting computer may solve lots of problems. If it doesn’t work for you, try those methods below.
Solution 2: Enable File and Network Sharing
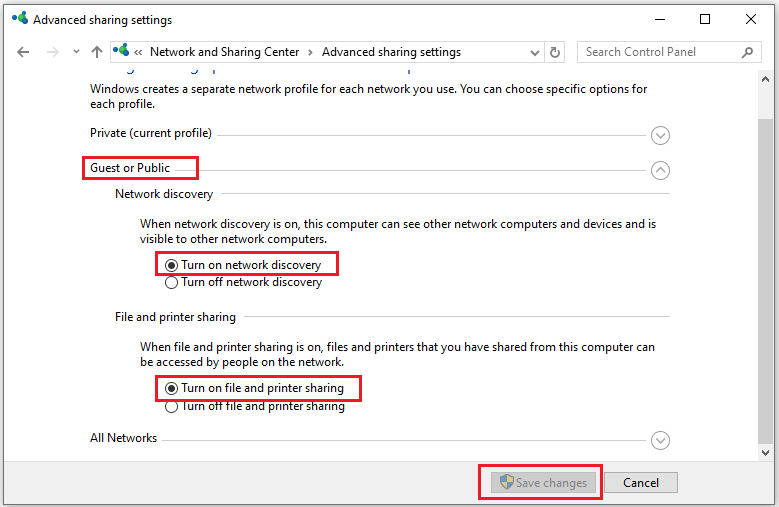
File sharing can only work when you enable sharing settings correctly, such as, turning on network discovery, and file and printer sharing. To do that, follow the instructions:
Step 1: Type Control Panel in the search box and open it.
Step 2: Go to Network and Sharing Center, and then click Change advanced sharing settings in the left side of the window.

Step 3: Under Private, please check Turn on network discovery and Turn on file and printer sharing.
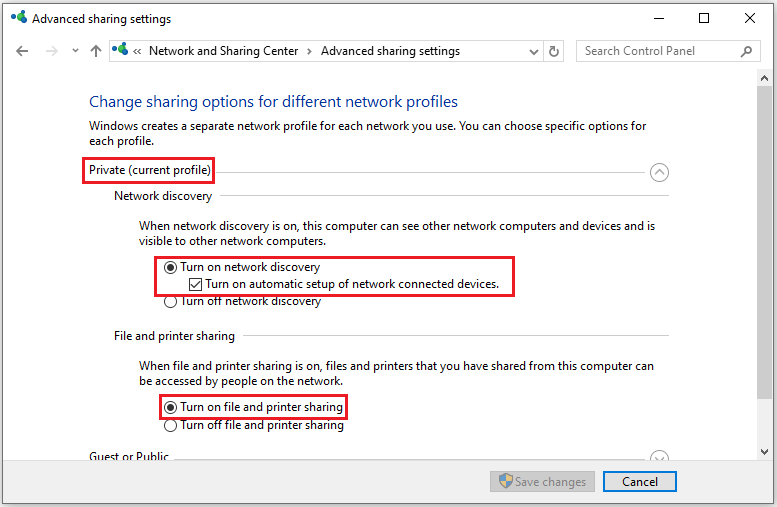
Step 4: Under Guest or Public, check Turn on network discovery and Turn on file and printer sharing. Then click Save changes.
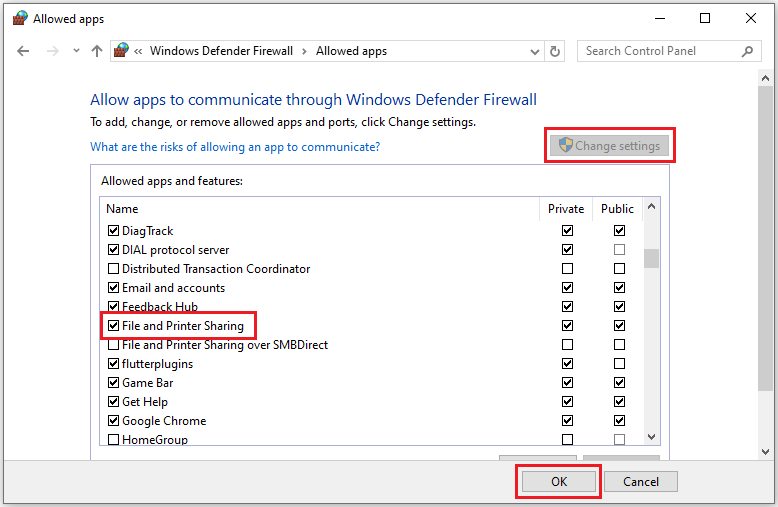
To make sure the problem can be solved, don’t forget to allow File and Printer Sharing through Windows Defender Firewall.
Step 1: Go to Control Panel > Windows Defender Firewall > Allow an app or feature through Windows Defender Firewall.
Step 2: In the popup window, click Change settings and make sure to check File and Printer Sharing in the list. Then click OK.
After finishing all the steps, you need to right-click the items you want to share and choose Properties. Then go to the Sharing tab and click Advanced Sharing. Next, check the Share this folder option and click Apply and OK to continue. In addition, you can also change the permission to guests by clicking Permissions.
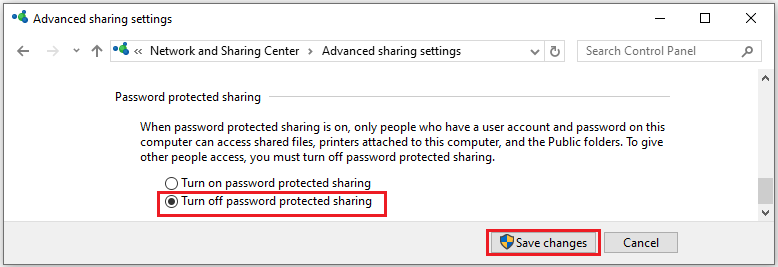
Solution 3: Turn Off Password Protected Sharing
The file sharing not working in Windows 11/10 issue may be triggered by password protected sharing. Hence, you can try to turn off the password protection feature to fix it.
Step 1: Open Control Panel > Network and Sharing Center > Change advanced sharing settings.
Step 2: Under All Networks, please click Turn off password protected sharing. Then click Save changes.
Solution 4: Run Shared Folders Troubleshooter
The Shared Folders troubleshooter may be helpful for you to get rid of the cannot access shared folder in Windows 10/11 issue.
Step 1: Go to Settings > Update & Security > Troubleshoot > click Additional troubleshooters.
Step 2: Find Shared Folders under Find and fix other problems section, and then click it to Run the troubleshooter.

Solution 5: Add a Windows Credential
A Windows credential is required when accessing a specific shared folder on a remote computer. If you don’t have it, please add one and try again. To do this, you need to know the IP address, username, and password of the remote computer or server.
Step 1: Open Control Panel, and click on Credentials Manager.
Step 2: Select Windows Credentials and click the Add a Windows credential button.
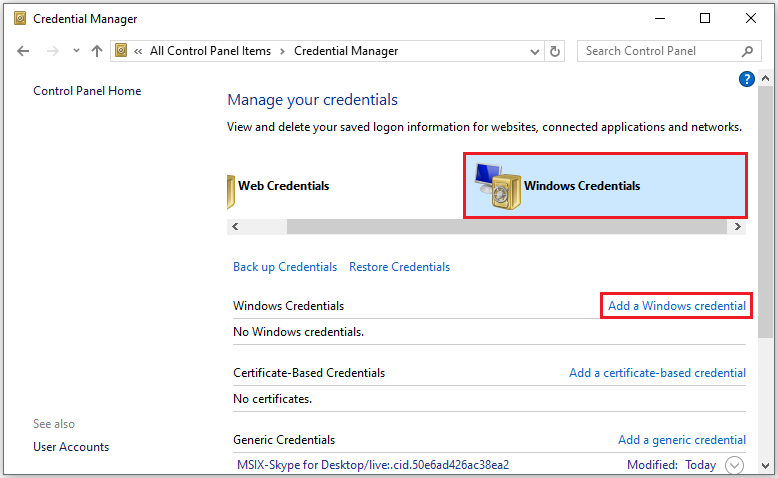
Step 3: Next, input the IP address, username and password of the target computer and click Save.
Solution 6: Enable SMB 1.0/CIFS File Sharing Support
The disabled SMB 1.0/CIFS File Sharing Support feature might cause Windows 10 file sharing not working after update. To resolve this issue, you need to enable SMB 1.0 in Windows Features.
Step 1: Go to Control Panel > Programs and Features > Turn Windows features on or off at the left pane.
Step 2: Find and check SMB 1.0/CIFS File Sharing Support.
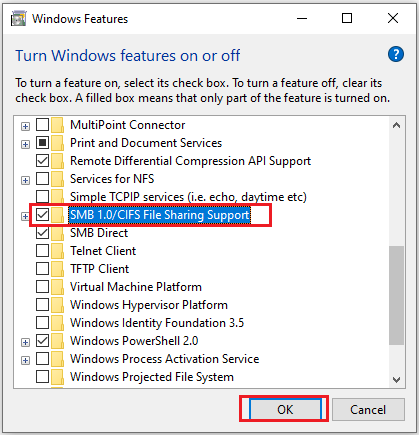
Step 3: Click OK and restart your computer to see if the file sharing not working in Windows 10/11 issue still persists.
Solution 7: Disable IPv6
Disable IPv6 connection on the computer is also a useful way to fix the Windows 10 file transfer not working issue. Please follow these steps:
Step 1: Press Win + R keys together to open Run box.
Step 2: Input ncpa.cpl to open Network Connections and then right-click on your connected network to choose Properties.
Step 3: Find and uncheck Internet Protocol Version 6 (TCP/IPv6).
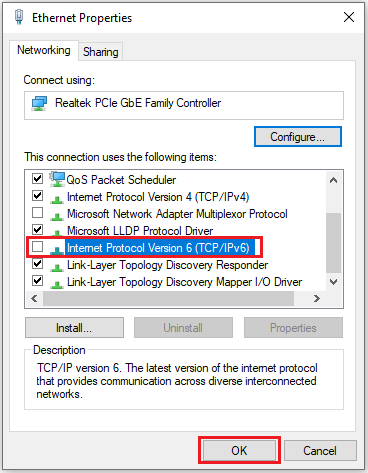
Step 4: Click OK and restart your computer to check whether the Windows 10 file transfer not working problem is gone.
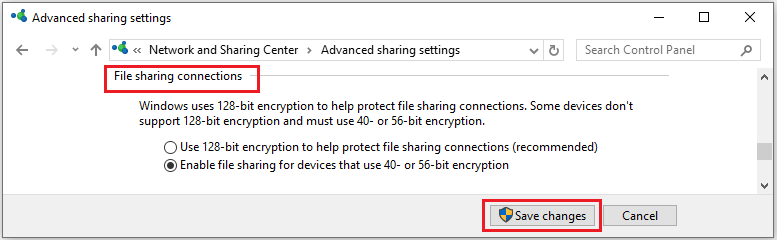
Solution 8: Change File Sharing Connections
Incompatible File Sharing connection may give rise to the file sharing not working in Windows 11/10 issue. Your device likely uses 128-bit encryption to protect File Sharing connections. However, some Windows devices don’t support 128-bit encryption and use either 40- or 56-bit encryption. To resolve the problem, you’d better to change the encryption level for File Sharing connections.
Step 1: Open Control Panel, and click Network and Sharing Center > Change advanced sharing settings.
Step 2: Expand the All Networks menu and scroll to the File sharing connections section. You can try both 128-bit encryption and 40- or 56- bit encryption alternatively and click Save changes.
Solution 9: Update Windows to the Latest Version
The cannot access shared folders in Windows 10/11 issue may be due to a bug in the update. To ensure optimal performance, please upgrade to a latest version if you haven’t done it.
Step 1: Open Settings and navigate to Update & Security.
Step 2: Click on Check for updates to check whether there is a new version of Windows available.
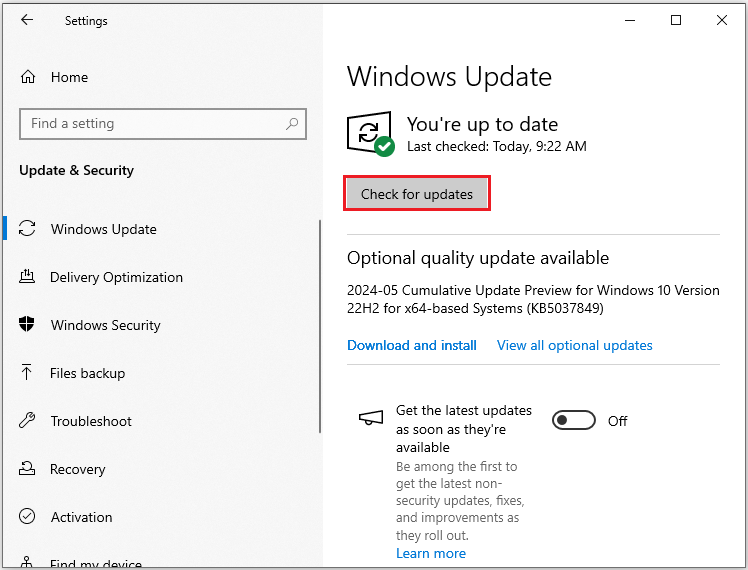
Step 3: If an update is available, install it and reboot your computer.
Bottom Line
File sharing is indeed useful in making your files visible to different computers as long as they are on the same LAN. Knowing how to fix the cannot access shared folders in Windows 10/11 issue becomes quite important. Follow these 9 methods mentioned above and you can solve it easily.
If you have any question in using MiniTool ShadowMaker, please contact us via [email protected] and we will reply to you as soon as possible.
Windows 10 File Sharing Not Working FAQ
2. Restart your computer.
3. Enable file and network sharing.
4. Turn off password protected sharing.
5. Run shared folders troubleshooter.
6. Add a Windows credential.
7. Enable SMB 1.0/CIFS File Sharing Support.
8. Disable IPv6.
9. Change file sharing connections.
User Comments :