The Pictures folder is an efficient way to arrange all your images and access them from one location.
However, there are times when you start your computer only to find that the Pictures folder is missing, as in the example below:
“The Pictures folder is missing from the Users folder. The latest Windows update basically deleted my Pictures folder, and I want to know how to get it back.”tenforums.com
What causes your Pictures folder to be missing? And where can you find your Pictures folder in Windows 11/10?
There are some common causes for the Pictures folder loss:
- Folder Location Change: The Pictures folder may have been unintentionally moved to a different location.
- Hidden Pictures Folder: The folder might be set to hidden.
- Malware Infection: If your computer is compromised by a virus or malware, it can disrupt the system, leading to the deletion or relocation of the Pictures folder.
- Etc.
To locate the Pictures folder, keep reading to get more detailed information.
Where Is the Pictures Folder on Windows
The Pictures folder is typically found within your User profile directory.
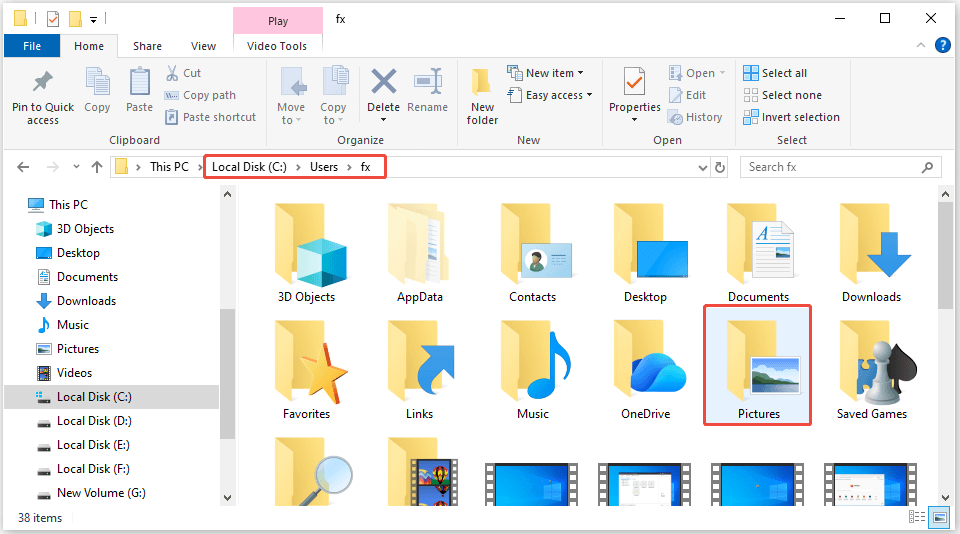
>> In User Folder:
You can reach it by going to the following path in File Explorer:
C:\Users\Username\Pictures
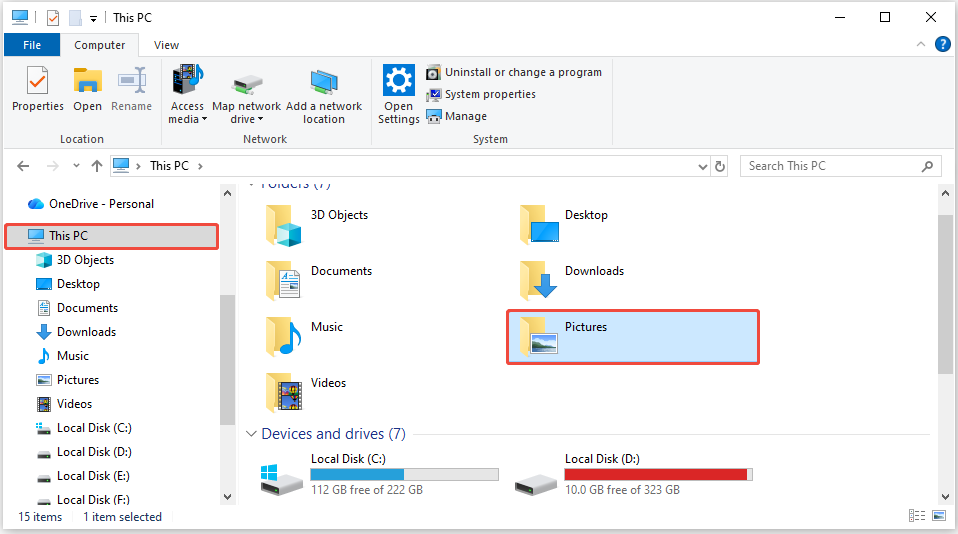
>> In This PC:
To locate the Pictures folder, open File Explorer and go to This PC.
If you don’t see your Pictures folder in these two locations, read on to learn how to find the missing Pictures folder in Windows.
How to Restore the Missing Pictures Folder on Windows 10/11
To restore your Pictures folder, you must either re-enable its visibility or move it to the original location.
In this section, we will explore both scenarios. Before trying the most complicated methods, start with some basic checks: restart the PC and use the correct user profile.
If it doesn’t work, follow the methods outlined below step by step.
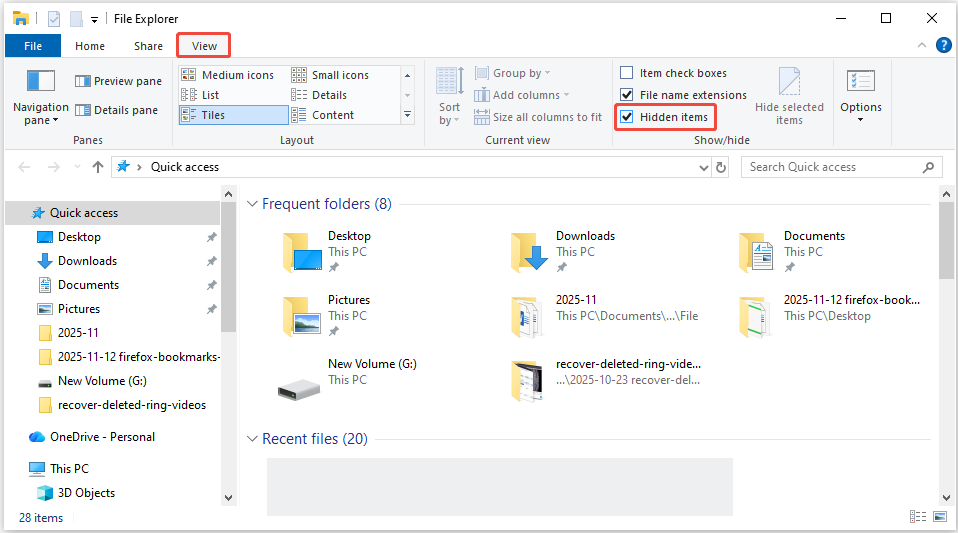
Method 1. Show Hidden Files
Sometimes, the Pictures folder may not be lost or moved, and it may be hidden accidentally in Windows.
In this case, you should enable the option to show hidden files.
If you prefer a quick video guide to show hidden files, watch this short video:
Here is how to show hidden files:
Step 1. Press Win + E to launch File Explorer.
Step 2. Navigate to the View tab.
Step 3. Ensure that the Hidden items option is checked.
After that, the Pictures folder should be visible.
If this method doesn’t work, use the following solutions to locate your Pictures folder in Windows.

Method 2. Restore Default Pictures Folder Location
The Pictures folder location may have been changed, and you might still be looking for the folder in its original place, specifically in the Users folder.
No matter where the Pictures folder is currently situated, you can follow these steps to return it to its default position:
Step 1. Press Win + R to launch the Run dialog box. Type shell:My Pictures in the textbox and press Enter.
Step 2. Open the Pictures folder’s Properties interface:
- On Windows 11: Click on the three dots towards the top of the window and choose Properties.
- On Windows 10: Right-click the blank area in the Pictures folder and select Properties.
Step 3. In the Pictures Properties window, go to the Location tab.
Step 4. Click on Restore Default. After clicking this button, the Pictures folder will revert to its original location.
If you prefer to restore the Pictures folder to a different location than its original spot, simply choose Move… and select a different folder.
Step 5. Click Apply > OK.

Method 3. Create a New Pictures Folder
You can manually create a new Pictures folder in your user profile. This will make sure that Windows identifies it as the standard storage location for photos.
Follow these steps to do it:
Step 1. Press Win + E to open File Explorer and then go to C:\Users\Username.
Step 2. Right-click an empty area, select New > Folder, and then label it Pictures.
If this doesn’t fix the problem, move on to the next solution.
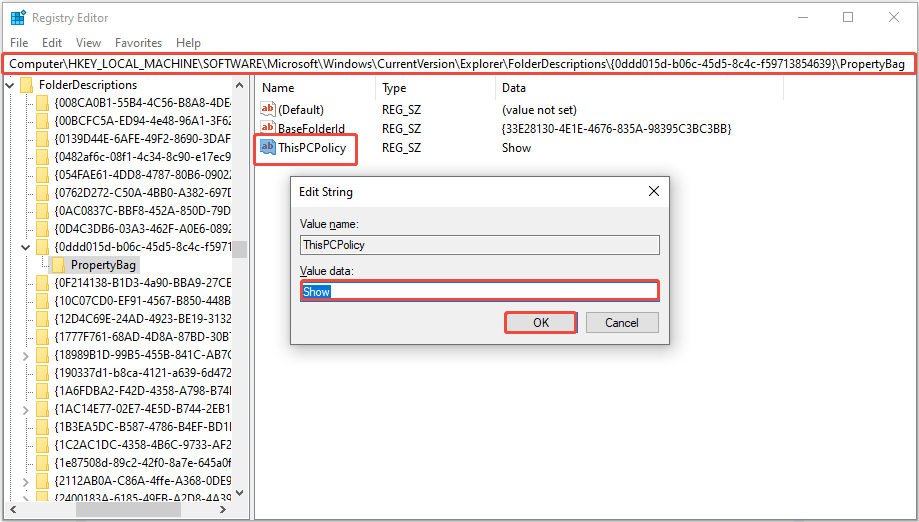
Method 4. Modify the Registry Value
The ThisPCPolicy registry value controls whether the Pictures folder is displayed under This PC in File Explorer. If you can’t find your Pictures folder, it could be due to this registry value being set to Hide.
In this situation, you must modify the value to Show to restore the folder’s visibility.
Additionally, you can modify the “My Pictures” registry value to change the folder’s location.
Here’s how you can solve the “Windows Pictures folder is missing” issue through the Registry Editor:
>> Modify ThisPCPolicy Value to Show:
Step 1. Press Win + R to open Run, then type regedit in the box, and press Enter.
Step 2. If the User Account Control prompt appears, click Yes.
Step 3. Go to the following path:
Computer\HKEY_LOCAL_MACHINE\SOFTWARE\Microsoft\Windows\CurrentVersion\Explorer\FolderDescriptions\{0ddd015d-b06c-45d5-8c4c-f59713854639}\PropertyBag
Step 4. In the right panel, double-click on ThisPCPolicy.
Step 5. In the pop-up window, modify the Value data to Show and click OK.
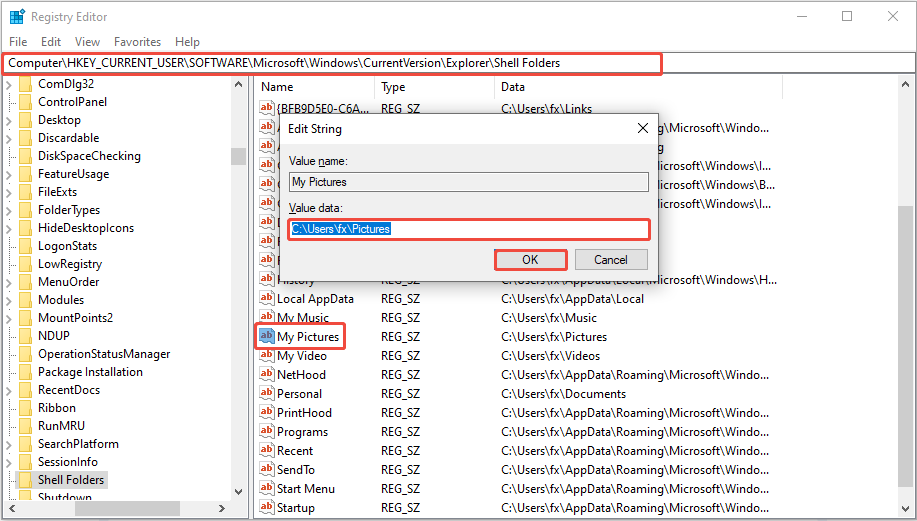
>> Modify My Pictures Value to Default Location:
Step 1. In Registry Editor, navigate to the following location:
HKEY_CURRENT_USER\SOFTWARE\Microsoft\Windows\CurrentVersion\Explorer\Shell Folders
Step 2. In the right panel, double-click My Pictures.
Step 3. In the new interface, ensure the Value data is the C:\Users\Username\Pictures location. If not, change it manually, replacing Username with your account name.
Step 4. Click OK.
How to Recover Lost/Deleted Pictures From the Pictures Folder
Missing subfolders or files in the Pictures folder is also a common issue, as illustrated by the following example:
“A subfolder of my Pictures folder has disappeared. The folder was accessed earlier, several hours ago. How do I find out what happened and fix it? It was my main subfolder for images, so I’m hoping the files can be recovered.”reddit.com
There are several reasons that your files or folders may be lost from your Pictures folder:
- Accidental Deletion: The Pictures folder or files within it might have been unintentionally deleted.
- Wrong User Account: If you log into the computer using a different user account, you will not be able to see the wanted pictures in the Pictures folder.
- Virus and Malware: If your computer is infected with a virus, this can also lead to data loss.
- Etc.
In this part, you will learn how to recover lost/deleted files or folders from the Pictures folder in Windows.
If you prefer to watch a video to perform a picture recovery in Windows, this short video below may be helpful:
Solution 1. Check the Recycle Bin
The first place to restore the deleted pictures is the Recycle Bin. If you don’t empty the Recycle Bin or permanently delete your files, this solution is possible to find your lost pictures.
Here’s how to do it:
Step 1. Double-click the Recycle Bin icon to open it.
Step 2. In the pop-up window, locate and right-click your deleted picture, then select Restore.

Go to the Pictures folder to check your recovered files. If you don’t find the desired files in the Recycle Bin, proceed with the next solution.
Solution 2. Restore From the Previous Version
If you have enabled File History, try restoring the previous version for the Pictures folder, which contains lost photos.
Follow these steps to do it:
Step 1. Locate and right-click the Pictures folder in This PC or the Users folder, then select Restore previous versions.
Step 2. In the pop-up window, select a version that includes your desired pictures and click the Restore button.
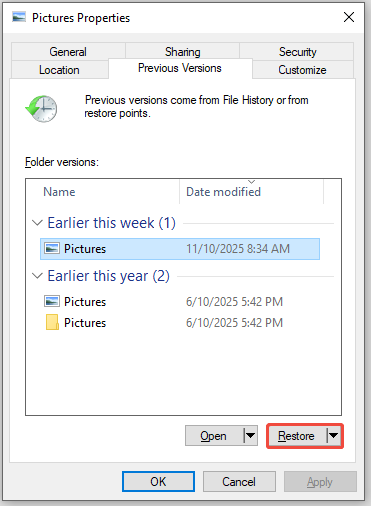
Step 3. Click Restore again to confirm the action.
Another option to recover the Pictures folder’s files is using File History. Keep reading to learn how to complete it.
Solution 3. Use File History
File History is a useful backup feature in Windows that automatically saves your library files to an external hard drive or a network location.
If you had previously set up File History before your files were deleted, you can utilize it to recover your data.
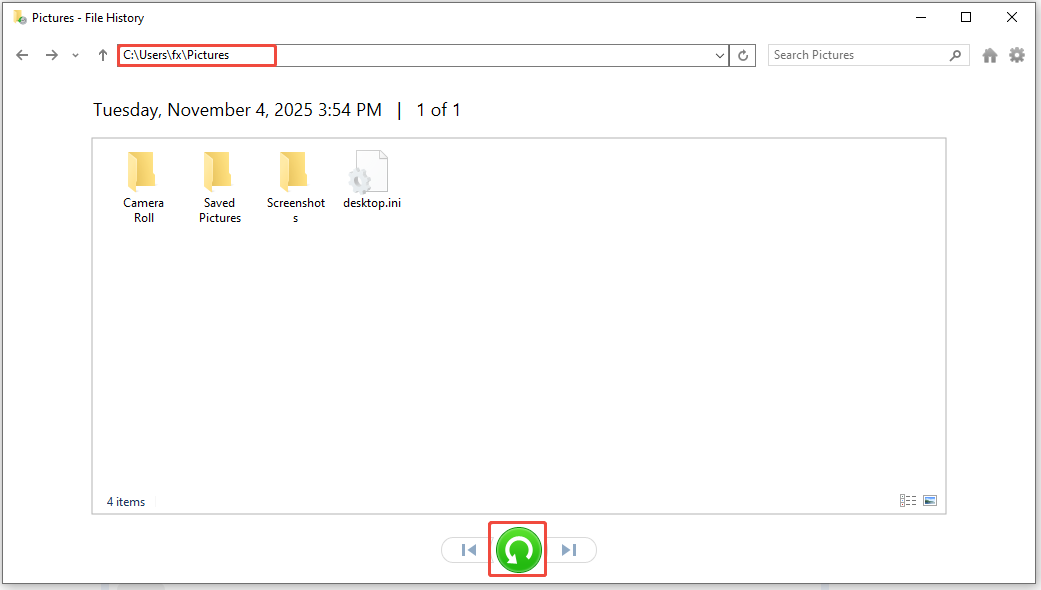
Step 1. Type Control Panel in the Windows search box and press Enter.
Step 2. Select System and Security, then click on File History, followed by Restore personal files in the left panel.
Step 3. Open your Pictures folder, look through the available files, and choose the ones you wish to recover. After that, right-click the green Restore button and decide whether to send them back to their original location (Restore) or to a different one (Restore to).
If you don’t enable the File History, what you need is professional and free data recovery software.
Solution 4. Use MiniTool Power Data Recovery
MiniTool Power Data Recovery is the most recommended tool to recover missing photos from the Pictures folder in Windows.
Here is an overview of its main features and advantages:
| Supported file types | Pictures, videos, audio files, documents, and more |
| OS compatibility | Windows 11/10/8/8.1 |
| Supported file systems | NTFS, exFAT, FAT32, Ext, etc. |
| Supported data loss scenarios | Accidental deletion, virus infection, disk formatting, etc. |
| Free edition | Free file preview and 1 GB of free data recovery |
| Ease of use | Simple recovery procedures featuring a user-friendly interface |
As you can see, this MiniTool file restore tool can help recover files effectively.
Now, download and install the software to get your pictures back.
MiniTool Power Data Recovery FreeClick to Download100%Clean & Safe
Here’s the breakdown to recover files from the Pictures folder using MiniTool Power Data Recovery:
Step 1. Launch the software and choose the Pictures folder to scan
Launch MiniTool Power Data Recovery to enter its main interface. Under the Recover From Specific Location section, choose Select Folder, and click Browse.
In the pop-up window, select your Pictures folder and click the Select Folder button.

As the scanning process will take some time, be patient and wait for it to complete to get the full scan results.
Step 2. Find the target pictures
Once the scan is complete, you will be located at the Path tab by default. Expand each folder to find the wanted files.
Additionally, switch to the Type tab and expand the Picture category. All detected photos will be listed by file format. Browse the desired format and select the photos you want to recover.
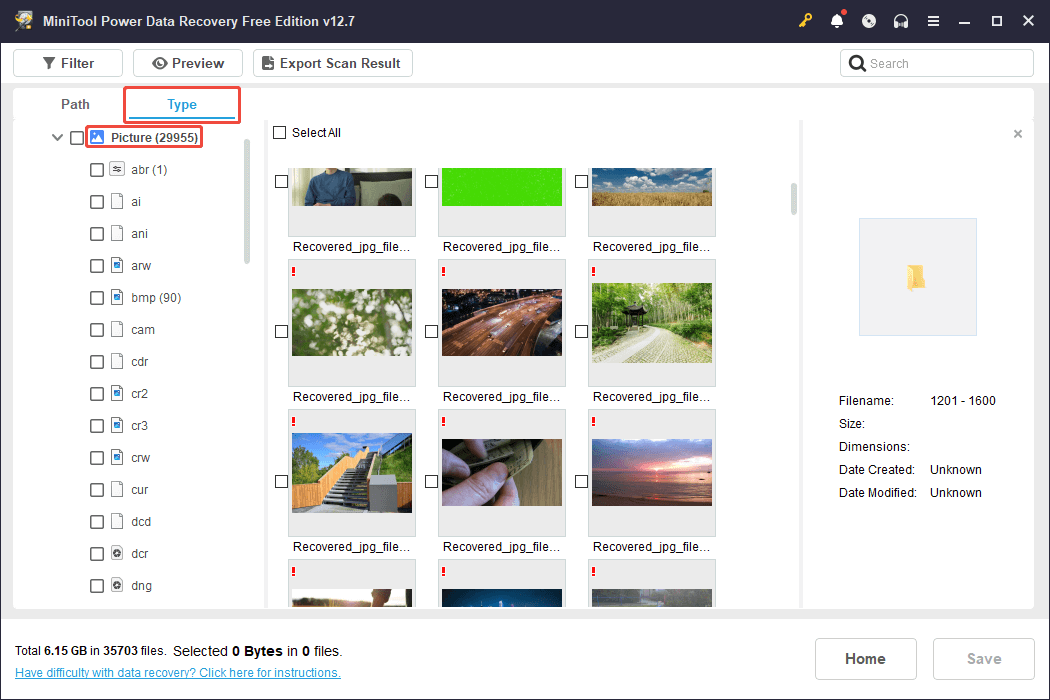
To find a specific file, type a full or partial file name in the search box at the top-right corner and press Enter.
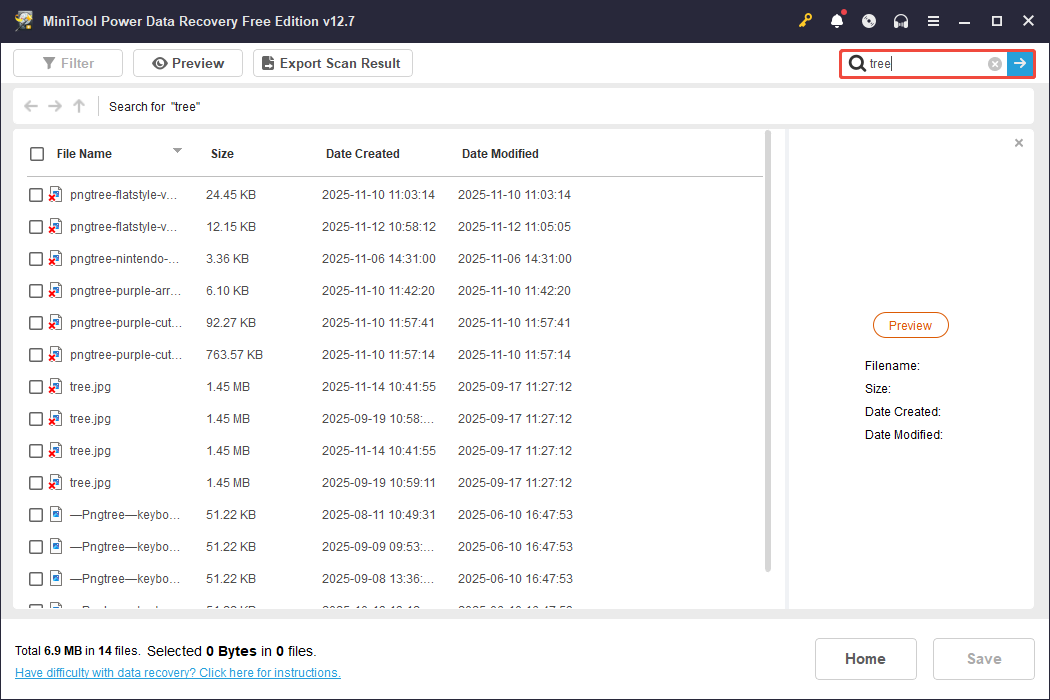
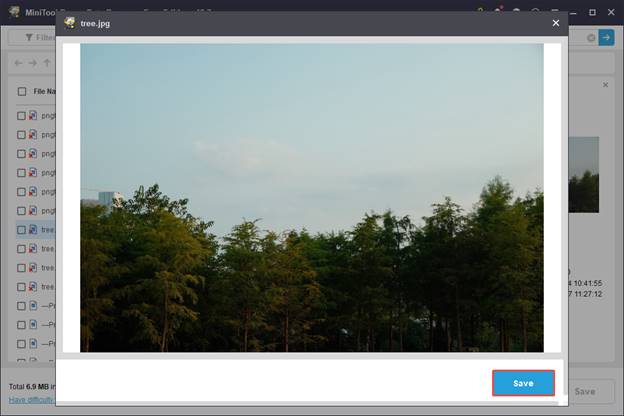
To avoid wasting the 1 GB of free data recovery capacity, double-click on each file you wish to preview.
After you have confirmed that the photo is the one you wish to recover, click Save and select a destination to store it directly from the preview window.
Step 3. Save wanted pictures
Alternatively, select all files you want to recover, and then click the Save button in the scan results window to save all chosen pictures at once.
Next, select a different directory to store the recovered photos to avoid data overwrite, and then click OK.
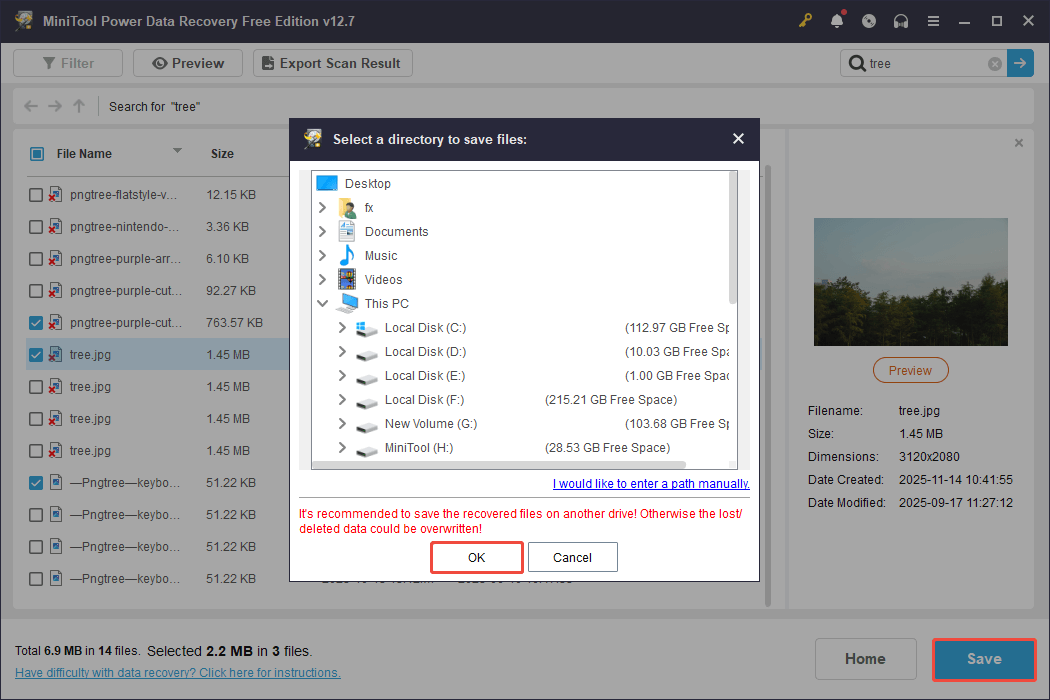
Once the recovery process is complete, you can go to the chosen location to see the recovered pictures.
The free version permits you to restore only 1 GB of files. To retrieve files exceeding this limit, you will need to upgrade to the full edition.
Final Words
To sum up, this guide talks about how to fix the “Windows Pictures folder is missing” issue, including showing hidden files, restoring the default folder location, and changing the registry value data.
Try these methods one by one until you get the Pictures folder back.
In addition, if you want to recover files or folders in the Pictures folder, consider using the four solutions mentioned above.
If you need any help or have any questions when using MiniTool software, please send an email to the support team at [email protected].
About The Author

Position: Columnist
Sandy became an English editor after graduation. She is devoted to finding effective solutions for diverse IT problems and provides articles on data recovery, data backup, and computer partitions and drives. In her spare time, she likes listening to music and playing games.
User Comments :