The “an update service was shutting down” error prevents you from completing the system update. To fix the Windows 11/10 update issue, try to run the troubleshooter, reset Windows Update components, and repair system files. Just follow the instructions in this guide from MiniTool.
Cannot Update Windows as a Service Was Shutting Down
About the Update Error
The Windows Update feature is a built-in component of the operating systems, including Windows 11 and 10. It enables you to check for updates regarding new features, security patches, and bug fixes. Then, it automatically downloads and installs these updates on the PC.
However, during the update, you may encounter an error stating “Updates failed. We could not complete the install because an update service was shutting down”.
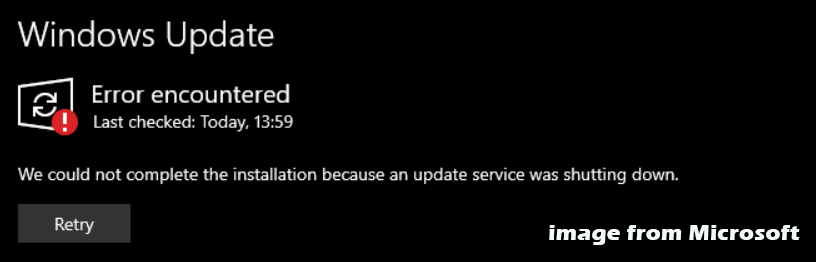
This boresome error blocks you from getting crucial updates to keep the system secure and reliable.
Here is a question: why does the update error occur?
Check out some underlying reasons below.
Why Couldn’t I Complete the Install?
Windows Update may fail to install updates for many reasons. We will demonstrate some popular ones here that cause that error:
- An update service that is shutting down: As it is stated in the error message, the main culprit is related to the update service. A very long period of inactivity or a system hang can lead to the service being idle or shutting down.
- Software conflicts: Third-party applications, especially a third-party antivirus program, may conflict with Windows Update. It can cause the service to crash, preventing the installation.
- Issues with Windows Update components: The components or database regarding Windows Update may be damaged.
- System file corruption: Windows system files may get corrupted, disrupting the update process.
Back up Data Beforehand
Before you fix the update error to install new updates, we recommend backing up important data in advance. This aims to avoid improper operation leading to data loss.
In terms of data backup, MiniTool ShadowMaker, a professional PC backup software for Windows 11/10/8/7, is worth trying. It is renowned for its comprehensive backup and recovery solutions.
In detail, this backup program supports file backup, folder backup, system backup, disk backup, and partition backup. With a backup in hand, it is easy to get back the lost data or restore the problematic system to a previous state.
Additionally, you can run this free backup software to regularly back up your device, ensuring backups are up-to-date. Besides, incremental and differential backups can be easily created.
Now, let us show you how to back up data to an external hard drive.
Step 1: Plug an external hard drive into the PC that encounters “We could not complete the install because an update service was shutting down”.
Step 2: Install and launch MiniTool ShadowMaker Trial Edition.
MiniTool ShadowMaker TrialClick to Download100%Clean & Safe
Step 3: Head to the Backup page. Then, hit SOURCE > Folders and Files, tick the boxes of files or folders you wish to back up, and click OK.
Step 4: Hit the DESTINATION section, go to the Computer tab, and pick an external drive to save backups.
Step 5: After the selection of the backup source and target, tap on Back Up Now to execute the backup immediately.

Upon data backup, it is time to fix the Windows update error by trying the following troubleshooting steps.
How to Fix “An Update Service Was Shutting Down”
To resolve this issue, you can use the Windows Update Troubleshooter, restart Windows update services, repair system files, and try other workarounds.
Now, let’s take a look at these methods in detail.
Basic Checks
Before some advanced fixes, first, we suggest performing basic checks.
Way 1: Restart Windows 11/10
In some cases, a simple restart can fix update-related problems. If you cannot update Windows because a service was shutting down, reboot the system.
To do this, click the Start button, hit Power, and tap on Restart. After that, access Windows Update to check if the error persists.
Way 2: Check Network Connection
Make sure you have a stable network connection. Otherwise, network issues can give rise to update errors, like an update error.

Way 3: Check Disk Space
To complete the installation of Windows updates, the C drive should have enough disk space. Just open File Explorer to check the free space.
If there is not enough space, free up some by running Disk Cleanup or Storage Sense, uninstalling unwanted apps, and deleting unnecessary files. For more information, refer to the guide on how to free up disk space.
If these ways don’t solve the issue, continue troubleshooting by trying the solutions below.
Fix 1: Restart Windows Update Services
To solve the “update service was shutting down” error, restarting the services related to Windows update does the trick. These services include Windows Update, Background Intelligent Transfer Service (BITS), and Cryptographic Services.
Take these steps:
Step 1: Open the Services window.
1. Press Win + R on your keyboard to launch the Run window.
2. Input services.msc in the box and click OK.
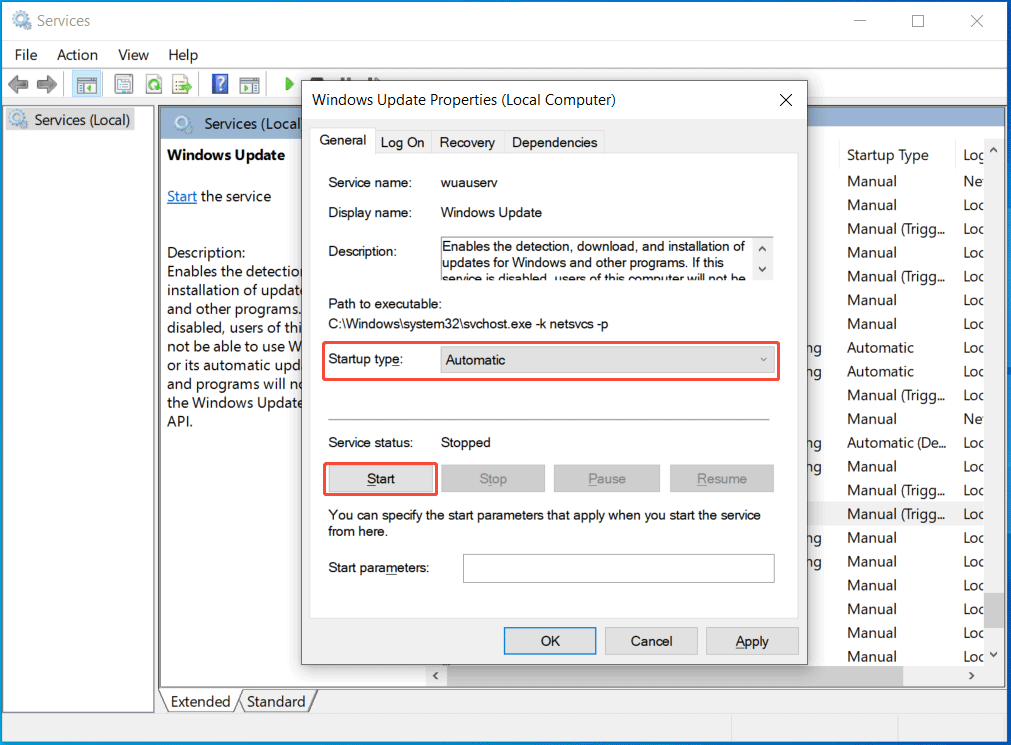
Step 2: Restart the Windows Update service.
- Scroll down and locate Windows Update.
- Right-click on the service and choose Properties.
- In the new window, choose Automatic from the drop-down menu of Startup type.
- If this service is stopped, click Start to run it.
- Save the changes by clicking Apply > OK.
Step 3: Do the same thing for other services, including:
- Cryptographic Services
- Background Intelligent Transfer Service
Step 4: Reboot your computer and run Windows Update again to check if the error disappears.
If yes, proceed with the troubleshooting steps.
Fix 2: Run Windows Update Troubleshooter
Windows 10 and 11 come with many troubleshooters to address some issues with internet connections, printing, Bluetooth devices, Windows Update, and more.
In case the PC cannot update Windows because a service was shutting down, the Windows Update troubleshooter may work. Have a try!
Step 1: Access the Settings window via the Start menu.
Step 2: Go to the troubleshooter list.
- In Windows 11, navigate to System > Troubleshoot > Other troubleshooters.
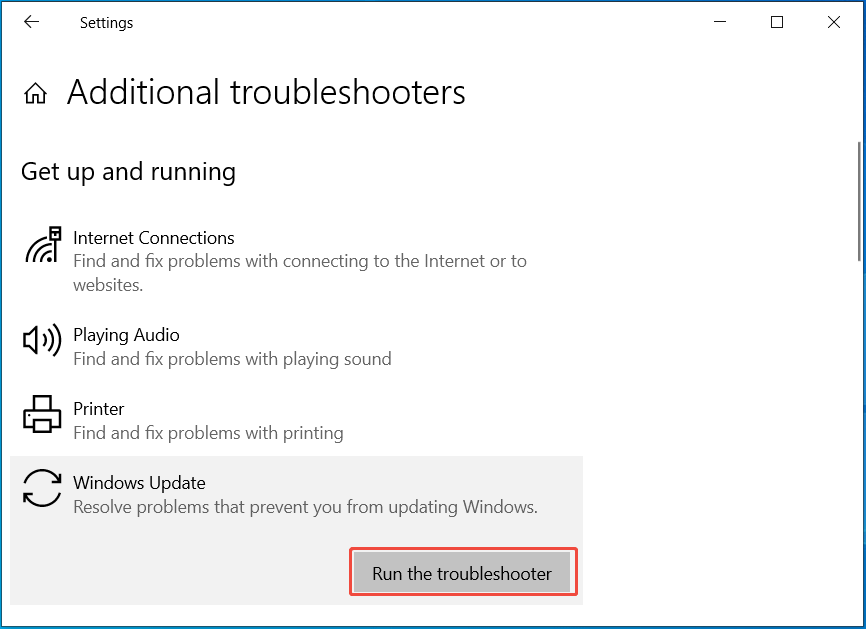
- In Windows 10, head to Update & Security > Troubleshoot > Additional troubleshooters.
Step 3: Run the Windows Update troubleshooter.
- In Windows 11, locate Windows Update, and hit the Run button.
- In Windows 10, hit Windows Update, and then click Run the troubleshooter.
Step 4: The troubleshooter begins detecting problems and then fixes the found issues.
After that, run Windows Update again to check for available updates and install them. It may not throw the error “we could not complete the install because an update service was shutting down”.
Fix 3: Repair System Files
Corruption in system files often triggers various issues, including Windows update failure. According to users, repairing system files can do the trick. So, give it a try.
To run this task, run SFC and DISM.
SFC, short for System File Checker, is tailored for Windows users. It can scan system files for corruption and replace any damaged or incorrect versions with a cached copy.
DISM stands for Deployment Image Servicing and Management. You can run DISM to mount, capture, split, and manage Windows image files. In addition, it allows you to repair Windows system files and images.
Let’s explore how to perform SFC and DISM scans.
Step 1: Run Command Prompt as Admin.
- Type cmd into the Windows 11/10 Search.
- Right-click on Command Prompt and choose Run as administrator.
- Hit Yes in the UAC window.
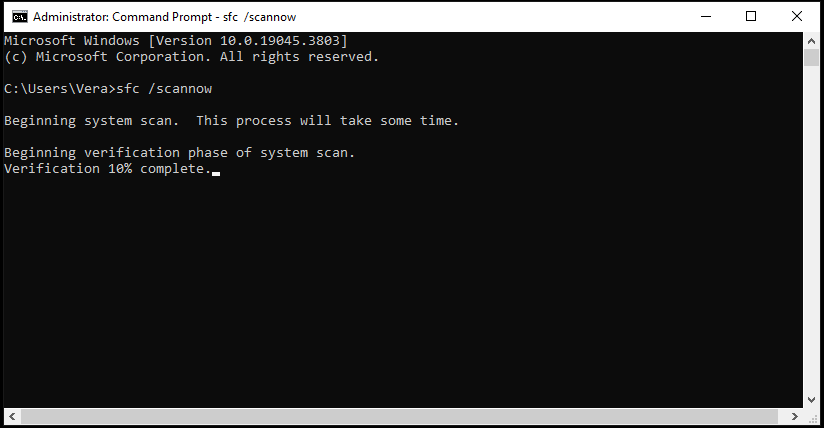
Step 2: Run an SFC scan.
- Input the sfc /scannow command into the CMD window.
- Press Enter to begin the verification phase of the system scan.
- Let the process finish and restart the system.
Step 3: If you still cannot update Windows because a service was shutting down, fire up Command Prompt again.
Step 4: Perform a DISM scan by copying & pasting the following commands one after another and pressing Enter after each one.
- DISM /Online /Cleanup-Image /CheckHealth
- DISM /Online /Cleanup-Image /ScanHealth
- DISM /Online /Cleanup-Image /RestoreHealth
Step 5: It may take several minutes for the operations to be finished. Upon completion, restart the Windows 10/11 PC.
Fix 4: Repair Corrupted Windows Update Database
The error “an update service was shutting down” may stem from corruption in the Windows update database. According to users, repairing the database can effectively resolve the issue.
Here is a tutorial:
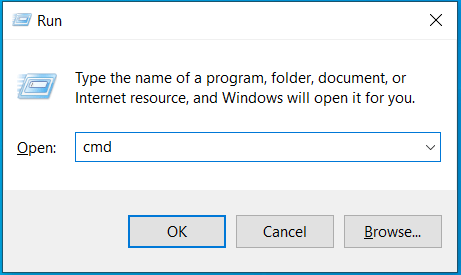
Step 1: Open Command Prompt with admin rights.
- Press Win + R to open Run.
- Input cmd in the box.
- Press Ctrl + Shift + Enter on your keyboard.
- Click Yes in the UAC pop-up.
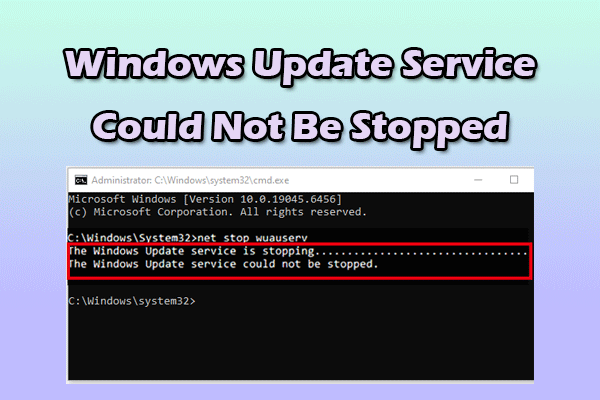
Step 2: Stop some services by typing the following commands one by one and pressing Enter after each.
- net stop wuauserv
- net stop cryptSvc
- net stop bits
- net stop msiserver
Step 3: Execute the commands below to rename the Software Distribution and Catroot2 folder.
- Ren C:\Windows\SoftwareDistribution SoftwareDistribution.old
- Ren C:\Windows\System32\catroot2 Catroot2.old
Step 4: Restart some services by running the following commands.
- net start wuauserv
- net start cryptSvc
- net start bits
- net start msiserver
Step 5: Restart your computer to allow the changes to take effect.
Now, you may install Windows updates without any errors.
Fix 5: Uninstall Third-Party Antivirus Software
“We could not complete the install because an update service was shutting down” may be caused by software conflicts. To be specific, third-party antivirus software may interfere with Windows Update, blocking it from installing updates.
Hence, try to uninstall that software via these steps.
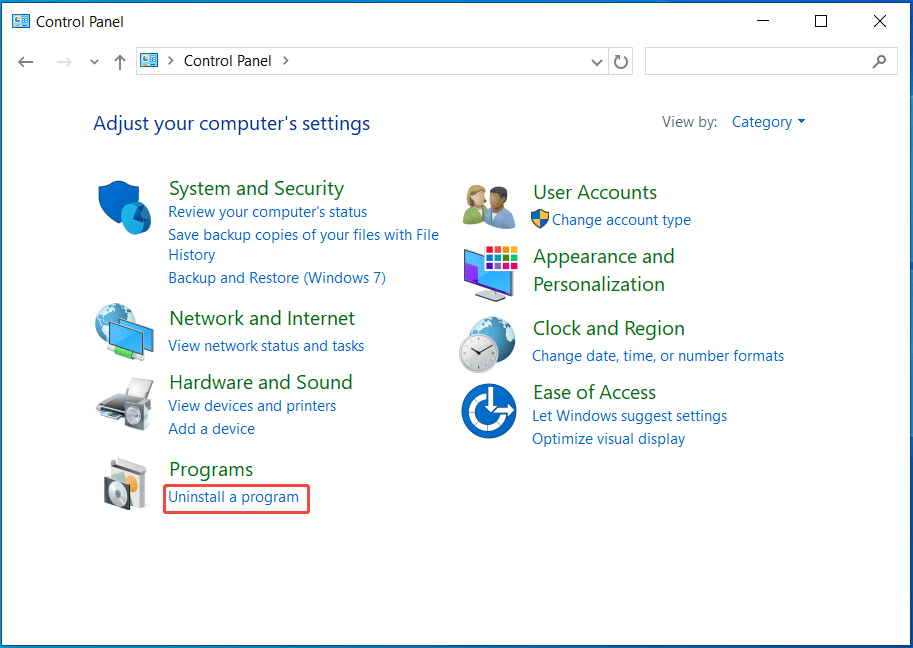
Step 1: Open Control Panel in Windows 11/10.
- Type Control Panel in the Search box.
- Click Open on the right side.
Step 2: Access the Programs and Features window.
- Choose Category from the View by menu.
- Hit Uninstall a program under Programs.
Step 3: Uninstall antivirus software.
- Select the target program.
- Click Uninstall to remove it from your computer.
Fix 6: Perform an In-Place Upgrade
If none of the above solutions can resolve the Windows update issue, consider performing an in-place upgrade.
Next, take these steps to upgrade Windows 11/10 to a new version.
Step 1: Download Media Creation Tool and launch it.
Step 2: Accept the license terms.
Step 3: Choose the Upgrade this PC now option.
Step 4: After downloading Windows, follow the prompts to get ready for the installation.
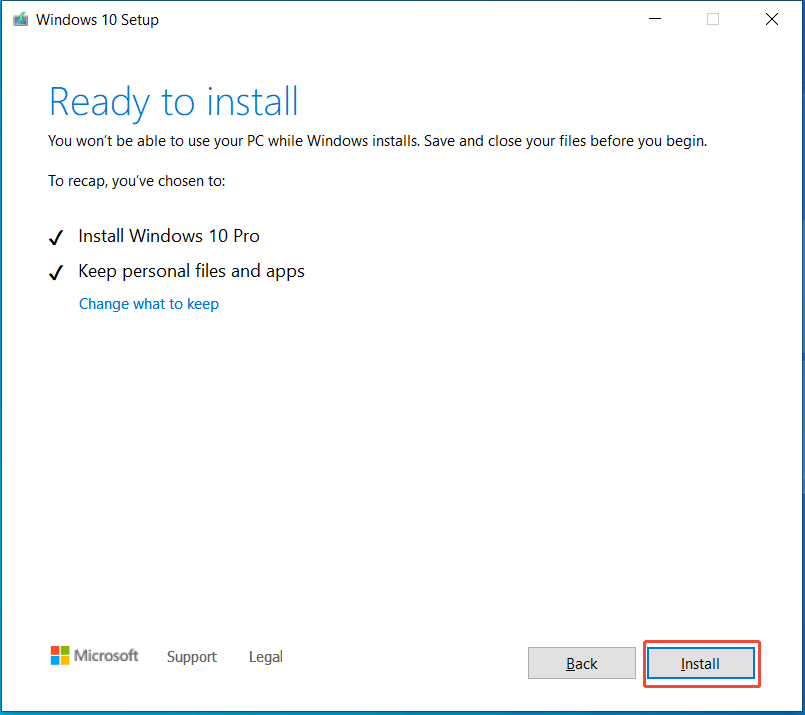
Step 5: On the Ready to install screen, make sure Keep personal files and apps is selected. Then, hit Install to begin the update installation.
Step 6: Wait for installation. Your computer will restart several times.
Bottom Line
It can be frustrating to experience “we could not complete the install because an update service was shutting down”. From this post, you can find how to easily fix this error. Now, restart some services, run SFC & DISM, uninstall antivirus software, and try other workarounds.
We hope these solutions can help you out. After fixing, we recommend running MiniTool ShadowMaker to create a system image. That way, you can quickly restore the machine from a system backup in case of system issues.
An Update Service Was Shutting Down FAQ
1. Go to Settings > Update & Security > Windows Update.
2. Click Change active hours > Change.
3. Set the active hours to cover the times you are using the device.
1. Run Windows Update troubleshooter
2. Disable antivirus software
3. Run SFC and DISM
4. Resize the recovery partition
5. Update .NET Framework
6. Reset Windows Update components
1. Corrupted update files
2. Antivirus interference
3. Background program conflict
About The Author

Position: Columnist
Vera has been working at the MiniTool Team for over 10 years as a technical editor and content writer. She mainly focuses on disk and partition management, data recovery, Windows backup and restore, and PC troubleshooting. Through in-depth software testing and hands-on experience, she has helped users solve a wide range of computer problems and better protect their data on Windows devices.
User Comments :