Sometimes, System Restore could not access a file during the process in Windows 11/10. This guide from MiniTool explains how to disable antivirus software, run a system restore in Safe Mode, check file permissions, perform an SFC scan, and try other options to fix this error.
System Restore Could Not Access a File Windows 10/11
Understanding Error System Restore Could Not Access a File
System Restore is a built-in feature in Windows. It can help revert the computer’s system files, settings, and applications to a previous state.
This feature is useful to undo recent changes and restore your system to a previous state if problems occur after a Windows update or a new installation.
However, System Restore can sometimes fail, producing the error 0x80070005.
Here is the detailed error information:
“System Restore did not complete successfully. Your computer’s system files and settings were not changed.
Details:
System Restore could not access a file. This is probably because an anti-virus program is running on the computer. Temporarily disable your antivirus program and retry System Restore.
An unspecified error occurred during System Restore. (0x80070005)

What Causes System Restore Error 0x80070005
System Restore error 0x80070005 can be caused by:
- Antivirus software interference: This is the most frequent cause. The antivirus program may protect files that System Restore is attempting to modify, resulting in a conflict.
- Corrupted settings: The settings that manage system protection may get damaged, blocking System Restore from working correctly.
- Permission issues: Your user account may not have the necessary admin permissions for system changes, or the System Volume Information folder is set to “read-only”.
- Damaged system files: Critical system files and registry entries required for System Restore to work properly are corrupted by viruses, malware, power outages, and other issues.
- Disabled services: You may disable the Volume Shadow Copy service, which is essential for System Restore.
Fortunately, you can resolve the issue by following the solutions below.
How to Fix System Restore Could Not Access a File Windows 11/10
To successfully perform a system restore, try these methods to address your issue, such as disabling antivirus software, checking the System Volume Information folder, running SFC, and using other workarounds.
Here is a breakdown.
Fix 1: Disable/Uninstall Antivirus Program
System Restore can fail if antivirus software is active. Temporarily disabling it often resolves the issue.
Windows 11 and 10 provide a built-in antivirus, Windows Security, to protect against online threats like viruses and malware.
Take these steps to disable it before a system restore:
Step 1: Press Win + S to open the Search bar, input Windows Security, and choose the best match.
Step 2: Select Virus & threat protection from the Home page.
Step 3: Click Manage settings under Virus & threat protection settings.
Step 4: Locate Real-time protection and toggle the switch to “Off”.

If you use a third-party antivirus program, disable it via the system tray or the app. The steps may vary by software. If you install Avast, refer to our disabling Avast guide.
Additionally, you can uninstall the third-party antivirus software:
Step 1: Access Control Panel and choose Category from the View by menu.
Step 2: Choose Uninstall a program under Programs.
Step 3: Right-click on the antivirus program and select Uninstall.
After disabling or uninstalling the antivirus, run System Restore again to see if the error persists.
Fix 2: Use a Different Restore Point
In some cases, System Restore fails to access a file as the restore point you are using becomes corrupted. To solve this issue in Windows 11/10, try with another restore point.
Step 1: Press Win + R to open the Run dialog box, input rstrui.exe, and click OK.
Step 2: Click Next in the System Restore window.
Step 3: In the restore point list, select a different one to continue.

Step 4: Click Finish, then Yes to start the restore process.
This may resolve error 0x80070005.
If the issue persists, proceed with the following troubleshooting tips.
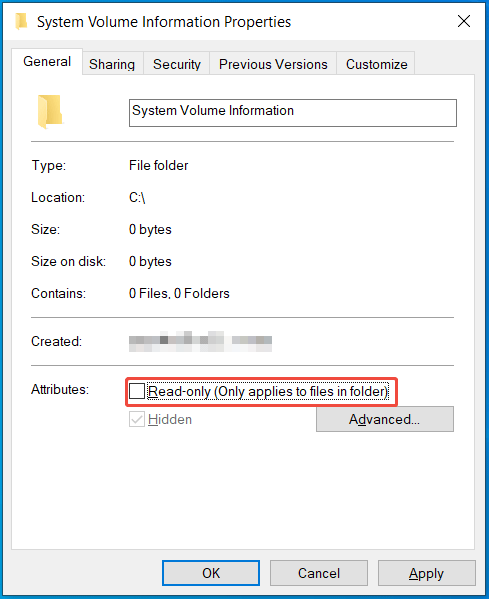
Fix 3: Check System Volume Information Folder
System Restore can fail due to incorrect permission settings, especially when the System Volume Information folder is read-only.
This folder is a hidden and protected folder in Windows that stores system restore points, volume shadow copies, and other crucial system data. Each partition has such a folder.
To adjust the permissions in Windows 11/10:
Step 1: Unhide system files first.
- Open File Explorer by pressing Win + E.
- Go to the View menu and choose Options.
- In the Folder Options window, navigate to the View tab.
- Uncheck Hide protected operating system files (Recommended) and click Yes when prompted.
- Save the change by clicking OK.
Step 2: Change the folder permissions.
- Go to the C: drive and locate the System Volume Information folder.
- Right-click this folder and choose Properties.
- Under the General tab, untick the Read-only attribute, and click OK.
Step 3: Remember to hide the protected operating system files again when done.
Try a system restore and check if you can successfully operate.
Fix 4: Run SFC and DISM
The “System Restore could not access a file” error can stem from corrupted system files. It is recommended to run SFC (System File Checker) and DISM (Deployment Image Servicing and Management) to repair the corruption.
SFC works by verifying the integrity of protected system files and replacing the damaged versions with the correct ones from a cache or installation source. DISM scans the Windows image for corruption and fixes it by downloading replacement files from Windows Update.
Follow the steps:
Step 1: Open an elevated Command Prompt by typing cmd in the Search box and clicking Run as administrator.
Step 2: Type sfc /scannow and press Enter to begin a system scan that will take some time.
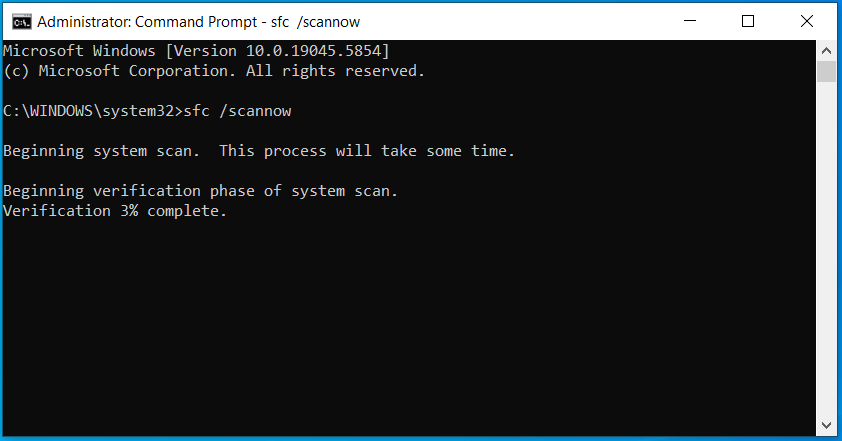
Upon the scan, restart Windows 11/10 and try a system restore. If it still fails with the error 0x80070005, run DISM.
Step 1: Open Command Prompt with admin privileges.
Step 2: Type DISM.exe /Online /Cleanup-Image /Restorehealth and press Enter.
Step 3: Restart the computer and run a system restore.
Fix 5: Run CHKDSK
System Restore may fail if there are drive errors. To resolve the “System Restore could not access a file” issue, run the CHKDSK command.
Step 1: Launch Command Prompt as an administrator.
Step 2: Execute the command: chkdsk c: /f /r to check for drive errors and bad sectors, fix those errors, and recover unreadable data.
Step 3: Since the drive is locked, you need to type Yes and press Enter to schedule the disk check the next time you restart the computer.
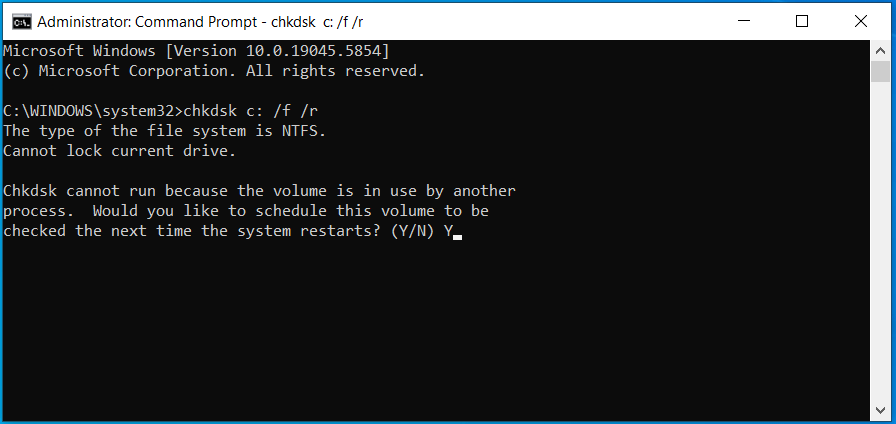
Step 4: Manually reboot the system to start a disk check.
Once completed, use a restore point for a system restore. It may not fail.
Fix 6: Perform a System Restore in Safe Mode or WinRE
If System Restore doesn’t work in the Windows desktop environment, restoring the system in Safe Mode or WinRE is a good option. This can help if a background program is interfering with the restoring process.
In Safe Mode
Step 1: Open the Run window by pressing Win + R, input msconfig, and press Enter.
Step 2: In the Boot tab, check Safe boot, and click OK > Restart.
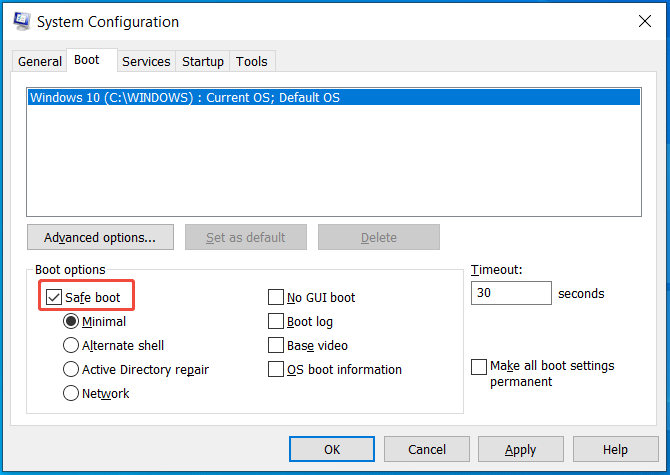
Step 3: Windows 11/10 will boot to Safe Mode.
Step 4: In Run, type rstrui.exe, and click OK to access the System Restore window.
Step 5: Follow the on-screen instructions to start a system restore.
In WinRE
Step 1: Click Start > Power, choose Restart, then hold the Shift key on your keyboard to access Windows Recovery Environment.
Step 2: Navigate to Troubleshoot > Advanced options.
Step 3: Choose System Restore.
Step 4: Follow the on-screen prompts to restore your system to a previous state.
Fix 7: Reset the Repository
This method is recommended by some users in the Microsoft forum. Take these steps to fix the System Restore error 0x80070005.
Step 1: Boot the computer to Safe Mode.
Step 2: Open Command Prompt as admin.
Step 3: Type net stop winmgmt and press Enter to stop the Windows Management Instrumentation (WMI) service.
Step 4: Type winmgmt /resetrepository and press Enter to reset the Repository that refers to a database storing meta-information and definitions for system management.
Step 5: Execute the net start winmgmt command to restart the WMI service.
Step 6: Restart the computer after performing these steps.
Fix 8: Check Volume Shadow Copy Service
The Volume Shadow Copy service is a Windows technology that creates snapshots of a volume at a specific point in time.
However, if this service is disabled, any services that depend on it, such as backup applications and System Restore, will fail to start.
Check this service via the following steps:
Step 1: Type Services in Windows 11/10 Search and press Enter.
Step 2: Double-click on Volume Shadow Copy to open its Properties window.
Step 3: Set Startup type to Automatic. If the status of this service is stopped, click Start.
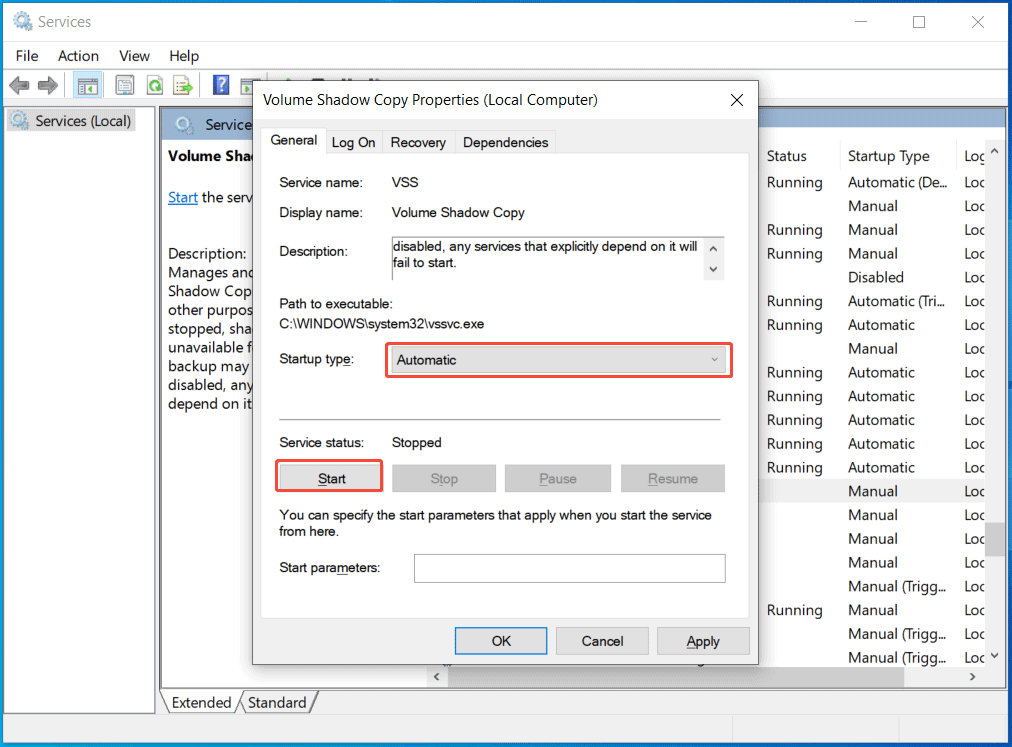
Step 4: Save the changes by clicking Apply > OK.
You may not encounter “System Restore could not access a file” when performing a restore.
Use an Alternative to Back up System
System Restore is a good tool to restore your computer to an earlier state, but it often stops working and throws some errors.
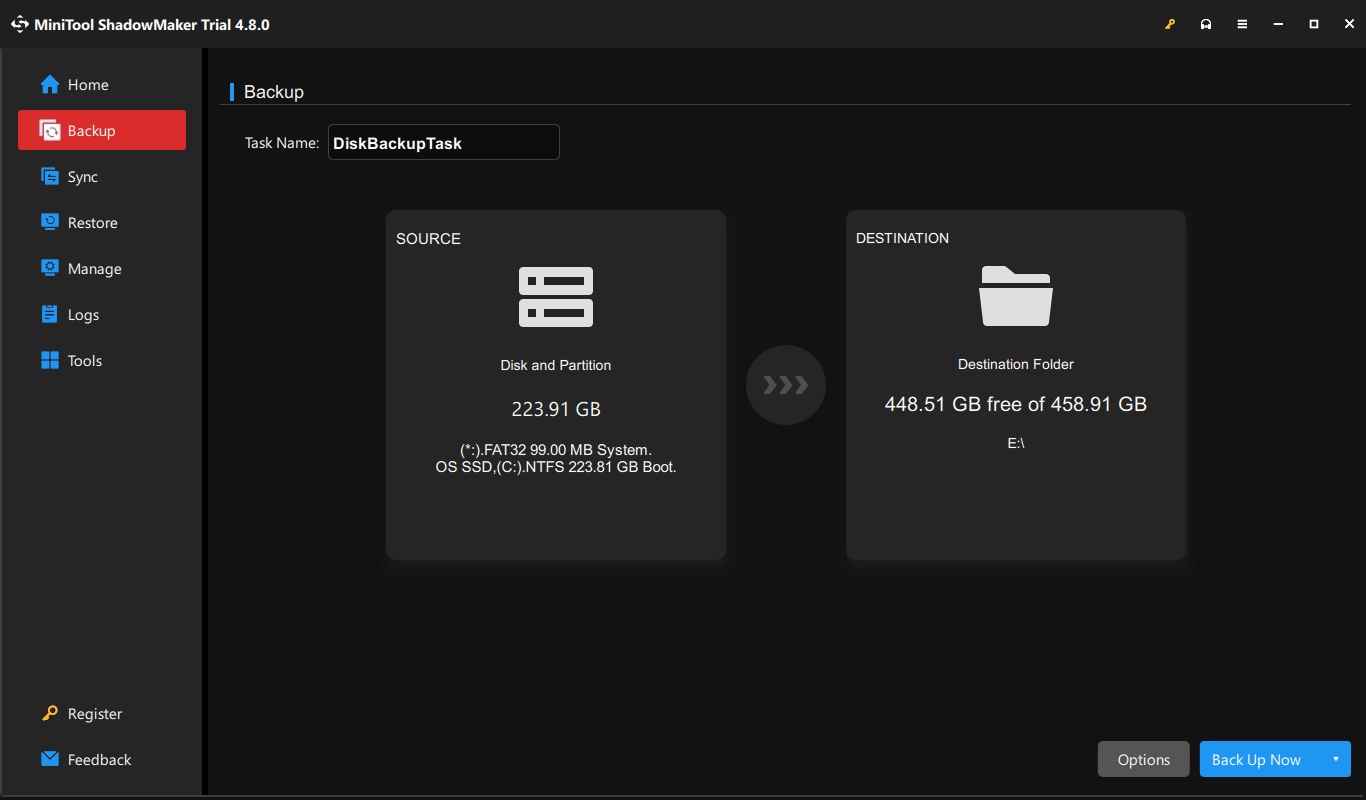
We strongly recommend using another backup solution, such as MiniTool ShadowMaker. It offers more comprehensive and reliable backup and recovery options than System Restore.
This utility features disk, partition, folder, file, and system backup & recovery to protect data and perform a quick disaster recovery.
Moreover, MiniTool ShadowMaker supports creating automatic, incremental, and differential backups. In addition, it provides many advanced options, such as adding a comment for the backup, sector-by-sector backup, password protection, and others.
Here is how to back up Windows 11/10.
Step 1: Plug a USB drive or external hard drive into the PC.
Step 2: Download, install, and launch MiniTool ShadowMaker.
MiniTool ShadowMaker TrialClick to Download100%Clean & Safe
Step 3: On the Backup page, the software automatically selects the system partitions required for Windows to run. You only need to click DESTINATION and pick the USB or external drive to store the backup file.
Step 4: Start the system backup by choosing Back Up Now.
After the backup, go to Tools > Media Builder and follow the on-screen instructions to create a bootable USB drive. In case the system fails to load, use that bootable drive to boot the device and perform a system recovery.
Conclusion
In this comprehensive guide, we introduce the potential causes and 8 effective solutions to fix “System Restore could not access a file”. Try to resolve the issue by taking these troubleshooting steps above.
For a reliable backup and recovery, we recommend MiniTool ShadowMaker. If you have issues when using this program, contact us at [email protected].
System Restore Could Not Access a File FAQ
1. Run CHKDSK
2. Execute the ICACLS * /reset /t /c /q command
3. Run SFC and DISM
4. Perform the net user administrator /active:yes command
5. Adjust file and system settings
2. Use Windows Update Troubleshooter
3. Reset Windows Update components
4. Temporarily disable your antivirus software
5. Run SFC and DISM
1. Restart the computer
2. Try a different USB port
3. Re-download the file
4. Run CHKDSK
5. Run SFC and DISM
6. Update or roll back drivers
7. Disable antivirus software
8. Run the Hardware and Devices Troubleshooter
About The Author

Position: Columnist
Vera has been working at the MiniTool Team for over 10 years as a technical editor and content writer. She mainly focuses on disk and partition management, data recovery, Windows backup and restore, and PC troubleshooting. Through in-depth software testing and hands-on experience, she has helped users solve a wide range of computer problems and better protect their data on Windows devices.
User Comments :