
The “Windows Security Center service can’t be started” error often occurs if the system fails to initialize the Security Center service. Learn what causes the error and how to resolve it in Windows 11/10 through 7 effective methods.
Quick Answer
The “Windows Security Center service cannot be started” issue is usually caused by incorrect service settings, corrupted system files, or third-party conflicts.
You can fix it through these methods:
- Enable Security Center via Registry Editor
- Restart the Security Center service
- Reconfigure the service account
- Repair the WMI Repository
- Fix damaged system files
- Uninstall third-party software
- Run a malware scan
- Reset Windows
Why Windows Security Center Service Cannot Be Started
Understanding the causes behind this error can help you troubleshoot and resolve it quickly. The table below summarizes the most common reasons.
| Cause | Recommended Fix |
| Disabled Security Center service | Enable this service via Registry Editor |
| Misconfigured Security Center service | Set its startup type to Automatic |
| Incorrect service logon account | Run the service as a local service |
| A corrupt WMI Repository | Repair WMI Repository |
| Corrupted system files | Run DISM & SFC |
| Third-party antivirus conflicts | Uninstall third-party antivirus software |
| Malware interference | Run a deep malware scan |
Back Up Your Files Before Fixing the Error
Before fixing the error, it is recommended to back up files to avoid data loss. This is because some solutions, such as editing the registry and resetting Windows, may put your files at risk.
To keep data safe, use the dedicated backup software for Windows 11/10, MiniTool ShadowMaker. It supports various backup types, including file/folder/system/partition/disk backup, offering comprehensive protection to your PC.
MiniTool ShadowMaker TrialClick to Download100%Clean & Safe
Step 1: Connect a USB drive or an external hard drive to the computer.
Step 2: Launch MiniTool ShadowMaker and go to the Backup tab.
Step 3: Click SOURCE > Folders and Files, browse your PC to select the files you want to back up, and choose OK.
Step 4: Click DESTINATION and select the connected drive to store the image file.
Step 5: Begin the backup task by clicking Back Up Now.

After data backup, follow the instructions to fix the “Windows Security Center service can’t be started” error.
How to Fix Windows Security Center Service Cannot Be Started
Solution 1: Enable Security Center Service
If the Security Center service is disabled in the registry, the error can occur in Windows 11/10. Check the registry and ensure the service is enabled.
Step 1: Press Win + R to open the Run box.
Step 2: Type regedit in the box and click OK to enter Registry Editor. If prompted by User Account Control, click Yes on the popup window.
Step 3: In the address bar of the Registry Editor, copy and paste the path below. HKEY_LOCAL_MACHINE\SYSTEM\CurrentControlSet\Services\SecurityHealthService
Step 4: Double-click the Start.
Step 5: If the Value data is set to 4, it means that Windows Security Center is disabled. Set it to 2 and click OK to save the changes.
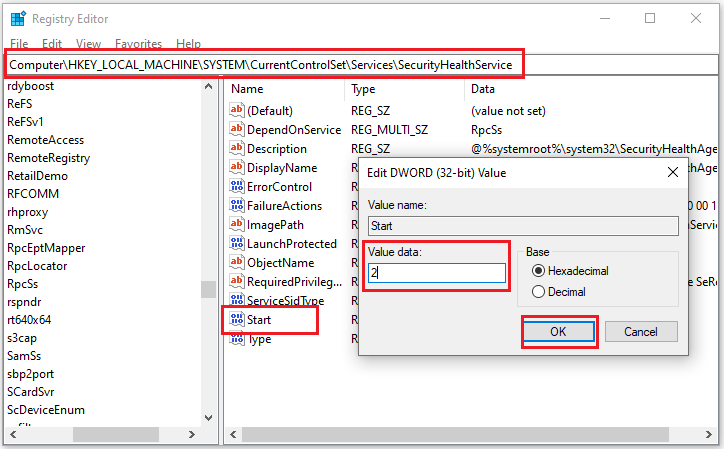
Step 6: Do step 4 and step 5 for below path as well: HKEY_LOCAL_MACHINE\SYSTEM\CurrentControlSet\Services\wscsvc
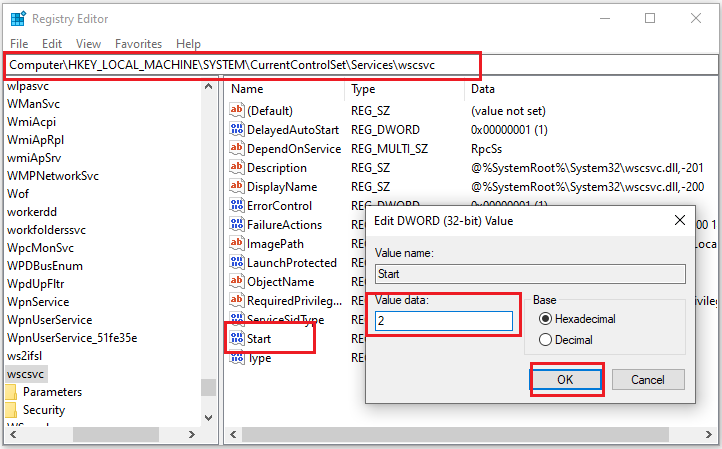
When all steps are finished, quit Registry Editor and check if you’ll receive the error message.
Solution 2: Configure Security Center Correctly
To start Windows Security Center properly, make sure that the Security Center service is configured correctly. To do this, follow these steps:
Step 1: Press Win + R to open the Run box.
Step 2: Type services.msc in the box and click OK to open Service.
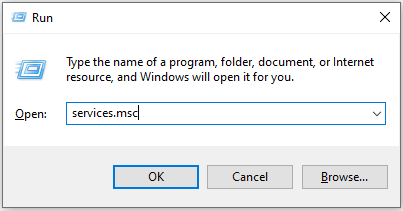
Step 3: Locate and right-click Security Center, and select Properties.
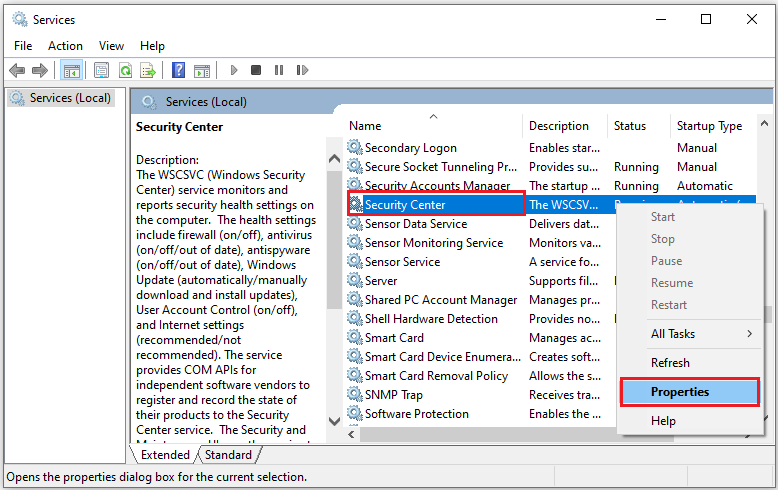
Step 4: Go to the General tab > Startup type to Automatic > Start.
Step 5: Then click Apply > OK.
Step 6: After finishing all the steps, reboot your computer.
Run Security Center Service as a Local Service
The Windows Security Center service disabled automatically issue may occur when the Security Center service is not running under the Local Service account. To fix the issue, follow these steps to run the service as a local service.
Step 1: Press Win + R to open the Run box.
Step 2: Type services.msc in the box and click OK to open Service.
Step 3: Locate Security Center and double-click it.
Step 4: Go to the Log On tab, then select This account and click Browse.
Step 5: Type Local Service in the box and click OK to go on.
Step 6: Input the password, confirm the password and click Apply > OK.
Step 7: Repeat all the above steps for another service – Windows Management Instrumentation.
Step 8: Reboot Your computer to see if this problem is solved.
Solution 4: Repair the WMI Repository
A corrupt WMI Repository can make Windows Security Center fail to start, so repairing it can fix the issue in most cases. Here’s how to do it.
Step 1: Type cmd in the search box to locate Command Prompt and choose Run as administrator.
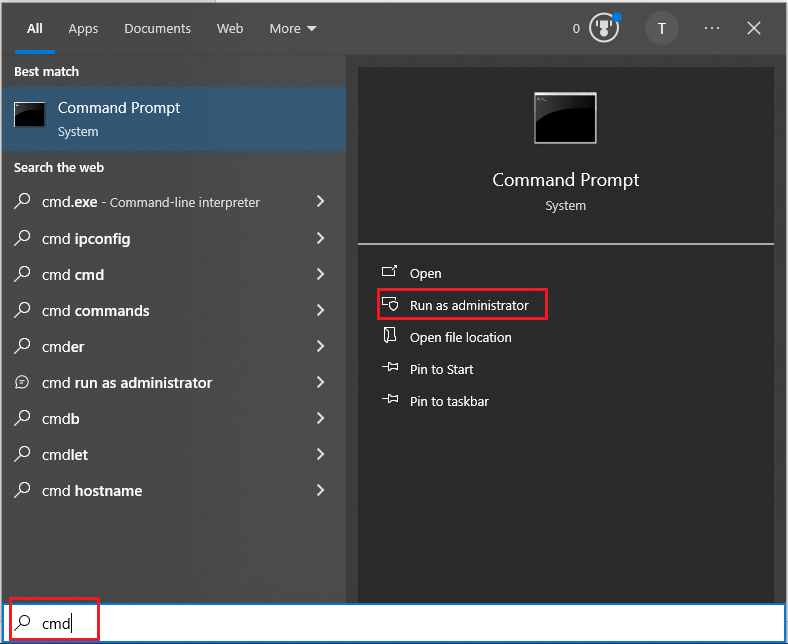
Step 2: Type winmgmt /verifyrepository and hit Enter.
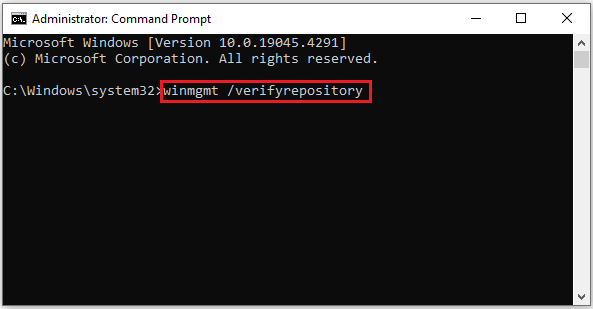
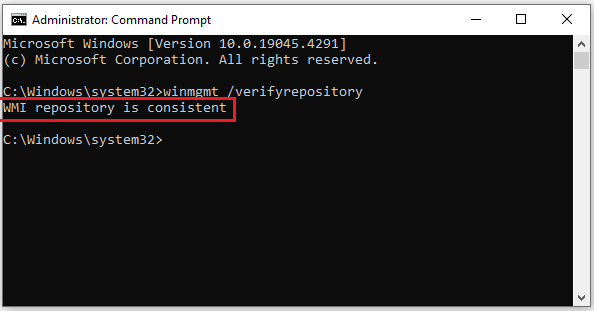
But if you get the message “WMI repository is inconsistent”, it means the WMI repository is corrupted and you need to repair it. To do so, follow the steps below:
Step 3: Type winmgmt /salvagerepository and hit Enter.
Step 4: After getting the message “WMI repository has been salvaged”, restart your PC to check if the Windows Security Center service missing issue is fixed.
Solution 5: Run DISM and SFC
Corrupted system files can trigger the “Windows Security Center Service cannot be started” error. Running DISM and SFC is helpful to address your issue.
Step 1: Type cmd in the search box to locate Command Prompt and choose Run as administrator.
Step 2: Type DISM /Online /Cleanup-Image /RestoreHealth and press Enter to perform a DISM scan.
Step 3: Type sfc /scannow and hit Enter.
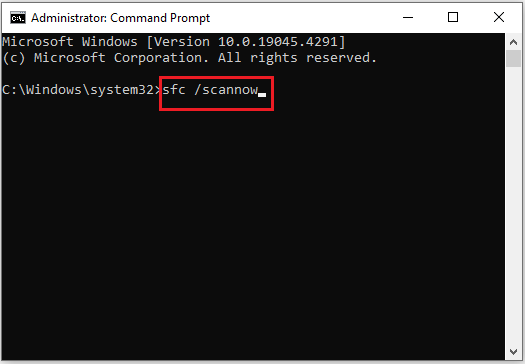
Step 4: When the process ends, reboot your computer.
Solution 6: Disable or Uninstall Antivirus Software
Some third-party security software may conflict with Windows, resulting in Windows Security Center service not starting. Temporarily disabling or uninstalling the software can help.
To disable the software, access the settings page in the app itself, or right-click the icon in the taskbar and choose the proper option.
To uninstall the antivirus software:
Step 1: Type Control Panel in the search and press Enter.
Step 2: Set View by to Category and click Uninstall a program under Programs.
Step 3: Right-click the target program and choose Uninstall.
Check if the error is resolved.
Solution 7: Reset Your Windows
If none of the above solutions have worked, it might be time for the last resort.
To fix the error once and for all, we recommend that you back up all your data and reset Windows to its factory defaults. We hope you don’t need to do this, but it’s better than using your computer without a functioning Windows Security Center.
Step 1: Click Start > Setting > Update & Security > Recovery.
Step 2: Find Reset this PC part from the right-hand panel and click on the Get started button.
Step 3: Choose to Keep my files or Remove everything (take the latter as an example).
Step 4: Choose from Just remove my files and Remove files and clean the drive.
Step 5: Click Next > Reset > Continue and wait the process to complete.
Bottom Line
To conclude, this post has presented seven methods to fix the security center service can’t be started issue. If you get the same error message, you can take them and try them out.
In addition, MiniTool ShadowMaker is a good choice to create a backup to keep your system and data safe. If you have any problem about MiniTool ShadowMaker, please don’t hesitate to contact us via [email protected].
Windows Security Center Service Cannot Be Started FAQ
1. Close the fake alert without clicking any button or calling the phone number
2. Clear browsing cache
3. Remove strange extensions
4. Run a full system scan
About The Author

Position: Columnist
Vera has been working at the MiniTool Team for over 10 years as a technical editor and content writer. She mainly focuses on disk and partition management, data recovery, Windows backup and restore, and PC troubleshooting. Through in-depth software testing and hands-on experience, she has helped users solve a wide range of computer problems and better protect their data on Windows devices.
User Comments :