Want to image a computer in Windows 10 but don’t know how? This article from MiniTool will offer the answer to you. After reading, you can learn how to image a computer Windows 11/10 using professional imaging software – MiniTool ShadowMaker and Backup and Restore (Windows 7).
What is Imaging a Computer
Imaging a computer also known as imaging a disk, means to create an image backup for the whole hard drive, including the operating system, boot files, applications, and all the other files. Creating an image of the computer or imaging the hard drive is an effective way to keep the computer and files safe. System imaging is a full backup of everything on the hard disk or a single partition of your PC. Once you have a complete system image, you can copy it back to a drive to restore your system state.
If your computer fails to boot due to the system crash, Windows update errors, incompatible drivers, virus attack, malware or some other reasons, you can choose to restore your computer to the previous state with the hard drive images created before. In addition, if your data is lost by accidents, you can restore them by the backups.
However, do you know how to image a computer Windows 11/10? In this post, we will introduce 2 free computer imaging software to do that.
How to Image a Computer Easily: 2 Options
To create a Windows computer image, two ways are available. The first method is using the Windows built-in imaging tool, Backup and Restore (Windows 7), to create a system image. The other option is using a third-party computer imaging software, such as MiniTool ShadowMaker. In this section, we will show how to image a computer with the two software.
Option 1: Image a Computer with MiniTool ShadowMaker
It is highly recommended to create system image Windows 10 with MiniTool ShadowMaker. It is a piece of professional backup software and is designed to back up the operating system, files, folders, disks and partitions. It also enables you to move Windows to another drive when you just buy a new HDD or SSD.
Besides those backup features, MiniTool ShadowMaker is also a piece of file sync software which enables you to sync files to two or more locations so as to keep data safe.
With the system image created by MiniTool ShadowMaker, it is able to restore your computer to a normal state when the system is crashed or attacked. Or, you can restore the files if they are deleted mistakenly.
Now, follow the instructions on how to use this computer imaging software.
Step 1: Download MiniTool ShadowMaker, install and launch it.
MiniTool ShadowMaker TrialClick to Download100%Clean & Safe
Step 2: Click Keep Trial to enter its main interface and click the Backup tab.
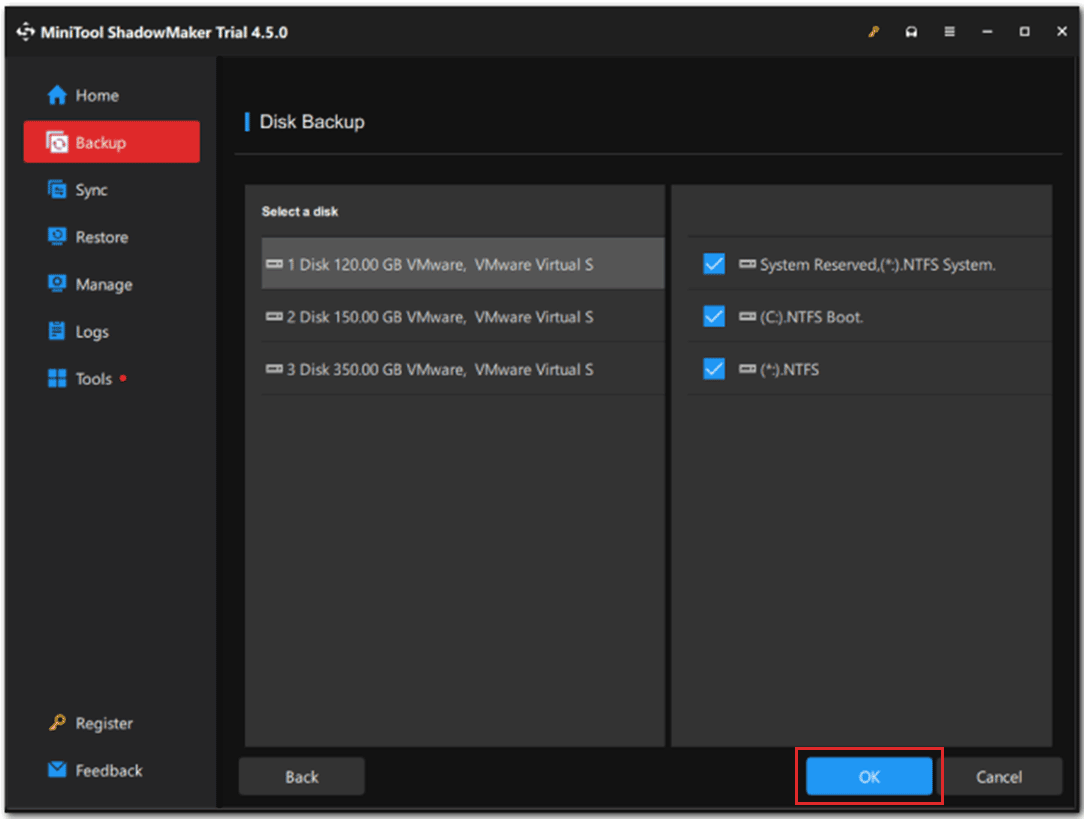
Step 3: Click SOURCE and choose Disk and Partitions to select the system disk and check all partitions on this hard drive. Then click OK.
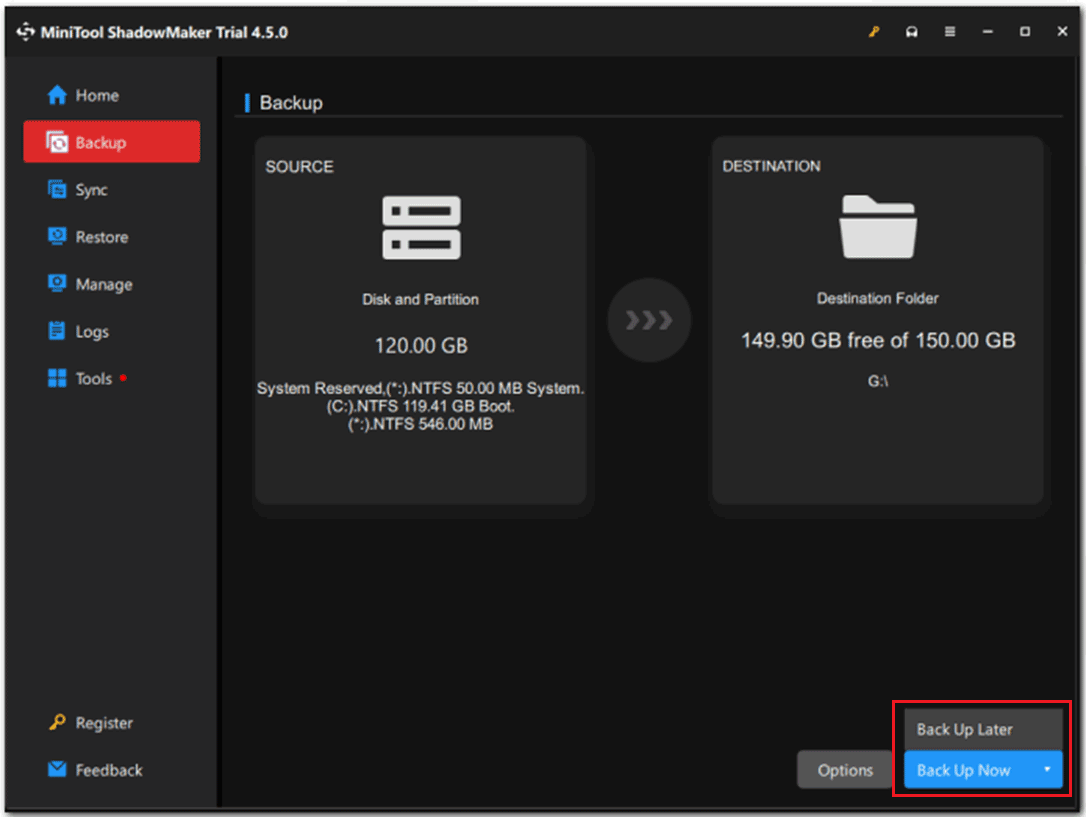
Step 4: Next, click DESTINATION to choose a target disk to save the backup image. A USB drive or an external hard drive is recommended to be the destination path. And then click OK to continue.
Step 5: After that, you can click Back Up Now to start to image the computer immediately or to delay the backup task by clicking Back Up Later.
Once all steps are finished, you successfully create a disk image Windows 10. To further protect the computer, you had better go to the Tools tab to click Media Builder feature to create a bootable USB drive. When your computer fails to boot, you can use it to boot and restore the computer to a normal state with the system image created before.
Option 2: Image a Computer with Backup and Restore (Windows 7)
As mentioned in the above part, Microsoft provides a Windows built-in imaging tool, Backup and Restore (Windows 7) which helps users to back up and restore PC when needed. Here are the details on how to use this software to image a computer.
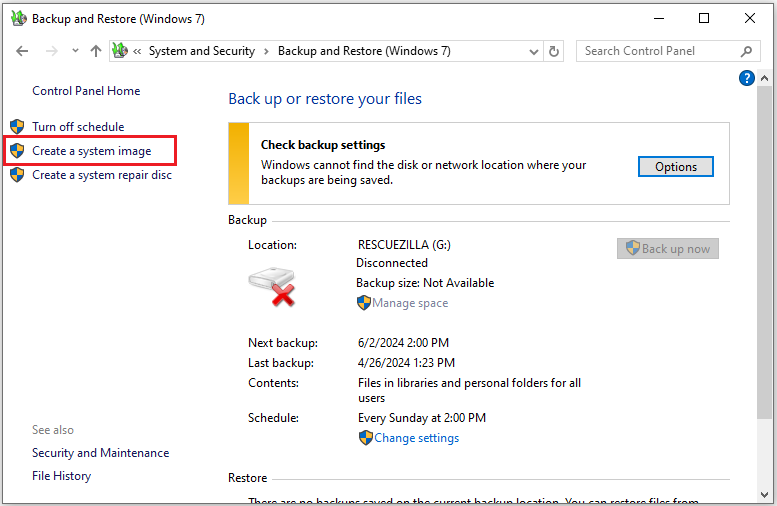
Step 1: Open Control Panel > click System and Security > Backup and Restore (Windows 7).
Step 2: In the pop-up window, click Create a system image from the left menu to activate system backup.
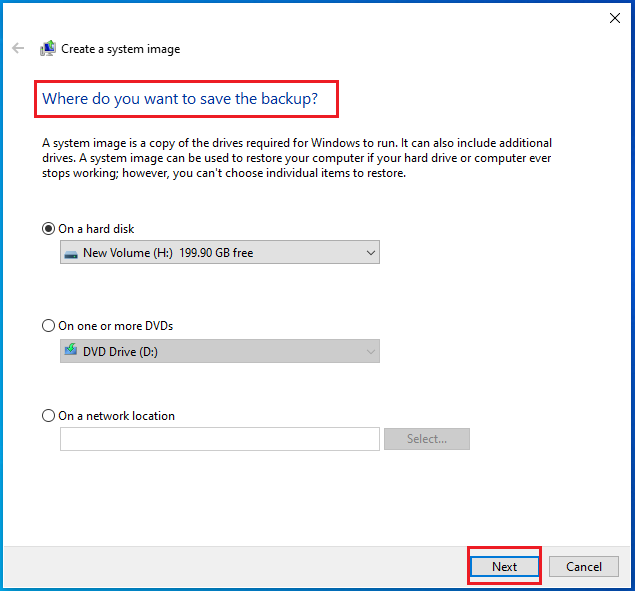
Step 3: Next, you are required to choose a target disk to save the backup. It enables you to select a hard disk, a DVD drive, or a network location (another external hard drive is recommended). After the selection, click Next to go on.
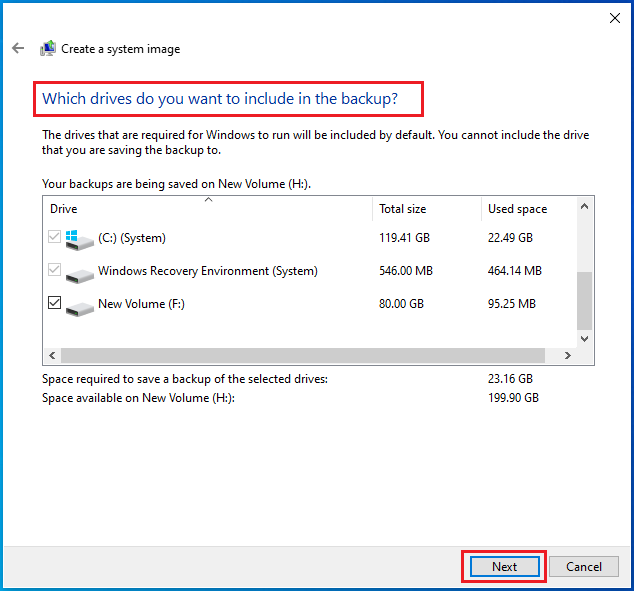
Step 4: Decide which drives to be included in the backup. All system-related partitions are checked by default. You should check the left partitions on the system disk. Then click Next.
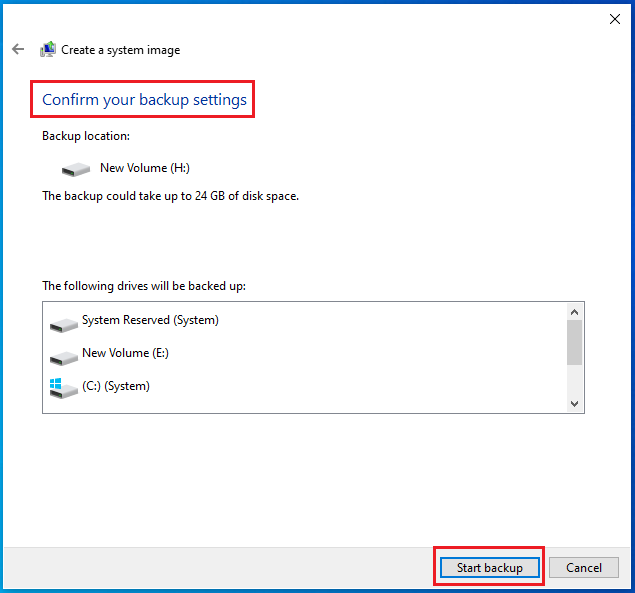
Step 5: Finally, confirm the backup settings and click the Start backup button to perform computer imaging.
Once all steps are finished, you have created a system image Windows 10 successfully. If your computer comes across some errors, you can restore your computer to a previous state with the created system image backup. Just do that by entering WinRE and go to the Troubleshoot > Advanced Options > System Restore.
Another Way to Back up Hard Drive – Disk Clone
What’s more, MiniTool ShadowMaker supports cloning HDD to SSD and also enables you to clone SSD to larger SSD. When your old HDD/SSD is not performing well, you can clone the entire disk to another drive for disk data backup and then replace the old disk with the new one.
To clone disk, here are details.
MiniTool ShadowMaker TrialClick to Download100%Clean & Safe
Step 1: Launch MiniTool ShadowMaker and click Keep Trial to enter its main interface.
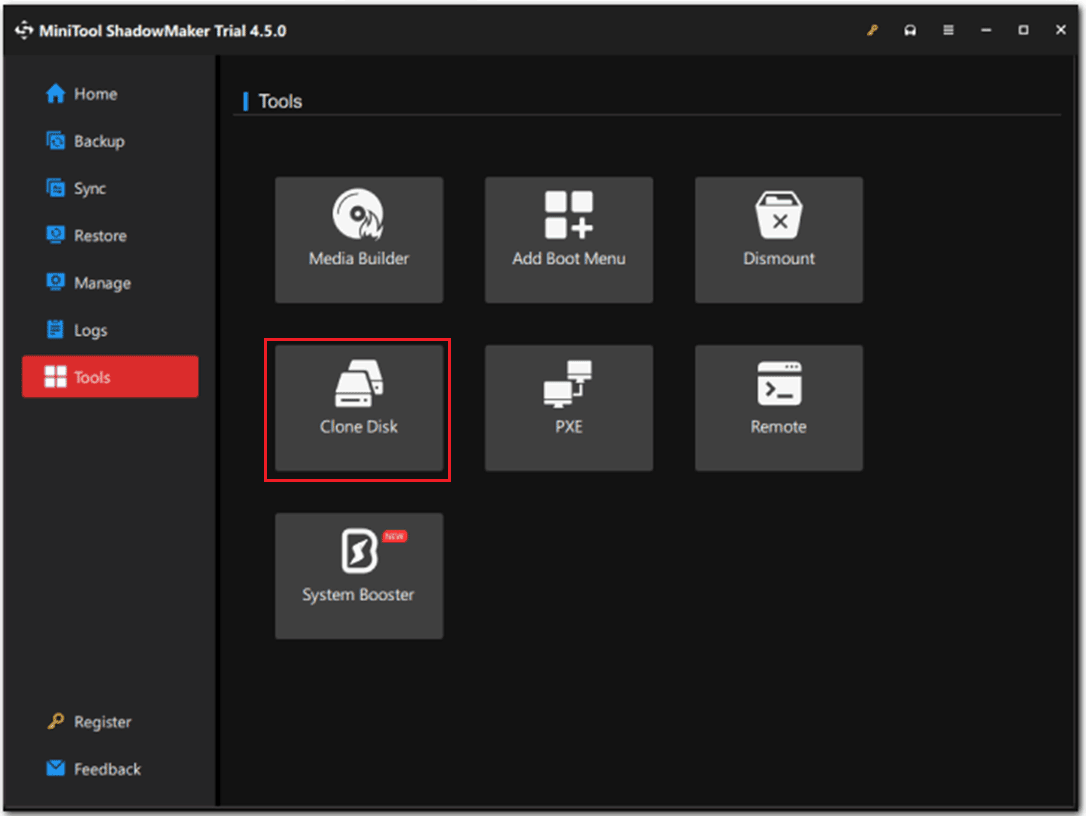
Step 2: Go to Tools tab and select Clone Disk.
Step 3: Click the Options button at the bottom.
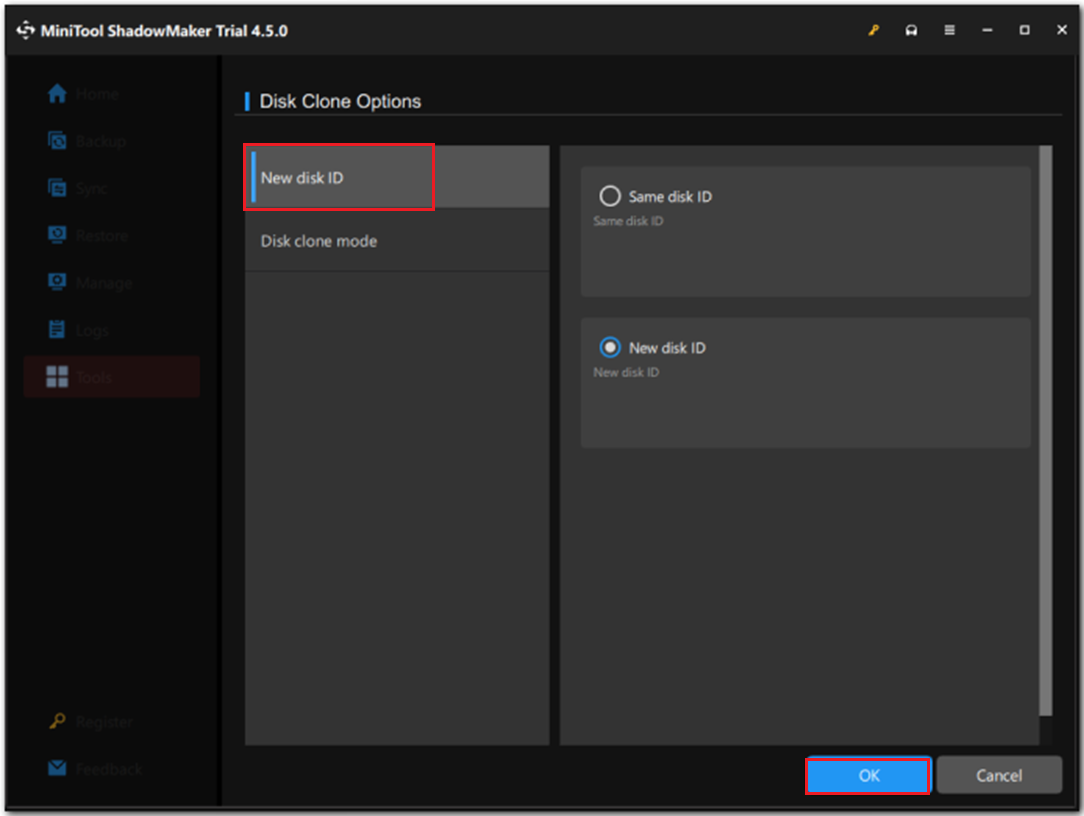
Step 4: Select Same disk ID or New disk ID under the New disk ID tab according to your requirement.
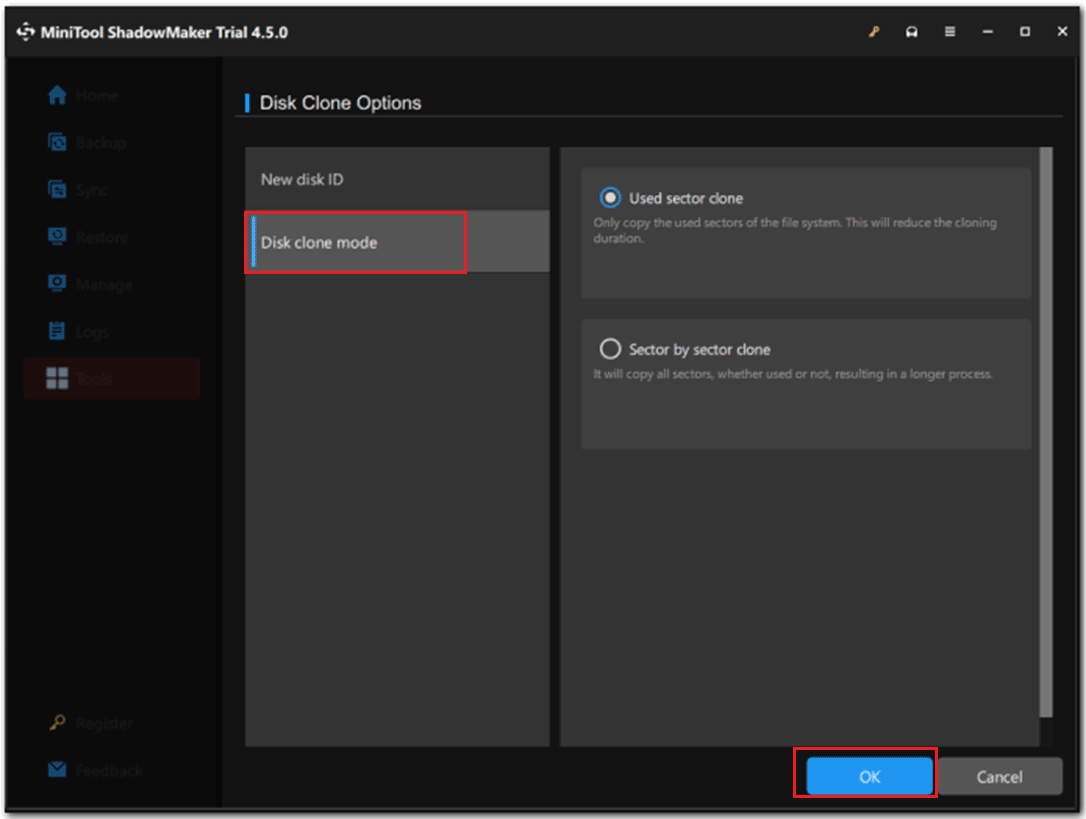
Step 5: Switch to Disk clone mode, and then select Used sector clone or Sector by sector clone. Then click OK to save the settings.

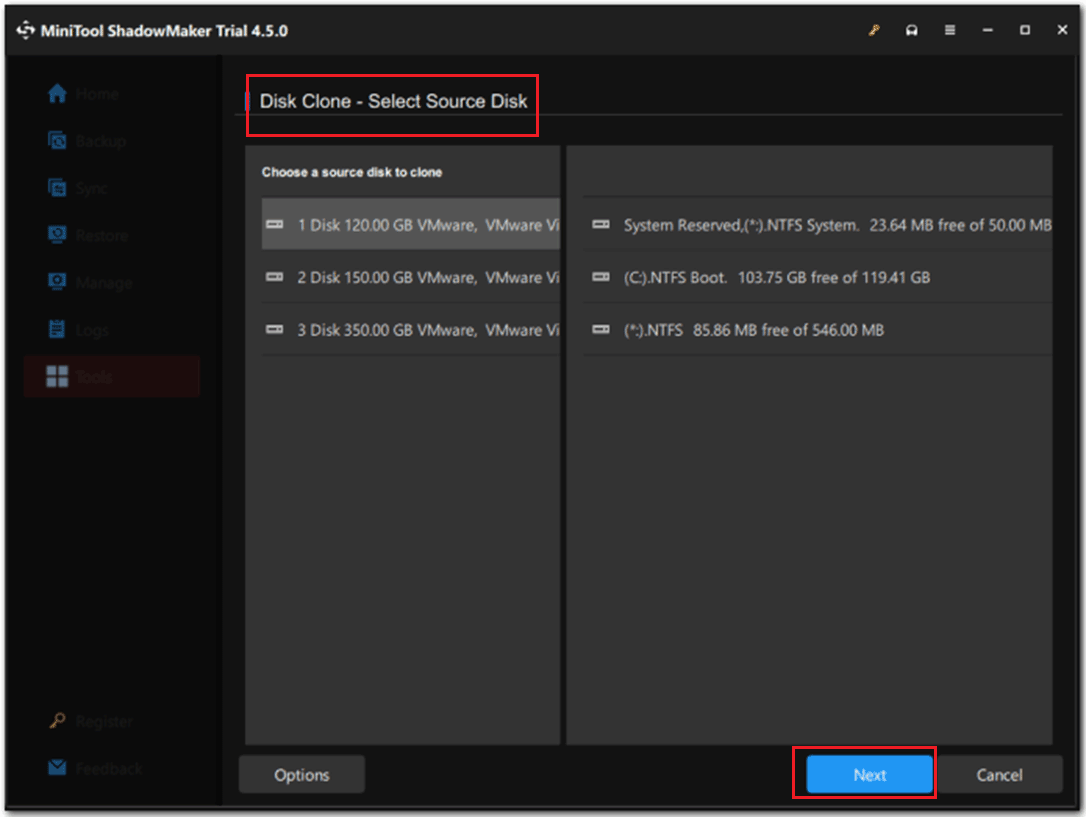
Step 6: Choose the disk you want to clone, then click Next.
Step 7: On the next page, choose where to store the copy. Then click Start to begin the process.

Step 8: When you confirm the disk cloning, the cloning process begins. Please wait patiently until the process is finished successfully.
When the disk cloning process is finished, if you select Same disk ID in step 4, you will receive a warning message which tells you that the source disk and target disk have the same signature. Therefore, one disk is marked as offline by Windows, you need to remove one that you don’t need.
Once all steps are finished, the original system disk has been backed up. If your computer encounters some accidents, you can connect the target disk to the computer and boot from it.
MiniTool ShadowMaker vs Backup and Restore (Windows 7)
MiniTool ShadowMaker and Backup and Restore (Windows 7) are two pieces of computer imaging software. What are the differences between MiniTool ShadowMaker and Backup and Restore (Windows 7)? MiniTool ShadowMaker is more powerful and flexible than the Windows built-in feature, for example:
- MiniTool ShadowMaker supports imaging a computer to a USB flash drive, while Backup and Restore (Windows 7) can’t.
- MiniTool ShadowMaker offers 3 backup schemes and you can change them yourself. The Windows snap-in tool does not have this option.
- MiniTool ShadowMaker provides more features, such as syncing file, cloning disk, creating a bootable drive, PXE, encrypting the backup image, etc.
- MiniTool ShadowMaker allows you to make multiple backups and previous backups won’t be deleted. While Backup and Restore (Windows 7) only enables you to keep one system image backup on a drive and all other previous backup versions will be overwritten.
- When using Backup and Restore (Windows 7), you may encounter some errors, such as Windows Backup not working, Windows Backup stuck, etc.
Further Reading: How to Image One Computer to Another?
If your computer is replaced with a new hardware, your computer is likely to crash due to hardware incompatibility problems. Thus, you are required to restore the operating system image to different hardware. To do it, MiniTool ShadowMaker is a good choice.
MiniTool ShadowMaker TrialClick to Download100%Clean & Safe
Step 1: Back up the operating system of the computer with MiniTool ShadowMaker.
Step 2: Create a bootable USB flash drive with Media Builder in the Tools page.
Step 3: Then, enter the BIOS page to boot your computer with a new hardware from the bootable USB drive.
Step 4: Go to the Restore tab and find the system image you have created, and click the Restore button to choose a version. Then click the Next button.
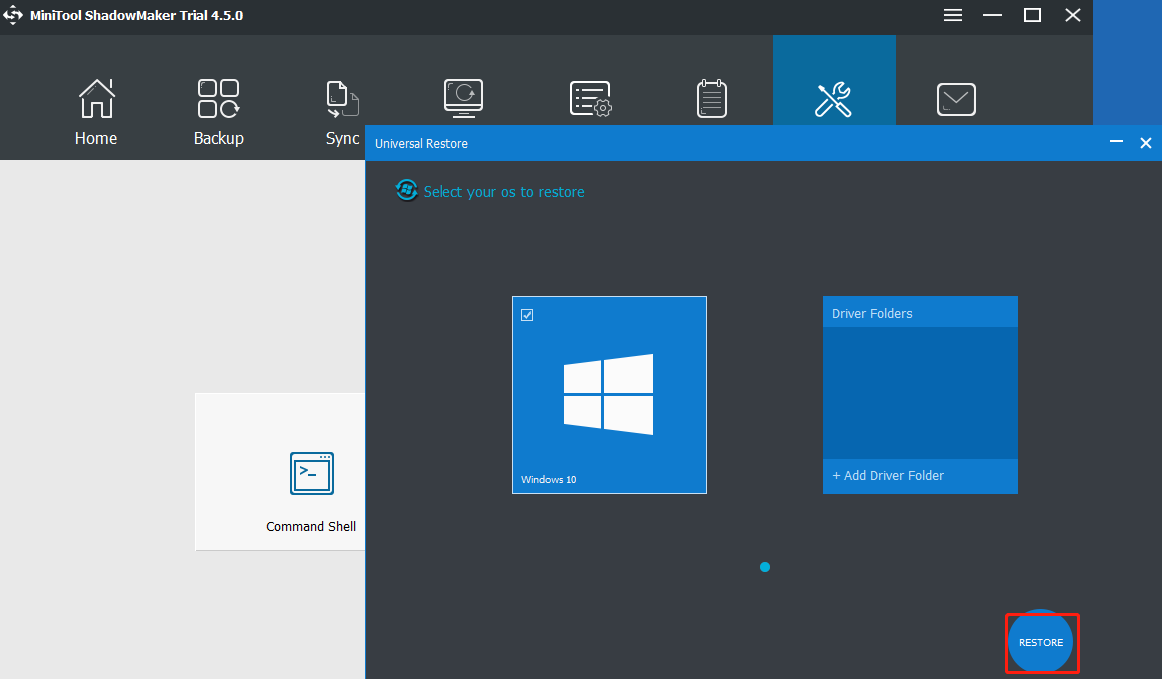
Step 5: After the system is restored, go to Tools to click the Universal Restore feature.
- MiniTool ShadowMaker will then automatically detect the installed operating system on the hard drive, for example, Windows 10. Just click Restore button to perform a repair.
- Later, you can reboot the PC with a new hardware without incompatibility issue.
Bottom Line
There are two pieces of computer imaging software mentioned in this post, you can try them to create a system image to protect your computer from a system crash or hard disk issue.
If you have any problem with MiniTool ShadowMaker, please feel free to contact us via [email protected] and we will reply to you as soon as possible.
User Comments :