If Startup Repair cannot repair this computer automatically, you should try removing external devices, running bootrec.exe, booting into Safe Mode, using SFC and CHKDSK, restoring the system, and so forth. Read this MiniTool post, which will walk you through the detailed steps of each method.
Startup Repair Cannot Repair This Computer Automatically
Overview of Startup Repair
Startup Repair is a recovery tool specifically designed for the Windows system, aiming to assist users in resolving various system issues that may prevent the PC from starting properly.
This tool typically runs in the Windows Recovery Environment (WinRE), especially when it is impossible to access the system desktop. It can automatically detect the system partitions on the hard drive, analyze and rebuild the damaged boot configuration data (BCD), and repair the lost system files.
Moreover, Startup Repair can also identify some hardware-related problems, such as abnormal hard drive connections or partition table errors. Then it will perform automatic repairs if possible, allowing your computer to resume its normal startup process.
PC Stuck in Startup Repair
However, many users report that they are prompted with the error message “Startup Repair cannot repair this computer automatically” or “Automatic Repair couldn’t repair your PC” and then get stuck in the startup repair loop.
Technically, this problem could be caused due to the following factors:
- An incompatible external device connected to the computer.
- Corrupted system files on the system disk.
- Faulty Master Boot Record (MBR) on the hard drive.
- Virus attacks.
- Disk write errors.
- Sudden power interruptions.
- Disk damage.
Luckily, the following methods can help resolve this issue effectively.
Suggestion: Back up Your Data in Advance
The following operations might lead to accidental data loss. Therefore, before going for the solutions, let’s first protect your precious data by backing it up. To back up your data, you can try MiniTool ShadowMaker. It is a PC backup software compatible with Windows 7/8/8.1/10/11.
This program is so powerful that you can perform file backup, system backup, partition backup, and disk backup. For those who hope to improve the overall performance of the computer, cloning HDD to SSD and moving Windows to another drive are supported. Don’t hesitate to download this 30-day free trial and enjoy its services now!
When you encounter a situation where you cannot access the system, you can utilize MiniTool ShadowMaker to back up the important items.
Create Bootable Media
Firstly, you can create a bootable USB flash drive so that you are capable of booting an unbootable Windows machine and performing backup and restore.
Step 1. Connect an empty USB flash drive to a working computer and then download & install MiniTool ShadowMaker on it.
MiniTool ShadowMaker TrialClick to Download100%Clean & Safe
Step 2. Launch the software and click on Keep Trial to enter its main interface.
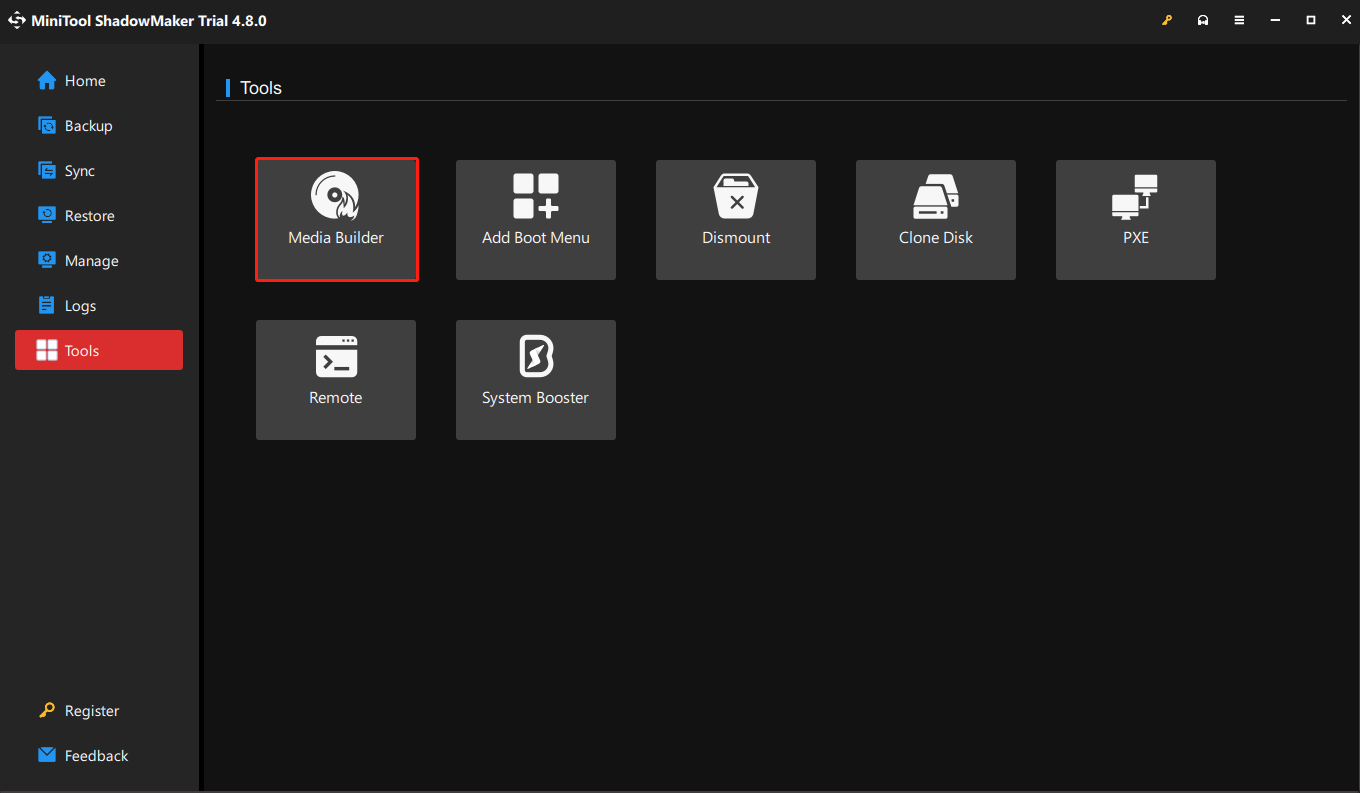
Step 3. Go to the Tools page and select Media Builder.
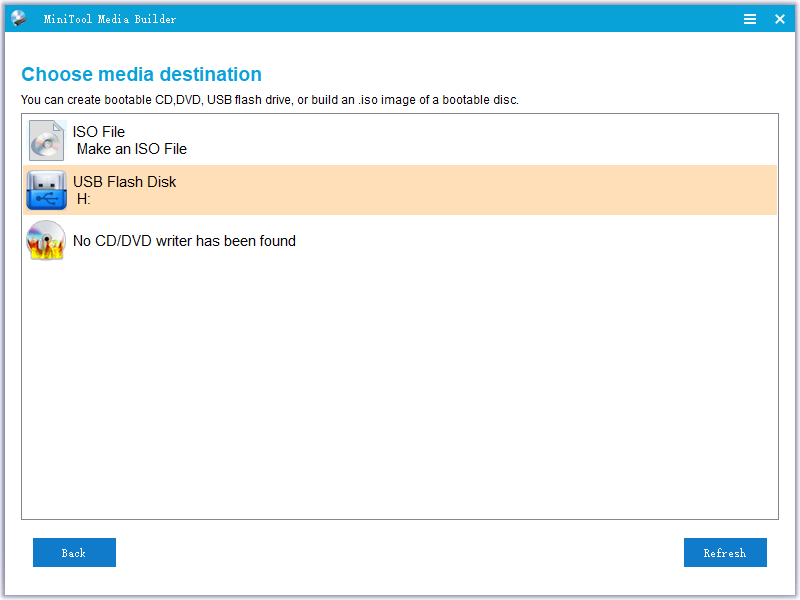
Step 4. Tap on WinPE-based media with MiniTool plug-in > choose the connected USB drive as the media destination > click on Yes to confirm and start the process.
Perform File Backup
With such a bootable USB in hand, you can back up the files on your computer when the system fails to start.
Step 1. Plug it into your problematic computer > set it as the first boot device in BIOS > boot your computer from it.
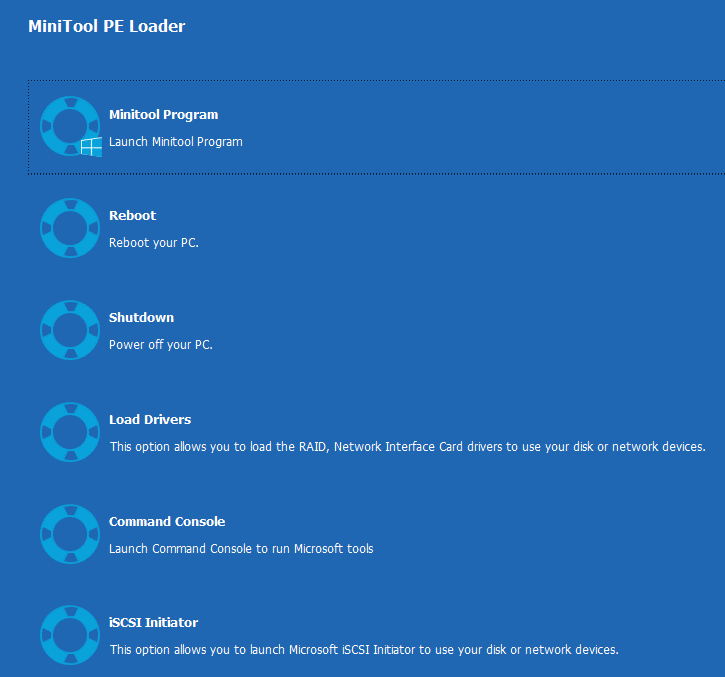
Step 2. In the MiniTool PE Loader screen, click on MiniTool Program to launch MiniTool ShadowMaker.
Step 3. In the Backup page, click on Source > Folders and Files to pick the files that you want to protect.
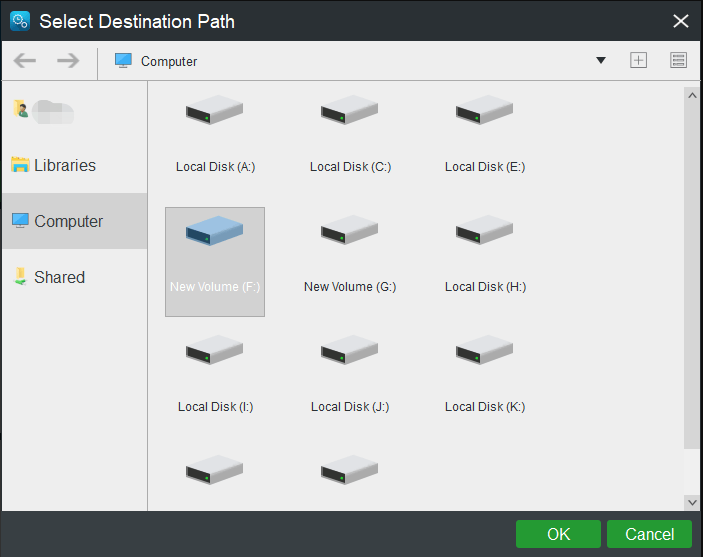
Step 4. Navigate to Destination to select an external hard drive or a USB flash drive as the storage path.
Step 5. After determining the backup source and destination, click on Back up Now to start the process at once.
Fix 1: Remove Peripheral Devices
As mentioned earlier, the reason why Startup Repair couldn’t repair your PC might be an incompatible device connected to your machine.
If you have recently connected devices such as cameras or portable music players to your computer, disconnect the device and restart the computer. Check if the issue persists. If not, try reconnecting the device again via a different port.
In addition, it is recommended to ensure the compatibility of the new device before connecting it and installing the corresponding driver before using it.
Fix 2: Fix Boot Issues Using Bootrec.exe
Bootrec.exe is a tool provided by Microsoft in the Windows recovery environment. When your computer fails to boot correctly, it can help you fix errors in the MBR, BCD, Boot Sectors, and the boot.ini file.
Step 1. Shut down your PC and then download the Windows Media Creation Tool on a working computer to create bootable media, such as a bootable USB disk.
Step 2. Insert the bootable media into your problematic PC and boot from it.
Step 3. When prompted to Press any key to boot from CD or DVD, hit any key to continue.
Step 4. Select your language preferences in the Windows Setup interface > click on Next.
Step 5. Click on Repair your computer in the lower-left corner to enter WinRE.

Step 6. Select Choose an option > Troubleshoot > Advanced Options > Command Prompt.
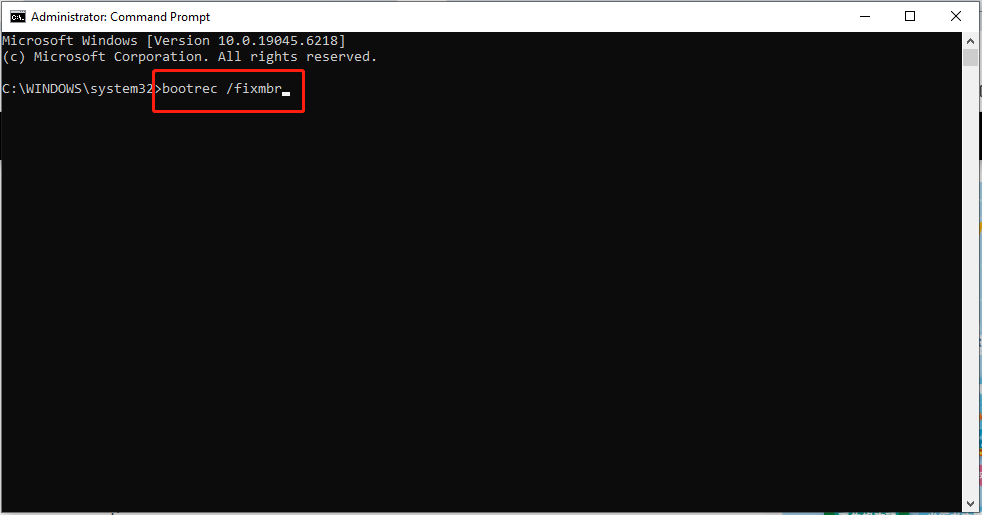
Step 7. In the Command Prompt box, hit Enter respectively after inputting the following commands:
bootrec /fixmbr
bootrec /fixboot
Patiently wait for the execution to be completed. If these commands don’t turn out fruitful, try to go for the command below:
bootrec /rebuildbcd
If the bootrec.exe tool runs successfully, you will obtain the installation path of the Windows directory. Now, you need to type Y and press Enter to add an entry to the BCD storage area. It will notify you that the entry has been successfully saved. Restart your PC to see if it works fine.
If bootrec.exe is ineffective for you, you can continue to try the following methods.
Fix 3: Start in Safe Mode
Safe Mode is a troubleshooting option available for Windows. It enables the computer to start in a restricted state. Only the essential files and drivers required for Windows operation will be activated.
Entering Safe Mode when encountering any issues related to the computer’s startup may be helpful in solving the problem.
Here’s a step-by-step tutorial for you:
Step 1. Boot into WinRE with your bootable media (same as those in Fix 2) and select Repair your computer.
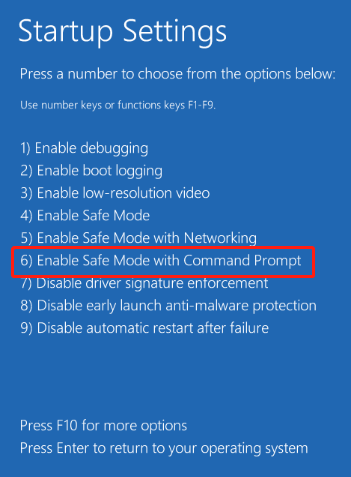
Step 2. Select Troubleshoot > Advanced options > Startup Settings.
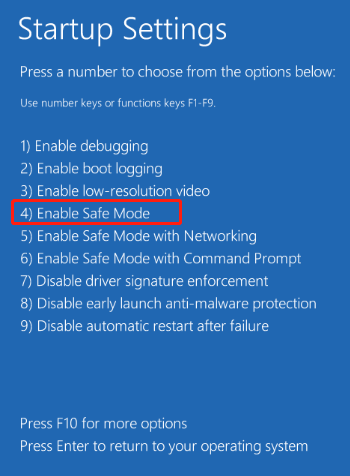
Step 3. In the Start-up Settings screen, tap on Restart.
Step 4. After restarting, the computer will show another screen that has different startup options. In this stage, press 4 or F4 to choose Enable Safe Mode or 5 or F5 to boot into Safe Mode with Networking.
When your computer is in Safe Mode, you’ll see the words Safe Mode in the corners of your monitor. To exit Safe Mode, restart your computer and let Windows start normally.
Now, you can do the following operations to fix the issue that Startup Repair cannot repair this computer:
- Run antivirus software to scan for and remove the virus.
- Uninstall suspicious software or drivers.
- Update the hardware driver using a CD/DVD/USB that contains the driver.
Fix 4: Run System Files Checker
SFC (System File Checker), a built-in Windows tool, can help check and repair damaged or missing system files. Abnormal shutdowns, forced removal of storage devices, and failed system updates, etc., can all corrupt system files, leading to Startup Repair failures.
To use the SFC tool, what you need to do is boot your computer into Safe Mode with Command Prompt.
To do that:
Step 1. Boot into WinRE with the installation disc as mentioned above > select Troubleshoot > Advanced options > Startup Settings.
Step 2. Click on the Restart button and then hit 6 or F6 to boot the PC into Safe Mode with Command Prompt.
Step 3. Select an account and enter the password.
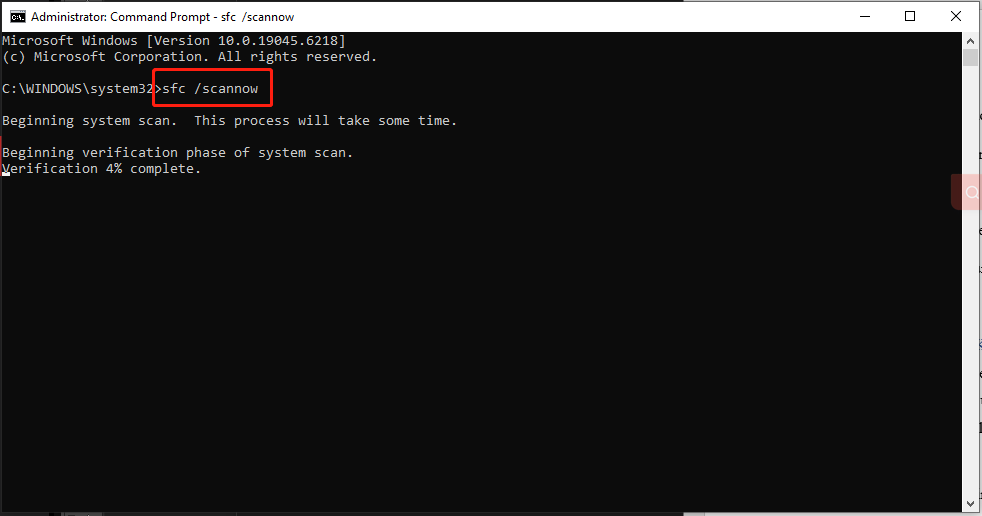
Step 4. Type sfc /scannow in the command window and press Enter to execute.
Step 5. After successfully running the command, restart your computer.
Fix 5: Execute the CHKDSK Tool
Bad sectors and file system errors may also prevent the Startup Repair from completing its task. In such cases, you can use a tool in the Windows system called CHKDSK to verify the integrity of the disk and fix logical system errors.
This utility can identify bad sectors on the hard drive and mark them, so that the system will ignore these errors when using this drive.
Let’s see how to work with the CHKDSK tool and its specific commands.
Step 1. Follow the same steps as in Fix 3 or 4 to navigate to the Command Prompt dialog box.
Step 2. Type chkdsk c: /f /r in the command window and press Enter.
Step 3. Next up, restart your computer. Once restarted, the CHKDSK tool will start to scan the hard drive to look for problems and then fix them accordingly.
Fix 6: Clean Boot the PC
If the above methods fail to solve the problem, you can perform a clean boot in Safe Mode to more clearly identify the root cause of the issue. This is an effective troubleshooting method.
It not only helps you locate the problem but also facilitates subsequent repair work. This is because during a clean boot, the system resource usage is lower, and the computer runs more stably.
This provides a favorable environment for executing system repair tools, updating or uninstalling drivers, and cleaning up malware, etc.
Here are the steps on how to perform a clean boot on your computer:
Step 1. In Safe Mode, press Win + R to open the Run dialog box.
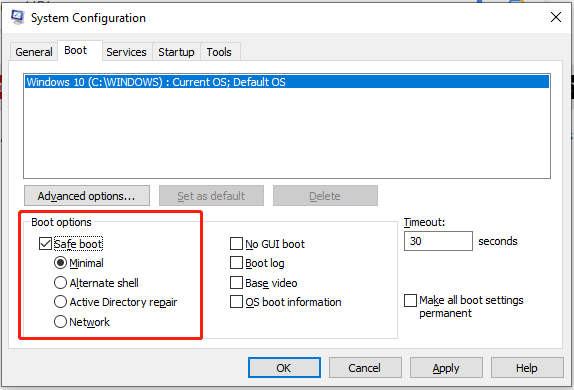
Step 2. Type msconfig and hit OK to open System Configuration.
Step 3. In the Boot tab, navigate to Boot options > check the Safe boot option > set it to Minimal > click on Apply to save changes.
Step 4. Then switch to the Service tab > check Hide all Microsoft services in the lower-left corner > tap on the Disable all button > hit Apply to save changes.

Step 5. Next up, go to the Startup tab > hit Open Task Manager > disable all the startup programs in Task Manager.
Finally, exit the window and try to boot your computer.
Fix 7: Restore Your System
System Restore can help you quickly return your computer to a previous normal operating state when problems occur. After restoration, the system will roll back the computer’s system files, registry settings, and installed programs to the state they were in when the restore point was created.
This process will retain your personal files, such as documents, pictures, music, or videos, but will undo any applications installed and any changes made to the system settings.
Here’s how to do that:
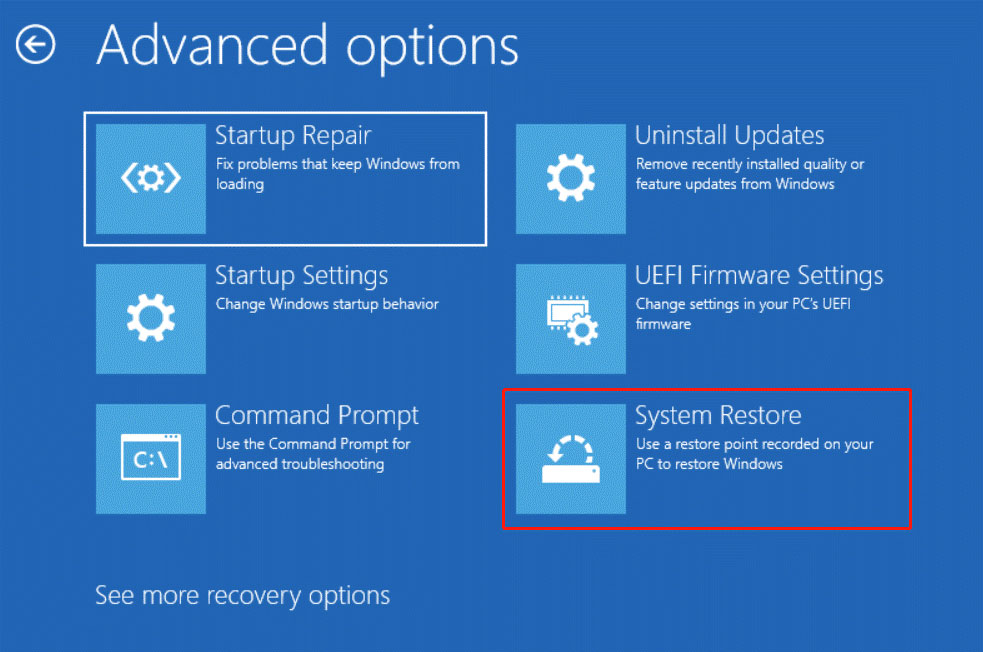
Step 1. In WinRE, navigate to Advanced options > Troubleshoot > System Restore.
Step 2. In the next pop-up window, click Next > select a system restore point and hit Next. If there are multiple restore points, choose one according to your description and the created time and date.
Step 3. Tap on Scan for affected programs to make sure which apps were added after the restoration will be removed. Then click Close and Next in turn.
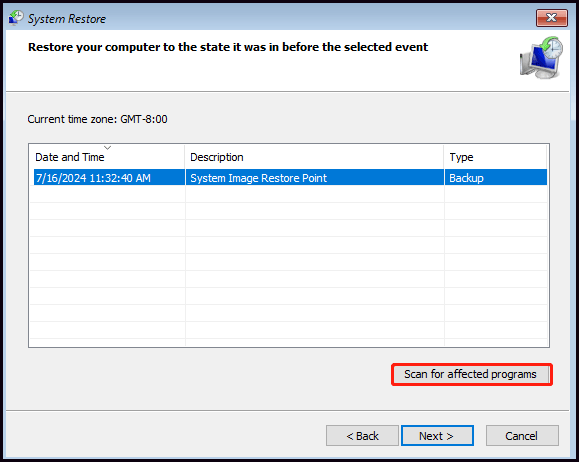
Step 4. Finish the restore process by following the on-screen instructions
It’s recommended to manually create a restore point before making major system changes, installing new software, or updating drivers. This way, you can easily undo the changes by using System Restore when errors occur.
If the disk space is insufficient, old restore points may be automatically deleted to free up space. Therefore, it is important to regularly check and ensure there is enough available space.
Wrapping It Up
This guide gets into the nuts and bolts of the error “Startup Repair cannot repair this computer automatically” or “Automatic Repair couldn’t repair your PC” on Windows 7/8/8.1/10/11.
After reading this post, you should have solved this error, and now you can use your computer normally. What’s more, you can use MiniTool ShadowMaker to back up files or the system of your PC. With a system image by your side, it will save much time to restore your system.
For more problems about our product, please contact us via [email protected]. We are looking forward to receiving your feedback!
Startup Repair Cannot Repair This Computer Automatically FAQ
2. Update your software.
3. Cut down on the bloat.
4. Test your Wi-Fi connection.
5. Reinstall the operating system.
User Comments :