Are you using any backup and recovery solution in protecting crucial files from being lost in case of PC crashing or freezing? In this guide from MiniTool, we are about to contrast system backup image vs Recovery Drive from several aspects and share a user-friendly backup tool.
System Backup Image vs Recovery Drive
The reasons you back up computers are based on the potential impact of data loss and the many ways in which that data can be irretrievably lost. Examples include hard drive crashes, malware & viruses, mistakenly deleted files, computer upgrades, etc.
To prevent data loss in system failures, there are several backup options available for creating a data backup, of which a system image and a recovery drive are widely regarded as the two most effective techniques. In this case, it’s worthwhile to discuss system backup image vs Recovery Drive.
In this text, you can take a closer look at the differences between system image vs Recovery Drive and find the most suitable one.
About System Backup Image
What is a system backup image? A system backup image is a backup solution that takes a snapshot of your entire system (including the operating system, application data, system settings, patches, and files) at a given point in time. In short, a system image is an exact copy of the system. Additionally, you can also back up your entire system disk with it.
It enables you to easily restore everything to its original state in the event of hardware failure, disaster recovery, or any malware attack, with no need to reinstall Windows and applications. Especially in less disastrous cases, if you want to replace hardware without changing system settings and configurations, you may need a system image backup.
Main points:
1. A system image is much smaller than the space already used.
The system image file contains all the contents of the system, so its size is close to the used disk space. For instance, if you have used 200GB on a 500GB hard drive, the system image file will be 200GB or so. However, during the backup process, this image file will be compressed. So, the actual generated image file will be much smaller than the space already used. When restoring, the decompressed files will return to their original size.
2. Different backup programs use different types of system images.
Windows creates system images with the .xml and .vhd file extensions, while third-party programs use their own file extensions. Therefore, whether it is backing up your computer or recovering the system image, you have to use the same tool to accomplish the tasks.
To ensure the system image is valid for restoration, you can keep multiple backup tools. Meanwhile, you have to distinguish that image A was created by tool A and image B was created by tool B. Each backup image file is independent when it comes to restoration.
![[Best Fixes] “File In Use” Error on Your Windows 10/11 Computer](https://images.minitool.com/minitool.com/images/uploads/2021/11/fix-file-in-use-error-windows-10-11-thumbnail.png)
How to Create a System Image?
Although both File History and Backup and Restore are Windows native backup solutions, only the latter can be used to back up the entire system. It is well known that File History is a file-level backup mechanism, keeping copies of files, folders, music, pictures, documents, etc.
Backup and Restore, by contrast, can create not only files and folder backups but also system image backups, to be used for recovery in the event of data corruption, hardware failure, or malware infection.
To Create a System Image:
Step 1. Press Windows and S to evoke the search bar > type control panel and hit Enter.
Step 2. In Control Panel, locate Backup and Restore (Windows 7) and click Create a system image on the left side of the window.
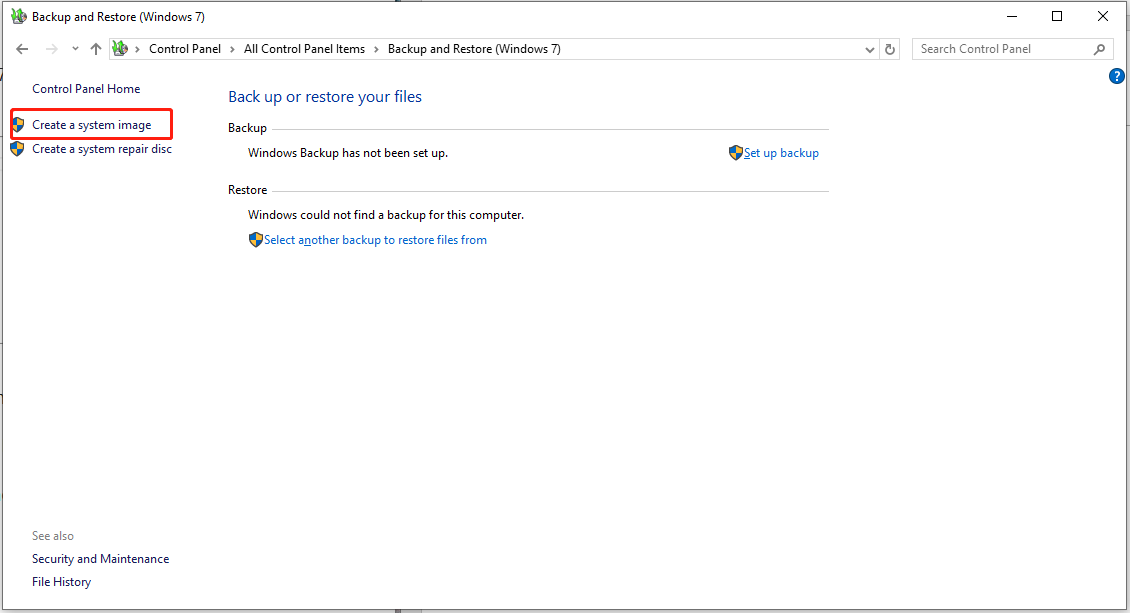
Step 3. Select the target hard disk, DVD, or network location to save the backup > tap on Next.
Step 4. Choose the drives you want to include in the backup > click on Next.
Step 5. Confirm your backup settings and then click on Start backup to carry out the operation. Wait for the progress to be done.

To Perform System Image Recovery:
Step 1. Boot into the Windows pre-install environment using a bootable media and click on Next.
Step 2. On the bottom of the window, select Repair your computer > Troubleshoot > Advanced Options > System Image Recovery.
Step 3. Then choose the specific system image you have created manually or just hit Next.
Step 4. Choose whether you want to repartition and format your drive > click Next.
Step 5. Tap on Finish > click Yes to confirm the process to begin it.
About Recovery Drive
What is Recovery Drive? The Recovery Drive utility in Windows is a valuable tool designed to backing up essential system files needed to restore a PC to its initial state. This feature creates a recovery media that can help you restore your PC to its factory settings even if you replace the hard drive or completely wipe it.
The recovery drive contains Windows files, any updates installed at the time of media creation, and any settings from the PC manufacturer, ensuring an available backup solution from bare metal recovery scenarios.
Creating a recovery drive is a proactive measure that ensures a quick and effective system recovery in case of major issues such as hardware failures. This drive can be used for bare metal recovery of the device it was created for, ensuring a smooth and efficient recovery process.
Most importantly, you need an empty USB drive to store the backup on the recovery drive. The feature works in a manner similar to a factory reset. It will completely format your machine. Desktop applications and personal data will not be backed up as part of this process.
How to Create a Windows Recovery Drive?
To create a Windows 11 recovery drive, you’ll need a USB drive that is at least 16GB or larger.
Warning: Use an empty drive because this process will erase any data that’s already stored on the drive.
To Create a Recovery Drive:
Step 1. Insert your USB drive into your PC.
Step 2. Go to Control Panel through Windows Search > select Recovery.
Step 3. In the Recovery window, click Create a recovery drive and then grant the required privileges.
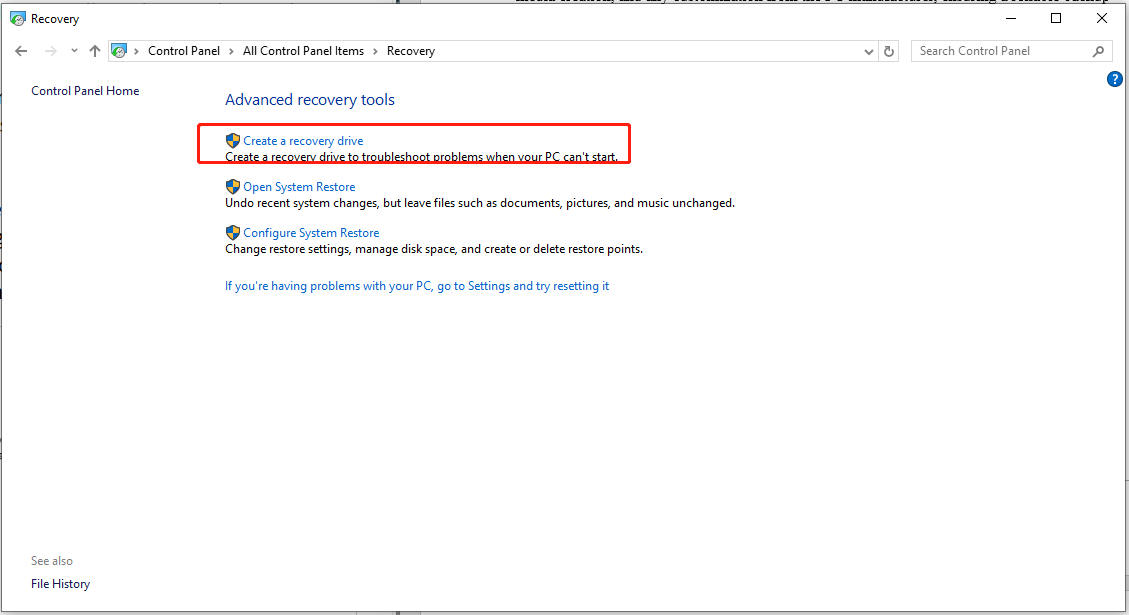
Step 4. In the Recovery Drive page, check Back up system files to the recovery drive and tap on Next.
Step 5. Choose your USB drive connected and then click Next.
Step 6. Confirm the warning that your recovery drive will be cleared in order to proceed > click Create > hit Finish to complete the process.
To Reinstall Windows with the Recovery USB Drive:
Step 1. Boot your computer from USB recovery drive you created.
Step 2. Once Windows Recovery Environment loads, select Troubleshoot > Recover from a drive > pick either Just remove my files or Clean the drive fully depending on your preference.
Step 3. Click on Recover to start restoring Windows from your USB drive and follow the instructions on the screen to set up your PC to complete the restoration.
Here’s a quick comparison of System Backup Image vs Recovery Drive:
| System Backup Image | Recovery Drive | |
| Contents | A backup of the whole system | Vital data without personal data and software |
| Media | Network path | Require an external drive for backup |
| Limitations | A big image file | Erase the personal data and apps like a factory reset |
System Backup Image: You can recover anything on your system using a system image.
Recovery Drive: Only a few vital data are stored on the recovery drive to ensure that system boots up properly. When your computer has a significant problem, you may reinstall Windows 11 using the recovery drive.
Better Choice: Use MiniTool ShadowMaker to Backup System
If you want a higher compression level for creating a system image, the ability of file compression is basically found in professional third-party backup and recovery tools, e.g., MiniTool ShadowMaker.
This PC backup software stands out from the similar products in the market, offering you a 30-day free trial edition. It only takes a few clicks to backup files, system, folders, partitions, and disks for your PC. When it comes to severe issues in your system like black screen of death, system crashes, hard drive failures, malware attacks and more, it will be much easier to restore your data and system with these backups.
Additionally, MiniTool ShadowMaker also has more abundant services than the inbuilt Windows backup apps, including creating backup schedules, excluding unnecessary files, changing the image compression level, cloning HDD to SSD, transferring Windows to another drive, etc.
Now, let’s see how to create a system backup image with MiniTool ShadowMaker:
Step 1. Download and install this freeware by clicking the download button below.
MiniTool ShadowMaker TrialClick to Download100%Clean & Safe
Step 2. Launch it and hit Keep Trial to enter its home page.
Step 3. In the Backup page, you can see that your system has been selected in SOURCE, by default. So, you just need to go to DESTINATION to choose a storage.

Step 4. Go to Options in the lower right corner and choose Compression under Backup Options.
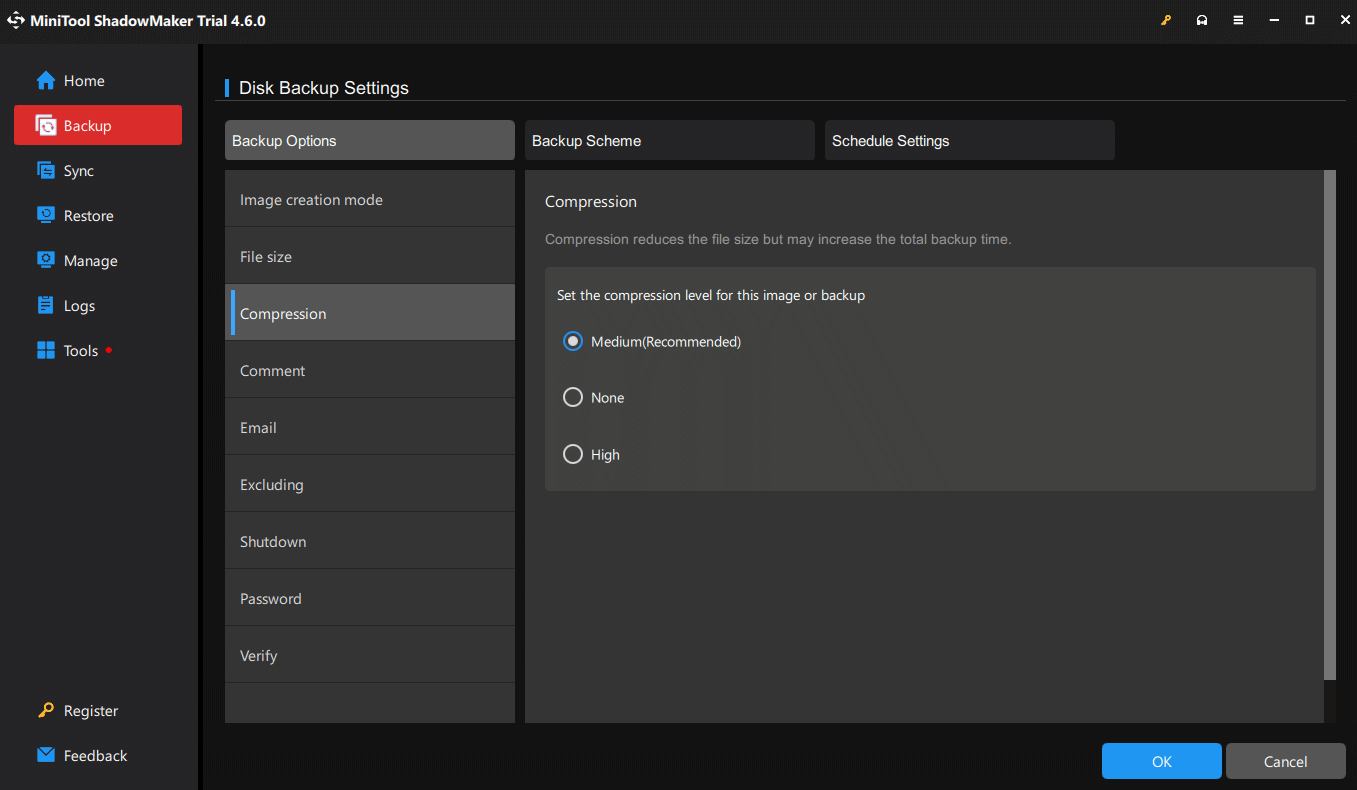
Medium – 50% of the size of the source file, which is recommended
None – no compression
High – 30% of the size of your source file
The Compression feature can reduce the file size to save your storage space. Modify the compression level as you want.
Step 5. Click on Back Up Now to begin the process at once.
In the End
From your perspective, this guide generalizes the differences between system backup image vs Recovery Drive. As a result, both of the backup options are critical components of the backup procedure. And MiniTool ShadowMaker also is an optional backup solution for saving time and effort. You can accordingly choose among them, depending on your needs and requirements. We’d love to receive your feedback via [email protected].
System Backup Image vs Recovery Drive FAQ
2. Go to Control Panel through Windows Search > select Recovery > click Create a recovery drive.
3. In the Recovery Drive page, check Back up system files to the recovery drive > click Next > choose your USB drive connected > click Next.
4. Tap on Create > hit Finish.
User Comments :