JPEG/JPG files are widely used in our everyday lives, appearing on phones, computers, and removable storage devices. At the same time, JPEG/JPG file loss or corruption can occur unexpectedly. This MiniTool post will explore some methods to perform a JPG/JPEG recovery on Windows 10/11, focusing on two frequent situations: unintentional deletion and photo corruption.
Are you facing the JPEG or JPG file loss in the same scenario as the user below:
“I have some older JPEG files that seem corrupted and no longer open, neither in the Windows Photo app nor in Adobe Photoshop. I also found that some JPG files are missing from my PC. Any tips for advanced recovery options? Thanks!”reddit.com
Don’t worry! This is where this post comes in.
Now, we will explore what a JPEG or JPG file is and how to quickly and easily carry out a JPG/JPEG recovery on Windows.
What Is a JPEG/JPG File
JPG/JPEG, which stands for Joint Photographic Experts Group, is a widely used image format that accommodates compressed bitmap images in both 8-bit and 24-bit color.
JPG/JPEG is characterized by high resolution, reduced file sizes, and flexible compression options. It is ideal for online transmission, and its file extensions are “.jpg” or “.jpeg.”
A common and reasonable question that many people have is how .jpg differs from .jpeg. If you are confused about it, keep reading.
What Is the Difference Between JPG and JPEG?
There is no technical difference between a JPG and a JPEG; they refer to the same file format.
The only difference lies in the file extensions, “.jpg” and “.jpeg.” The “.jpg” extension originated from the limitation of early Windows operating systems, which only allowed three-character file extensions, resulting in the omission of the “e.”
Modern operating systems support both extensions, allowing the terms and formats to be used interchangeably.
With the prevalence of JPEG/JPG images, the loss of JPEG/JPG photos from devices like phones, digital cameras, or computers has become increasingly common.
Consequently, a growing number of users are seeking ways to recover lost JPEG photos.
Before exploring particular recovery techniques, you may wonder: Is it possible to recover deleted or lost JPG/JPEG files on Windows?
Can You Recover Deleted/Lost JPEG or JPG Files
Absolutely YES, in most situations.
Regardless of whether the images were wrongly removed or damaged due to a system malfunction, failed file transfer, or a virus, there is still a possibility of recovering them until they are overwritten.
Tip: In Solid State Drives (SSD), the TRIM command can erase deleted file locations, making data recovery more difficult.
Major Scenarios of JPEG or JPG File Deletion or Loss
Here are some common causes of losing JPG or JPEG files:
- Unintentional deletion of JPG files during the file editing process.
- Formatting of the storage device.
- Infection from malware or a virus attack.
- Other unforeseen incidents, including system crashes or power failures.
Proven Tips to Successfully Recover Deleted or Lost JPEG/JPG Files
We have also provided some effective tips for successful JPG/JPEG recovery that you can follow:
- Avoid saving any images: If a JPEG/JPG file has been deleted from your storage device, you should stop using the drive right away. This is important to prevent new files from overwriting the deleted ones.
- Take action quickly: The later the JPEG/JPG file recovery is performed, the higher the risk of being unable to restore data.
- Use a professional data recovery tool: When you decide to recover JPG files with data recovery tools, remember to select reliable and secure data recovery software and get it from the official website.
Read on to discover how to recover JPEG photos.
How to Recover Lost or Deleted JPEG/JPG Photos on Windows
After having a basic understanding of what a JPEG/JPG file is, now you can start to recover deleted or lost JPEG files.
Check out this short video for a quick guide:
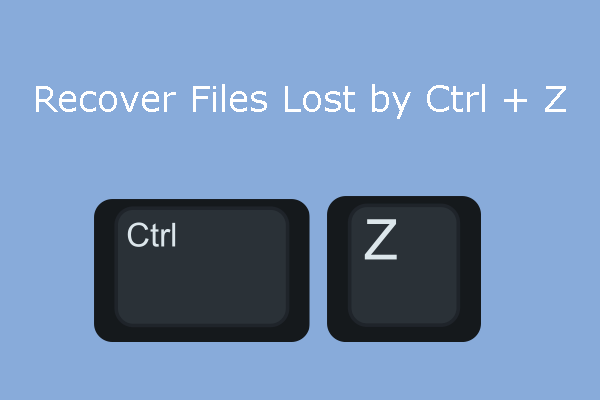
Solution 1. Undo the Deletion
If a JPEG/JPG file is mistakenly deleted, you can first try pressing Ctrl + Z to revert the last action. This shortcut is intended to undo the most recent action in situations such as:
- You deleted the file from your system.
- You moved the file from one directory to another.
- You changed the file name to an incorrect one.
- You cut the file and placed it in an incorrect location.
- Etc.
The Ctrl + Z method is time-sensitive. If you’ve executed other actions or restarted your computer, this technique may not be effective anymore.
In this case, you need to try other JPEG recovery methods below.
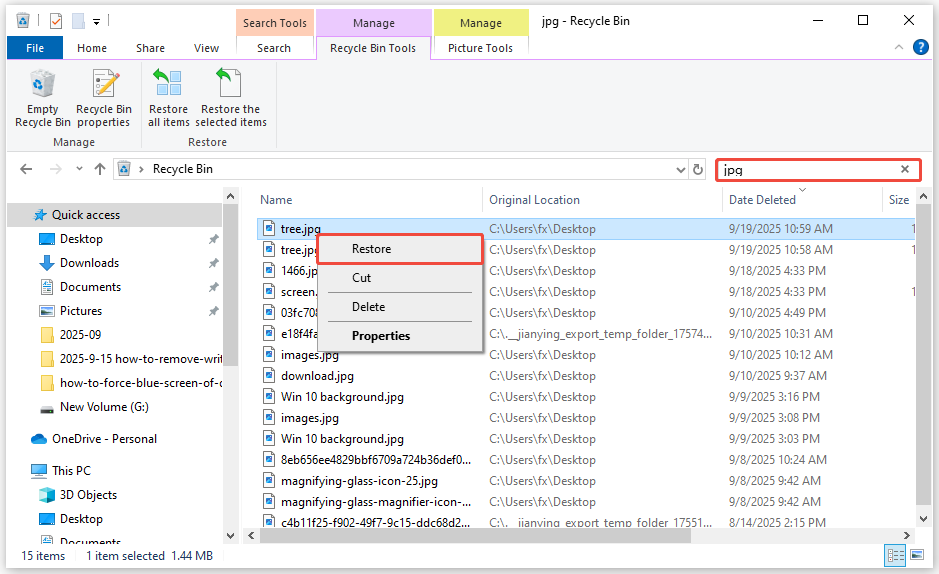
Solution 2. Check the Recycle Bin
The Recycle Bin is a temporary storage location for files deleted from your PC. When you delete a JPEG file, it is usually sent to the Recycle Bin rather than being permanently deleted from your hard drive.
It gives you a second chance to recover files you may have deleted by mistake. Here you can see how to recover deleted JPEG files from the Recycle Bin:
Step 1. Double-click the Recycle Bin icon on your desktop to open it.
Step 2. Locate the deleted JPEG/JPG file. Then, right-click it and choose Restore to recover it to its original location.
Alternatively, you can drag and drop these files to any folder you prefer.
If you are having trouble finding the files, use the search bar in the top-right corner to search for your files by file name or file extension (.jpg).
Important: Files deleted in the following ways won’t go to the Recycle Bin and cannot be recovered using this method:
- Files that are deleted using the Shift + Delete keyboard shortcut.
- Files deleted from external/removable media.
- Files that are deleted via Disk Cleanup or similar file cleaning applications.
If you deleted JPEG files by using the methods mentioned above, you need to try the following data recovery solutions.
Solution 3. Via File History
Windows has a built-in backup feature known as File History, which enables you to retrieve previous versions of your files. Make sure that you have enabled the File History and opted to back up your JPEG/JPG files.
Here’s how you can recover JPEG files using File History:
Step 1. Type Control Panel in the search bar and press Enter.
Step 2. Choose the System and Security option.
Step 3. Click the File History option and select Restore personal files from the left panel.
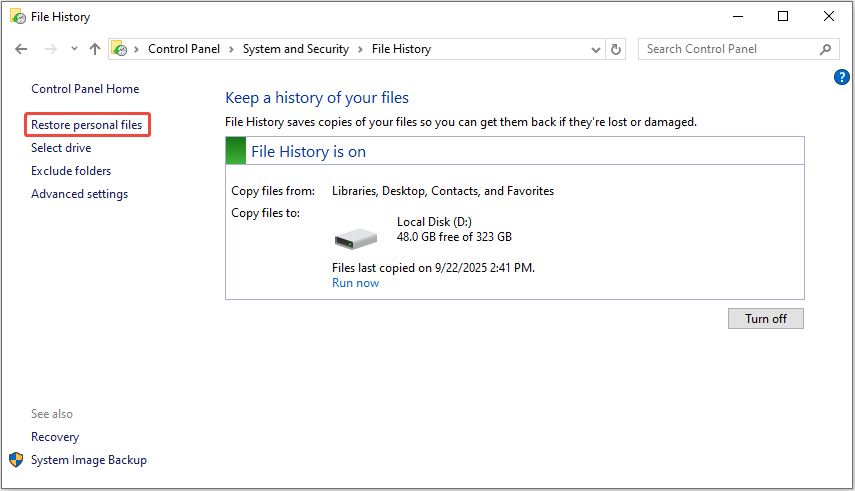
Step 4. Choose the version of the JPG file you wish to recover and click the Restore option to bring the files back.

Solution 4. Restore the Previous Version
The previous version of the file can also help complete JPEG/JPEG file recovery on Windows.
Step 1. Find the folder where the deleted/lost JPG files were located. Right-click on the folder and select Restore previous versions.
Step 2. In the pop-up window, choose a folder version where your JPG files are not lost or deleted, and click the Restore button.
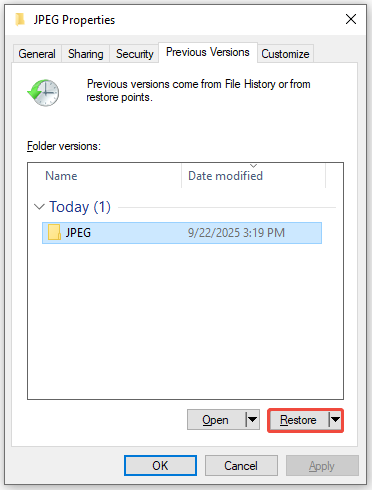
Step 3. Next, click Restore again to confirm the action.
Solution 5. Use Windows File Recovery
If you haven’t enabled File History or any other backups before losing JPEG/JPG files, you need to use file recovery software to rescue your JPEG/JPG files.
One reliable option provided by Microsoft is the Windows File Recovery tool. This command-line utility is specifically intended to recover deleted files from various storage devices.
Here’s how to recover lost or deleted JPG files using Windows File Recovery:
Step 1. Download and install the Windows File Recovery application from the Microsoft Store.
Step 2. Open Windows File Recovery to view the Winfr command usage, explanations, and example commands for various recovery scenarios.
Step 3. According to the commands, here are some examples of how to recover JPG/JPEG images in Windows:
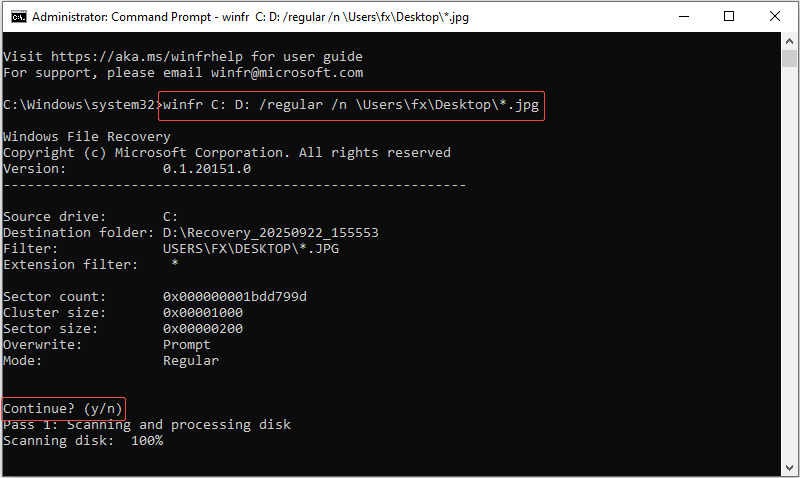
1. Utilize the regular mode to restore all JPG images from the Desktop folder on the C: drive and save them to the D: drive: winfr C: D: /regular /n \Users\username\Desktop\*.jpg. Replace the username with an actual one. Then, press Enter to continue.
When prompted by Continue? (y/n), press Y on your keyboard to start recovery and wait for the recovery process to finish.
2. Utilize the extensive mode to recover JPG files from the Pictures folder: winfr C: D: /extensive /n “\C:\Pictures\*.JPG.
3. Utilize the extensive mode to recover photos with “tree” in the file name: Winfr C: D: /extensive /n *tree*.JPG.
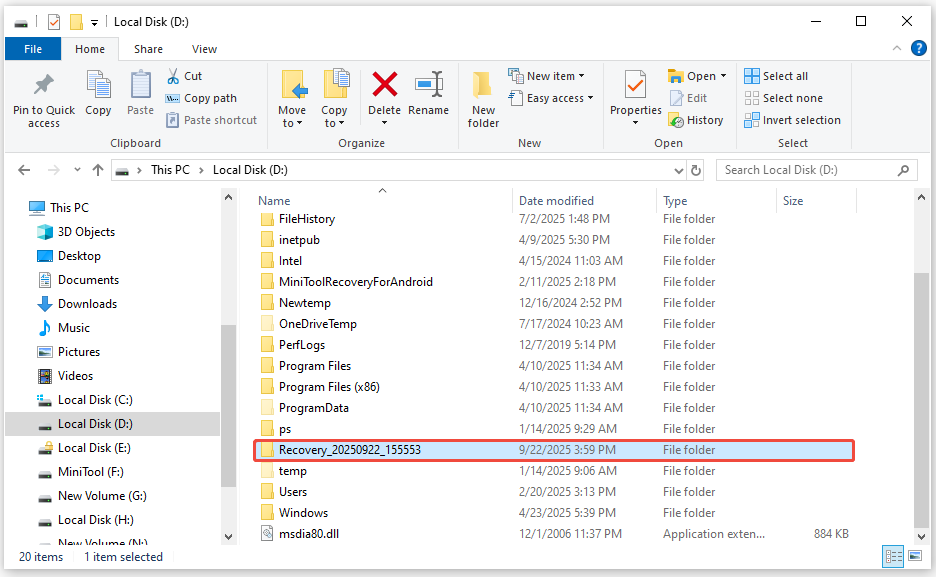
Step 4. Press Win + E to open the File Explorer, go to the location you chose as the destination drive, and find the Recovery folder to see your recovered files.
Here are some suggestions for utilizing Windows File Recovery:
- Start with the regular mode initially. If you can’t locate the files, then move on to the extensive mode.
- Use the extensive mode for FAT32 or exFAT file systems.
- When a file or folder name has spaces, enclose it in quotation marks.

Solution 6. Use MiniTool Power Data Recovery (Recommended)
If all the methods above fail, consider utilizing reliable JPG file recovery software, MiniTool Power Data Recovery, to restore deleted JPG files on Windows.
MiniTool Power Data Recovery is a free data recovery tool designed for Windows 11/10/8.1/8 that securely supports JPEG recovery, along with many other picture, video, audio, document, and archive formats.
It is fully compatible with all types of storage devices for data recovery, such as internal or external HDDs/SSDs, USB flash drives, SD cards, and others.
By using trustworthy data recovery software, you can recover JPEG files in various scenarios of data loss, such as accidental deletions, malware attacks, hardware failures, formatting, and file system corruption.
Now, download the free edition of this tool and use it to recover 1 GB of files for free.
MiniTool Power Data Recovery FreeClick to Download100%Clean & Safe
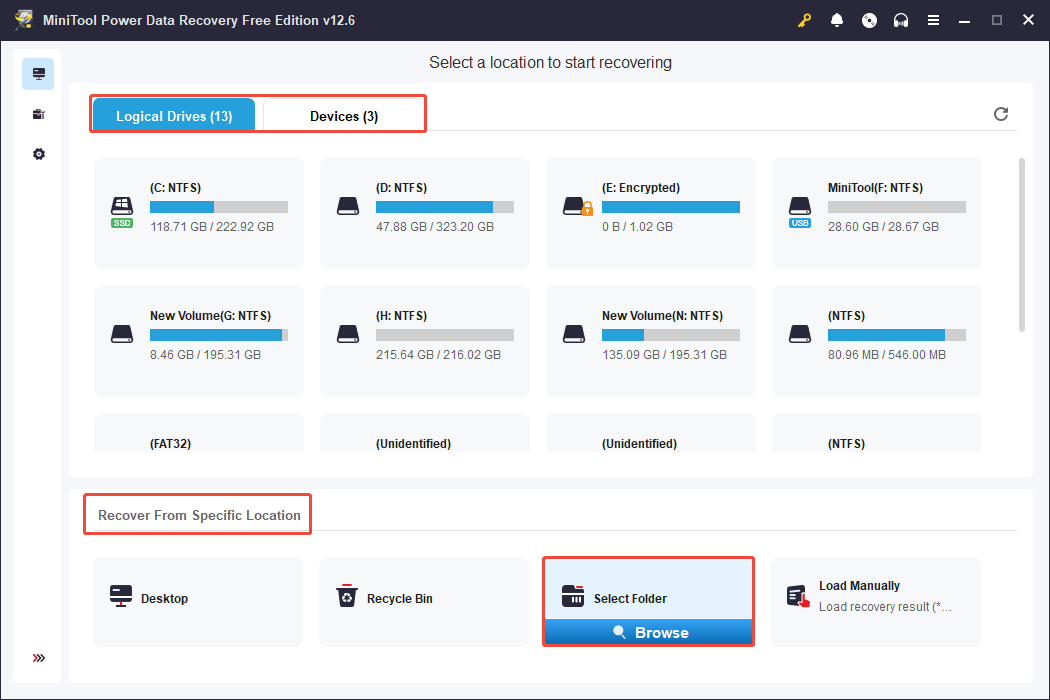
Step 1. Launch the software to go to its main interface. Here, you will have three data scanning options:
- Logical Drives: This section displays all existing and lost partitions on your computer disks, including their file system, size, and drive letter. Hover over the target partition and click Scan to proceed.
- Devices: This module shows all internal or external disks rather than individual partitions, ideal for recovering files from multiple partitions at once or when the location of lost files is unknown.
- Recover From Specific Location: This section allows for quick scanning and recovery options, allowing you to scan the desktop, Recycle Bin, or a specific folder for efficiency.
In this step, we use the Select Folder feature to scan the folder where deleted JPEG files were stored.
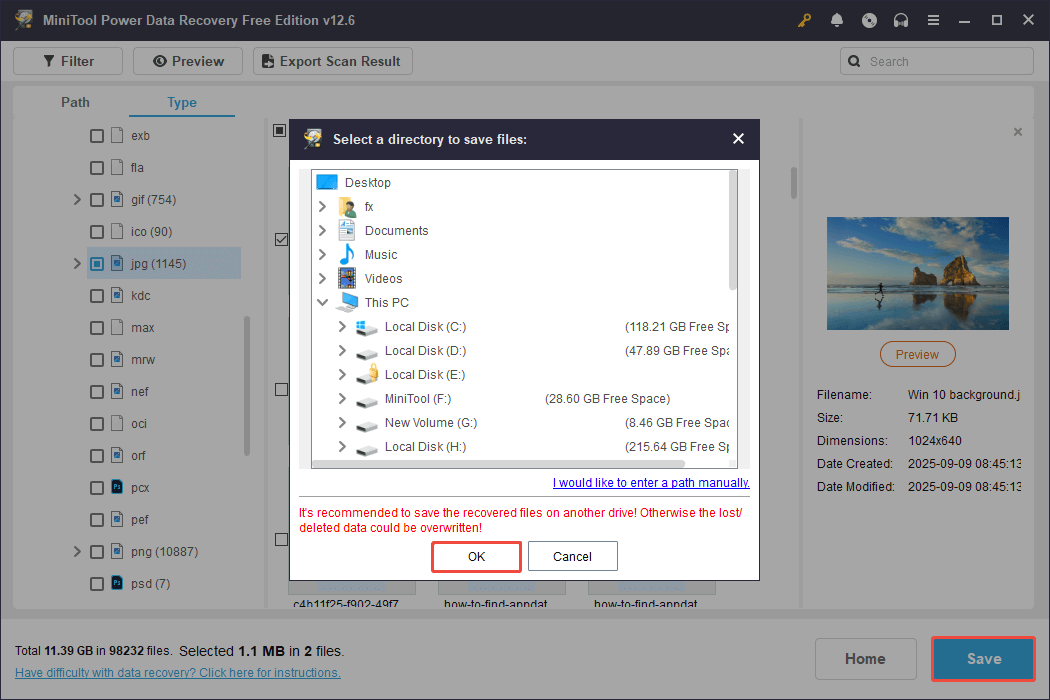
Step 2. Once the full scan is done, you can go to the Type category and expand Picture > jpg to find all JPG files. You can right-click on a file to change the view mode between list and thumbnail.
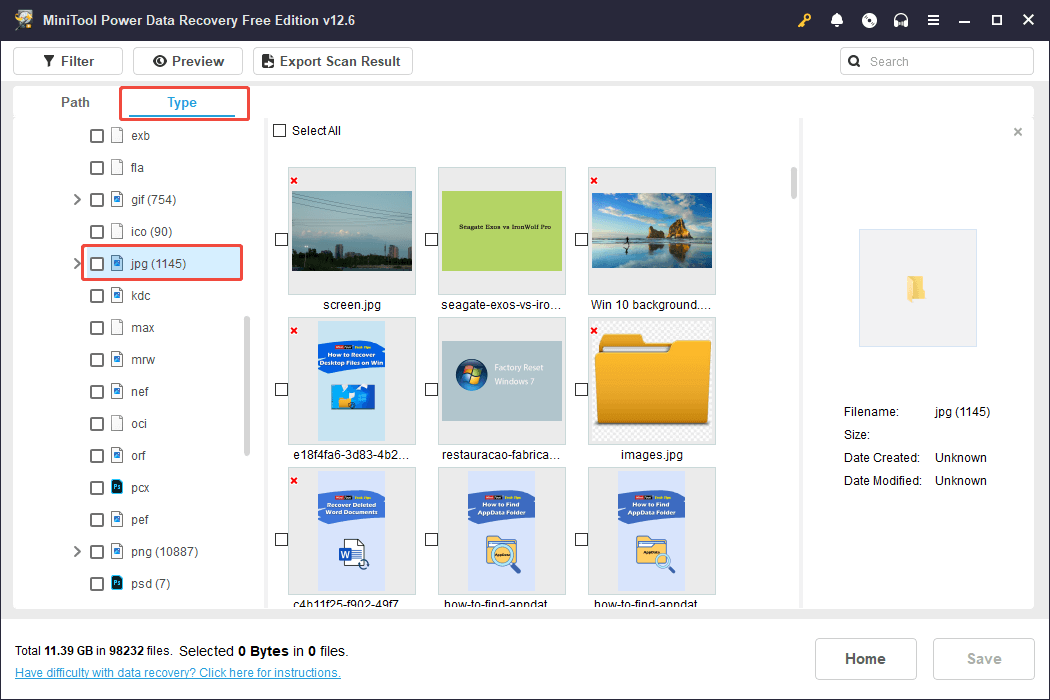
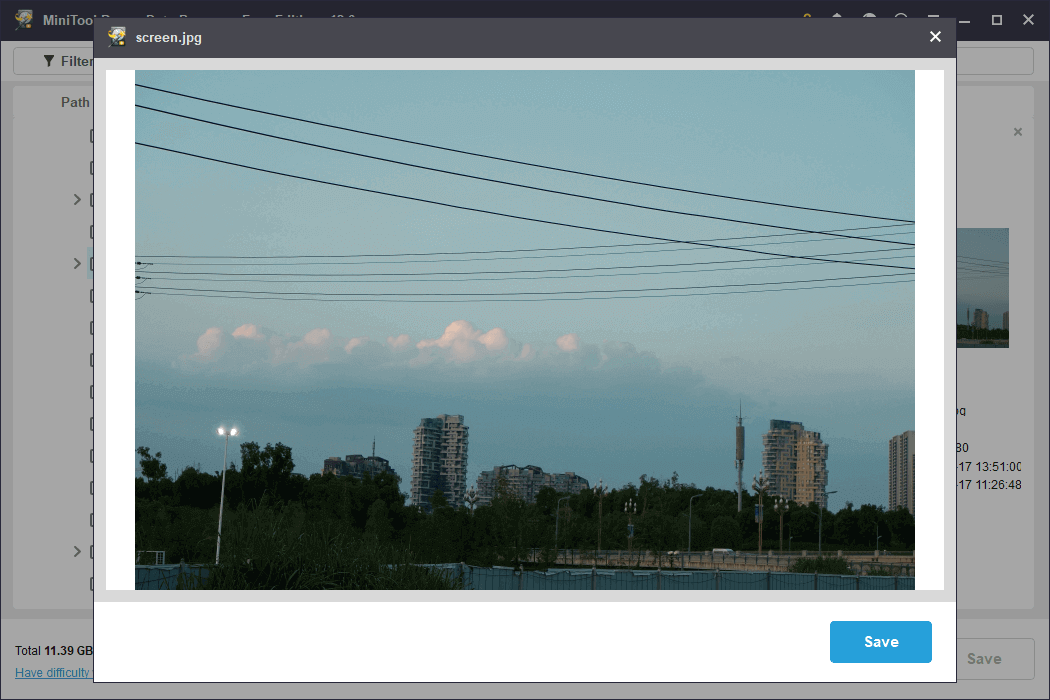
Step 3. Double-click on each photo to preview it for confirmation.
Step 4. Finally, click the Save button in the lower right corner. Then you will be asked to select a directory to store the recovered files. Select one separate from the original location to avoid data overwriting, and click OK.
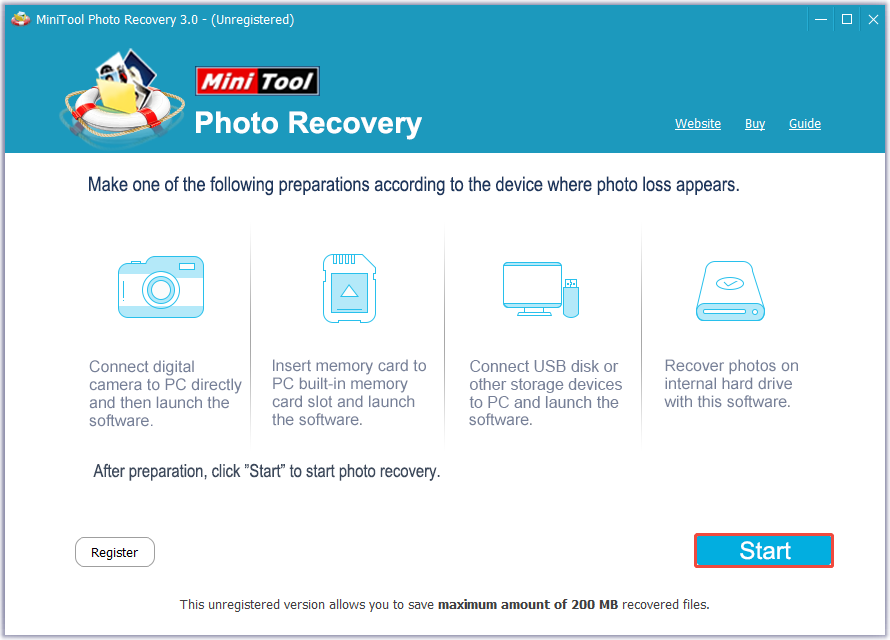
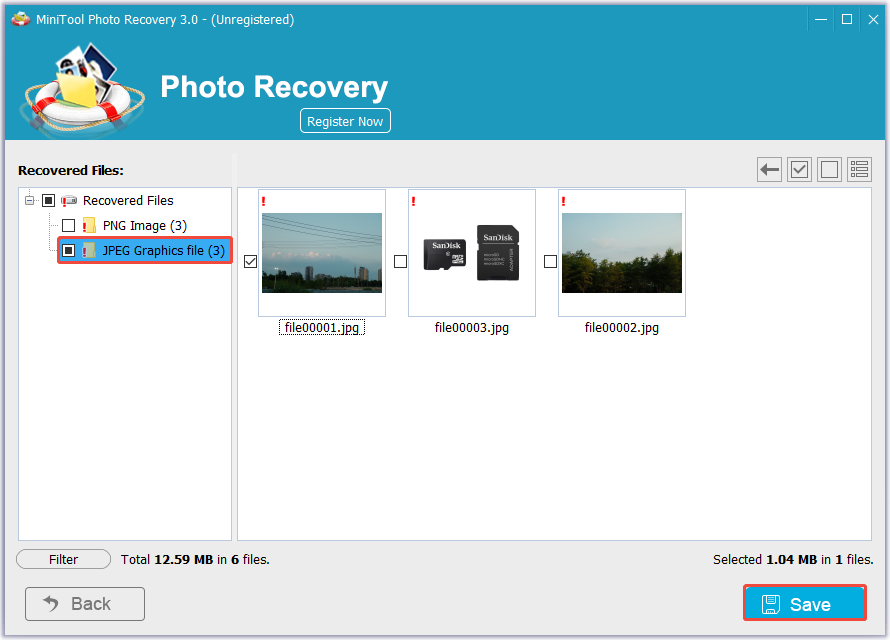
Solution 7. Use MiniTool Photo Recovery
MiniTool offers another excellent photo recovery tool, MiniTool Photo Recovery, to restore JPG/JPEG files on Windows.
This free photo recovery software can recover photos from various types of digital cameras, memory cards, USB drives, computer hard drives, and other file storage devices.
It scans your storage device in read-only mode without doing any harm to the original files.
Besides, MiniTool Photo Recovery offers clear interfaces and easy operations that make it easy to perform JPEG recovery.
MiniTool Windows Photo RecoveryClick to Download100%Clean & Safe
Step 1. Launch MiniTool Photo Recovery and click Start to continue.
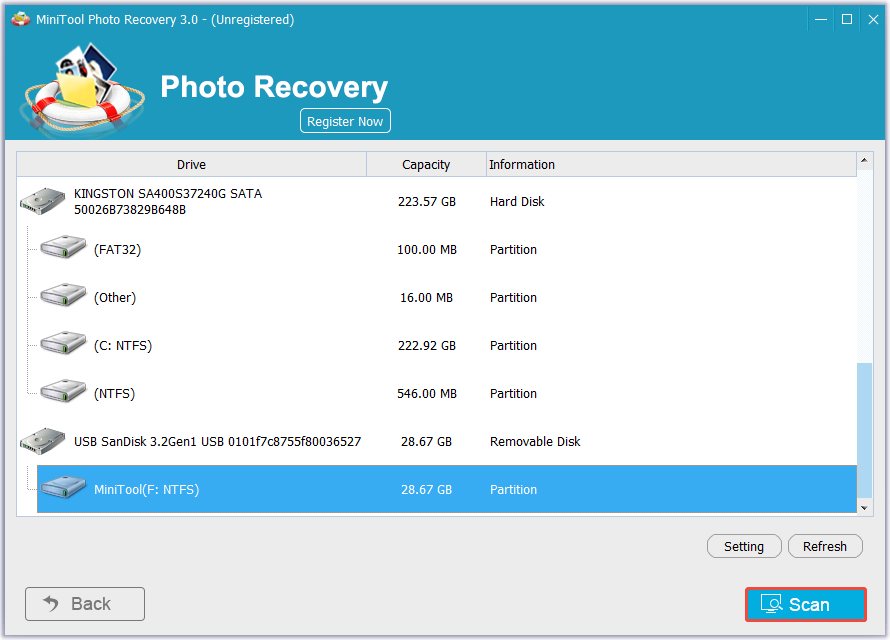
Step 2. Select the target partition where the JPG photo loss happens and then click the Scan button.
Step 3. Go to the JPEG Graphic file folder, check all the wanted JPG pictures, and click the Save button. In the pop-up window, click the Browse button to choose a desired location to store selected files.
What if the recovered JPG/JPEG files are corrupted? Go to the next part to learn how to fix them.
How to Repair Corrupted JPEG Files
Picture this: you try to open a JPEG or JPG photo and are met with a broken image icon, a picture that gets stuck loading, gray or green stripes on the icon, or a message saying “file cannot be opened.”
All of these indicate that the JPEG file you are trying to access is damaged and requires repair.
Now, let’s learn how to repair corrupted JPG files.
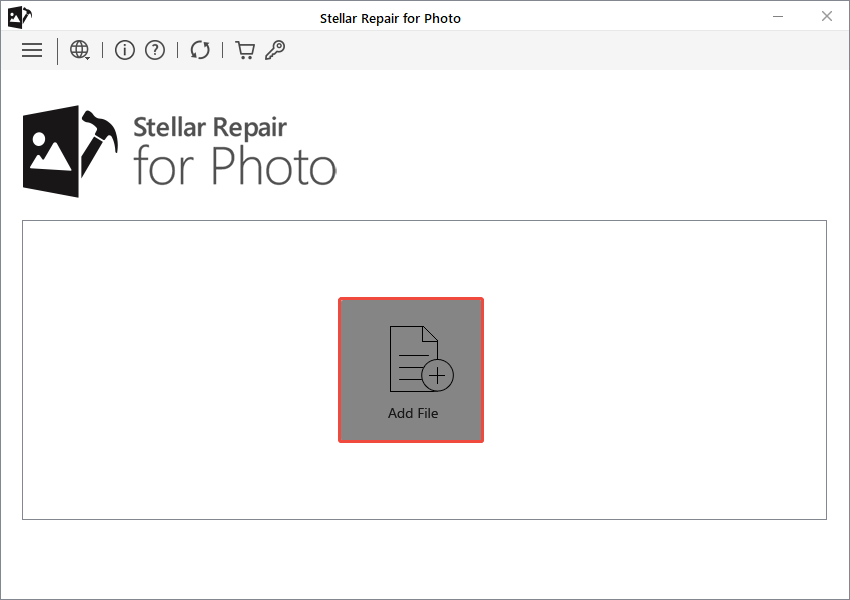
Repair JPG Files With Stellar Repair for Photo
Stellar Repair for Photo is built to recover JPEG/JPG files that are severely damaged. It can help fix broken headers and markers, clean up visual artifacts, remove distorted areas in pictures, and fix issues with image files not opening.
Let’s see how to use Stellar Repair for Photo to repair corrupted JPEG files:
Step 1. Download and install Stellar Repair for Photo, and then launch it.
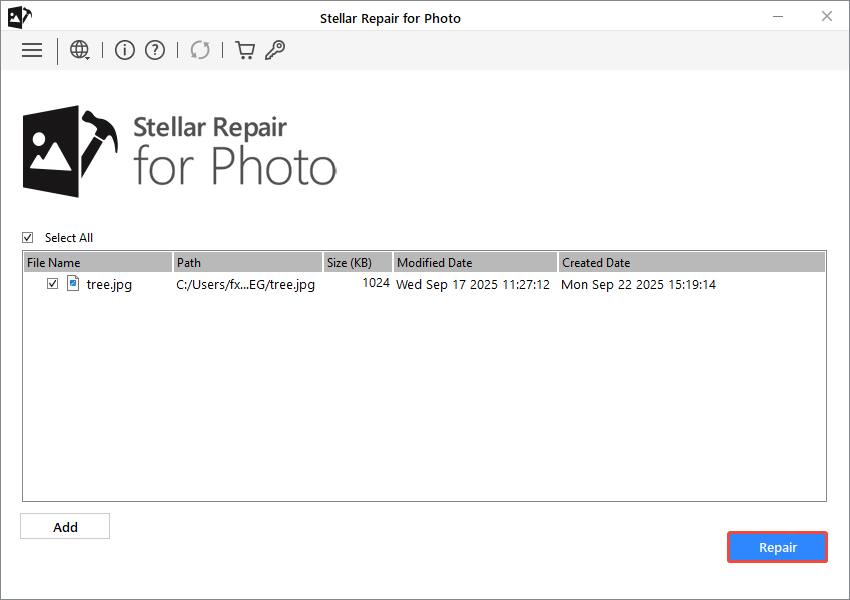
Step 2. Click the Add File icon to select one or more of your corrupted JPEG/JPG images, and click Open.
Step 3. Once all the files you want to repair are added, click the Repair button to start the photo repair process.
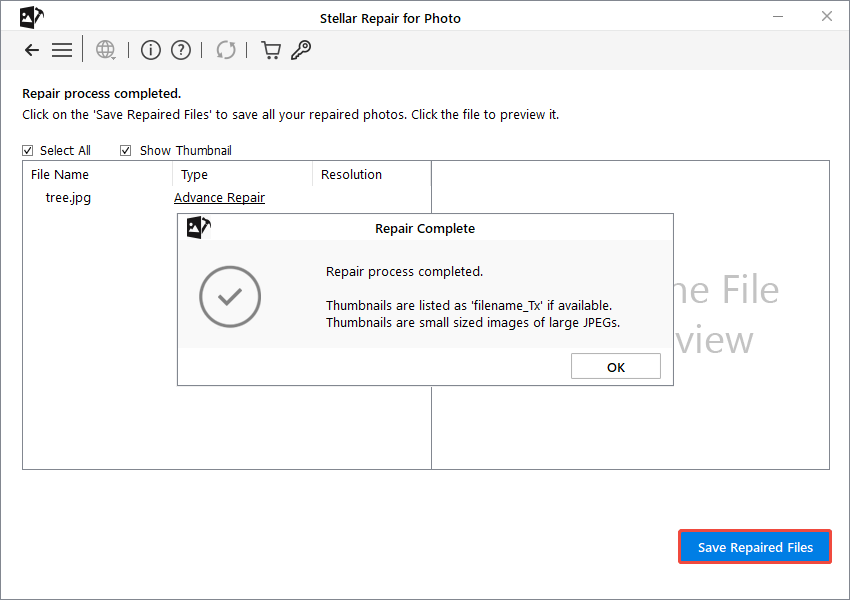
Step 4. Once it is done, click the Save Repaired Files to save them.
Bonus Tips: Back Up Your JPEG/JPG Files
Now you should know how to recover deleted or lost JPEG/JPG files and how to repair corrupted JPG pictures.
It is worth noting that you should develop a habit of backing up your JPEG files regularly to avoid future loss.
If you are looking for robust data backup software, MiniTool ShadowMaker is recommended. You can use it to perform backup actions on a regular basis to keep data safe.
Download the trial edition that supports a 30-day free trial and check if it is satisfactory.
MiniTool ShadowMaker TrialClick to Download100%Clean & Safe
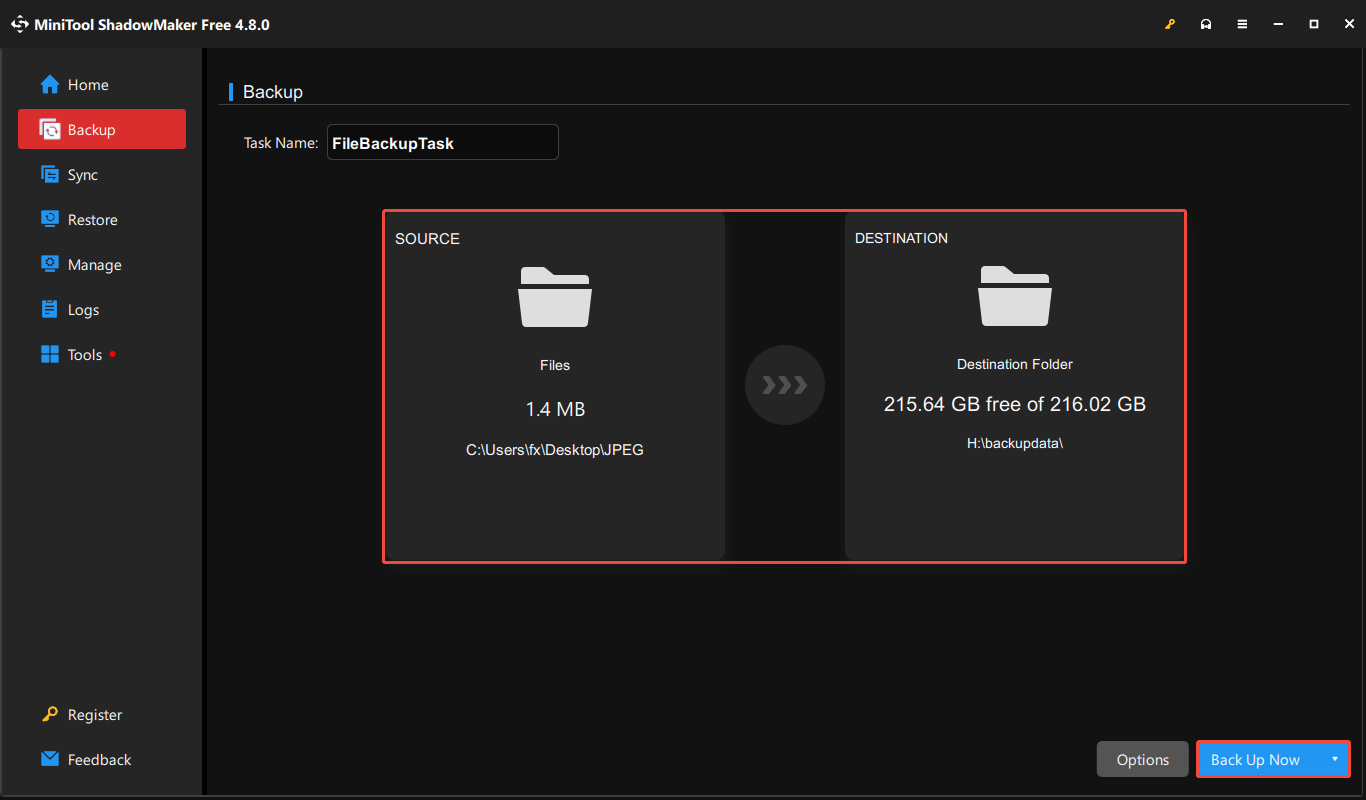
Step 1. Run the backup tool and click Keep Trial to enter its main interface.
Step 2. Go to the Backup tab from the left-hand menu bar.
Step 3. In the right panel, click SOURCE > Folders and Files to select all the JPEG files you want to back up. Next, click DESTINATION and choose a location to store the backup image file.
Step 4. Click Options if you want to flexibly configure the backup type (full, incremental, or differential backup) and adjust the schedule settings.
Step 5. Click Back Up Now and wait for the backup process to finish.
Bottom Line
To sum up, to perform a JPEG recovery, you can start by checking the Recycle Bin or any backups like File History.
If the JPG files are indeed eliminated, utilize a reliable data recovery software such as MiniTool Power Data Recovery to scan your storage device and recover them.
To repair corrupted JPEG files, attempt to use a dedicated JPEG repair program such as Stellar Repair for Photo.
If you encounter any issues or have any questions when using MiniTool’s products, please do not hesitate to send an email to the support team via [email protected].
About The Author

Position: Columnist
Sandy became an English editor after graduation. She is devoted to finding effective solutions for diverse IT problems and provides articles on data recovery, data backup, and computer partitions and drives. In her spare time, she likes listening to music and playing games.
User Comments :