The commands in Command Prompt are very useful and they can help you to solve many problems on computers. However, do you know some commands that can back up your files? In this guide on MiniTool Website, we will show you some backup commands in CMD. Scroll down to learn more details about them!
Can You Backup Files from Command Prompt?
File backup is very important for most computer users to prevent data loss because accidental errors may crop up at any time such as Windows update errors, system restore errors, file system errors, virus attacks, system crashes, hard disk failures and so on.
There are two inbuilt backup and recovery programs in Windows – File History and Backup and Restore. However, sometimes, you may find that Windows 10 backup stops working such as File History stops working, the backup does not complete successfully and more.
Fortunately, there are other backup tools in Windows – Windows 10 backup command line tools, which enable you to backup files from Command Prompt. What’s more, backing up files from Command Prompt allows you to backup data without booting into Windows and they are pretty useful when your system fails to boot. In this guide, we will introduce 4 types of Windows 10 backup command line tools – Xcopy, Robocopy, Notepad CMD, WBAdmin and show you how they work step by step.
4 Ways to Backup Files from Command Prompt
Way 1: Back up via Robocopy Command
When you want to copy, transfer or back up some files, the combination of Copy & Paste or Ctrl + C & Ctrl + V might meet your needs. However, if you need to execute complex or large file copy operations, the basic copy tools are not convenient because you have to wait for a pretty long time.
In this case, Robocopy (also called Robust File Copy) may satisfy you. This tool provides you with more than 80 command-line parameters and switches, so you can back up desired files quickly and efficiently. To back up large files with this Windows 10 backup command line tool, you need:
Move 1: Enable File Sharing
Step 1. Press Win + E altogether to open File Explorer.
Step 2. Locate the folder which contains the files that you want to back up and right-click on it to choose Properties.
Step 3. Under the Sharing tab, hit Share.
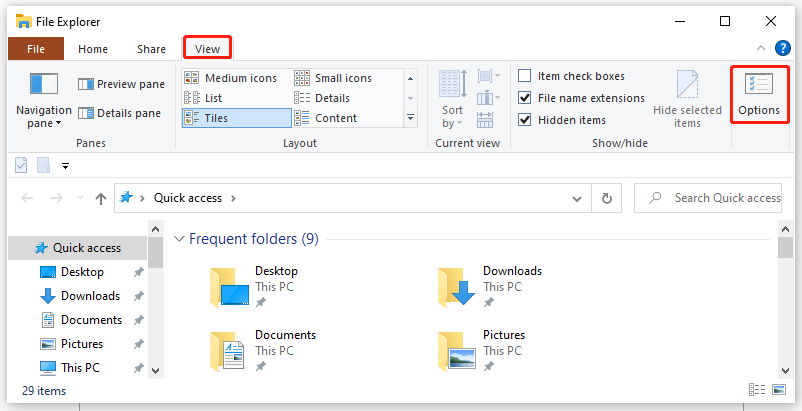
Tip: If you cannot find the Sharing tab, just go to File Explorer > View > Options > tick Use Sharing Wizard (Recommended) under the View tab > hit Apply.
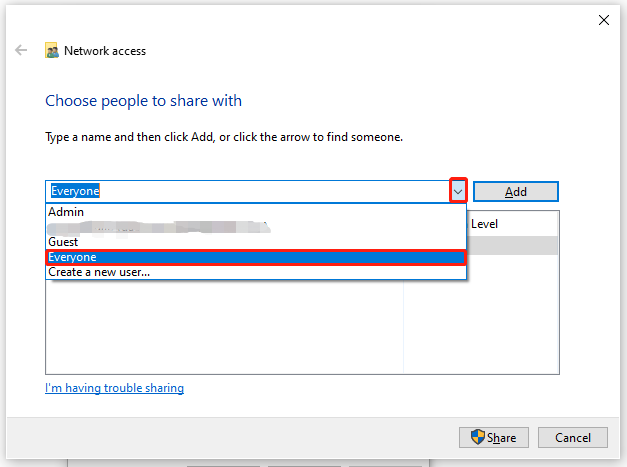
Step 4. Click on the inversed arrow to select Everyone in the drop-down menu and tap on Add.
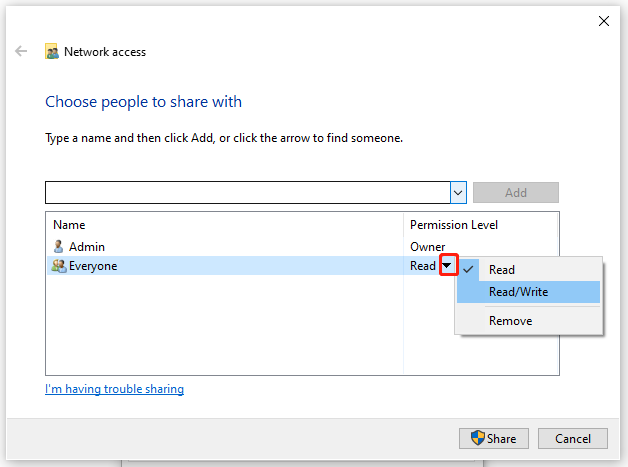
Step 5. Under Permission Level, either choose Read or Read/Write according to your need. The former option allows you to view and open the sharing folder and the latter one permits you to view, open, and modify the content of the file.
Step 6. Click on Share > Done > Close and then wait for the completion message to pop up.
Move 2: Back up Large Files with Robocopy
Step 1. Press Win + R at the same time to open the Run dialog.
Step 2. Type cmd and hit Ctrl + Shift + Enter to launch an elevated Command Prompt.
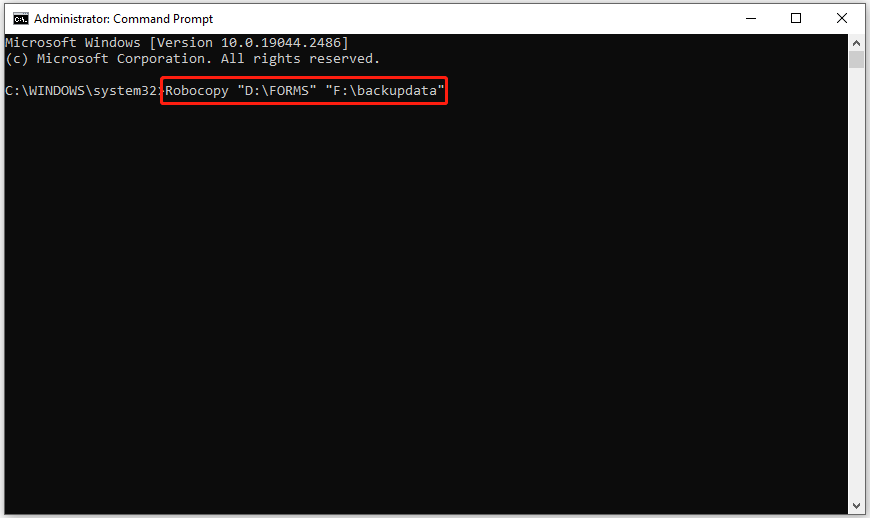
Step 3. The basic Robocopy command syntax is: Robocopy [source] [destination]. For example, if you want to back up the contents of D:\FORMS to F:\backupdata, you can run this command: Robocopy “D:\FORMS” “F:\backupdata”.
Way 2: Back up via Xcopy Command
You can also back up your files or directories using the XCopy command on Windows PC. This command is more powerful than the Copy command and it has three significant features: identifying updated files, excluding files based on file names & extensions, and directly copying the directory. Here’s how to use this Windows 10 backup command line tool to back up a file:
Step 1. Run Command Prompt as an administrator.
Step 2. To back up the files you want, you need to follow this command syntax and run your command: XCOPY [source] [destination] [options]. For example, if you want to copy the News2023 file from the News folder of C drive to the Posts folder of E drive, run the command as follows:
XCOPY C:\News\News2023 “E:\Posts” /I
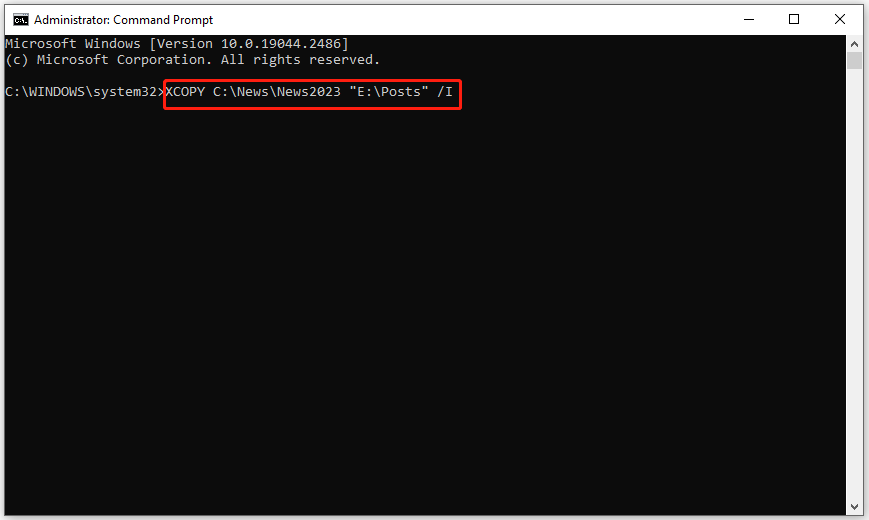
The I/ parameter will force Xcopy to assume the destination is a directory. If you don’t use this parameter and you would like to copy from a source that is a directory or file group & copy to a non-existent destination, the Xcopy command will hint to you to enter whether the destination is a file or directory.
Tip:
- Like Robocopy, Xcopy doesn’t copy open files, either.
- When the name of the file or folder is over 8 characters or contains spaces, you had better add quotation marks around the path to avoid any errors.
- The filename is limited to 254 characters, or else the command will fail with the insufficient memory error.
Way 3: Back up via Notepad CMD
When your computer fails to boot, you boot your computer from an installation disc and use the combination of Notepad & Command Prompt to back up the files you want. Here’s how to do it:
Step 1. Boot your computer from the installation disc.
Step 2. Press Shift + F10 altogether to open Command Prompt.
Step 3. Type notepad.exe and hit Enter to launch the Notepad application.
Step 4. As soon as Notepad is launched, hit File > Save As.
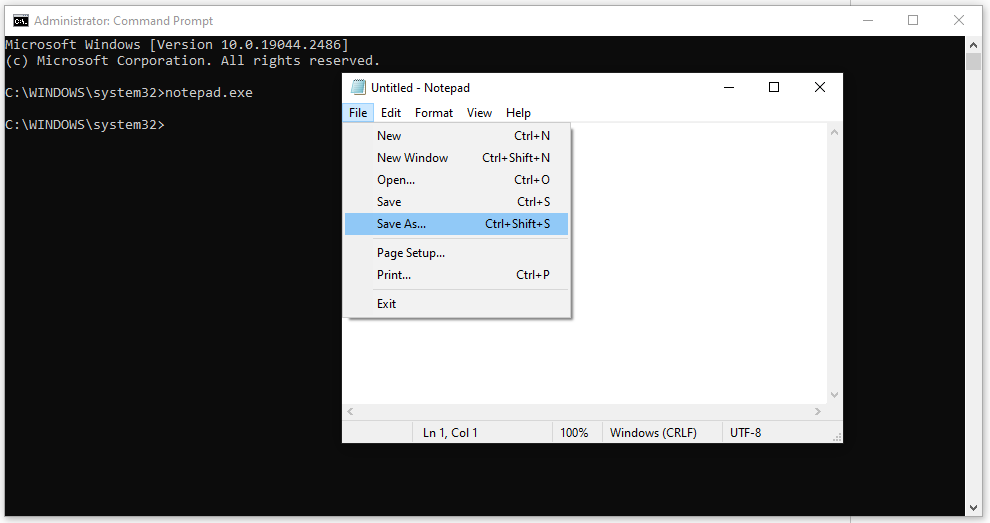
Then, you can choose the files you want to back up on your computer.
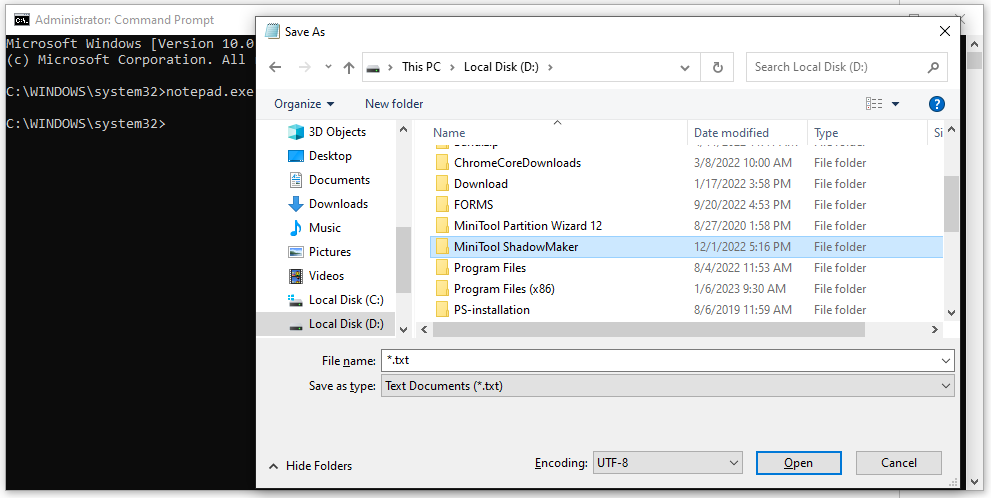
Step 5. Plug your USB flash drive into the computer > right-click on the desired files > hit Send to > select the USB drive as the backup destination.
Way 4: Back up via WBAdmin Command
Another Windows 10 backup command line tool is WBAdmin which allows administrators to create backups in Windows Server 2008 R2, Windows Server 2012, Microsoft Windows Vista, Windows 7, Windows 8, and Windows 10. Here’s how to backup files with this Windows 10 backup command line tool:
Step 1. Launch Command Prompt with administrative rights.
Step 2. The basic WBAdmin command syntax is: Wbadmin start backup -backuptarget:X: -include: [source]. X refers to the target drive where you want to store your backup images, so you should replace it with your target drive letter.
For example, if you desire to back up the file named test1.docx in C:\User\Public\Documents and the test2.xlsx file in D drive to E drive, you type the following command and hit Enter.
Wbadmin start backup -backuptarget:E: -include:C:\Users\Public\Documents\test1.docx, D:\test2.xlsx
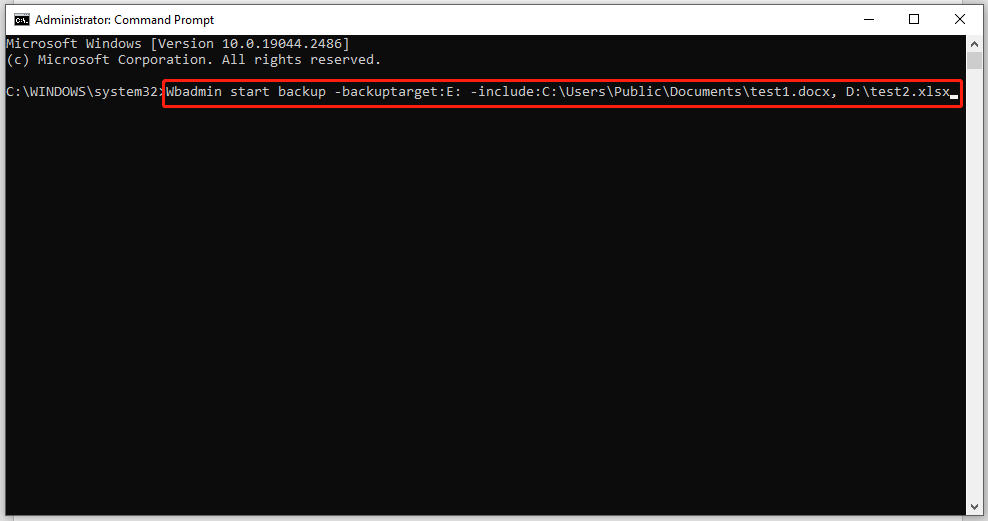
-include: Specify the comma-delimited list of sources to include in the backup.
# Further Reading: How to Create Full Backups Using Windows 10 WBAdmin Command
In addition to backing up files/folders, the WBAdmin command also enables you to back up your OS, volumes, and applications. Here, we will show you how to use this tool to back up your computer in Windows 10.
Step 1. Run Command Prompt as an administrator.
Step 2. Type the following command to create a backup and hit Enter. (Don’t forget to replace E: with the drive letter for the storage you want to use for the backup)
wbAdmin start backup -backupTarget:E: -include:C: -allCritical -quiet
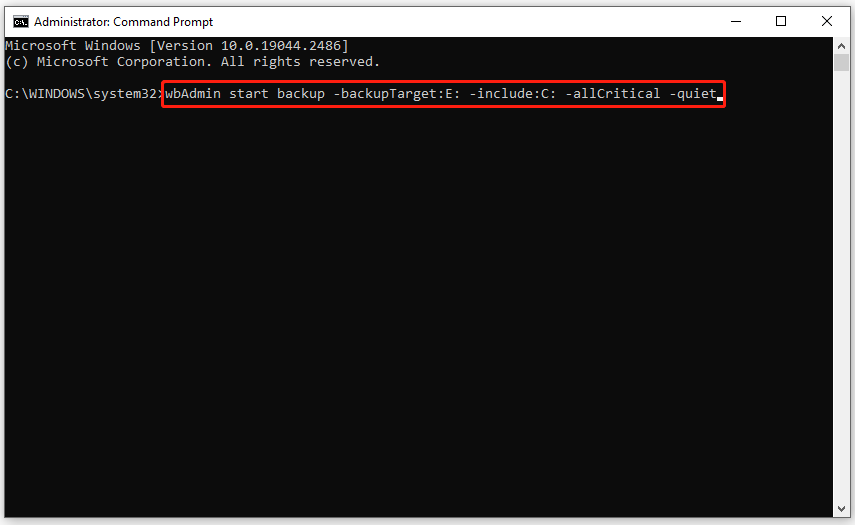
-allCritical: specify that all the critical volumes that contain system state are included in backups.
-quiet: run the command without prompts.
Or you can run this command to create a full backup that contains all the drives connected to your computer:
wbAdmin start backup -backupTarget:E: -include:C:,E:,F: -allCritical -quiet
Change C:, E:, and F: to the letters that reflect the hard drives on your device.
If you want to create a backup of your device to a shared network folder, run the command below:
wbAdmin start backup -backupTarget:\\sharedFolder\folderName -user:username -password:userPassword -include:C: -allCritical -quiet
In this command, replace the network path, username, and password with your information. The time to complete the process will vary from task to task. After the process is done, a backup of Windows 10 will be created and the WBadmin command tool will save the backup image in the WindowsImageBackup folder of the storage drive.
Tip: At the same time, the WBAdmin command also support individual file and folder restore, bare metal restore, and system state restore. The system state and bare metal restore require a Windows installation disc or recovery drive to boot into the recovery environment.
Better and Easier Way to Back up Files
Obviously, backing up files with Windows 10 backup command line tools is complicated for ordinary users like you. You need to pay more attention during the operation because any unexpected error will result in some data loss.
Therefore, why don’t you choose an easier and more convenient way to back up files? When it comes to a user-friendly backup tool, MiniTool ShadowMaker stands out from most backup tools in the market. It is a free backup software which supports backing up files, folders, systems, partitions, and disks on Windows PC.
With this tool in hand, you can create a backup just within a few clicks and the interface of this tool is clean and clear. In addition to backup, it also has other powerful functions such as restoration, file sync, and disk clone. Here’s how to back up files with this handy tool:
Step 1. Download MiniTool ShadowMaker and follow the installation wizard to install it.
MiniTool ShadowMaker TrialClick to Download100%Clean & Safe
Step 2. Double-click the shortcut of this program to launch it and hit Keep Trial.
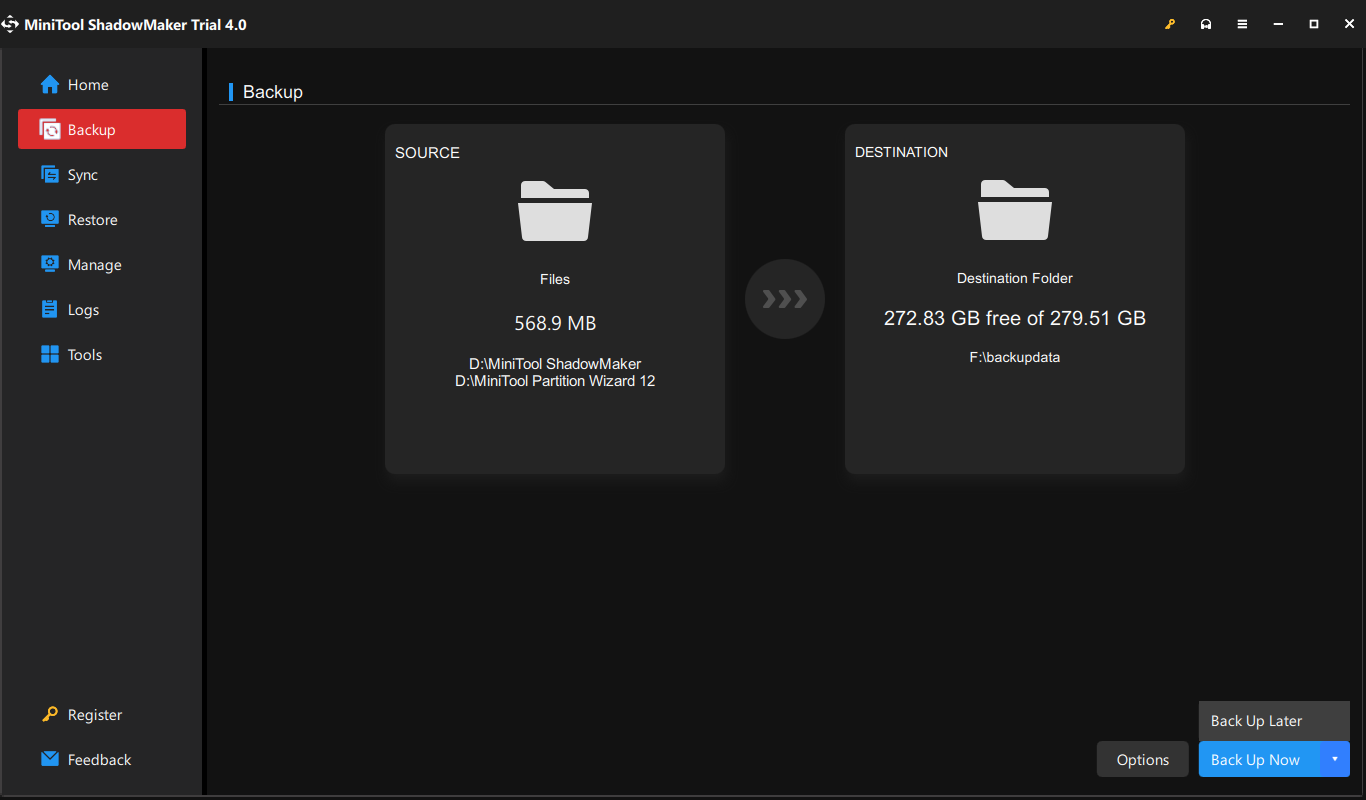
Step 3. In the Backup page, you can choose the backup source in SOURCE and select a destination for your backup task in DESTINATION.
Step 4. Now, hit Back Up Now to start the backup. Also, choosing Back Up Later is permitted. If you choose the latter one, your backup task will remain in the Manage page.
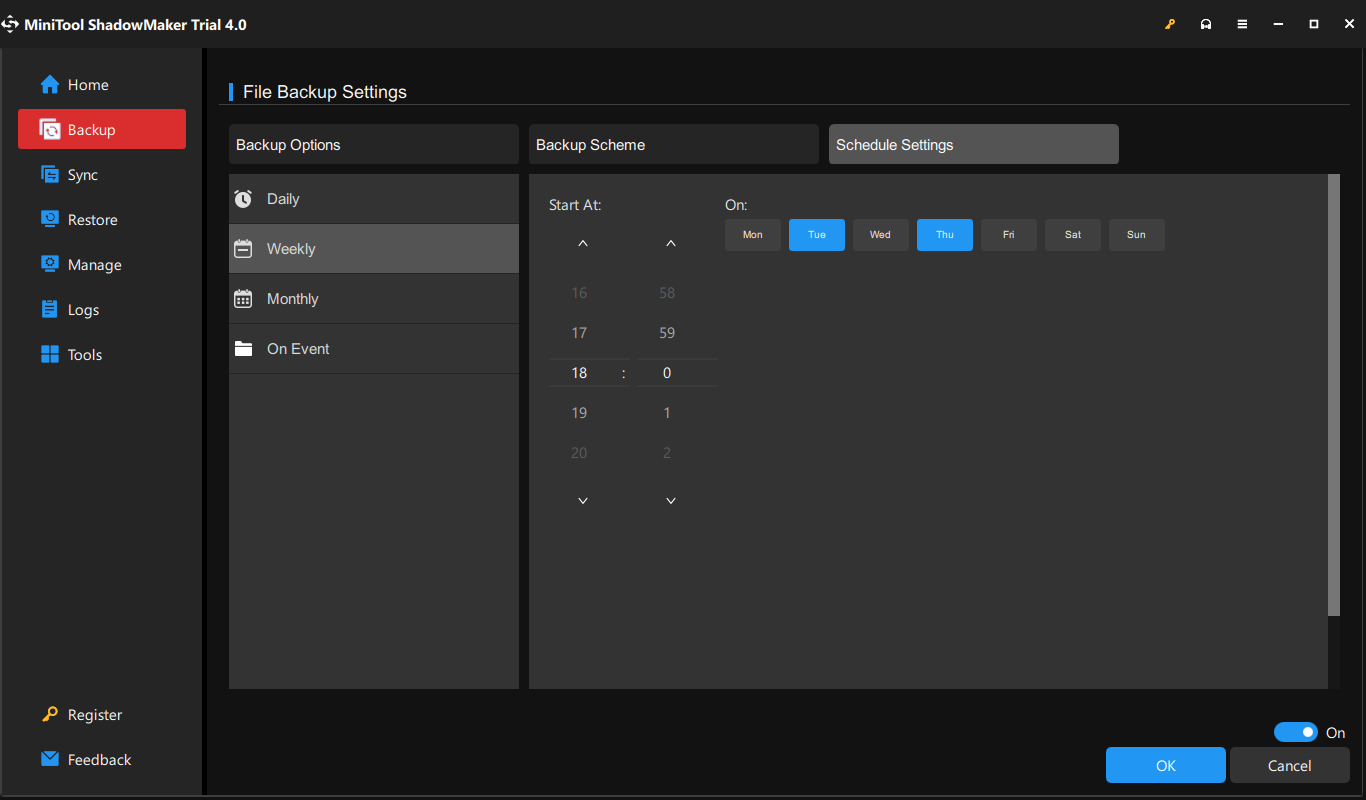
Tip: For those who want to create a backup regularly, go to Options > Schedule Settings > toggle it on, and then you can set some time points to execute the scheduled backup daily, weekly, monthly, or on event.
We Need Your Voice
In Summary, this tutorial covers 4 types of backup commands in Windows Command Prompt. These Windows 10 backup command lines are designed for computer experts and it is easy for ordinary users to make some blunders. As a result, we advise you to back up your data with a more handy backup tool – MiniTool ShadowMaker.
For further queries about Windows 10 backup command lines or our product, don’t hesitate to tell us in the comment area below or contact us via [email protected]. Thanks a million!
Windows 10 Backup Command Line FAQ
Way 2: Use WBadmin Command Prompt.
2. To take a system state backup to F: drive, run this command: wbadmin start systemstatebackup -backuptarget:F:( replace F: with your target drive number).
2. In the command window, run the following command one by one:
wbadmin enable backup
-addtarget:
-removetarget:
-schedule:
-include:
-allCritical
-quiet


User Comments :