Here are 6 common Stealth Cam SD card issues that you may encounter. In this MiniTool post, you can find effective solutions to fix these issues, as well as powerful and reliable data recovery software to rescue your precious memories in the Stealth Cam camera.
As a well-regarded camera brand, Stealth Cam’s top-tier trail cameras are designed for outdoor surveillance and wildlife observation. Stealth Cam cameras use infrared technology and motion sensors to capture high-resolution photos and videos in low-light or nighttime conditions. The term “Stealth” describes how the cameras are intentionally designed to seamlessly merge into their surroundings, reducing the likelihood of being noticed by animals. Wildlife photographers and fans like using these cameras to discreetly monitor and follow wildlife activity in the native environment.
SD card is short for Secure Digital card. It is a kind of memory card that complies with standards set by the SD Association. SD card finds widespread use in various portable electronic devices, including but not limited to digital cameras, mobile phones, tablets, portable media players, and video game consoles.
Even though the Stealth Cam is very useful, the reality is that its SD card may have some problems, like write protection, format errors, or insufficient storage space. Most of the time, you may not know what kind of issue you may encounter and whether your lost files are still recoverable. Just keep reading to find out how to fix Stealth Cam SD card problems and how to perform SD card recovery!
Issue 1: Stealth Cam SD Card Photos and Videos Missing/Not Showing up
Before performing the data recovery operation, you need to remove and reinsert the SD card to rule out the possibility of improper connection of the SD card, which may cause the data in the SD card to not be recognized. If files on your Stealth Cam SD card are hidden due to unintentional operation, you can refer to the guide to reveal hidden files. Once the files are missing, please proceed with the instructions below.
If your Stealth Cam SD card photos and videos are missing, you can use professional SD card recovery software to rescue your data. Meanwhile, SD card errors and memory card repair solutions both could lead to permanent data loss. MiniTool Photo Recovery and MiniTool Power Data Recovery are highly recommended. This post will show you how to recover data from the Stealth Cam SD card. Just try the following 2 methods!
Recommendation 1: Perform SD Card Recovery by Using MiniTool Photo Recovery
MiniTool Photo Recovery represents an exemplary photo recovery tool that offers full compatibility with Windows 11/10/8. This software is specifically designed to restore photos and videos from digital cameras, USB flash drives, SD cards, and computer storage devices.
Major steps to recover data from the Stealth Cam SD card using MiniTool Photo Recovery
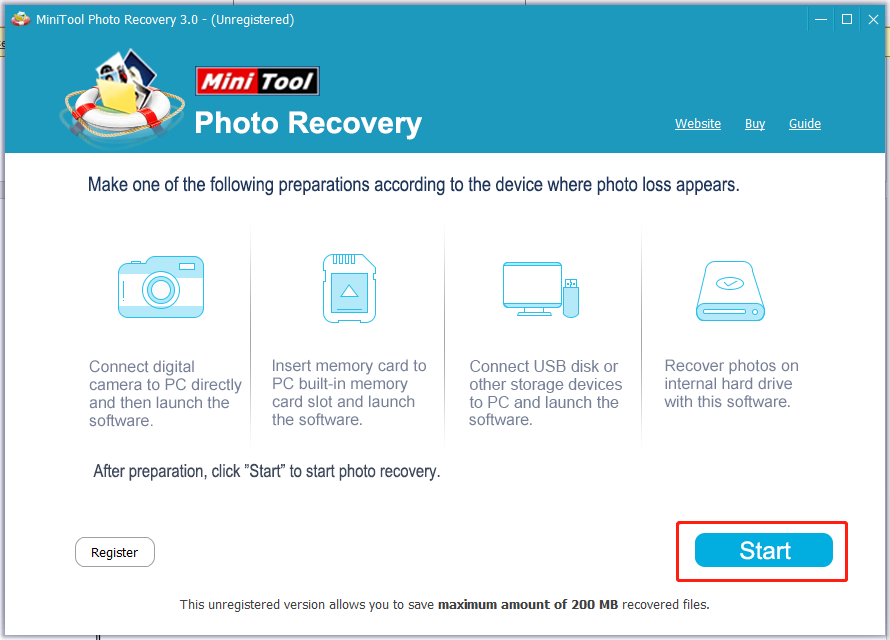
Step 1: Insert the SD card into your computer with a card reader. Open the MiniTool Photo Recovery on the desktop.
Step 2: In the pop-up window, click the Start button to start the SD card photo and video recovery.
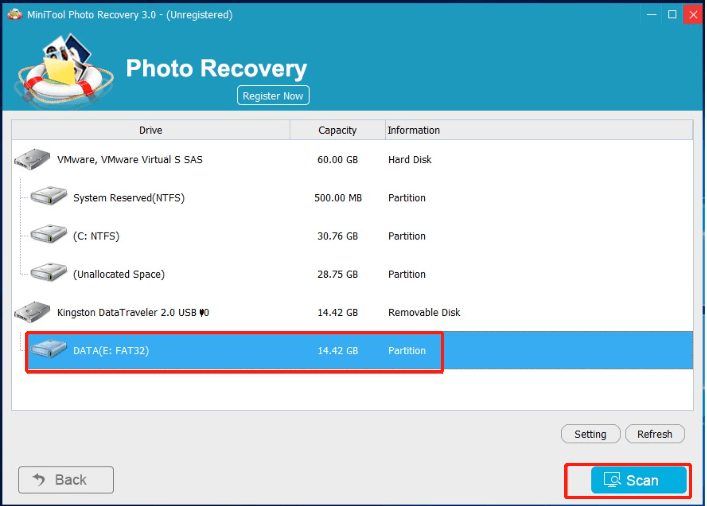
Step 3: Select your Stealth Cam SD card and click the Scan button.
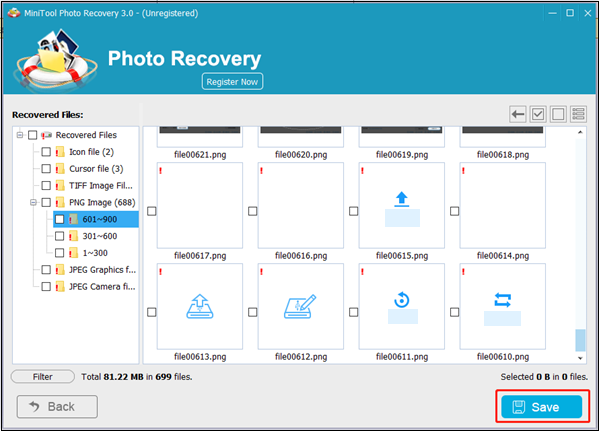
Step 4: After scanning, a list of file types will display all the found files. You can preview pictures by double-clicking on them. Afterward, you can select all the necessary pictures and other data, then click the Save button.
Step 5: Select the save path. You are recommended to save all the selected photos to a different drive to prevent data from being overwritten.
Recommendation 2: Perform SD Card Recovery by Using MiniTool Power Data Recovery
In addition to MiniTool Photo Recovery, MiniTool Power Data Recovery is another choice for you. MiniTool Power Data Recovery is designed to handle various data loss situations like accidental deletion, SD card formatting, and corruption. The software can thoroughly scan the camera SD card and recover photos with a high success rate. Its intuitive interface ensures that the recovery process goes smoothly, even for users without technical expertise.
If you are not sure whether this secure data recovery software is your best choice, you can try its free edition first. MiniTool Power Data Recovery Free enables you to scan and preview files and recover up to 1GB of files without paying a penny.
MiniTool Power Data Recovery FreeClick to Download100%Clean & Safe
Major steps to recover data from the Stealth Cam SD card using MiniTool Power Data Recovery
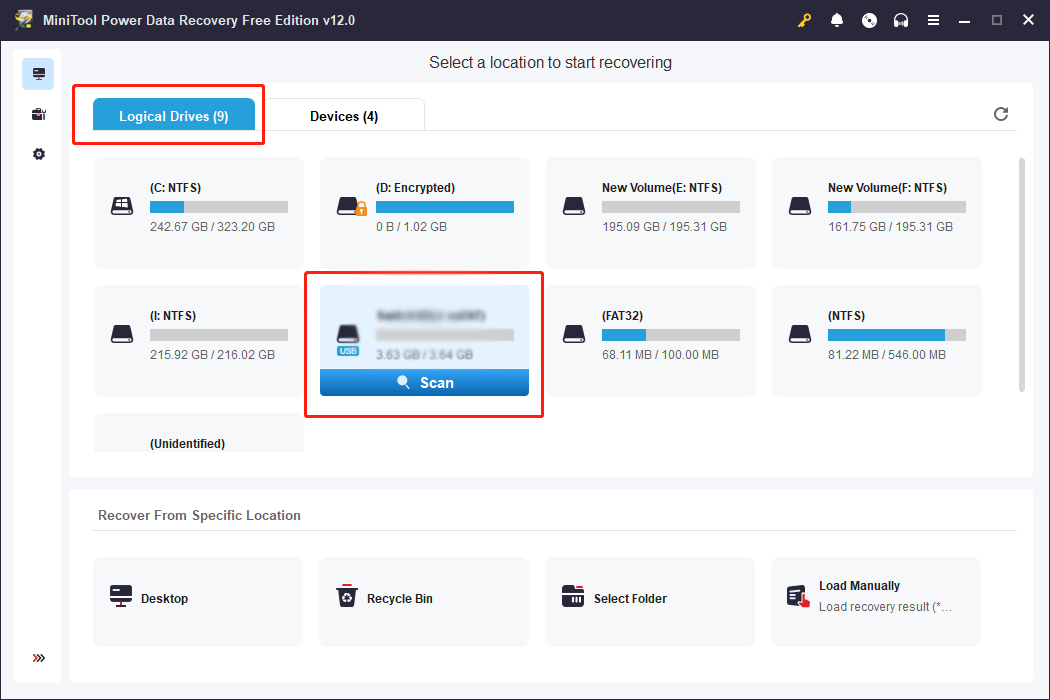
Step 1: Connect your Stealth Cam SD card to the computer and click the MiniTool Power Data Recovery icon on your desktop to enter the main interface.
Step 2: In this concise window, you can see a This PC interface with two sections: Logical Drives and Devices. You can choose to scan the Stealth Cam SD in the Device section or the target partition in the Logical Drives section by moving the mouse on it and clicking the Scan button. It will take a few minutes to complete the entire scanning process. Wait patiently until the process finishes to get the best results.
- Logical Drives: This module displays all detected partitions of internal disks and external devices, and lists some specific locations, such as Desktop, Recycle Bin, and Select Folder.
- Devices: Click the Devices tab, and you will see the entire disks under it.
Step 3: By default, files are listed by path on the result page. When there are fewer files, you can directly expand the Lost Files or Deleted Files folder to find the required file.
If there are piles of files in the result lists, you can use some functions to swiftly locate files:
- Filter: To apply specific criteria to your file search, click the Filter button, which will display the filter criteria. This function allows you to refine your search based on file type, file size, date modified, and file category, thereby enabling you to efficiently locate files based on specific conditions.
- Type: Click the Type button to check files according to their types. This function works significantly when you want to restore a certain type of file, including Document, Picture, Audio & Video, and Other files.
- Search: Located in the top right corner, the Search function helps locate exact files quickly. By entering relevant keywords from the target file names in the designated search bar and subsequently pressing Enter, users can efficiently locate files based on their names.
- Preview: You can click the Preview button to check whether the chosen file is what you want. This function allows you to preview files, photos, and videos during the scanning process. And it ensures data recovery accuracy. You can browse this guide to learn about the preview file formats supported by MiniTool Power Data Recovery. Please note that the previewed videos and audio should not be larger than 2GB.
Step 4: Tick the checkboxes in front of the photos you went to recover, then click the Save button.
Step 5: In the pop-up interface, you need to choose the correct restoration path for those photos and click OK to confirm the action.
It is worth mentioning that MiniTool Power Data Recovery Free only provides 1GB of free data recovery capacity. If the software has recovered 1GB of files, A “File Saving Limit” prompt window will pop up. Updating to a premium edition is recommended to accomplish the recovery process if you choose files larger than 1GB.
Issue 2: Stealth Cam SD Card Not Formatted
Sometimes, you may find that the Stealth Cam SD card cannot be formatted. The reasons are various:
- The SD card is write-protected.
- The SD card gets infected with a virus.
- There are bad sectors on the SD card.
- The SD card is corrupted due to file system errors.
Let’s see how to troubleshoot the Stealth Cam SD card issues.
Way 1: Format the SD Card on the Stealth Cam Camera
Before formatting the SD card, you’d better recover your data from it first to avoid some important data being lost permanently.
Step 1: Insert the SD card into your Stealth camera and turn it on.
Step 2: Click the Menu button on the camera, and navigate to the gear wheel icon or Settings.
Step 3: Choose Format. An All Data Will Be Deleted pop-up willappear, click Format again.
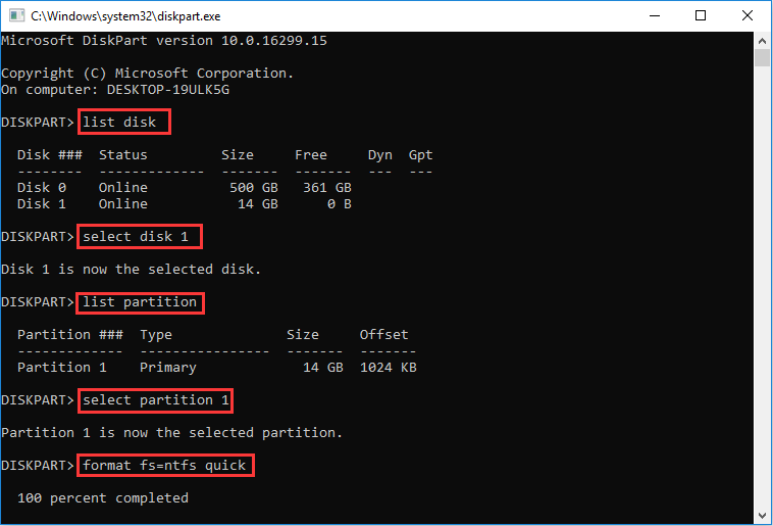
Way 2: Format the Stealth Cam SD Card with CMD
Step 1: Type cmd in the Windows Search bar and press Enter.
Step 2: Type Diskpart and hit Enter to open Diskpart.
Step 3: Then type the following commands and press Enter after each one:
- list disk
- select disk * (* represents disk number)
- list partition
- select partition * (* represents partition number)
- format fs=ntfs quick
Way 3: Format the Stealth Cam D Card with Disk Management
Step 1: Press Win + X simultaneously to pen the WinX menu and choose Disk Manager.
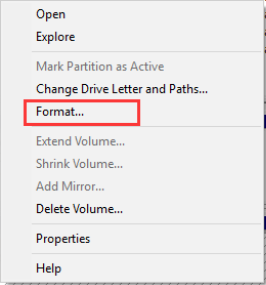
Step 2: Choose the partition of the Stealth CamSD card. Then right-click it and select Format.
Step 3: Specify the volume label, file system, and allocation unit size by yourself, and then click OK.
Step 4: Click OK to confirm your action in the pop-up window.
Way 4: Remove Write Protection on the Stealth Cam SD Card
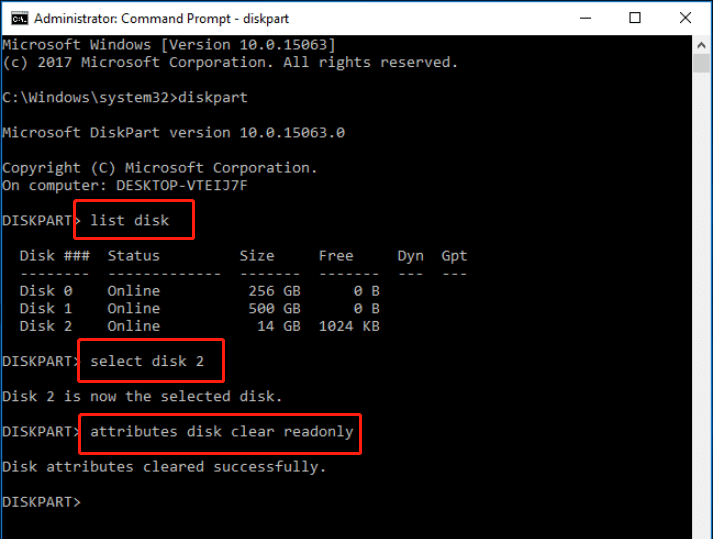
Step 1: Press the Windows + R key combination to open the Run command line. Input diskpart and press Enter.
Step 2. In the diskpart window, type the following commands and hit Enter after each one.
- list disk
- select disk * (* represents the disk that has the write-protected partition)
- attributes disk clear readonly
Issue 3: Stealth Cam Can’t Read SD Card
If you have inserted an SD card that is not compatible with the Stealth Cam or if the card is damaged, the camera will be unable to read it. This may result in error messages or the camera failing to recognize the card altogether. It’s important to ensure that you are using a compatible and undamaged memory card to avoid any issues with the camera’s functionality.
If you use the right SD card, how to fix the Stealth Cam cannot be read issue? Just try the following ways:
- Check the SD card reader and USB port.
- Remove the write protection.
- Format the SD card.
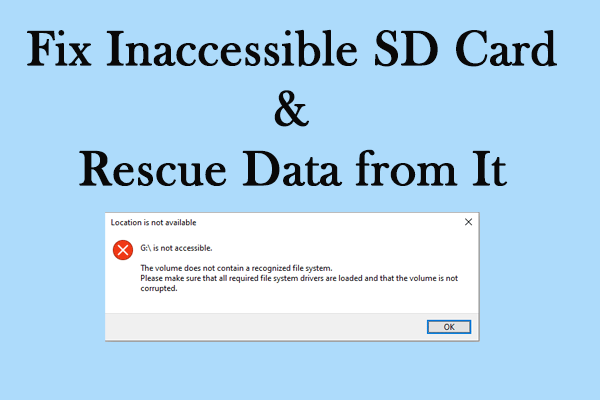
Issue 4: Stealth Cam SD Card Is Not Accessible
Generally, the issue of SD cards not being accessible is very annoying. What causes your Stealth Cam SD card to be inaccessible? Here we list some probable causes for this error:
- Corrupted file system.
- Virus infection.
- Improper insertion or ejection.
- Bad sectors in SD cards.
- SD card is physically damaged.
Let’s see how to fix the Stealth Cam SD card issues.
Way 1: Change the Drive Letter
Step 1: Press Win + X and select Disk Manager from the WinX menu.
Step 2: Find the Stealth Cam SD card and right-click on it.
Step 3: Choose Change Drive Letter and Paths from the list.
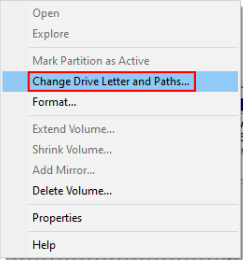
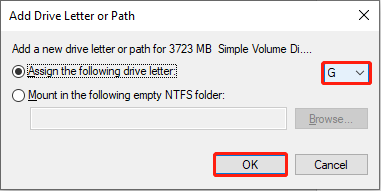
Step 4: Select Add in the pop-up window.
Step 5: Choose a drive letter besides Assign the following drive letter, then click OK.
Way 2: Run CHKDSK Command
Step 1: Type cmd in the Windows Search box, right-click the Command Prompt from the result list, and choose Run as an administrator.
Step 2: Type CHKDSK X: /f and hit Enter. Then, change X with the drive letter of the inaccessible SD card.
Way 3: Format the Stealth Cam SD Card
If you want to use a powerful and professional application like MiniTool Partition Wizard to format your SD card, you can follow this post to format it quickly.
MiniTool Partition Wizard FreeClick to Download100%Clean & Safe
Issue 5: Stealth Cam SD Card Not Full but Says Full
If you ensure that your Stealth Cam SD card is not full but the SD card shows it is full, the possible causes of this issue are listed as follows:
- The SD card files are hidden or invisible.
- The SD card is infected with a virus.
- The SD card is not properly connected to your device.
- The SD card is corrupted or has file system errors.
- The SD card is not properly formatted.
- There is a problem with the device used to read the SD card, such as your camera.
Way 1: Show Hidden Files on the Stealth Cam SD Card
If files on the Stealth Cam SD card become inadvertently hidden or due to virus infection, users may encounter the “SD card says it’s full but there’s nothing on it” error. In this situation, you can show hidden files on the SD card manually.
Way 2: Error Checking the SD Card
Step 1: Insert the Stealth Cam SD card into your Windows PC using a card reader.
Step 2: Click the File Explorer icon on your desktop and move on to the This PC section. In the right panel, find and right-click the Stealth Cam SD card to select Properties.
Step 3: Click the Tool tab and select Check to check the drive for system errors.
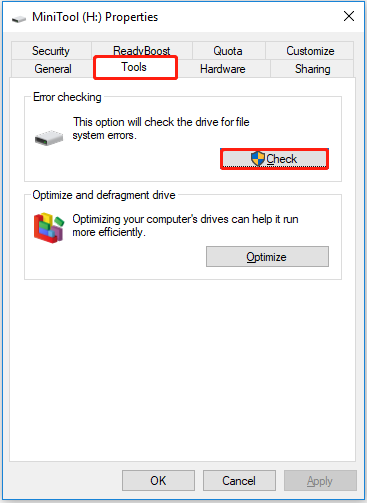
Step 4: In the pop-up window, click Scan and repair drive to start disk repair. Please be patient to wait for the process to complete.
Issue 6: Stealth Cam SD Card Is Locked
If your Stealth Cam SD card is locked, you might encounter an error message stating “disk is write-protected.” This indicates that you are unable to open, view, copy, edit, save, or format files stored on the locked SD card. To handle such an issue, you can just unlock the SD card.
Manually Unlock the Stealth Cam SD Card
Step 1: Unmount your Stealth Cam SD card.
Step 2: Check the position of the switch located at the top left corner of your Stealth Cam SD card.
Step 3: If the switch is in the down position, move it to the up position to unlock your card. This will remove the write protection, allowing you to access the photos and files saved on the SD card.
Wrapping Things Up
After reading this post, you should know 6 common Stealth Cam SD card issues and powerful SD card recovery software. Hope these tips help you.
If you have any questions about recovering data from the Stealth Cam SD card, you can directly send us emails via [email protected]. We will solve it as soon as possible.
![[Fixed] SD Card Cannot Be Read by PCs/Phones](https://images.minitool.com/minitool.com/images/uploads/2018/08/fix-cannot-read-sd-card-thumbnail.jpg)
User Comments :